更新 CentOS Mirror 的來源

之前 Mirror CentOS 時,是依照官方網站上的建議,使用的是 us-msync.centos.org::CentOS,但 CentOS 7 Release 後,學校的 CentOS Mirror 站台卻一直無法 Mirror 到 7,所以參考官方網站上的 List of CentOS Mirrors ,改採用 交通大學資訊工程學系 的 rsync 站台。

每天早上 6 時執行
# crontab -e
0 6 * * * /usr/bin/rsync -avqzH –delete linux.cs.nctu.edu.tw::CentOS /var/ftp/CentOS

在 CentOS 7.x 上安裝 XOOPS 輕鬆架

距離上一次使用 XOOPS CMS 系統大概有二、三年之久了,主要的原因是架網站很容易,但維護起來確很難,尤其是網路安全上的問題。
不過今天參加宜蘭縣自由軟體研討會中吳弘凱老師的介紹後,決定要再試用看看。
XOOPS輕鬆架官方網站:http://campus-xoops.tn.edu.tw/
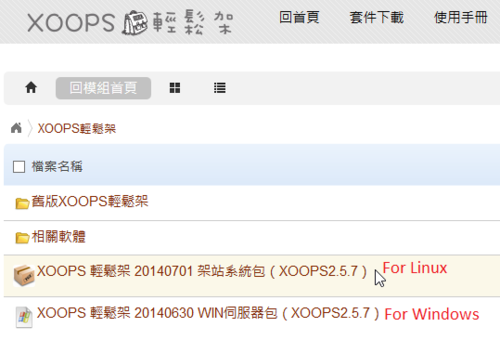
[@more@]XOOPS輕鬆架下載:http://campus-xoops.tn.edu.tw/modules/tad_uploader/index.php?of_cat_sn=11

底下是在 CentOS 7.x 下安裝
1. 將下載下來的檔案上傳到 Server 上
2. 檔案解壓縮
# tar xvzf my_xoops_base_20140701.tgz -C /var/www/html

3. 更改目錄名稱及搬移目錄
# mv /var/www/html/public_html /var/www/html/xoops

4. 更改目錄權限
# chown -R root:root /var/www/html/xoops
# chown -R apache:apache /var/www/html/xoops/uploads
# chmod 777 /var/www/html/xoops/mainfile.php
# chmod 777 /var/www/html/xoops/include/license.php
# chmod 777 /var/www/html/xoops_data/caches
# chmod 777 /var/www/html/xoops_data/caches/xoops_cache
# chmod 777 /var/www/html/xoops_data/caches/smarty_cache
# chmod 777 /var/www/html/xoops_data/caches/smarty_compile
# chmod 777 /var/www/html/xoops_data/configs

5. 開啟瀏覽器進行安裝

6. 完成安裝

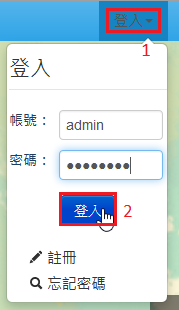
登入管理

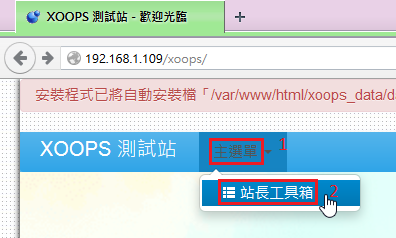
進入站長工具箱

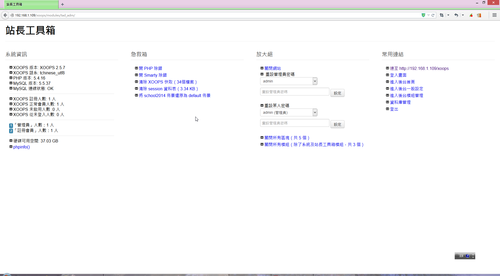
站長工具箱

7. 安裝完成後的設定

# chmod 444 /var/www/html/xoops/mainfile.php
# mv /var/www/html/xoops_data /var/www
# mv /var/www/html/xoops/xoops_lib /var/www
修改 /var/www/html/xoops/mainfile.php
# vim /var/www/html/xoops/mainfile.php
    // For forward compatibility
    // Physical path to the XOOPS library directory WITHOUT trailing slash
    define(‘XOOPS_PATH’, “/var/www/xoops_lib“);
    // Physical path to the XOOPS datafiles (writable) directory WITHOUT trailing slash
    define(‘XOOPS_VAR_PATH’, “/var/www/xoops_data“);
    // Alias of XOOPS_PATH, for compatibility, temporary solution
    define(“XOOPS_TRUST_PATH”, XOOPS_PATH);

在 CentOS 7.x 安裝 ownCloud 7

ownCloud 7 Release,新增的功能可以參考官方網站製作的 New in ownCloud 7
ownCloud 官方網站:http://owncloud.org/
[@more@]新增 EPEL 套件庫
# wget http://dl.fedoraproject.org/pub/epel/7/x86_64/e/epel-release-7-2.noarch.rpm
# rpm –import http://dl.fedoraproject.org/pub/epel/RPM-GPG-KEY-EPEL-7
# rpm -ivh epel-release-7-2.noarch.rpm
# sed -i ‘s/enabled=1/enabled=0/g’ /etc/yum.repos.d/epel.repo

加入 ownCloud 套件庫
# cd /etc/yum.repos.d/
# wget http://download.opensuse.org/repositories/isv:ownCloud:community/CentOS_CentOS-7/isv:ownCloud:community.repo
# rpm –import http://download.opensuse.org/repositories/isv:/ownCloud:/community/CentOS_CentOS-7/repodata/repomd.xml.key
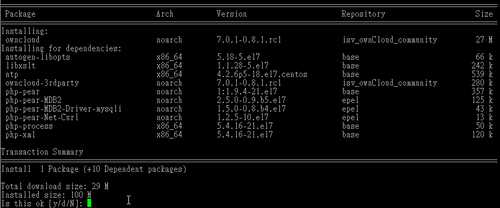
# yum install owncloud –enablerepo=epel


更改目錄權限,否則會出現下圖的錯誤訊息
# chown -R apache:apache /var/www/html/owncloud/config


開啟支援 .htaccess 的功能
修改 Apache Web Server 設定檔,加入下面的設定內容
# vim /etc/httpd/conf/httpd.conf
<Directory “/var/www/html/owncloud”>
    AllowOverride All
</Directory>
重新啟動 Apache Web Server
# systemctl restart httpd

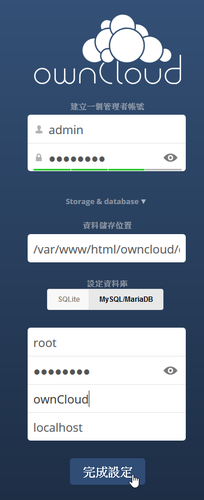
安裝畫面

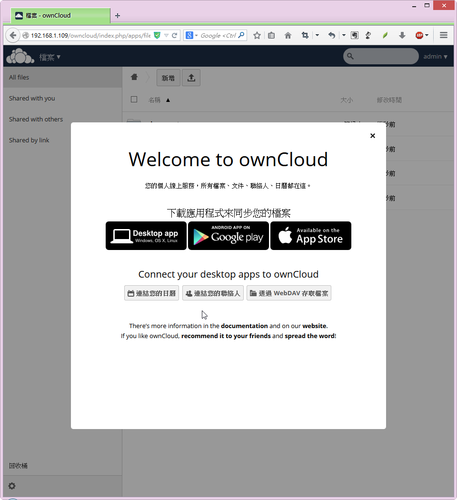
安裝完成

在 CentOS 7.x 安裝 Apache / MariaDB / PHP

安裝 Apache
# yum install httpd

啟動 Web Server
# service httpd start
Redirecting to /bin/systemctl start  httpd.service

# systemctl start httpd

在防火牆開啟 http 服務
# firewall-cmd –permanent –add-service=http
# systemctl restart firewalld

設定開機時啟動 Web Server
# systemctl enable httpd
[@more@]安裝 PHP
# yum install php php-mysql php-pdo php-gd php-mbstring

修改時區設定
# sed -i ‘s/;date.timezone =/date.timezone = Asia/Taipei/’ /etc/php.ini

重新啟動 Web Server
# service httpd restart
Redirecting to /bin/systemctl restart  httpd.service

# systemctl restart httpd

安裝 MariaDB
# yum install mariadb-server mariadb

啟動 MariaDB
# systemctl start mariadb

初始化資料庫設定
# /usr/bin/mysql_secure_installation

設定開機時啟動 MariaDB
# systemctl enable mariadb

firewall-cmd 指令

參考網站:
CentOS 7 Firewalld 防火牆說明介紹 @ 黃昏的甘蔗 :: 隨意窩 Xuite日誌
小懶蟲的blog~: [CentOS 7] 防火牆設定
How to Configure ‘FirewallD’ in RHEL/CentOS 7 and Fedora 21
How To Set Up a Firewall Using FirewallD on CentOS 7 | DigitalOcean

在 CentOS 7

# firewall-cmd –get-zones
work drop internal external trusted home dmz public block

# firewall-cmd –get-default-zone
public

# firewall-cmd –get-active-zones
public
  interfaces: ens33 ppp0

# firewall-cmd –set-default-zone=internal
# firewall-cmd –get-default-zone
internal
[@more@]# firewall-cmd –list-all-zones
work
  target: default
  icmp-block-inversion: no
  interfaces:
  sources:
  services: dhcpv6-client ssh
  ports:
  protocols:
  masquerade: no
  forward-ports:
  sourceports:
  icmp-blocks:
  rich rules:

drop
  target: DROP
  icmp-block-inversion: no
  interfaces:
  sources:
  services:
  ports:
  protocols:
  masquerade: no
  forward-ports:
  sourceports:
  icmp-blocks:
  rich rules:

internal
  target: default
  icmp-block-inversion: no
  interfaces:
  sources:
  services: dhcpv6-client mdns samba-client ssh
  ports:
  protocols:
  masquerade: no
  forward-ports:
  sourceports:
  icmp-blocks:
  rich rules:

external
  target: default
  icmp-block-inversion: no
  interfaces:
  sources:
  services: ssh
  ports:
  protocols:
  masquerade: yes
  forward-ports:
  sourceports:
  icmp-blocks:
  rich rules:

trusted (active)
  target: ACCEPT
  icmp-block-inversion: no
  interfaces: ens33
  sources:
  services:
  ports:
  protocols:
  masquerade: no
  forward-ports:
  sourceports:
  icmp-blocks:
  rich rules:

home
  target: default
  icmp-block-inversion: no
  interfaces:
  sources:
  services: dhcpv6-client mdns samba-client ssh
  ports:
  protocols:
  masquerade: no
  forward-ports:
  sourceports:
  icmp-blocks:
  rich rules:

dmz
  target: default
  icmp-block-inversion: no
  interfaces:
  sources:
  services: ssh
  ports:
  protocols:
  masquerade: no
  forward-ports:
  sourceports:
  icmp-blocks:
  rich rules:

暫時開放 ftp 服務
# firewall-cmd –add-service=ftp

永久開放 ftp 服務
# firewall-cmd –add-service=ftp –permanent
永久關閉
# firewall-cmd –remove-service=ftp –permanent
success
# firewall-cmd –zone=public –add-service=ftp –permanent
# firewall-cmd –zone=home –add-service=ftp –permanent
# firewall-cmd –zone=public –remove-service=ftp –permanent

重新載入
# firewall-cmd –reload
# firewall-cmd –complete-reload
# 列出設定
# firewall-cmd –zone=public –list-all
public (active)
  target: default
  icmp-block-inversion: no
  interfaces: ens33 ppp0
  sources:
  services: dhcpv6-client ocserv openvpn
  ports:
  protocols:
  masquerade: no
  forward-ports:
  sourceports:
  icmp-blocks:
  rich rules:
        rule family=”ipv4″ source address=”192.168.1.0/24″ service name=”ssh” accept
        rule family=”ipv4″ source address=”192.168.1.0/24″ service name=”http” accept

# firewall-cmd –zone=public –list-services
dhcpv6-client ocserv openvpn

# firewall-cmd –zone=public –add-port=4990-4999/udp –permanent
# firewall-cmd –zone=public –list-ports
4990-4999/udp

限定連線來源 IP 及開放的服務
# firewall-cmd –add-rich-rule=”rule family=”ipv4″ source address=”192.168.1.0/24″ service name=”ssh” accept” –permanent
# firewall-cmd –add-rich-rule=”rule family=”ipv4″ source address=”192.168.1.0/24″ service name=”ssh” limit value=10/m accept” –permanent
# firewall-cmd –add-rich-rule=”rule family=”ipv4″ source address=”192.168.1.0/24″ service name=”http” accept” –permanent
# firewall-cmd –add-rich-rule=”rule family=”ipv4″ source address=”192.168.1.0/24″ port port=80 accept” –permanent
# firewall-cmd –remove-rich-rule=”rule family=”ipv4″ source address=”192.168.1.0/24″ port port=80 accept” –permanent

也可以直接去編修 /etc/firewalld/zones/public.xml
# cat /etc/firewalld/zones/public.xml
<?xml version=”1.0″ encoding=”utf-8″?>
<zone>
  <short>Public</short>
  <description>For use in public areas. You do not trust the other computers on networks to not harm your computer. Only selected incoming connections are accepted.</description>
  <service name=”dhcpv6-client”/>
  <service name=”openvpn”/>
  <rule family=”ipv4″>
    <source address=”192.168.1.0/24″/>
    <service name=”ssh”/>
    <accept/>
  </rule>
  <rule family=”ipv4″>
    <source address=”192.168.1.0/24″/>
    <service name=”http”/>
    <accept/>
  </rule>
</zone>

重新載入
# firewall-cmd –reload
# firewall-cmd –complete-reload

讓設定生效
# systemctl restart firewalld

檢視設定是否生效
# iptables -L -n | grep 21
ACCEPT     tcp  —  0.0.0.0/0            0.0.0.0/0            tcp dpt:21 ctstate NEW
檢查防火牆狀態
# firewall-cmd –state
running

# systemctl stop firewalld
# firewall-cmd –state
not running

# firewall-cmd –list-all
public (default)
  interfaces:
  sources:
  services: dhcpv6-client ftp ssh
  ports:
  masquerade: no
  forward-ports:
  icmp-blocks:
  rich rules:

在 FirewallD 的服務名稱
# firewall-cmd –get-service
amanda-client bacula bacula-client dhcp dhcpv6 dhcpv6-client dns ftp high-availability http https imaps ipp ipp-client ipsec kerberos kpasswd ldap ldaps libvirt libvirt-tls mdns mountd ms-wbt mysql nfs ntp openvpn pmcd pmproxy pmwebapi pmwebapis pop3s postgresql proxy-dhcp radius rpc-bind samba samba-client smtp ssh telnet tftp tftp-client transmission-client vnc-server wbem-https

查詢服務的啟用狀態
# firewall-cmd –query-service ftp
yes
# firewall-cmd –query-service ssh
yes
# firewall-cmd –query-service samba
no
# firewall-cmd –query-service http
no

修改 firewalld 系統內定的服務
將檔案複製到 /etc/firewalld/services 目錄之下
# cp /usr/lib/firewalld/services/openvpn.xml /etc/firewalld/services
將內定使用的 udp 改成 tcp
# sed -i ‘s/udp/tcp/’ /etc/firewalld/services/openvpn.xml

自行加入要開放的 Port
# firewall-cmd –add-port=3128/tcp –permanent
# firewall-cmd –list-all
public (default)
  interfaces:
  sources:
  services: dhcpv6-client ftp ssh
  ports: 3128/tcp
  masquerade: no
  forward-ports:
  icmp-blocks:
  rich rules:

直接將原本  iptables 使用的規則移植到 firewalld
# firewall-cmd –permanent –direct –add-rule ipv4 filter INPUT 0 -p udp -s “140.111.74.0/24” –dport 161 -j ACCEPT
success
或者直接修改 /etc/firewalld/direct.xml
# cat /etc/firewalld/direct.xml
<?xml version=”1.0″ encoding=”utf-8″?>
<direct>
   <rule priority=”0″ table=”nat” ipv=”ipv4″ chain=”POSTROUTING”> -s 192.168.18.0/24 -j MASQUERADE</rule>
   <rule priority=”0″ table=”filter” ipv=”ipv4″ chain=”INPUT”>-p tcp -s 192.168.1.0/24 –dport 22 -j ACCEPT</rule>
   <rule priority=”0″ table=”filter” ipv=”ipv4″ chain=”INPUT”>-p udp -s 140.111.74.0/24 –dport 161 -j ACCEPT</rule>
</direct>

查看目前的 Direct 規則
# firewall-cmd –direct –get-all-rules
ipv4 nat POSTROUTING 0 -s 192.168.18.0/24 -j MASQUERADE
ipv4 filter INPUT 0 -p tcp -s 192.168.1.0/24 –dport 22 -j ACCEPT
ipv4 filter INPUT 0 -p udp -s 140.111.74.0/24 –dport 161 -j ACCEPT

NAT
# firewall-cmd –permanent –direct –passthrough ipv4 -t nat -A POSTROUTING -s  10.8.0.0/24 -o ppp0 -j MASQUERADE
# firewall-cmd –reload

# firewall-cmd –permanent –add-rich-rule ‘rule family=ipv4 source address=192.168.1.10/24 forward-port port=8080 protocol=tcp to-port=80’

如果真的不習慣使用 firewalld
安裝 iptables-services 套件
# yum install iptables-services
設定開機時啟動 iptables 服務
# systemctl enable iptables.service
Created symlink from /etc/systemd/system/basic.target.wants/iptables.service to /usr/lib/systemd/system/iptables.service.
啟動 iptables 服務
# systemctl start iptables.service

設定開機時不啟動 firewalld 服務
# systemctl disable firewalld.service
Removed symlink /etc/systemd/system/dbus-org.fedoraproject.FirewallD1.service.
Removed symlink /etc/systemd/system/basic.target.wants/firewalld.service.
設定取消使用 firewalld 服務
# systemctl mask firewalld.service
Created symlink from /etc/systemd/system/firewalld.service to /dev/null.
設定不取消使用 firewalld 服務
# systemctl unmask firewalld.service
Removed symlink /etc/systemd/system/firewalld.service.

更多的 FirewallD 請參考:https://fedoraproject.org/wiki/FirewallD

讓 sudo log 單獨在一個檔案中

sudo 的 log 檔內定會產生在 /var/log/secure 之下
# grep sudo /var/log/secure
Jul 15 10:32:24 localhost sudo: t850008 : TTY=pts/0 ; PWD=/home/t850008 ; USER=root ; COMMAND=/bin/cat /etc/shadow
Jul 15 10:33:51 localhost sudo: t850008 : TTY=pts/0 ; PWD=/home/t850008 ; USER=root ; COMMAND=/bin/cat /etc/shadow
Jul 15 10:33:54 localhost sudo: t850008 : TTY=pts/0 ; PWD=/home/t850008 ; USER=root ; COMMAND=/bin/cat /etc/shadow
Jul 15 10:34:23 localhost sudo: t850008 : TTY=pts/0 ; PWD=/home/t850008 ; USER=root ; COMMAND=/bin/cat /etc/shadow
Jul 15 10:44:06 localhost sudo: t850008 : command not allowed ; TTY=pts/0 ; PWD=/home/t850008 ; USER=root ; COMMAND=/sbin/shutdown -r now

不過 /var/log/secure 也包含一些以 ssh 登入的訊息和其它的內容
# grep -E ‘sshd|useradd’ /var/log/secure
Jul 13 12:23:15 localhost sshd[2542]: pam_unix(sshd:session): session closed for user root
Jul 13 12:24:48 localhost sshd[1543]: Server listening on 0.0.0.0 port 22.
Jul 13 12:24:48 localhost sshd[1543]: Server listening on :: port 22.
Jul 13 12:26:14 localhost sshd[2465]: Address 192.168.1.1 maps to linzhaongdeipad.home, but this does not map back to the address – POSSIBLE BREAK-IN ATTEMPT!
Jul 13 12:26:24 localhost sshd[2465]: Accepted password for root from 192.168.1.1 port 3029 ssh2
Jul 13 12:26:24 localhost sshd[2465]: pam_unix(sshd:session): session opened for user root by (uid=0)
Jul 13 12:43:50 localhost sshd[2465]: pam_unix(sshd:session): session closed for user root
Jul 13 12:45:24 localhost sshd[1286]: Server listening on 0.0.0.0 port 22.
Jul 13 12:48:10 localhost sshd[2370]: Address 192.168.1.1 maps to linzhaongdeipad.home, but this does not map back to the address – POSSIBLE BREAK-IN ATTEMPT!
Jul 13 12:48:14 localhost sshd[2370]: Accepted password for root from 192.168.1.1 port 3188 ssh2
Jul 13 12:48:14 localhost sshd[2370]: pam_unix(sshd:session): session opened for user root by (uid=0)
Jul 13 13:02:45 localhost useradd[3294]: failed adding user ‘mysql’, exit code: 9
Jul 15 10:17:17 localhost sshd[1224]: Server listening on 0.0.0.0 port 22.
Jul 15 10:18:21 localhost sshd[10248]: Accepted password for root from 192.168.1.115 port 2163 ssh2
Jul 15 10:18:21 localhost sshd[10248]: pam_unix(sshd:session): session opened for user root by (uid=0)
Jul 15 10:30:47 localhost useradd[10318]: new group: name=t850008, GID=1000
Jul 15 10:30:47 localhost useradd[10318]: new user: name=t850008, UID=1000, GID=1000, home=/home/t850008, shell=/bin/bash
將 sudo 的 log 檔單獨出來,可以簡化一些分析時的資料量
[@more@]# visudo
# add at the last line
Defaults syslog=local1

修改 syslog 設定檔
# vim /etc/rsyslog.conf
把上面這一行改成下面一行
#*.info;mail.none;authpriv.none;cron.none                /var/log/messages
*.info;mail.none;authpriv.none;cron.none;local1.none    /var/log/messages
加入下面這一行
local1.*                                                /var/log/sudo.log

重新啟動 syslog 服務
# systemctl restart rsyslog

切換成 t850008 身份
# su – t850008

列出 /etc/shadow 內容
$ sudo cat /etc/shadow

列出 /var/log/sudo.log 內容
$ sudo cat /var/log/sudo.log
Jul 15 11:12:41 localhost sudo: t850008 : TTY=pts/0 ; PWD=/home/t850008 ; USER=root ; COMMAND=/bin/cat /etc/shadow
Jul 15 11:12:53 localhost sudo: t850008 : TTY=pts/0 ; PWD=/home/t850008 ; USER=root ; COMMAND=/bin/cat /var/log/sudo.log

sudo 指令

一般都不建議直接使用 root 來登入系統,而是建議先使用一般使用者登入,在有須要做系統管理時,再使用 su –  切換成 root 身份來執行。但有時在多人管理的系統中,不方便把 root 的密碼直接告訴所有的人,這時候可以改用 sudo 指令,因為使用者在切換成 root 身份時,只要輸入自己的密碼即可,且可以設定產生 log 檔,方便做更進一步稽核。
建立使用者
# useradd t850008

設定密碼
# passwd t850008
[@more@]
# visudo
加入下面二行,讓使用者可以取得所有 root 的權限
# add at the last line: user ‘t850008’ can use all root privilege
t850008    ALL=(ALL)       ALL

切換到 t850008 使用者
# su – t850008

列出 /etc/shadow 內容
$ cat /etc/shadow
cat: /etc/shadow: 拒絕不符權限的操作

使用 sudo 指令並列出 /etc/shadow 第 2-5 行的內容
$ sudo cat /etc/shadow | sed -n ‘2,5p’

We trust you have received the usual lecture from the local System
Administrator. It usually boils down to these three things:

    #1) Respect the privacy of others.
    #2) Think before you type.
    #3) With great power comes great responsibility.

[sudo] password for t850008:

bin:*:16231:0:99999:7:::
daemon:*:16231:0:99999:7:::
adm:*:16231:0:99999:7:::
lp:*:16231:0:99999:7:::

做更進一步的限制
讓使用者無法關機或重新啟動系統
# visudo
t850008    ALL=(ALL)       ALL,!SHUTDOWN
Cmnd_Alias SHUTDOWN = /sbin/halt, /sbin/shutdown, /sbin/poweroff, /sbin/reboot, /sbin/init

切換到 t850008 使用者
# su – t850008

無法重新開機
$ sudo /sbin/shutdown -r now
[sudo] password for t850008:
Sorry, user t850008 is not allowed to execute ‘/sbin/shutdown -r now’ as root on localhost.home.

CentOS 7.x 更改預設的執行層級

之前的 CentOS Linux 要更改預設的執行層級,是在 /etc/inittab 中設定
但在 CentOS 7.x 中有稍許的不同
# cat /etc/inittab
# inittab is no longer used when using systemd.
#
# ADDING CONFIGURATION HERE WILL HAVE NO EFFECT ON YOUR SYSTEM.
#
# Ctrl-Alt-Delete is handled by /etc/systemd/system/ctrl-alt-del.target
#
# systemd uses ‘targets’ instead of runlevels. By default, there are two main targets:
#
# multi-user.target: analogous to runlevel 3
# graphical.target: analogous to runlevel 5
#
# To set a default target, run:
#
# ln -sf /lib/systemd/system/<target name>.target /etc/systemd/system/default.target
#
[@more@]目前的執行層級
# ll /etc/systemd/system/default.target
lrwxrwxrwx. 1 root root 37  7月 10 19:24 /etc/systemd/system/default.target -> /lib/systemd/system/multi-user.target

# ll /lib/systemd/system/multi-user.target
-rw-r–r–. 1 root root 524  6月 10 13:35 /lib/systemd/system/multi-user.target

改成圖形模式
# ln -fs /lib/systemd/system/graphical.target /etc/systemd/system/default.target

# ll /etc/systemd/system/default.target
lrwxrwxrwx. 1 root root 37  7月 12 19:24 /etc/systemd/system/default.target -> /lib/systemd/system/graphical.target

關閉 CentOS 7 上的 Firewall

查看目前系統上的 Firewall Rule
# iptables -L INPUT -n
Chain INPUT (policy ACCEPT)
target     prot opt source               destination
ACCEPT     all  —  0.0.0.0/0            0.0.0.0/0            ctstate RELATED,ESTABLISHED
ACCEPT     all  —  0.0.0.0/0            0.0.0.0/0
INPUT_direct  all  —  0.0.0.0/0            0.0.0.0/0
INPUT_ZONES_SOURCE  all  —  0.0.0.0/0            0.0.0.0/0
INPUT_ZONES  all  —  0.0.0.0/0            0.0.0.0/0
ACCEPT     icmp —  0.0.0.0/0            0.0.0.0/0
REJECT     all  —  0.0.0.0/0            0.0.0.0/0            reject-with icmp-host-prohibited

因為預設的防火牆規則很難修改並處理,所以想先關閉預設的 Firewall Rules
[@more@]
關閉 Firewall
# systemctl stop firewalld

預設不啟動 Firewall
# systemctl disable firewalld
rm ‘/etc/systemd/system/dbus-org.fedoraproject.FirewallD1.service’
rm ‘/etc/systemd/system/basic.target.wants/firewalld.service’

之後就可以使用 Scripts 的方式來設定要使用的 Firewall Rules

關閉 CentOS 7 上的 IPv6

因為測試的 CentOS 7 是在家裡使用,所以 IPv6 應該是使用不到的
# ifconfig eth0
eth0: flags=4163<UP,BROADCAST,RUNNING,MULTICAST>  mtu 1500
        inet 192.168.1.109  netmask 255.255.255.0  broadcast 192.168.1.255
        inet6 fe80::20c:29ff:fea6:2215  prefixlen 64  scopeid 0x20<link>
        ether 00:0c:29:a6:22:15  txqueuelen 1000  (Ethernet)
        RX packets 462  bytes 41942 (40.9 KiB)
        RX errors 0  dropped 0  overruns 0  frame 0
        TX packets 356  bytes 46939 (45.8 KiB)
        TX errors 0  dropped 0 overruns 0  carrier 0  collisions 0
[@more@]修改方式
修改 /etc/default/grub
GRUB_CMDLINE_LINUX 後加上 ipv6.disable=1
# vim /etc/default/grub
GRUB_TIMEOUT=5
GRUB_DISTRIBUTOR=”$(sed ‘s, release .*$,,g’ /etc/system-release)”
GRUB_DEFAULT=saved
GRUB_DISABLE_SUBMENU=true
GRUB_TERMINAL_OUTPUT=”console”
GRUB_CMDLINE_LINUX=”rd.lvm.lv=centos/swap vconsole.font=latarcyrheb-sun16 rd.lvm.lv=centos/root crashkernel=auto  vconsole.keymap=us rhgb quiet net.ifnames=0 biosdevname=0 ipv6.disable=1
GRUB_DISABLE_RECOVERY=”true”

產生新的 grub 設定檔
# grub2-mkconfig -o /boot/grub2/grub.cfg
Generating grub configuration file …
Found linux image: /boot/vmlinuz-3.10.0-123.el7.x86_64
Found initrd image: /boot/initramfs-3.10.0-123.el7.x86_64.img
Warning: Please don’t use old title `CentOS Linux, with Linux 3.10.0-123.el7.x86_64′ for GRUB_DEFAULT, use `Advanced options for CentOS Linux>CentOS Linux, with Linux 3.10.0-123.el7.x86_64′ (for versions before 2.00) or `gnulinux-advanced-caeda11c-71b9-4cc4-961b-b4541b247804>gnulinux-3.10.0-123.el7.x86_64-advanced-caeda11c-71b9-4cc4-961b-b4541b247804′ (for 2.00 or later)
Found linux image: /boot/vmlinuz-0-rescue-07f9be0c0fc843ce885a7539150c8e55
Found initrd image: /boot/initramfs-0-rescue-07f9be0c0fc843ce885a7539150c8e55.img
done

重新開機
# sync;sync;sync;sync;shutdown -r

IPv6 已經關閉
# ifconfig eth0
eth0: flags=4163<UP,BROADCAST,RUNNING,MULTICAST>  mtu 1500
        inet 192.168.1.109  netmask 255.255.255.0  broadcast 192.168.1.255
        ether 00:0c:29:a6:22:15  txqueuelen 1000  (Ethernet)
        RX packets 83  bytes 8436 (8.2 KiB)
        RX errors 0  dropped 0  overruns 0  frame 0
        TX packets 73  bytes 10238 (9.9 KiB)
        TX errors 0  dropped 0 overruns 0  carrier 0  collisions 0