CentOS Linux 6.6 x86_64 客製化

試裝了 CentOS Linux 6.6 x86_64 之後,順手把 Server 的安裝光碟完成。
安裝只要二步驟:
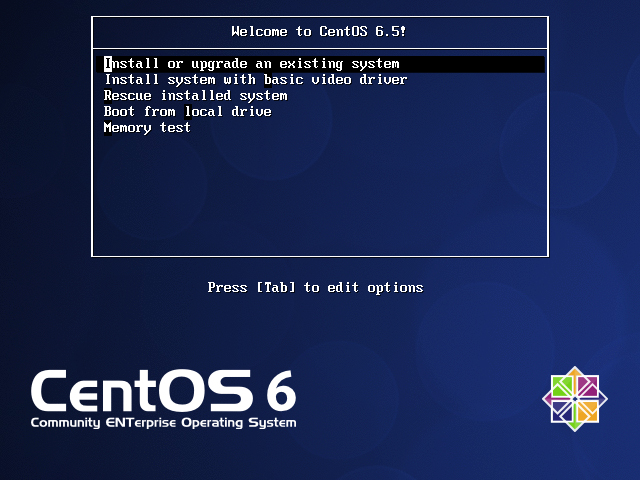
光碟安裝畫面,已取消倒數計時
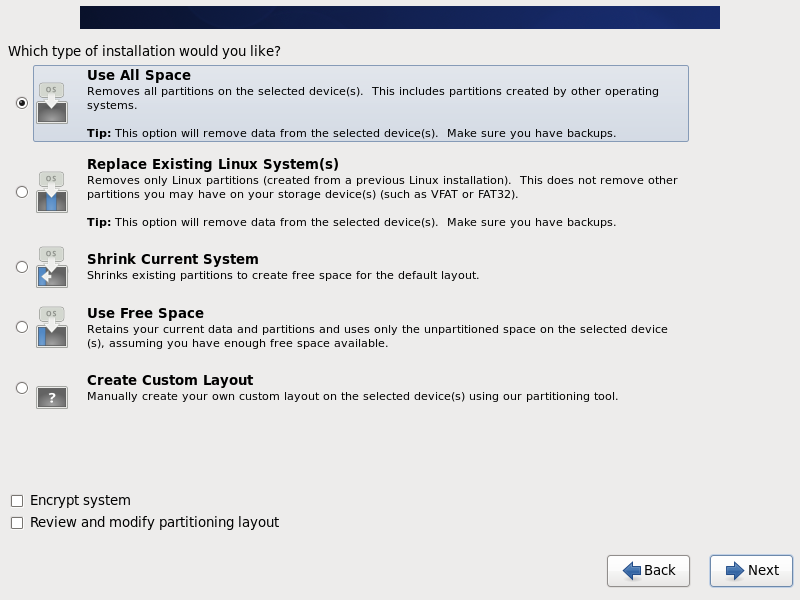
[@more@]第一步驟:硬碟分割

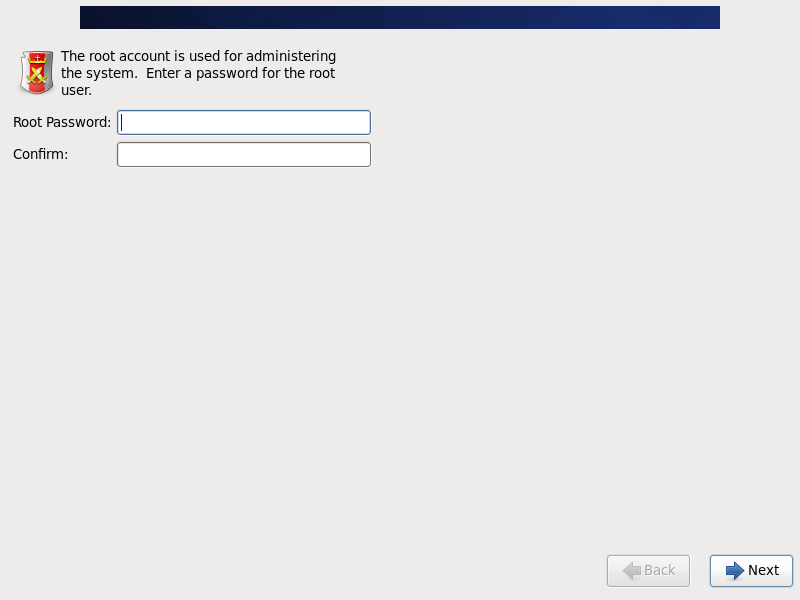
第二步驟:設定 root 密碼

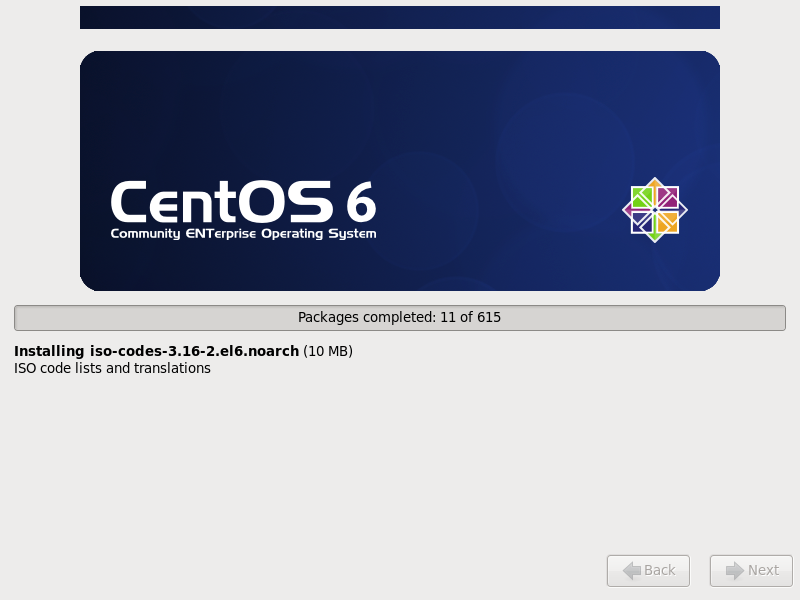
開始安裝

共有 646 個套件

安裝完成

這個版本的特點:
1. 套件更新到 2014-10-29
2. 套件更新伺服器改成臺灣
3. 預設啟動 LAMP (Linux + Apache + MySQL + PHP) / vsFTP Server
4. Apache Web Server 增加一些安全性上的設定
    ServerTokens Prod
    ServerSignature Off
5. MySQL Server 修改成 UTF-8 的使用環境
6. PHP 部分的設定,僅列出部份的修改
    時區改成 Asia/Taipei
    upload_max_filesize = 500M
    post_max_size = 500
7. 修改 SELinux 讓 vsFTP Server 能正常使用(SELINUX=enforcing)
8. 每天早上 6 點向 time.stdtime.gov.tw 對時

更改 CentOS Linux Mirror 來源

原本是使用交通大學資訊工程學系,改用義守大學
# crontab -l | grep rsync
#0 */6 * * * /usr/bin/rsync -avqzH –delete linux.cs.nctu.edu.tw::CentOS /var/ftp/CentOS > /dev/null 2>&1
0 */6 * * * /usr/bin/rsync -avqzH –delete ftp.isu.edu.tw::centos /var/ftp/CentOS > /dev/null 2>&1

CentOS Linux 6.6

CentOS Linux 6.6 已經釋出,可以下載 ISO  檔來安裝,或使用 yum update 來更新到最新版本。
# yum update

關於 CentOS 6.6 的介紹可以參考:CentOS 6.6 正式发布 – 开源中国社区
CentOS Linux ISO 6.6 版下載
i386
樹德科技大學
ftp://ftp.stu.edu.tw/Linux/CentOS/6.6/isos/i386/
元智大學
ftp://ftp.yzu.edu.tw/Linux/CentOS/6.6/isos/i386/
Hinet IDC
http://mirror01.idc.hinet.net/CentOS/6.6/isos/i386/
義守大學
ftp://ftp.isu.edu.tw/pub/Linux/CentOS/6.6/isos/i386/
國家高速網路與計算中心
ftp://ftp.twaren.net/Linux/CentOS/6.6/isos/i386/
南臺科技大學
ftp://ftp.stust.edu.tw/pub/Linux/CentOS/6.6/isos/i386/
中山大學
http://ftp.nsysu.edu.tw/CentOS/6.6/isos/i386/
台中市教網
http://ftp.tc.edu.tw/Linux/CentOS/6.6/isos/i386/
頭城國小
ftp://140.111.74.109/CentOS/6.6/isos/i386/
[@more@]
x86_64
樹德科技大學
ftp://ftp.stu.edu.tw/Linux/CentOS/6.6/isos/x86_64/
元智大學
ftp://ftp.yzu.edu.tw/Linux/CentOS/6.6/isos/x86_64/
Hinet IDC
http://mirror01.idc.hinet.net/CentOS/6.6/isos/x86_64/
義守大學
ftp://ftp.isu.edu.tw/pub/Linux/CentOS/6.6/isos/x86_64/
國家高速網路與計算中心
ftp://ftp.twaren.net/Linux/CentOS/6.6/isos/x86_64/
南臺科技大學
ftp://ftp.stust.edu.tw/pub/Linux/CentOS/6.6/isos/x86_64/
中山大學
http://ftp.nsysu.edu.tw/CentOS/6.6/isos/x86_64/
台中市教網
http://ftp.tc.edu.tw/Linux/CentOS/6.6/isos/x86_64/
頭城國小
ftp://140.111.74.109/CentOS/6.6/isos/x86_64/

CentOS 5.x / 6.x / 7 bash 漏洞檢測及修正

參考網站:bash 漏洞檢測與修補 « Jamyy’s Weblog

bash 的漏洞造成的危害,請參考:
MyFirefox | Unix亮紅燈!大漏洞「Shellshock」可惡意挾持電腦系統

CentOS 5.x
# cat /etc/redhat-release
CentOS release 5.10 (Final)

目前安裝 bash 套件
# rpm -qa | grep bash
bash-3.2-32.el5_9.1

bash 版本
# bash –version
GNU bash, version 3.2.25(1)-release (i386-redhat-linux-gnu)
Copyright (C) 2005 Free Software Foundation, Inc.

檢查是否有漏洞(有)
# env x='() { :;}; echo vulnerable’ bash -c “echo this is a test”
vulnerable
this is a test

更新之後的 bash 套件
# rpm -qa | grep bash
bash-3.2-33.el5.1
或
bash-3.2-33.el5_10.4

bash 版本
# bash –version
GNU bash, version 3.2.25(1)-release (x86_64-redhat-linux-gnu)
Copyright (C) 2005 Free Software Foundation, Inc.

檢查是否有漏洞(無)
# env x='() { :;}; echo vulnerable’ bash -c “echo this is a test”
bash: warning: x: ignoring function definition attempt
bash: error importing function definition for `x’
this is a test[@more@]CentOS 6.x
# cat /etc/redhat-release
CentOS release 6.5 (Final)

bash 版本
# bash –version
GNU bash, version 4.1.2(1)-release (x86_64-redhat-linux-gnu)

檢查是否有漏洞(無)
# env x='() { :;}; echo vulnerable’ bash -c “echo this is a test”
bash: warning: x: ignoring function definition attempt
bash: 錯誤,輸入的函數定義為 `x’
this is a test

更新之後的 bash 套件
# rpm -qa | grep bash
bash-4.1.2-15.el6_5.2.i686
bash-4.1.2-15.el6_5.2.x86_64

CentOS 7.x
# cat /etc/redhat-release
CentOS Linux release 7.0.1406 (Core)

目前安裝 bash 套件
# rpm -qa | grep bash
bash-4.2.45-5.el7.x86_64
bash-completion-2.1-6.el7.noarch

目前 bash 的版本
# bash –version
GNU bash, version 4.2.45(1)-release (x86_64-redhat-linux-gnu)
Copyright (C) 2011 Free Software Foundation, Inc.

檢查是否有漏洞(有)
# env x='() { :;}; echo vulnerable’ bash -c “echo this is a test”
vulnerable
this is a test

更新之後的 bash 套件
# rpm -qa | grep bash
bash-4.2.45-5.el7_0.4.x86_64
bash-completion-2.1-6.el7.noarch

更新之後的 bash 版本
# bash –version
GNU bash, version 4.2.45(1)-release (x86_64-redhat-linux-gnu)

出現這樣,不知道有沒有修補完成(?),但應該是有修正完成
# env x='() { :;}; echo vulnerable’ bash -c “echo this is a test”
this is a test

CentOS 6.5 升級到 CentOS 7

一般個人使用 CentOS Linux 的習慣,小版本間的升級 6.4–> 6.5 就直接使用 yum update 來升級,大版本間的升級通常會先備份資料及設定檔後,重新安裝,比較少用升級的方式處理,因為升級可能會有些風險,倒不如重新安裝來的安全些。
底下文章參考:zh-tw/TipsAndTricks/CentOSUpgradeTool – CentOS Wiki
1. 在套件庫加入設定檔
# vim /etc/yum.repos.d/upgradetool.repo
[upg]
name=CentOS-$releasever – Upgrade Tool
baseurl=http://dev.centos.org/centos/6/upg/x86_64/
gpgcheck=1
enabled=1
gpgkey=file:///etc/pki/rpm-gpg/RPM-GPG-KEY-CentOS-6

2. 更新套件儲存庫
# yum update[@more@]3. 安裝升級所需套件
# yum install redhat-upgrade-tool preupgrade-assistant-contents

4. 列出升級事前助手的所有內容
# preupg -l
CentOS6_7

5. 匯入 CentOS 7 金鑰
# rpm –import http://mirror.centos.org/centos/RPM-GPG-KEY-CentOS-7

6. 進行升級
# centos-upgrade-tool-cli –network 7 –instrepo=ftp://140.111.74.109/CentOS/7/os/x86_64/

7. 重新開機
# init 6

8. 經過漫長的升級

更新前
# cat /etc/redhat-release
CentOS release 6.5 (Final)

更新後
# cat /etc/redhat-release
CentOS Linux release 7.0.1406 (Core)

感想:
1. 升級完之後並沒有仔細去驗證所有的服務是否都能正常執行,通常如果有使用到第三方套件庫,如:rpmforge / epel …,或者是是使用桌面環境,如:GNOME / KDE….,失敗的機率會很大。
2. 升級所花的時間並沒有比重新安裝少,所以還是重新安裝新的系統比較實在,也可以順便把系統做一下清理。

CentOS Linux 6.5 2014_09_17 客製化

等待廠商來安裝圖書館投影機時製作的
光碟開機畫面(未更動)
[@more@]
安裝只要設定 root 密碼和分割硬碟即可。

設定 root 密碼

分割硬碟

不用挑選套件,直接安裝

更動部分:
1. Web Server 改用 Nginx,並完成與 PHP 之間的設定
2. MySQL Server 改用 MariaDB,並修改成 UTF-8 的使用環境
3. Samba Server 改用 Samba 4
4. 修改 php 設定,包含:上傳的檔案大小到 200M,時區改成 Asis/Taipei……等等。
5. 套件更新到 2014_09_17
6. 套件更新伺服器改成臺灣
7. 每天早上 6 點對時
8. 啟用 Nginx / MariaDB /vsftpd Server

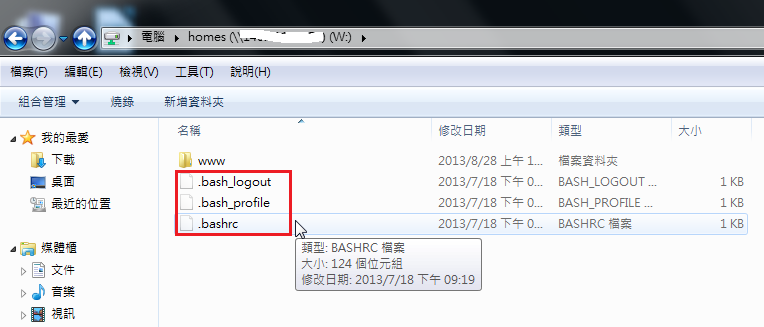
Samba 網路硬碟不顯示隱藏檔

學生上電腦課時,是使用 Samba Server 來儲存資料,使用者登入之後可以很方便在任何一台電腦存取到自己的檔案。
今天發現學生開啟家目錄後,會顯示一些在 Linux 是隱藏檔的檔案。

為了避免造成學生的困擾,所以做了以下的調整。[@more@]1. 修改 Samba Server 設定檔,以 CentOS 6.x 為例
# vim /etc/samba/smb.conf
[homes]
        comment = Home Directories
        browseable = no
        writable = yes
        valid users = %S
        create mode = 0664
        directory mode = 0775
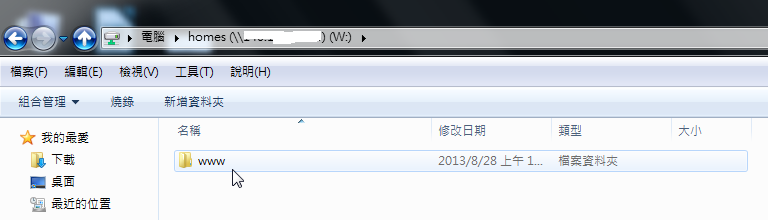
        veto files=/.*/

加入 veto files=/.*/ 這一行設定

2. 重新啟動 Samba Server
# service nmb restart
正在停止 NMB 服務:                                        [  確定  ]
正在啟動 NMB 服務:                                        [  確定  ]
# service smb restart
正在停止 SMB 服務:                                        [  確定  ]
正在啟動 SMB 服務:                                        [  確定  ]

3. 重新整理後,隱藏檔的部分就不見了!

MariaDB Server 調整

參考 – 新安裝 CentOS 6.5 筆記 ~ .阿欣部落. ~
在 /usr/share/mysql/ 下有幾個範例配置檔
    my-innodb-heavy-4G.cnf: 適合大於 4GB RAM 的伺服器使用。
    my-huge.cnf: 適合 1GB – 2GB RAM 的伺服器使用。
    my-large.cnf: 適合 512MB RAM 的伺服器使用。
    my-medium.cnf: 適合 64MB ~ 512 RAM 的伺服器使用。
    my-small.cnf: 適合記憶體小於 64MB的伺服器。
# ls -l /usr/share/mysql/*.cnf
-rw-r–r–. 1 root root  4920 Jun 24 22:24 /usr/share/mysql/my-huge.cnf
-rw-r–r–. 1 root root 20438 Jun 24 22:24 /usr/share/mysql/my-innodb-heavy-4G.cnf
-rw-r–r–. 1 root root  4907 Jun 24 22:24 /usr/share/mysql/my-large.cnf
-rw-r–r–. 1 root root  4920 Jun 24 22:24 /usr/share/mysql/my-medium.cnf
-rw-r–r–. 1 root root  2846 Jun 24 22:24 /usr/share/mysql/my-small.cnf

備份原檔
# mv /etc/my.cnf.d/mysql-clients.cnf /etc/my.cnf.d/mysql-clients.cnf.$(date +%F)
複製範例檔到設定目錄,Server 的 RAM 是 2G
# cp /usr/share/mysql/my-huge.cnf /etc/my.cnf.d/mysql-clients.cnf[@more@]

MariaDB Server UTF-8 環境設定
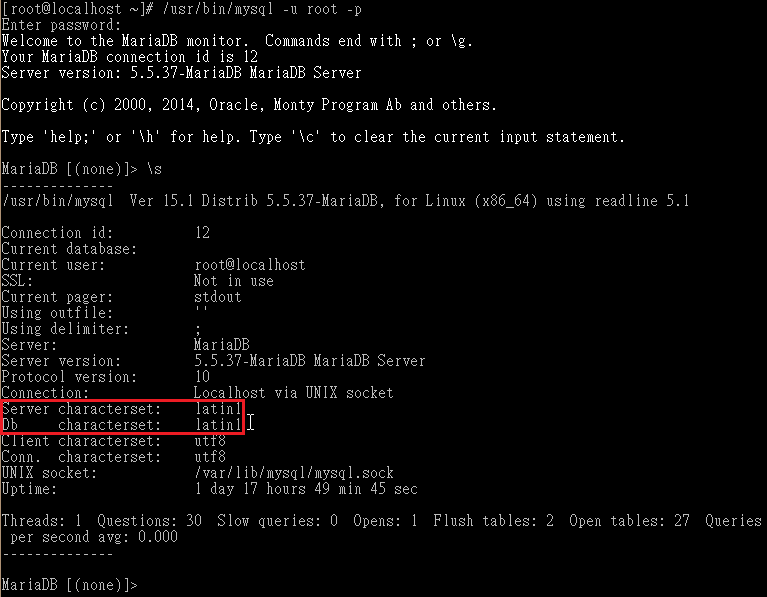
查看目前 MariaDB Server 的設定
# /usr/bin/mysql -u root -p
輸入密碼後,輸入 s
可以看到
Server characterset:    latin1
Db     characterset:    latin1

Client 端設定
# sed -i ‘/[client]/adefault-character-set=utf8’ /etc/my.cnf.d/client.cnf
Server 端設定
# sed -i ‘/[mysqld]/acharacter-set-server=utf8’ /etc/my.cnf.d/server.cnf

重新啟動 MariaDB Server
# systemctl restart mariadb

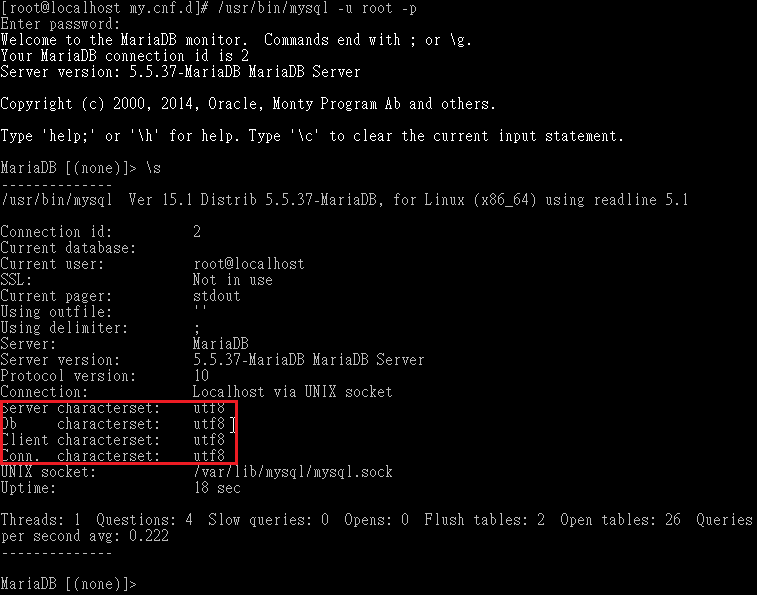
重新檢查一次
# /usr/bin/mysql -u root -p
輸入密碼後,輸入 s
可以看到
Server characterset:    utf8
Db     characterset:    utf8
Client characterset:    utf8
Conn.  characterset:    utf8

或
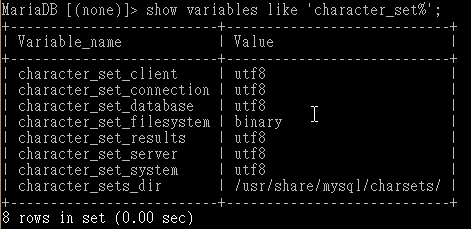
> show variables like ‘character_set%’;

CentOS 7.x 客製化光碟完成 -套件更新到 2014/08/24

CentOS 7.x 釋出時,因為版本號碼有些特別,所以當時並沒有把它當做是正式版本,遲遲沒有動手製作。會製作這樣的光碟,主要是為了測試系統時能更方便,在安裝時,不用挑選要安裝的套件,安裝完成之後不用再去啟動需要的服務,及做伺服器的一些設定,而且套件也更新到最新版本。

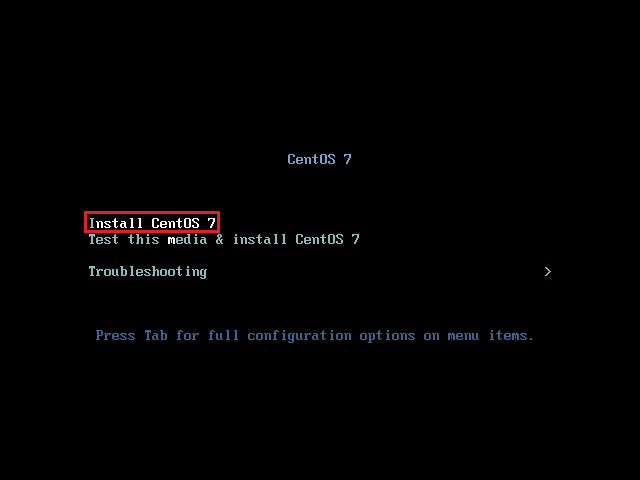
光碟開機畫面,已更改成預設為安裝 CentOS 7,並把 timeout 時間取消,要使用者按 Enter 鍵後才會開始安裝
[@more@]進入安裝畫面,共有三個地方要設定
1. 硬碟分割
2. 網路設定
3. 設定 root 密碼和建立一個非 root 使用者

選擇 INSTALLTION DESTINATION 進行硬碟分割

點選要安裝的硬碟進行分割後,按上方的 Done

按 NETWORK & HOSTNAME 進行網路設定

預設是不啟動網路

改成 ON 可以設定 DHCP 自動取得 IP 或按 Configure 手動設定網路組態,最後按上方的 Done

按 Begin installation 開始安裝

設定 root 密碼

設定 root 的密碼,如果您的密碼設定和我一樣,密碼強度被判別為 Weak,需要按二下上方的 Done 才可以

系統安裝中

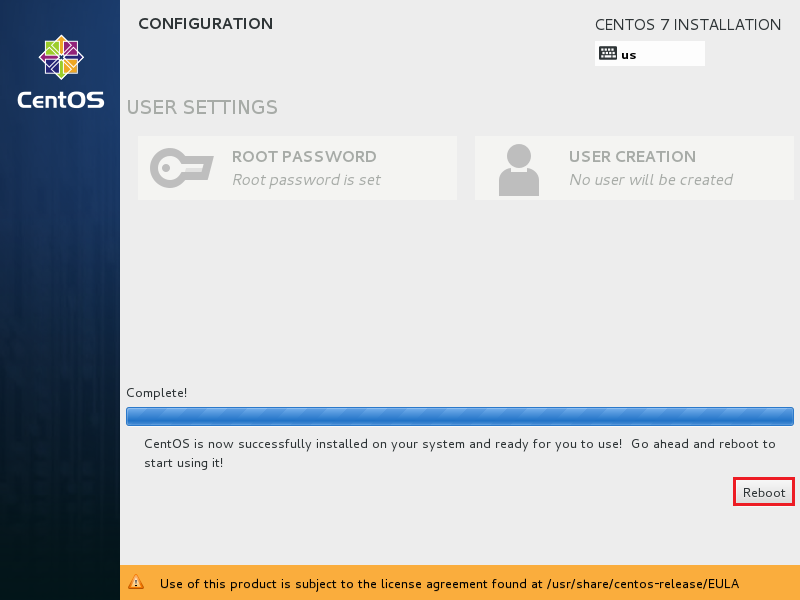
安裝完成,按 Reboot 重新開機

預設啟動 FTP/SSH/HTTP/SQL Server,防火牆預設關閉,SElinux 沒有關閉

不過,有一個遺憾是無法把容量控制在一片 CD 中,因為我儘量不去動原本光碟上的檔案,只修改套件的組合。

如果有興趣的人可以自行動手做做看:
參考網頁:
Building a custom CentOS 7 kickstart
Build your own customized install disc from CentOS 6.4 « Brainfuck

CentOS 7.x /etc/rc.d/rc.local 開機時不會自動執行

之前都會把一些每次 CentOS Linux 開機時會執行的一些指令寫在 /etc/rc.d/rc.local 檔案內,但最近卻發現它好像不會執行
# cat /etc/rc.d/rc.local
#!/bin/bash
# THIS FILE IS ADDED FOR COMPATIBILITY PURPOSES
#
# It is highly advisable to create own systemd services or udev rules
# to run scripts during boot instead of using this file.
#
# In constrast to previous versions due to parallel execution during boot
# this script will NOT be run after all other services.
#
# Please note that you must run ‘chmod +x /etc/rc.d/rc.local’ to ensure
# that this script will be executed during boot.

touch /var/lock/subsys/local
sh /etc/rc.d/firewall.server[@more@]但手動執行 firewall.server 可以正常執行
# sh /etc/rc.d/firewall.server

後來查看一下 /etc/rc.d/rc.local
# ls -l /etc/rc.d/rc.local
-rw-r–r– 1 root root 630  8月 24 11:26 /etc/rc.d/rc.local

發現似乎沒有執行的權限

後來加上了 /etc/rc.d/rc.local 的執行權限,似乎開機時會自動執行了!
# chmod 744 /etc/rc.d/rc.local