在 CentOS 7 上安裝 fail2ban

fail2ban 在 CentOS 7.x 上的執行方式和之前的 CentOS 5.x/6.x 有一些不同
安裝方式:
1. 使用 epel 套件庫
# rpm -Uvh http://dl.fedoraproject.org/pub/epel/7/x86_64/e/epel-release-7-5.noarch.rpm
# yum install fail2ban –enablerepo=epel[@more@]2. 這裡以建立 ssh 服務保護為例
# vim /etc/fail2ban/jail.d/sshd.local
[ssh-iptables]
enabled  = true
filter   = sshd
action   = iptables[name=SSH, port=ssh, protocol=tcp]
logpath  = /var/log/secure
maxretry = 3
bantime = 86400

3. 啟動 fail2ban
# systemctl start fail2ban

4. 設定開機時啟動
# systemctl enable fail2ban

5. 進行測試
login as: root
root@192.168.1.111’s password: ***
Access denied
root@192.168.1.111’s password: **
Access denied
root@192.168.1.111’s password: ***
Access denied
root@192.168.1.111’s password: ***

# iptables -L -n | tail -4
Chain f2b-SSH (1 references)
target     prot opt source               destination
REJECT     all  —  192.168.1.3      0.0.0.0/0            reject-with icmp-port-unreachable
RETURN     all  —  0.0.0.0/0            0.0.0.0/0

Drupal 使用 OpenLDAP 認證

Lightweight Directory Access Protocol (LDAP) | Drupal.org
https://www.drupal.org/project/ldap
# wget -P /var/www/html http://ftp.drupal.org/files/projects/ldap-7.x-2.0-beta8.tar.gz
# tar xvzf /var/www/html/ldap-7.x-2.0-beta8.tar.gz -C /var/www/html/drupal/sites/all/modules

ctools 7.x-1.4 | Drupal.org
https://www.drupal.org/node/2194551
# wget -P /var/www/html http://ftp.drupal.org/files/projects/ctools-7.x-1.4.tar.gz
# tar xvzf /var/www/html/ctools-7.x-1.4.tar.gz -C /var/www/html/drupal/sites/all/modules/

entity 7.x-1.5 | Drupal.org
https://www.drupal.org/node/2236077
# wget -P /var/www/html http://ftp.drupal.org/files/projects/entity-7.x-1.5.tar.gz
# tar xvzf /var/www/html/entity-7.x-1.5.tar.gz -C /var/www/html/drupal/sites/all/modules/

Feeds | Drupal.org
https://www.drupal.org/project/feeds
# wget -P /var/www/html http://ftp.drupal.org/files/projects/feeds-7.x-2.0-alpha8.tar.gz
# tar xvzf /var/www/html/feeds-7.x-2.0-alpha8.tar.gz -C /var/www/html/drupal/sites/all/modules

job_scheduler 7.x-2.0-alpha3 | Drupal.org
https://www.drupal.org/node/1566814
# wget -P /var/www/html http://ftp.drupal.org/files/projects/job_scheduler-7.x-2.0-alpha3.tar.gz
# tar xvzf /var/www/html/job_scheduler-7.x-2.0-alpha3.tar.gz -C /var/www/html/drupal/sites/all/modules

Organic groups | Drupal.org
https://www.drupal.org/project/og
# wget -P /var/www/html http://ftp.drupal.org/files/projects/og-7.x-2.7.tar.gz
# tar xvzf /var/www/html/og-7.x-2.7.tar.gz -C /var/www/html/drupal/sites/all/modules

entityreference 7.x-1.1 | Drupal.org
https://www.drupal.org/node/2140229
# wget -P /var/www/html http://ftp.drupal.org/files/projects/entityreference-7.x-1.1.tar.gz
# tar xvzf /var/www/html/entityreference-7.x-1.1.tar.gz -C /var/www/html/drupal/sites/all/modules

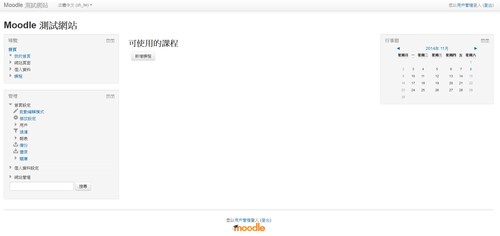
在 CentOS 7.x 上安裝 Moodle 2.7.2+

Moodle 官方網站:http://moodle.org
因為新版本 Moodle 2.7.x 只能在 PHP 5.4.4 版本上安裝,所以只能在 CentOS 7.x  上安裝

下載 Moodle 2.7.2+
# wget -P /var/www/html https://download.moodle.org/download.php/direct/stable27/moodle-latest-27.tgz
下載正體中文語系
# wget -P /var/www/html https://download.moodle.org/download.php/direct/langpack/2.7/zh_tw.zip
[@more@]解壓縮 Moodle 2.7.2+
# tar xvzf /var/www/html/moodle-latest-27.tgz -C /var/www/html

建立存放 Moodle 課程目錄
# mkdir /var/www/moodledata
解壓縮正體中文語系
# unzip /var/www/html/zh_tw.zip -d /var/www/moodledata
改變目錄的擁有者
# chown -R apache:apache /var/www/moodledata
處理 SELinux 的問題
# chcon -R -t httpd_sys_rw_content_t /var/www/moodledata

安裝缺少的 PHP 模組

# yum install php-xmlrpc php-soap php-intl php-ldap
# yum install php-pecl-zendopcache –enablerepo=remi

重新啟動 Apache Web Server
# systemctl restart httpd

完成安裝

在 CentOS 6.x/7.x 上安裝 Durpal 7.33

Drupal 英文官方網站:http://drupal.org/
Drupal Taiwan 正體中文支援站:http://drupaltaiwan.org/

下載 Drupal 7.33
# wget -P /var/www/html http://ftp.drupal.org/files/projects/drupal-7.33.tar.gz
解壓縮
# tar xvzf /var/www/html/drupal-7.33.tar.gz -C /var/www/html
更改目錄擁有者
# chown -R root:root /var/www/html/drupal-7.33
更改目錄名稱
# mv /var/www/html/drupal-7.33 /var/www/html/drupal[@more@]下載正體中文語系,因為網站上沒有 7.33 版,所以先下載 7.32 版
語系下載網站:http://ftp.drupal.org/files/translations/7.x/drupal
# wget -P /var/www/html/drupal/profiles/standard/translations http://ftp.drupal.org/files/translations/7.x/drupal/drupal-7.32.zh-hant.po

開始安裝

選擇 繁體中文

如果出現下面的畫面,就做以下的設定

# cp /var/www/html/drupal/sites/default/default.settings.php /var/www/html/drupal/sites/default/settings.php
# chmod a+w /var/www/html/drupal/sites/default/settings.php
# chmod a+w /var/www/html/drupal/sites/default
# mkdir -p /var/www/html/drupal/sites/default/files
# chmod a+w /var/www/html/drupal/sites/default/files

建立 drupal 資料庫
# /usr/bin/mysqladmin -u root -p create drupal
Enter password:

資料庫設定

安裝設定檔

設定網站

完成安裝

安裝完成

安裝完成後的設定
# chmod a-w /var/www/html/drupal/sites/default/settings.php
# chmod a-w /var/www/html/drupal/sites/default

Gallery 3 設定

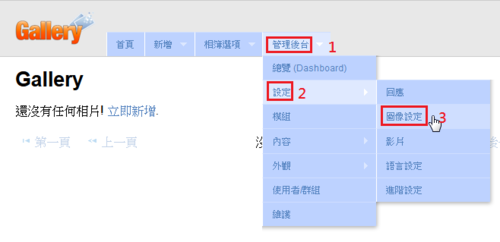
選擇 管理後台設定圖像設定

[@more@]
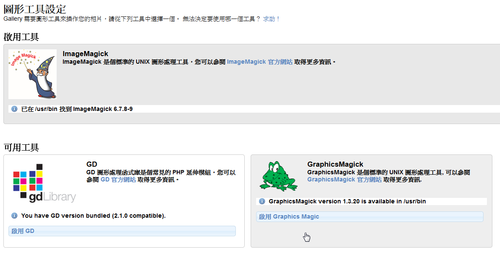
預設是使用 ImageMagick,也可以改用 GD or GraphicMagick

如果沒有安裝 GraphicsMagick
# yum install -y GraphicsMagick –enablerepo=epel

如果沒有安裝 GD / ImageMagick
# yum install -y gd php-gd ImageMagick

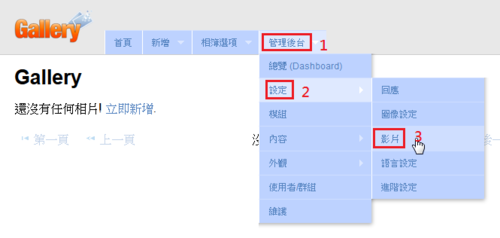
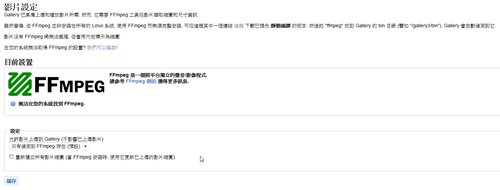
選擇 管理後台設定 / 影片

系統沒有安裝 ffmpeg

安裝 atrpms 第三方套件庫
# rpm -Uvh http://dl.atrpms.net/el7-x86_64/atrpms/stable/atrpms-repo-7-7.el7.x86_64.rpm
# sed -i ‘s/enabled=1/enabled=0/’ /etc/yum.repos.d/atrpms.repo

安裝 ffmpeg
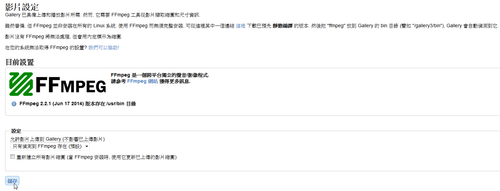
# yum install ffmpeg –enablerepo=atrpms,epel

ffmpeg 完成安裝

在 CentOS 7.x 下安裝 Gallery 3

Gallery 3 是一套網路
Gallery 3 官方網站:http://galleryproject.org/
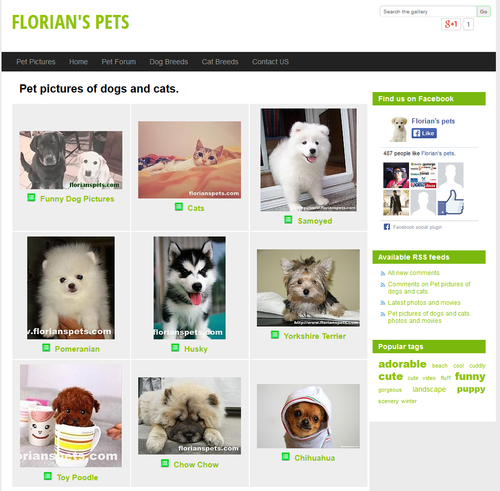
圖片取自官方網站:
[@more@]下載 Gallery 3.0.9
# wget -P /var/www/html http://downloads.sourceforge.net/project/gallery/gallery3/3.0.9/gallery-3.0.9.zip
解壓縮
# unzip /var/www/html/gallery-3.0.9.zip -d /var/www/html
更改目錄名稱
# mv /var/www/html/gallery3 /var/www/html/gallery
建立目錄
# mkdir /var/www/html/gallery/var
改變目錄擁有者
# chown -R apache:apache /var/www/html/gallery/var

開始安裝
http://Server’IP/gallery

解決出現的錯誤訊息

開啟 PHP short_open_tag 功能
# sed -i ‘s/short_open_tag = Off/short_open_tag = On/’ /etc/php.ini
重新啟動 Apache Web Server
# systemctl restart httpd

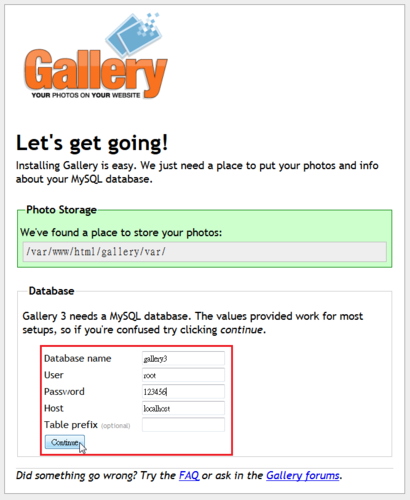
設定資料庫

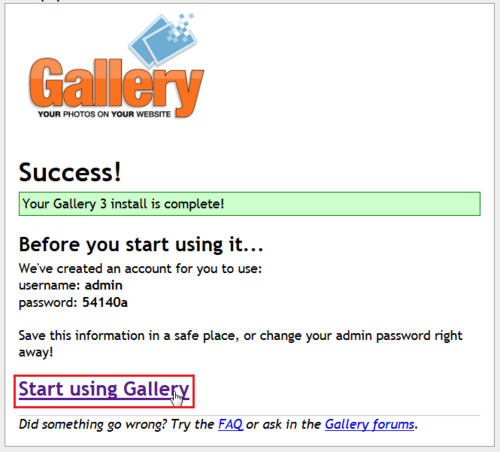
安裝完成

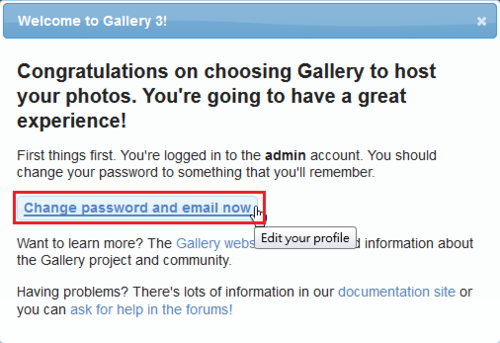
設定密碼及電子郵件

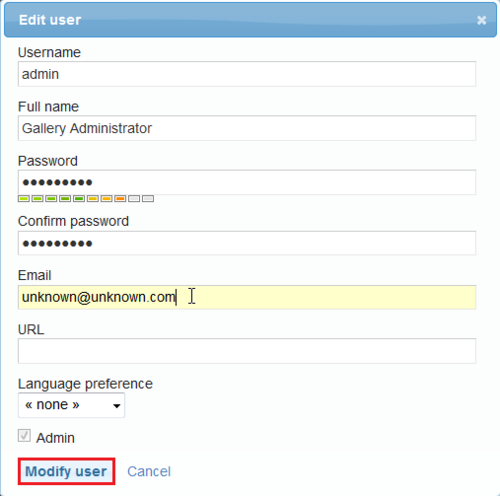
設定密碼及電子郵件

更改語系
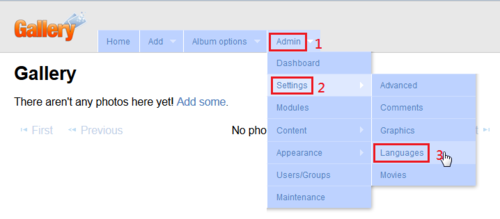
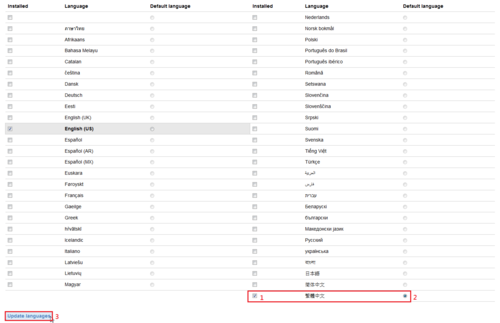
Admin / Settings / Languages

選擇 繁體中文 / 改成預設 / Update languages

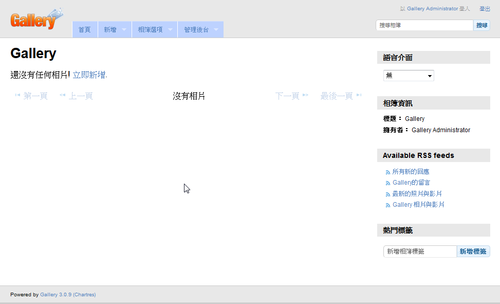
轉換語系

畫面就變成中文了!

啟動 SELinux 後的錯誤解決工具

參考網站:鳥哥的 Linux 私房菜 — 程序管理與 SELinux 初探
使用 audit2why 工具
auditd 會將 SELinux 發生的錯誤資訊寫入 /var/log/audit/audit.log

CentOS 7.x
# systemctl list-unit-files | grep audit
auditd.service                              enabled
CentOS 6.x
# chkconfig –list | grep audit
auditd          0:off   1:off   2:on    3:on    4:on    5:on    6:off
[@more@]
# /usr/bin/audit2why < /var/log/audit/audit.log
        Was caused by:
        The boolean httpd_unified was set incorrectly.
        Description:
        Allow httpd to unified

        Allow access by executing:
        # setsebool -P httpd_unified 1

解決方式:
# setsebool -P httpd_unified 1

CentOS 6.x/7.x 上安裝 ownCloud 7.x

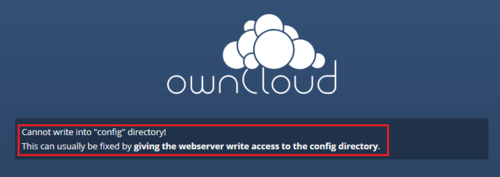
最近在 CentOS 6.x / 7.x 安裝 ownCloud 時,都會出現下面的畫面
[@more@]經過反覆的測試,發現應該是 SElinux 造成的問題
只要暫且把 SELinux 關閉
# setenforce 0

系統就可以正常安裝

可以在 owncloud 目錄下的 README.SELinux 中提到
NOTE: IF YOU INSTALLED FROM THE OFFICIAL OWNCLOUD RPM, YOU DO NOT NEED TO
      FOLLOW THE INSTRUCTIONS BELOW! THEY HAVE ALREADY BEEN DONE FOR YOU!

If you are running Fedora 16 with SELinux enabled, you need to relabel the
ownCloud installation directory to allow the webserver to store files there.

To do that, execute the following commands as user root AFTER you installed
ownCloud:

# semanage fcontext -a -t httpd_sys_rw_content_t ‘/var/www/html/owncloud/data’
# restorecon ‘/var/www/html/owncloud/data’
# semanage fcontext -a -t httpd_sys_rw_content_t ‘/var/www/html/owncloud/config’
# restorecon ‘/var/www/html/owncloud/config’

To remove the ownCloud directory label execute the following commands as
user root AFTER you uninstalled ownCloud:

# semanage fcontext -d -t httpd_sys_rw_content_t ‘/var/www/html/owncloud/data’
# restorecon ‘/var/www/html/owncloud/data’
# semanage fcontext -d -t httpd_sys_rw_content_t ‘/var/www/html/owncloud/config’
# restorecon ‘/var/www/html/owncloud/config’

Note: all of the above applies only to the default policies. If you modified
      them, please give the webserver write-access to the directories
      /var/www/html/owncloud/data and /var/www/html/owncloud/config

Note: for non-Fedora / Redhat systems running SELinux the policy might be
      called differently.

Enjoy you own Cloud!

只要是用 rpm 來安裝的,就可以不用做設定,但即使做了設定也沒有用

解決方式:
1. 關閉 SELinux,這是我最不建議的
# sed -i ‘s/SELINUX=enforcing/SELINUX=disabled/’ /etc/selinux/config

重新開機
# reboot

2. 設定目錄擁有者及 SELinux
# chown -R apache:apache /var/www/html/owncloud/data
# chown -R apache:apache /var/www/html/owncloud/config
# chcon -R -t httpd_sys_rw_content_t /var/www/html/owncloud/config
# chcon -R -t httpd_sys_rw_content_t /var/www/html/owncloud/data
# chcon -R -t httpd_sys_rw_content_t /var/www/html/owncloud/apps

在 CentOS 6.x 上安裝 Moodle 2.6.5+

因為 CentOS 6.x 的 PHP 是 5.3.3 版,所以不能安裝 Moodle 2.7.2。
切換目錄
# cd /var/www/html
下載 Moodle 2.6.5+
# wget https://download.moodle.org/download.php/direct/stable26/moodle-latest-26.tgz
下載正體中文語系 for 2.6.5+
# wget https://download.moodle.org/download.php/direct/langpack/2.6/zh_tw.zip[@more@]
解壓縮
# tar xvzf moodle-latest-26.tgz
建立儲放課程的目錄
# mkdir /var/www/moodledata
解壓縮正體中文語系到 /var/www/moodledata
# unzip zh_tw.zip -d /var/www/moodledata
改變目錄擁有者
# chown -R apache:apache /var/www/moodledata

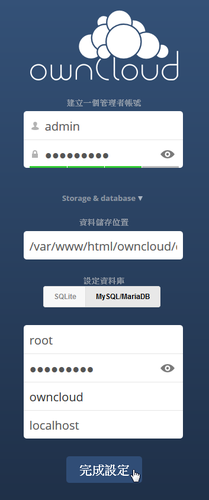
進行安裝

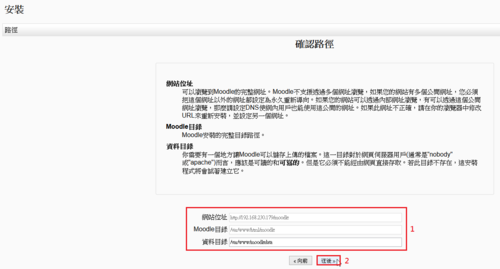
目錄設定

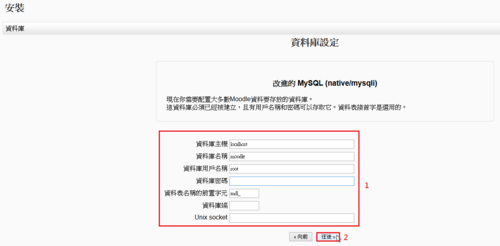
資料庫設定

資料庫伺服器設定

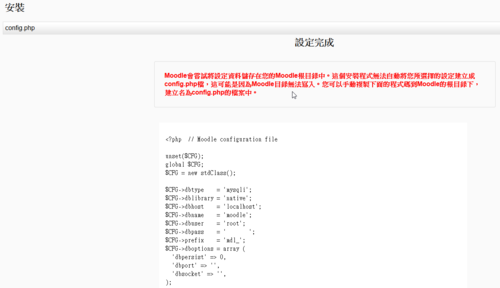
/var/www/html/moodle 目錄之下,建立 config.php 設定檔

授權協定

# yum install php-soap php-intl
至於 php_setting opcache.enable 設定的部分,因為要升級到 php 5.5 or 5.6,所以可以暫不處理
伺服器檢查

只剩下 php_setting opcache.enable 的部分

最後加入工作排程
# crontab -u apache -e

加入下面一行
*/15 * * * * /usr/bin/php /var/www/html/moodle/admin/cli/cron.php > /dev/null 2>&1


CentOS Linux 6.6 x86 客製化

現在已經很少使用 x86 版本了,連 CentOS 7.x 已都只出 x86_64 的版本,但還是製作一份,以備不時之需!
安裝只要二步驟:
光碟安裝畫面,已取消倒數計時
[@more@]
第一步驟:硬碟分割


第二步驟:設定 root 密碼


共有 649 個套件

安裝完畢!

和之前的 CentOS Linux 6.6 x86_64 客製化一樣,只是安裝介面改成正體中文

這個版本的特點:
1. 套件更新到 2014-10-29
2. 套件更新伺服器改成臺灣
3. 預設啟動 LAMP (Linux + Apache + MySQL + PHP) / vsFTP Server
4. Apache Web Server 增加一些安全性上的設定
    ServerTokens Prod
    ServerSignature Off
5. MySQL Server 修改成 UTF-8 的使用環境
6. PHP 部分的設定,僅列出部份的修改
    時區改成 Asia/Taipei
    upload_max_filesize = 500M
    post_max_size = 500
7. 修改 SELinux 讓 vsFTP Server 能正常使用(SELINUX=enforcing)
8. 每天早上 6 點向 time.stdtime.gov.tw 對時

不過這版本少安裝了 php-mbstring 套件,因為有出現相依性的錯誤訊息
# yum install php-mbstring
Loaded plugins: fastestmirror, security
Setting up Install Process
Loading mirror speeds from cached hostfile
 * base: ftp.jaist.ac.jp
 * extras: ftp.jaist.ac.jp
 * updates: ftp.jaist.ac.jp
Resolving Dependencies
–> Running transaction check
—> Package php-mbstring.i686 0:5.3.3-27.el6_5.2 will be installed
–> Processing Dependency: php-common(x86-32) = 5.3.3-27.el6_5.2 for package: php-mbstring-5.3.3-27.el6_5.2.i686
–> Finished Dependency Resolution
Error: Package: php-mbstring-5.3.3-27.el6_5.2.i686 (updates)
           Requires: php-common(x86-32) = 5.3.3-27.el6_5.2
           Installed: php-common-5.3.3-38.el6.i686 (@anaconda-CentOS-201410241409.i386/6.6)
               php-common(x86-32) = 5.3.3-38.el6
           Available: php-common-5.3.3-26.el6.i686 (base)
               php-common(x86-32) = 5.3.3-26.el6
           Available: php-common-5.3.3-27.el6_5.i686 (updates)
               php-common(x86-32) = 5.3.3-27.el6_5
           Available: php-common-5.3.3-27.el6_5.1.i686 (updates)
               php-common(x86-32) = 5.3.3-27.el6_5.1
           Available: php-common-5.3.3-27.el6_5.2.i686 (updates)
               php-common(x86-32) = 5.3.3-27.el6_5.2
 You could try using –skip-broken to work around the problem
 You could try running: rpm -Va –nofiles –nodigest