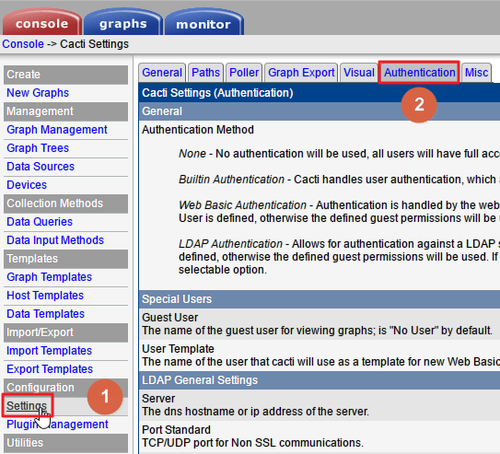
選擇 Console / Setting / Authentication

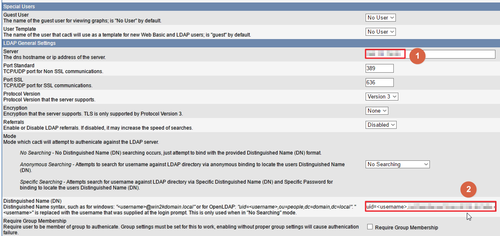
[@more@]改成 LDAP Authentication

LDAP Server IP
Distinguished Name (DN)

Search Base
Search Filter
Search Distingished Name (DN)
Search Password


全新的繁體中文 WordPress 網站《宜蘭部落格教育平台 網站》
參考網頁:
CentOS 7 : Create SSL Certificates : Server World
CentOS 7 : OpenLDAP : LDAP over TLS : Server World
1. 切換目錄
# cd /etc/pki/tls/certs
2. 建立 server.key
# make server.key
umask 77 ;
/usr/bin/openssl genrsa -aes128 2048 > server.key
Generating RSA private key, 2048 bit long modulus
…………….+++
…………………………………………………………+++
e is 65537 (0x10001)
Enter pass phrase:
Verifying – Enter pass phrase:[@more@]
3. 去除密碼從 server.key
# openssl rsa -in server.key -out server.key
Enter pass phrase for server.key:
writing RSA key
4. 建立 server.csr
# make server.csr
umask 77 ;
/usr/bin/openssl req -utf8 -new -key server.key -out server.csr
You are about to be asked to enter information that will be incorporated
into your certificate request.
What you are about to enter is what is called a Distinguished Name or a DN.
There are quite a few fields but you can leave some blank
For some fields there will be a default value,
If you enter ‘.’, the field will be left blank.
—–
Country Name (2 letter code) [TW]:
State or Province Name (full name) [Yilan]:
Locality Name (eg, city) [TouCheng]:
Organization Name (eg, company) [Elementary School]:
Organizational Unit Name (eg, section) [LDAP Server]:
Common Name (eg, your name or your server’s hostname) []:xxxx.tces.ilc.edu.tw
Email Address []:
Please enter the following ‘extra’ attributes
to be sent with your certificate request
A challenge password []:
An optional company name []:
5. 建立馮證
# openssl x509 -in server.csr -out server.crt -req -signkey server.key -days 3650
Signature ok
subject=/C=TW/ST=Yilan/L=TouCheng/O=Elementary School/OU=LDAP Server/CN=xxxx.tces.ilc.edu.tw
Getting Private key
6. 複製檔案到 /etc/openldap/certs 目錄
# cp /etc/pki/tls/certs/server.key /etc/pki/tls/certs/server.crt /etc/pki/tls/certs/ca-bundle.crt /etc/openldap/certs
7. 更改檔案擁有者及群組
# chown ldap:ldap /etc/openldap/certs/server.* /etc/openldap/certs/ca-bundle.crt
8. 建立 mod_ssl.ldif
# cat mod_ssl.ldif
dn: cn=config
changetype: modify
add: olcTLSCACertificateFile
olcTLSCACertificateFile: /etc/openldap/certs/ca-bundle.crt
–
replace: olcTLSCertificateFile
olcTLSCertificateFile: /etc/openldap/certs/server.crt
–
replace: olcTLSCertificateKeyFile
olcTLSCertificateKeyFile: /etc/openldap/certs/server.key
9. 匯入
# ldapmodify -Y EXTERNAL -H ldapi:/// -f mod_ssl.ldif
SASL/EXTERNAL authentication started
SASL username: gidNumber=0+uidNumber=0,cn=peercred,cn=external,cn=auth
SASL SSF: 0
modifying entry “cn=config”
10. 修改 /etc/sysconfig/slapd 加入 ldaps:///
# cp /etc/sysconfig/slapd /etc/sysconfig/slapd.$(date +%F)
# sed -i ‘/SLAPD_URLS/s@ldapi:/// ldap:///@ldapi:/// ldap:/// ldaps:///@’ /etc/sysconfig/slapd
11. 重新啟動 LDAP Server
# systemctl restart slapd.service
12. 檢查是否有正常執行
# netstat -antulp | egrep ‘389|636’
tcp 0 0 0.0.0.0:636 0.0.0.0:* LISTEN 1933/slapd
tcp 0 0 0.0.0.0:389 0.0.0.0:* LISTEN 1933/slapd
tcp6 0 0 :::636 :::* LISTEN 1933/slapd
tcp6 0 0 :::389 :::* LISTEN 1933/slapd
13. 防火牆設定
# firewall-cmd –permanent –add-service=ldap
# firewall-cmd –permanent –add-service=ldaps
# firewall-cmd –reload
或
# iptables -A INPUT -p tcp -s 192.168.1.0/24 –syn -m state –state NEW –dport 389 -j ACCEPT
# iptables -A INPUT -p tcp -s 192.168.1.0/24 –syn -m state –state NEW –dport 636 -j ACCEPT
為了安全的因素,LDAP 可以走 TLS/SSL 加密協定。
參考網頁:
Linux . 無限: 在 CentOS7/RHEL7 上安裝設定 LDAP Server(一)
1. 安裝 openssl 套件
# yum install openssl
2. 修改 /etc/pki/tls/openssl.cnf
# cp /etc/pki/tls/openssl.cnf /etc/pki/tls/openssl.cnf.$(date +%F)
[ req_distinguished_name ]
countryName = Country Name (2 letter code)
countryName_default = TW
countryName_min = 2
countryName_max = 2
stateOrProvinceName = State or Province Name (full name)
stateOrProvinceName_default = Yilan
localityName = Locality Name (eg, city)
localityName_default = TouCheng
0.organizationName = Organization Name (eg, company)
0.organizationName_default = Elementary School
organizationalUnitName = Organizational Unit Name (eg, section)
organizationalUnitName_default = LDAP Server[@more@]
3. 製作金鑰
# openssl req -new -x509 -nodes -out /etc/openldap/certs/cert.pem -keyout /etc/openldap/certs/priv.pem -days 3650
Generating a 2048 bit RSA private key
………+++
……………+++
writing new private key to ‘/etc/openldap/certs/priv.pem’
—–
You are about to be asked to enter information that will be incorporated
into your certificate request.
What you are about to enter is what is called a Distinguished Name or a DN.
There are quite a few fields but you can leave some blank
For some fields there will be a default value,
If you enter ‘.’, the field will be left blank.
—–
Country Name (2 letter code) [TW]:
State or Province Name (full name) [Yilan]:
Locality Name (eg, city) [TouCheng]:
Organization Name (eg, company) [Elementary School]:
Organizational Unit Name (eg, section) [LDAP Server]:
Common Name (eg, your name or your server’s hostname) []:
Email Address []:
4. 改變目錄擁有者及群組和檔案權限
# chown -R ldap:ldap /etc/openldap/certs
# chmod 600 /etc/openldap/certs/priv.pem
# ls -l /etc/openldap/certs/*
-rw-r–r– 1 ldap ldap 65536 Mar 8 17:46 /etc/openldap/certs/cert8.db
-rw-r–r– 1 ldap ldap 1391 Mar 10 14:14 /etc/openldap/certs/cert.pem
-rw-r–r– 1 ldap ldap 16384 Mar 8 17:46 /etc/openldap/certs/key3.db
-r–r—– 1 ldap ldap 45 Dec 7 10:22 /etc/openldap/certs/password
-rw——- 1 ldap ldap 1704 Mar 10 14:14 /etc/openldap/certs/priv.pem
-rw-r–r– 1 ldap ldap 16384 Dec 7 10:22 /etc/openldap/certs/secmod.db
5. 建立 tlsc.ldif
# cat tlsc.ldif
dn: cn=config
changetype: modify
replace: olcTLSCertificateFile
olcTLSCertificateFile: /etc/openldap/certs/cert.pem
dn: cn=config
changetype: modify
replace: olcTLSCertificateKeyFile
olcTLSCertificateKeyFile: /etc/openldap/certs/priv.pem
6. 匯入
# /bin/ldapmodify -Y EXTERNAL -H ldapi:/// -f tlsc.ldif
SASL/EXTERNAL authentication started
SASL username: gidNumber=0+uidNumber=0,cn=peercred,cn=external,cn=auth
SASL SSF: 0
modifying entry “cn=config”
modifying entry “cn=config”
7. 重新啟動 LDAP Server
# systemctl restart slapd.service
似乎沒有成功,嘗試其它方法!
底下的內容參考 PHP 程式: ldapsearch 輸出內容 (LDIF) 轉 UTF-8 編碼 « Jamyy’s Weblog
# 建立 php 的轉換檔
# vim /usr/local/bin/utf8ldif.php
<?php

function fn_output($str) {
if (strpos($str,":: ") > 0) {
//解 Base64 編碼
//當 ldap 欄位名稱後面接的是兩個冒號即表示該欄位內容為 Base64 編碼
$head = substr($str,0,strpos($str," ")-1);
$body = substr($str,strpos($str," ")+1);
$str = $head . " " . base64_decode($body) . "n";
} else if (preg_match('/x5c[A-F0-9][A-F0-9]x5c[A-F0-9][A-F0-9]/',$str)) {
//解 URL 編碼
//URL 編碼出現在註解 (#), ldapsearch -LLL 可取消輸出註解內容
$str = urldecode(str_replace("","%",$str));
}
if (!preg_match('/n$/',$str)) {
//如果處理過後的字串沒有換行符號 (n) 就塞一個給他
$str .= "n";
}
return($str);
}

$line_old = "";
$line_merge = "";
$params = count($argv);
if ($params == 1) {
//未給參數時, 開啟 STDIN 串流
$f = fopen("php://stdin","r");
} else {
//開啟指定檔案
$f = fopen("$argv[1]","r");
}
while (!feof($f)) {
$line = fgets($f);
if (substr($line,0,1) == " ") {
//若該行行首為空白字元, 表示因內容過長而斷行
//以 line_merge 變數合併各段落
if ($line_merge == "") {
$line_merge = trim($line_old) . trim($line);
} else {
$line_merge .= trim($line);
}
} else if ($line_merge > "") {
//輸出合併好的內容
echo fn_output($line_merge);
$line_merge = "";
} else {
//輸出一般內容
echo fn_output($line_old);
}
$line_old = $line;
}
fclose($f);
?>
[@more@]
1. 安裝 php 套件
# yum install php-cli
2. 進行測試
# /usr/bin/ldapsearch -x -b “ou=s0101,ou=student,ou=tces,dc=ilc,dc=edu,dc=tw” uid=s0101129 | php /usr/local/bin/utf8ldif.php
# extended LDIF
#
# LDAPv3
# base <ou=s0101,ou=student,ou=tces,dc=ilc,dc=edu,dc=tw> with scope subtree
# filter: uid=s0101129
# requesting: ALL
#
# s0101129, s0101, student, tces, ilc.edu.tw
dn: uid=s0101129,ou=s0101,ou=student,ou=tces,dc=ilc,dc=edu,dc=tw
uid: s0101129
cn: 五仁25男陳※駿
sn: 五仁25男陳※駿
mail: s0101129@smail.ilc.edu.tw
objectClass: person
objectClass: organizationalPerson
objectClass: inetOrgPerson
objectClass: posixAccount
objectClass: top
objectClass: shadowAccount
shadowMin: 0
shadowMax: 99999
shadowWarning: 7
shadowExpire: 17774
loginShell: /sbin/nologin
uidNumber: 1784
gidNumber: 1075
homeDirectory: /home/s0101/s0101129
# search result
search: 2
result: 0 Success
# numResponses: 2
# numEntries: 1
參考網頁:
Linux . 無限: 在 CentOS7/RHEL7 上安裝設定 LDAP Server(一)
CentOS 7 : OpenLDAP : Configure LDAP Server : Server World
CrashedBboy: CentOS 7 初探 Open LDAP
Install And Configure LDAP Server In CentOS 7 | Unixmen
1. 安裝 LDAP Server
# yum install openldap-servers openldap-clients migrationtools
2. 複製 LDAP 資料庫範例檔
# cp /usr/share/openldap-servers/DB_CONFIG.example /var/lib/ldap/DB_CONFIG
3. 更改擁有者及群組
# chown ldap. /var/lib/ldap/DB_CONFIG
# ls -l /var/lib/ldap/DB_CONFIG
-rw-r–r– 1 ldap ldap 845 Mar 8 17:56 /var/lib/ldap/DB_CONFIG[@more@]
4. 啟動 LDAP Server
# systemctl enable slapd.service
Created symlink from /etc/systemd/system/multi-user.target.wants/slapd.service to /usr/lib/systemd/system/slapd.service.
# systemctl start slapd.service
檢查是否有正常啟動
# systemctl status slapd.service
# ss -nlantu | grep slapd
tcp LISTEN 0 128 *:389 *:* users:((“slapd“,pid=1080,fd=8))
tcp LISTEN 0 128 :::389 :::* users:((“slapd“,pid=1080,fd=9))
5. 設定管理者密碼
# /sbin/slappasswd
New password:
Re-enter new password:
{SSHA}K7FYIrbIkq2jkgJNEvhigiP3hR+CguaD
# vim chrootpw.ldif
# specify the password generated above for “olcRootPW” section
dn: olcDatabase={0}config,cn=config
changetype: modify
add: olcRootPW
olcRootPW: {SSHA}K7FYIrbIkq2jkgJNEvhigiP3hR+CguaD
# /bin/ldapadd -Y EXTERNAL -H ldapi:/// -f chrootpw.ldif
SASL/EXTERNAL authentication started
SASL username: gidNumber=0+uidNumber=0,cn=peercred,cn=external,cn=auth
SASL SSF: 0
modifying entry “olcDatabase={0}config,cn=config”
6. 匯入基本的 schemas
# /bin/ldapadd -Y EXTERNAL -H ldapi:/// -f /etc/openldap/schema/cosine.ldif
SASL/EXTERNAL authentication started
SASL username: gidNumber=0+uidNumber=0,cn=peercred,cn=external,cn=auth
SASL SSF: 0
adding new entry “cn=cosine,cn=schema,cn=config”
# /bin/ldapadd -Y EXTERNAL -H ldapi:/// -D “cn=config” -f /etc/openldap/schema/nis.ldif
SASL/EXTERNAL authentication started
SASL username: gidNumber=0+uidNumber=0,cn=peercred,cn=external,cn=auth
SASL SSF: 0
adding new entry “cn=nis,cn=schema,cn=config”
# /bin/ldapadd -Y EXTERNAL -H ldapi:/// -f /etc/openldap/schema/inetorgperson.ldif
SASL/EXTERNAL authentication started
SASL username: gidNumber=0+uidNumber=0,cn=peercred,cn=external,cn=auth
SASL SSF: 0
adding new entry “cn=inetorgperson,cn=schema,cn=config”
7. 設定 LDAP 資料庫
# cat chdomain.ldif
dn: olcDatabase={2}hdb,cn=config
changetype: modify
replace: olcSuffix
olcSuffix: dc=ilc,dc=edu,dc=tw
dn: olcDatabase={2}hdb,cn=config
changetype: modify
replace: olcRootDN
olcRootDN: cn=Manager,dc=ilc,dc=edu,dc=tw
dn: olcDatabase={2}hdb,cn=config
changetype: modify
replace: olcRootPW
olcRootPW: {SSHA}K7FYIrbIkq2jkgJNEvhigiP3hR+CguaD
dn: cn=config
changetype: modify
replace: olcLogLevel
olcLogLevel: -1
dn: olcDatabase={1}monitor,cn=config
changetype: modify
replace: olcAccess
olcAccess: {0}to * by dn.base=”gidNumber=0+uidNumber=0,cn=peercred,cn=external,cn=auth” read by dn.base=”cn=Manager,dc=ilc,dc=edu,dc=tw” read by * none
dn: olcDatabase={2}hdb,cn=config
changetype: modify
add: olcAccess
olcAccess: {0}to attrs=userPassword,shadowLastChange by
dn=”cn=Manager,dc=srv,dc=world” write by anonymous auth by self write by * none
olcAccess: {1}to dn.base=”” by * read
olcAccess: {2}to * by dn=”cn=Manager,dc=ilc,dc=edu,dc=tw” write by * read
# /bin/ldapmodify -Y EXTERNAL -H ldapi:/// -f chdomain.ldif
SASL/EXTERNAL authentication started
SASL username: gidNumber=0+uidNumber=0,cn=peercred,cn=external,cn=auth
SASL SSF: 0
modifying entry “olcDatabase={2}hdb,cn=config”
modifying entry “olcDatabase={2}hdb,cn=config”
modifying entry “olcDatabase={2}hdb,cn=config”
modifying entry “cn=config”
modifying entry “olcDatabase={1}monitor,cn=config”
modifying entry “olcDatabase={2}hdb,cn=config”
8. 建立所須網域的 LDIF 檔案
# vim base.ldif
dn: dc=ilc,dc=edu,dc=tw
objectClass: top
objectclass: domain
dc: ilc
dn: cn=Manager,dc=ilc,dc=edu,dc=tw
objectClass: organizationalRole
cn: Manager
description: Directory Manager
dn: ou=tces,dc=ilc,dc=edu,dc=tw
objectClass: top
objectClass: organizationalUnit
ou: tces
dn: ou=teacher,ou=tces,dc=ilc,dc=edu,dc=tw
objectClass: top
objectClass: organizationalUnit
ou: teacher
dn: ou=student,ou=tces,dc=ilc,dc=edu,dc=tw
objectClass: top
objectClass: organizationalUnit
ou: student
dn: ou=s0101,ou=student,ou=tces,dc=ilc,dc=edu,dc=tw
objectClass: top
objectClass: organizationalUnit
ou: s0101
# /bin/ldapadd -x -D cn=Manager,dc=ilc,dc=edu,dc=tw -W -f base.ldif
Enter LDAP Password:
adding new entry “dc=ilc,dc=edu,dc=tw”
adding new entry “cn=Manager,dc=ilc,dc=edu,dc=tw”
adding new entry “ou=tces,dc=ilc,dc=edu,dc=tw”
adding new entry “ou=teacher,ou=tces,dc=ilc,dc=edu,dc=tw”
adding new entry “ou=student,ou=tces,dc=ilc,dc=edu,dc=tw”
adding new entry “ou=s0101,ou=student,ou=tces,dc=ilc,dc=edu,dc=tw”
9. 修改 migrationtools 設定檔
# cp /usr/share/migrationtools/migrate_common.ph /usr/share/migrationtools/migrate_common.ph.$(date +%F)
# sed -i ‘/DEFAULT_MAIL_DOMAIN/s/padl.com/ilc.edu.tw/’ /usr/share/migrationtools/migrate_common.ph
# sed -i ‘/DEFAULT_BASE/s/dc=padl,dc=com/dc=ilc,dc=edu,dc=tw/’ /usr/share/migrationtools/migrate_common.ph
# sed -i ‘s/$EXTENDED_SCHEMA = 0;/$EXTENDED_SCHEMA = 1;/’ /usr/share/migrationtools/migrate_common.ph
10. 由 Server 取出所要的資料
# grep ^s0101 /etc/passwd > /root/ldap_users_utf8
# grep ^s0101 /etc/group > /root/ldap_groups
# /bin/piconv -f utf8 -t big5 /root/ldap_users_utf8 > /root/ldap_users_big5
# /usr/share/migrationtools/migrate_passwd.pl /root/ldap_users_big5 > /root/users_big5.ldif
# /usr/share/migrationtools/migrate_group.pl /root/ldap_groups > /root/groups.ldif
# piconv -f big5 -t utf8 /root/users_big5.ldif > /root/users_utf8.ldif
11. 進行匯入
# /bin/ldapadd -x -D cn=Manager,dc=ilc,dc=edu,dc=tw -W -f groups.ldif
# /bin/ldapadd -x -D cn=Manager,dc=ilc,dc=edu,dc=tw -W -f users_utf8.ldif
12. 測試是否可以查詢的到
# /usr/bin/ldapsearch -x -b “ou=s0101,ou=student,ou=tces,dc=ilc,dc=edu,dc=tw” uid=s0101129
13. 防火牆設定
# /bin/firewall-cmd –permanent –add-service=ldap
# /bin/firewall-cmd –reload
或
# iptables -A INPUT -p tcp -s 192.168.1.0/24 –syn -m state –state NEW –dport 389 -j ACCEPT
僅列出與之前不同的地方
1. 安裝 openvpn-auth-ldap 套件
Ubuntu 16.04
# apt-get install openvpn-auth-ldap
CentOS 6.x/7.x
# yum install openvpn-auth-ldap
2. 修改 /etc/openvpn/server.conf
在檔案最後面加入下面的設定
# vim /etc/openvpn/server.conf
client-cert-not-required
username-as-common-name
plugin /usr/lib/openvpn/openvpn-auth-ldap.so /etc/openvpn/auth/auth-ldap.conf
# CentOS 7
plugin /usr/lib64/openvpn/plugin/lib/openvpn-auth-ldap.so /etc/openvpn/auth/ldap.conf
請確認 openvpn-auth-ldap.so 檔的位置[@more@]3. 建立目錄 /etc/openvpn/auth/
# mkdir /etc/openvpn/auth/
4. 建立 /etc/openvpn/auth/auth-ldap.conf 設定檔
# egrep -v ‘^#|^$’ /etc/openvpn/auth/auth-ldap.conf
<LDAP>
# LDAP server URL
#URL ldap://ldap1.example.org
URL ldap://192.168.1.20
# Bind DN (If your LDAP server doesn’t support anonymous binds)
BindDN cn=admin,dc=bpim3,dc=test,dc=org
# Bind Password
# Password SecretPassword
Password 123456
# Network timeout (in seconds)
Timeout 15
# Enable Start TLS
# Follow LDAP Referrals (anonymously)
# TLS CA Certificate File
# TLS CA Certificate Directory
# Client Certificate and key
# If TLS client authentication is required
# Cipher Suite
# The defaults are usually fine here
# TLSCipherSuite ALL:!ADH:@STRENGTH
</LDAP>
<Authorization>
# Base DN
BaseDN “ou=People,dc=example,dc=com”
# User Search Filter
SearchFilter “(&(uid=%u))”
# Require Group Membership
RequireGroup false
# Add non-group members to a PF table (disabled)
#PFTable ips_vpn_users
</Authorization>
5. 檢查 OpenVPN 設定檔是否正確
# openvpn –config /etc/openvpn/server.conf
6. 重新啟動 OpenVPN Server,並檢查是否有正常啟動
# systemctl restart openvpn@server.service;systemctl status openvpn@server.service
7. Client 端設定檔加入
auth-user-pass
參考網站:
Ubuntu Linux 安裝 LDAP Server – G. T. Wang
Ubuntu 設定 LDAP + PAM + NFS 實現多台電腦單一帳號驗證 | Mowd Blog
你的程式我的Code: Ubuntu 15.04 – LDAP 架設
使用Linux建置企業虛擬私有網路SSL VPN(下) – 技術專欄 – 網管人NetAdmin
LDAP Server IP:192.168.1.20
1. 更新套件庫
# apt-get update
2. 安裝 OpenLDAP Server
# apt-get install slapd ldap-utils
設定 LDAP 管理密碼
密碼確認
[@more@]3. 進行詳細的設定
# dpkg-reconfigure slapd
Omit OpenLDAP server configuration? No
DNS domain name:
Organization name?
Administrator password: Admin Password
Confirm password: Admin Password
Do you want the database to be removed when slapd is purged? No
4. 修改 /etc/ldap/ldap.conf 設定檔
# vim /etc/ldap/ldap.conf
BASE dc=bpim3,dc=test,dc=org
URI ldap://192.168.1.20/
5. 建立兩個群組:People 與 Group
# cat /root/ou.ldif
dn: ou=People,dc=bpim3,dc=test,dc=org
ou: People
objectClass: organizationalUnit
dn: ou=Group,dc=bpim3,dc=test,dc=org
ou: Group
objectClass: organizationalUnit
6. 將群組資料加入 LDAP 之中
# systemctl stop slapd
# /usr/sbin/slapadd -c -v -l /root/ou.ldif
# systemctl start slapd
7. 查詢剛建立的群組
# /usr/bin/ldapsearch -x ou=people
# extended LDIF
#
# LDAPv3
# base <dc=bpim3,dc=test,dc=org> (default) with scope subtree
# filter: ou=people
# requesting: ALL
#
# People, example.com
dn: ou=People,dc=bpim3,dc=test,dc=org
ou: People
objectClass: organizationalUnit
# search result
search: 2
result: 0 Success
# numResponses: 2
# numEntries: 1
8. 建立使用者資料 user.ldif
# cat /root/user.ldif
dn: cn=test001,ou=group,dc=bpim3,dc=test,dc=org
cn: test001
gidNumber: 1002
objectClass: top
objectClass: posixGroup
dn: uid=test001,ou=people,dc=bpim3,dc=test,dc=org
uid: test001
uidNumber: 1002
gidNumber: 1002
cn: test001
sn: LDAP
objectClass: top
objectClass: person
objectClass: posixAccount
objectClass: shadowAccount
loginShell: /bin/false
homeDirectory: /home/test001
dn: cn=test002,ou=group,dc=bpim3,dc=test,dc=org
cn: test002
gidNumber: 1003
objectClass: top
objectClass: posixGroup
dn: uid=test002,ou=people,dc=bpim3,dc=test,dc=org
uid: test002
uidNumber: 1003
gidNumber: 1003
cn: test002
sn: LDAP
objectClass: top
objectClass: person
objectClass: posixAccount
objectClass: shadowAccount
loginShell: /bin/false
homeDirectory: /home/test002
9. 匯入使用者資料
# /usr/bin/ldapadd -c -x -D cn=admin,dc=bpim3,dc=test,dc=org -W -f user.ldif
Enter LDAP Password: Admin Password
adding new entry “cn=test001,ou=group,dc=bpim3,dc=test,dc=org”
adding new entry “uid=test001,ou=people,dc=bpim3,dc=test,dc=org”
10. 設定使用者密碼
# /usr/bin/ldappasswd -x -D cn=admin,dc=bpim3,dc=test,dc=org -W -S uid=test001,ou=people,dc=bpim3,dc=test,dc=org
New password: New User Password
Re-enter new password: New User Password
Enter LDAP Password: Admin Password
Result: Success (0)
# /usr/bin/ldappasswd -x -D cn=admin,dc=bpim3,dc=test,dc=org -W -S uid=test002,ou=people,dc=bpim3,dc=test,dc=org
11. 查詢新增的使用者
# /usr/bin/ldapsearch -x uid=test001
# extended LDIF
#
# LDAPv3
# base <dc=bpim3,dc=test,dc=org> (default) with scope subtree
# filter: uid=test001
# requesting: ALL
#
# test001, People, example.com
dn: uid=test001,ou=People,dc=bpim3,dc=test,dc=org
uid: test001
uidNumber: 1002
gidNumber: 1002
cn: test001
sn: LDAP
objectClass: top
objectClass: person
objectClass: posixAccount
objectClass: shadowAccount
loginShell: /bin/false
homeDirectory: /home/test001
# search result
search: 2
result: 0 Success
# numResponses: 2
# numEntries: 1
參考網頁:
LDAP/OpenLDAPSetup – Debian Wiki
Debian 7.0 Wheezy – Configure LDAP Server : Server World
1. 安裝 Open LDAP Server
# apt-get install slapd ldap-utils
[@more@]2. 設定管理者密碼
資料庫存放位置
/var/lib/ldap
設定檔位置
/etc/dap
cp /usr/share/slapd/slapd.conf /etc/ldap
修改設定檔
# vim /etc/ldap/slapd.conf
Lightweight Directory Access Protocol (LDAP) | Drupal.org
https://www.drupal.org/project/ldap
# wget -P /var/www/html http://ftp.drupal.org/files/projects/ldap-7.x-2.0-beta8.tar.gz
# tar xvzf /var/www/html/ldap-7.x-2.0-beta8.tar.gz -C /var/www/html/drupal/sites/all/modules
ctools 7.x-1.4 | Drupal.org
https://www.drupal.org/node/2194551
# wget -P /var/www/html http://ftp.drupal.org/files/projects/ctools-7.x-1.4.tar.gz
# tar xvzf /var/www/html/ctools-7.x-1.4.tar.gz -C /var/www/html/drupal/sites/all/modules/
entity 7.x-1.5 | Drupal.org
https://www.drupal.org/node/2236077
# wget -P /var/www/html http://ftp.drupal.org/files/projects/entity-7.x-1.5.tar.gz
# tar xvzf /var/www/html/entity-7.x-1.5.tar.gz -C /var/www/html/drupal/sites/all/modules/
Feeds | Drupal.org
https://www.drupal.org/project/feeds
# wget -P /var/www/html http://ftp.drupal.org/files/projects/feeds-7.x-2.0-alpha8.tar.gz
# tar xvzf /var/www/html/feeds-7.x-2.0-alpha8.tar.gz -C /var/www/html/drupal/sites/all/modules
job_scheduler 7.x-2.0-alpha3 | Drupal.org
https://www.drupal.org/node/1566814
# wget -P /var/www/html http://ftp.drupal.org/files/projects/job_scheduler-7.x-2.0-alpha3.tar.gz
# tar xvzf /var/www/html/job_scheduler-7.x-2.0-alpha3.tar.gz -C /var/www/html/drupal/sites/all/modules
Organic groups | Drupal.org
https://www.drupal.org/project/og
# wget -P /var/www/html http://ftp.drupal.org/files/projects/og-7.x-2.7.tar.gz
# tar xvzf /var/www/html/og-7.x-2.7.tar.gz -C /var/www/html/drupal/sites/all/modules
entityreference 7.x-1.1 | Drupal.org
https://www.drupal.org/node/2140229
# wget -P /var/www/html http://ftp.drupal.org/files/projects/entityreference-7.x-1.1.tar.gz
# tar xvzf /var/www/html/entityreference-7.x-1.1.tar.gz -C /var/www/html/drupal/sites/all/modules
參考網頁:
wordpress 和 LDAP 的結合(TLS) | 資訊雜記
安裝 php-ldap
# pacman -S php-ldap
開啟 php ldap 功能
# sed -i ‘s/;extension=ldap.so/extension=ldap.so/’ /etc/php/php.ini
重新啟動 php-fpm
# systemctl restart php-fpm[@more@]下載 WordPress LDAP 外掛程式
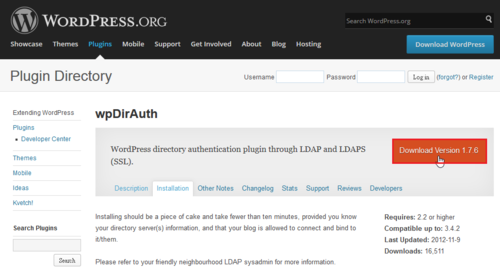
wpDirAuth:https://wordpress.org/plugins/wpdirauth/installation/
下載 wpDirAuth
# wget https://downloads.wordpress.org/plugin/wpdirauth.1.7.6.zip
解壓縮到 /srv/http/wordpress/wp-content/plugins 目錄
# unzip wpdirauth.1.7.6.zip -d /srv/http/wordpress/wp-content/plugins
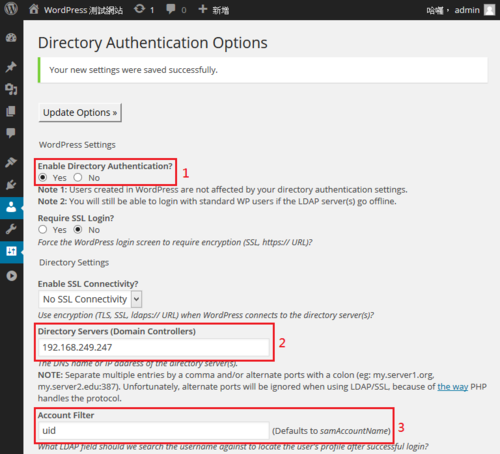
做以下的設定
1. Enable Directory Authentication?
2. Directory Servers (Domain Controllers)
3. Account Filter 