參考網頁:
以esxi5 command line方式啟動VM | 資訊組
VMWare ESX/ESXi CLI模式常用指令 | Tonyhack
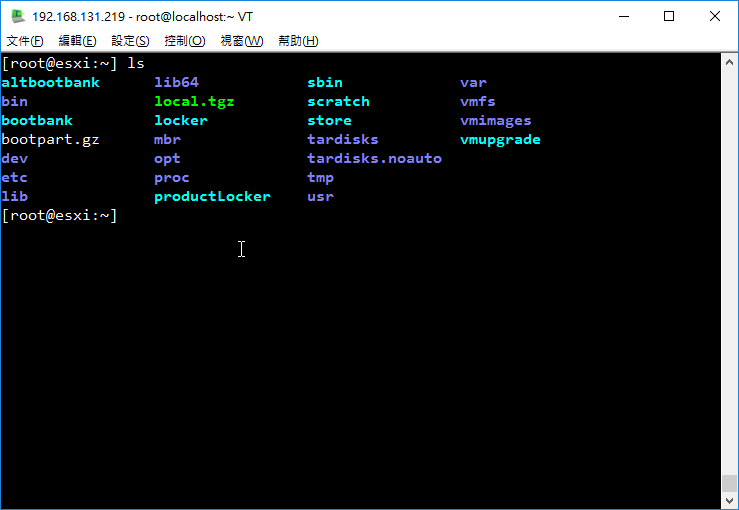
[root@esxi:~] esxcli storage nfs list
Volume Name Host Share Accessible Mounted Read-Only isPE Hardware Acceleration
———– ———— ———————————- ———- ——- ——— —– ———————
SynologyNAS 192.168.131.4 /volume1/homes/test/Server/esxi true true false false Not Supported
[root@localhost ~]# esxcli –server 192.168.131.234 storage nfs list
Connect to 192.168.131.4 failed. Server SHA-1 thumbprint: 8D:82:C4:77:31:18:C0:F7:21:B7:35:87:DA:F8:4C:F9:26:F9:9C:44 (not trusted).
[root@localhost ~]# esxcli –server 192.168.131.234 –thumbprint 8D:82:C4:77:31:18:C0:F7:21:B7:35:87:DA:F8:4C:F9:26:F9:9C:44 storage nfs list
Volume Name Host Share Accessible Mounted Read-Only isPE Hardware Acceleration
———– ———— ———————————- ———- ——- ——— —– ———————
SynologyNAS 192.168.131.4 /volume1/homes/test/Server/esxi true true false false Not Supported [@more@]
[root@esxi:~] esxcli storage filesystem list
[root@localhost ~]# esxcli –server 192.168.131.234 –thumbprint 8D:82:C4:77:31:18:C0:F7:21:B7:35:87:DA:F8:4C:F9:26:F9:9C:44 storage filesystem list
Mount Point Volume Name UUID Mounted Type Size Free
————————————————- ———– ———————————– ——- —— ————- ————-
/vmfs/volumes/75b5d24a-74d26ae7 SynologyNAS 75b5d24a-74d26ae7 true NFS 5892709236736 2628361314304
/vmfs/volumes/58cf7115-fa3ce98b-c6a7-ac220b89c4ca datastore1 58cf7115-fa3ce98b-c6a7-ac220b89c4ca true VMFS-5 119990648832 118971432960
/vmfs/volumes/58cf7810-bde83e8a-457c-ac220b89c4ca ST500G 58cf7810-bde83e8a-457c-ac220b89c4ca true VMFS-5 499826819072 372961705984
/vmfs/volumes/58cf7105-aa6028b9-3b61-ac220b89c4ca 58cf7105-aa6028b9-3b61-ac220b89c4ca true vfat 299712512 83927040
/vmfs/volumes/58cf7115-1fb5970a-817d-ac220b89c4ca 58cf7115-1fb5970a-817d-ac220b89c4ca true vfat 4293591040 4278255616
/vmfs/volumes/01e19870-f6a57a2a-ef43-8a0ec55b7d60 01e19870-f6a57a2a-ef43-8a0ec55b7d60 true vfat 261853184 261844992
/vmfs/volumes/4f70f378-d547f85f-a7d0-bb87da3f428b 4f70f378-d547f85f-a7d0-bb87da3f428b true vfat 261853184 111271936
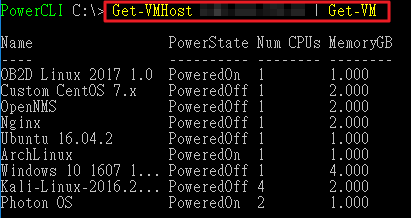
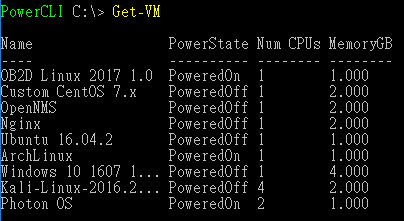
列出目前有開機的 VM
[root@localhost ~]# esxcli –server 192.168.131.234 –thumbprint 8D:82:C4:77:31:18:C0:F7:21:B7:35:87:DA:F8:4C:F9:26:F9:9C:44 vm process list
[root@esxi:~] esxcli vm process list
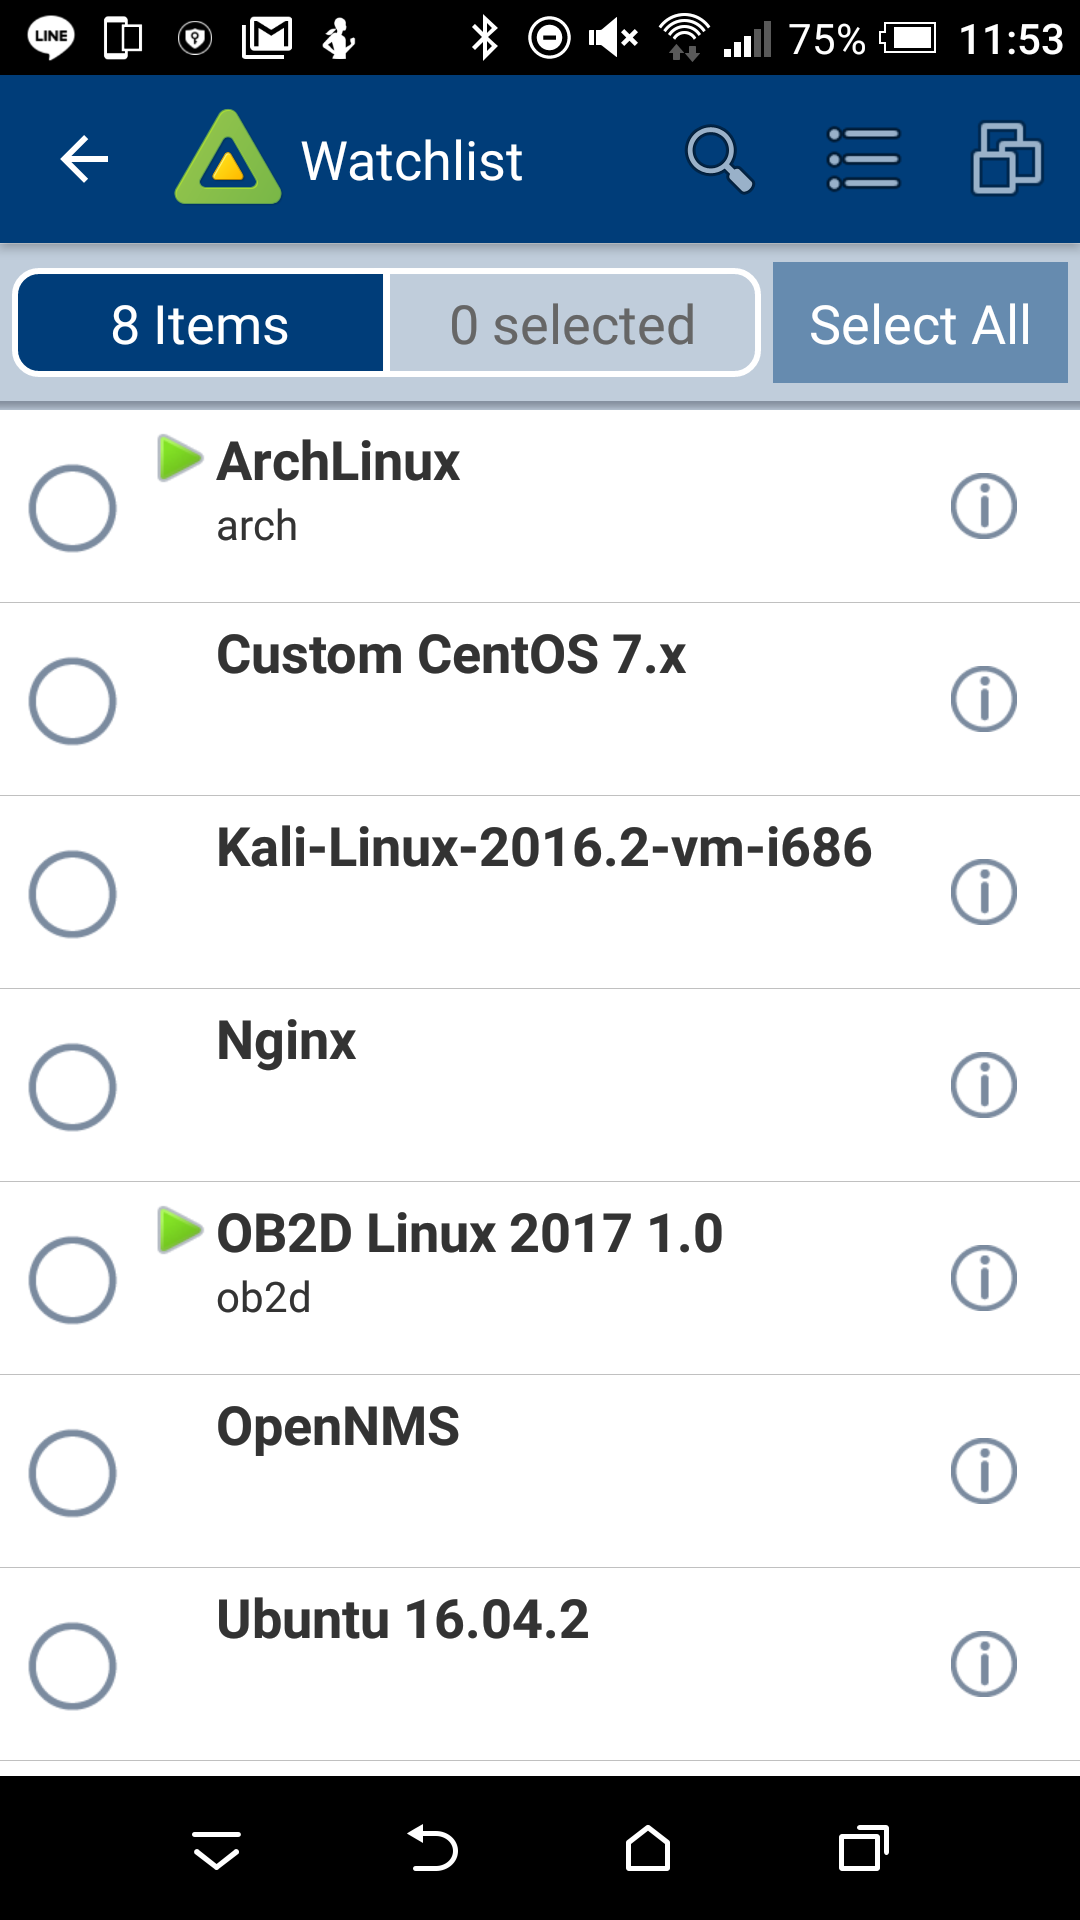
ArchLinux
World ID: 170247
Process ID: 0
VMX Cartel ID: 170246
UUID: 56 4d ee c4 34 b0 7b 76-5b 7a 64 fc a1 02 b8 97
Display Name: ArchLinux
Config File: /vmfs/volumes/58cf7810-bde83e8a-457c-ac220b89c4ca/ArchLinux/ArchLinux.vmx
OB2D Linux 2017 1.0
World ID: 170391
Process ID: 0
VMX Cartel ID: 170390
UUID: 56 4d ff d9 24 d7 09 68-60 03 51 55 23 d1 f8 42
Display Name: OB2D Linux 2017 1.0
Config File: /vmfs/volumes/58cf7810-bde83e8a-457c-ac220b89c4ca/ob2d/ob2d.vmx
關閉某一台 VM
esxcli vm process kill –tyep=[soft,hard,force] –world-id=World ID
[root@localhost ~]# esxcli –server 192.168.131.234 –thumbprint 8D:82:C4:77:31:18:C0:F7:21:B7:35:87:DA:F8:4C:F9:26:F9:9C:44 vm process kill –type=soft –world-id=170391
[root@esxi:~] esxcli vm process kill –type=soft –world-id=170391
列出 ESXi Server 上的 VM 資訊
[root@esxi:~] vim-cmd vmsvc/getallvms
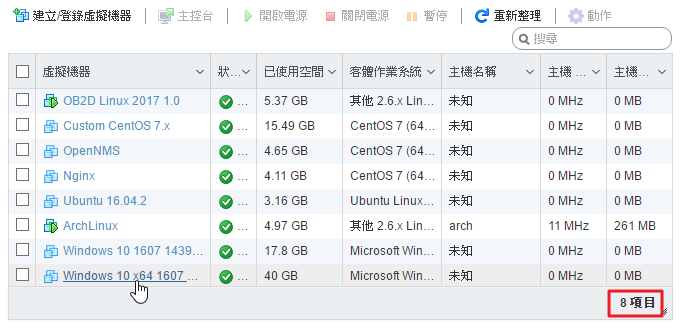
Vmid Name File Guest OS Version Annotation
1 OB2D Linux 2017 1.0 [ST500G] ob2d/ob2d.vmx other26xLinux64Guest vmx-13
2 Custom CentOS 7.x [ST500G] Custom CentOS 7.x/Custom CentOS 7.x.vmx centos7_64Guest vmx-13
21 OpenNMS [ST500G] OpenNMS/OpenNMS.vmx centos7_64Guest vmx-13
22 Nginx [ST500G] Nginx/Nginx.vmx centos7_64Guest vmx-13
24 Ubuntu 16.04.2 [ST500G] Ubuntu 16.04.2/Ubuntu 16.04.2.vmx ubuntu64Guest vmx-13
25 ArchLinux [ST500G] ArchLinux/ArchLinux.vmx other26xLinux64Guest vmx-13
26 Windows 10 1607 14393.969 [ST500G] Windows 10 1607 14393.969/Windows 10 1607 14393.969.vmx windows9_64Guest vmx-13
28 Windows 10 x64 1607 Build 14393.0 [ST500G] Windows 10 x64 1607 Build 14393.0/Windows 10 x64 1607 Build 14393.0.vmx windows9_64Guest vmx-12
開啟 OB2D Linux 2017 1.0
# vim-cmd vmsvc/power.on 1
Powering on VM:
[root@esxi:~] vim-cmd /vmsvc/power.getstate 1
Retrieved runtime info
Powered on
關閉 OB2D Linux 2017 1.0
[root@esxi:~] vim-cmd vmsvc/power.off 1
Powering off VM:
重新啟動 OB2D Linux 2017 1.0
[root@esxi:~] vim-cmd vmsvc/power.reboot 1
進入維護模式
[root@localhost ~]# esxcli –server 192.168.131.234 system maintenanceMode set –enable true
Connect to 192.168.131.234 failed. Server SHA-1 thumbprint: 8D:82:C4:77:31:18:C0:F7:21:B7:35:87:DA:F8:4C:F9:26:F9:9C:44 (not trusted).
[root@localhost ~]# esxcli –server 192.168.131.234 –thumbprint 8D:82:C4:77:31:18:C0:F7:21:B7:35:87:DA:F8:4C:F9:26:F9:9C:44 system maintenanceMode set –enable true
Enter username: root
Enter password:
[root@esxi:~] esxcli system maintenanceMode set –enable true
[root@localhost ~]# vicfg-hostops –server 192.168.131.234 –operation enter
Enter username: root
Enter password:
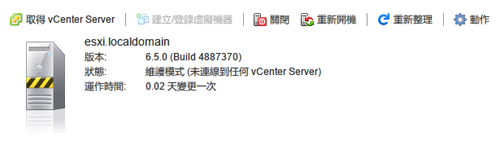
Host esxi.localdomain entered into maintenance mode successfully.
[root@esxi:~] vim-cmd hostsvc/maintenance_mode_enter
退出維護模式
[root@localhost ~]# esxcli –server 192.168.131.234 –thumbprint 8D:82:C4:77:31:18:C0:F7:21:B7:35:87:DA:F8:4C:F9:26:F9:9C:44 system maintenanceMode set –enable false
Enter username: root
Enter password:
[root@esxi:~] esxcli system maintenanceMode set –enable false
[root@localhost ~]# vicfg-hostops –server 192.168.131.234 –operation exit
Enter username: root
Enter password:
Host esxi.localdomain exited from maintenance mode successfully.
[root@esxi:~] vim-cmd hostsvc/maintenance_mode_exit

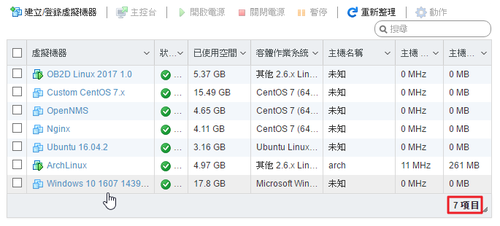
將特定 vmid 的 vm 自磁碟中刪除,不會做任何確認,請小心使用
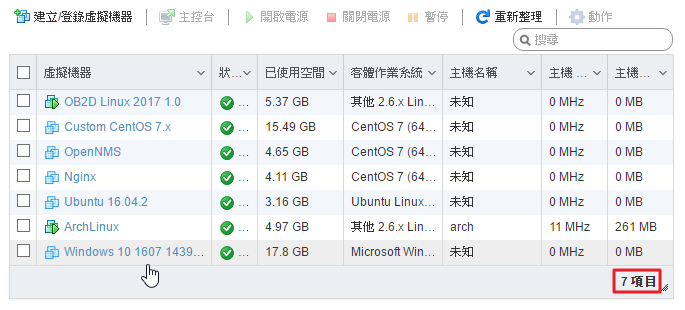
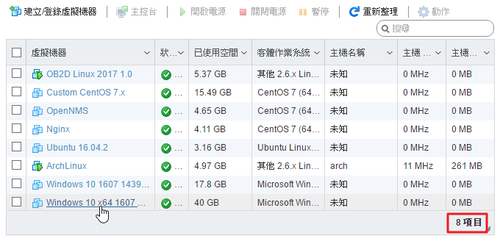
原本有 8 台 VM
[root@esxi:~] vim-cmd vmsvc/destroy 28
刪除後剩下 7 台
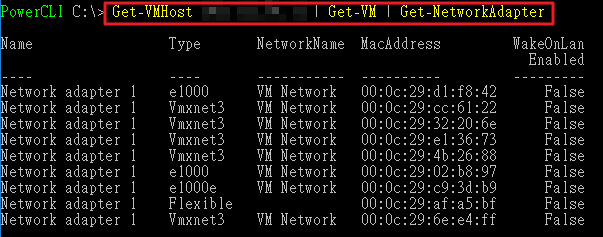
列出 ESXi Server 網路相關資訊
[root@esxi:~] vim-cmd hostsvc/net/info
[root@esxi:~] esxcli network ip interface ipv4 address list
Name IPv4 Address IPv4 Netmask IPv4 Broadcast Address Type Gateway DHCP DNS
—- ————- ————- ————– ———— ————– ——–
vmk0 192.168.131.234 255.255.255.0 192.168.131.255 STATIC 192.168.131.254 false
[root@esxi:~] esxcli network ip interface ipv6 address list
Interface Address Netmask Type Status
——— ———————— ——- —— ———
vmk0 fe80::ae22:bff:fe89:c4ca 64 STATIC PREFERRED
vmk0 2001:288:a229:4::234 64 STATIC PREFERRED
[root@esxi:~] esxcli network ip interface ipv4 get
Name IPv4 Address IPv4 Netmask IPv4 Broadcast Address Type Gateway DHCP DNS
—- ————- ————- ————– ———— ————– ——–
vmk0 192.168.131.234 255.255.255.0 192.168.131.255 STATIC 192.168.131.254 false
[root@esxi:~] esxcli network ip interface ipv6 get
Name IPV6 Enabled DHCPv6 Enabled Router Adv Enabled DHCP DNS Gateway
—- ———— ————– —————— ——– ———————
vmk0 true false false false 2001:288:a229:1::ffff
[root@esxi:~] esxcli network vm list
World ID Name Num Ports Networks
——– ———————– ——— ———-
75113 Windows_10_1607_14393.0 1 VM Network
74293 OB2D_Linux_2017_1.0 1 VM Network
67872 ArchLinux 1 VM Network
[root@esxi:~] esxcli network vm port list -w 74293
Port ID: 33554439
vSwitch: vSwitch0
Portgroup: VM Network
DVPort ID:
MAC Address: 00:0c:29:d1:f8:42
IP Address: 0.0.0.0
Team Uplink: vmnic0
Uplink Port ID: 33554434
Active Filters:
[root@esxi:~] esxcli network port stats get -p 33554434
Packet statistics for port 33554434
Packets received: 1426447
Packets sent: 106420
Bytes received: 465858786
Bytes sent: 25293372
Broadcast packets received: 684895
Broadcast packets sent: 91
Multicast packets received: 591189
Multicast packets sent: 302
Unicast packets received: 150363
Unicast packets sent: 106027
Receive packets dropped: 0
Transmit packets dropped: 13
[root@localhost ~]# esxcli –server 192.168.131.234 –thumbprint 8D:82:C4:77:31:18:C0:F7:21:B7:35:87:DA:F8:4C:F9:26:F9:9C:44 system module list
Enter username: root
Enter password:
Name Is Loaded Is Enabled
—————————– ——— ———-
vmkernel true true
chardevs true true
user true true
crypto true true
vsanapi true true
vsanbase true true
vprobe true true
vmkapi_mgmt true true
procfs true true
vmkapi_v2_2_0_0_mgmt_shim true true
vmkapi_v2_3_0_0_mgmt_shim true true
vmkapi_v2_1_0_0_vmkernel_shim true true
iodm true true
vmkapi_v2_3_0_0_vmkernel_shim true true
vmkapi_v2_2_0_0_vmkernel_shim true true
vmkata true true
iscsi_trans true true
iscsi_trans_compat_shim true true
vmkapi_v2_3_0_0_vmklinux_shim true true
vmkplexer true true
vmklinux_9 true true
vmkusb true true
vmkapi_v2_2_0_0_iscsiInc_shim true true
vmkapi_v2_3_0_0_iscsiInc_shim true true
etherswitch true true
netsched_fifo true true
netsched_hclk true true
netioc true true
vmklinux_9_2_3_0 true true
cnic_register true true
e1000 true true
dm true true
nmp true true
vmw_satp_local true true
vmw_satp_default_aa true true
vmw_psp_lib true true
vmw_psp_fixed true true
vmw_psp_rr true true
vmw_psp_mru true true
healthchk true true
teamcheck true true
vlanmtucheck true true
heartbeat true true
shaper true true
lldp true true
cdp true true
ipfix true true
tcpip4 true true
dvsdev true true
vmci true true
dvfilter true true
lacp true true
vmkapi_v2_3_0_0_dvfilter_shim true true
vmkapi_v2_1_0_0_dvfilter_shim true true
vmkapi_v2_2_0_0_dvfilter_shim true true
mptspi true true
esxfw true true
dvfilter-generic-fastpath true true
vmkibft true true
gss true true
lvmdriver true true
deltadisk true true
vdfm true true
sunrpc true true
vmfs3 true true
ufs true true
vfat true true
vmklink_mpi true true
swapobj true true
nfsclient true true
nfs41client true true
vflash true true
procMisc true true
nrdma true true
nrdma_vmkapi_shim true true
vmkapi_v2_3_0_0_rdma_shim true true
vmkapi_v2_2_0_0_nmp_shim true true
vmkapi_v2_1_0_0_nmp_shim true true
vmkapi_v2_3_0_0_nmp_shim true true
vmkapi_v2_2_0_0_iscsi_shim true true
vmkapi_v2_1_0_0_iscsi_shim true true
vmkapi_v2_3_0_0_iscsi_shim true true
hbr_filter true true
ftcpt true true
vrdma true true
filtmod true true
svmmirror true true
cbt true true
migrate true true
vfc true true
balloonVMCI true true
qfle3 false false
qflge false false
ixgben false false
[root@localhost ~]# esxcli –server 192.168.131.234 –thumbprint 8D:82:C4:77:31:18:C0:F7:21:B7:35:87:DA:F8:4C:F9:26:F9:9C:44 system module list –enabled=true
[root@localhost ~]# esxcli –server 192.168.131.234 –thumbprint 8D:82:C4:77:31:18:C0:F7:21:B7:35:87:DA:F8:4C:F9:26:F9:9C:44 system module list –enabled=true
[root@localhost ~]# esxcli –server 192.168.131.234 –thumbprint 8D:82:C4:77:31:18:C0:F7:21:B7:35:87:DA:F8:4C:F9:26:F9:9C:44 system module list –loaded=true
[root@localhost ~]# vicfg-module –server 192.168.131.234 –list
[root@localhost ~]# esxcli –server 192.168.131.234 –thumbprint 8D:82:C4:77:31:18:C0:F7:21:B7:35:87:DA:F8:4C:F9:26:F9:9C:44 system module set –module=module_name –enabled=true
防火牆
[root@esxi:~] esxcli network firewall get
Default Action: DROP
Enabled: true
Loaded: true
[root@esxi:~] esxcli network firewall ruleset list –ruleset-id sshServer
Name Enabled
——— ——-
sshServer true
[root@esxi:~] esxcli network firewall ruleset allowedip add –ruleset-id sshServer –ipaddress 192.168.131.1.0/24
[root@esxi:~] esxcli network firewall ruleset allowedip add –ruleset-id sshServer –ipaddress 192.168.1.10
列出 SSH Server Firewall Rule
[root@esxi:~] esxcli network firewall ruleset allowedip list –ruleset-id sshServer
Ruleset Allowed IP Addresses
——— ——————–
sshServer 192.168.1.10, 192.168.131.0/24
磁碟資訊
[root@esxi:~] esxcli system coredump partition list
Name Path Active Configured
————————————————————————– ———————————————————————————————- —— ———-
t10.ATA_____TS128GSSD370S___________________________C981072070__________:7 /vmfs/devices/disks/t10.ATA_____TS128GSSD370S___________________________C981072070__________:7 false false
t10.ATA_____TS128GSSD370S___________________________C981072070__________:9 /vmfs/devices/disks/t10.ATA_____TS128GSSD370S___________________________C981072070__________:9 true true
SNMP 相關資訊
[root@esxi:~] esxcli system snmp get
Authentication:
Communities: public
Enable: true
Engineid: 00000063000000a100000000
Hwsrc: indications
Largestorage: true
Loglevel: info
Notraps:
Port: 161
Privacy:
Remoteusers:
Syscontact:
Syslocation:
Targets:
Users:
V3targets:
[root@localhost ~]# esxcli –server 192.168.131.234 –thumbprint 8D:82:C4:77:31:18:C0:F7:21:B7:35:87:DA:F8:4C:F9:26:F9:9C:44 system snmp get
Enter username: root
Enter password:
Authentication:
Communities:
Enable: false
Engineid: 00000063000000a100000000
Hwsrc: indications
Largestorage: true
Loglevel: info
Notraps:
Port: 161
Privacy:
Remoteusers:
Syscontact:
Syslocation:
Targets:
Users:
V3targets:
[root@localhost ~]# vicfg-snmp –server 192.168.131.234 –show
Enter username: root
Enter password:
Current SNMP agent settings:
Enabled : 0
UDP port : 161
Communities :
Notification targets :
Options :
EnvEventSource=indications
engineid=00000063000000a100000000
loglevel=info
啟動 SNMP 服務
[root@localhost ~]# esxcli –server 192.168.131.234 –thumbprint 8D:82:C4:77:31:18:C0:F7:21:B7:35:87:DA:F8:4C:F9:26:F9:9C:44 system snmp set –enable=yes
Enter username: root
Enter password
[root@localhost ~]# esxcli –server 192.168.131.234 –thumbprint 8D:82:C4:77:31:18:C0:F7:21:B7:35:87:DA:F8:4C:F9:26:F9:9C:44 system snmp get
Enter username: root
Enter password:
Authentication:
Communities:
Enable: true
Engineid: 00000063000000a100000000
Hwsrc: indications
Largestorage: true
Loglevel: info
Notraps:
Port: 161
Privacy:
Remoteusers:
Syscontact:
Syslocation:
Targets:
Users:
V3targets
[root@localhost ~]# vicfg-snmp –server 192.168.131.234 –show
Enter username: root
Enter password:
Current SNMP agent settings:
Enabled : 1
UDP port : 161
Communities :
Notification targets :
Options :
EnvEventSource=indications
engineid=00000063000000a100000000
loglevel=info
[root@localhost ~]# esxcli –server 192.168.131.234 –thumbprint 8D:82:C4:77:31:18:C0:F7:21:B7:35:87:DA:F8:4C:F9:26:F9:9C:44 system snmp set –enable=no
Enter username: root
Enter password:
列出網路卡資訊
[root@esxi:~] esxcfg-nics -l
Name PCI Driver Link Speed Duplex MAC Address MTU Description
vmnic0 0000:00:19.0 ne1000 Up 1000Mbps Full ac:22:0a:80:c4:ca 1500 Intel Corporation 82579V Gigabit Network Connection
[root@localhost ~]# vicfg-nics –server 192.168.131.234 -l
Enter username: root
Enter password:
Name PCI Driver Link Speed Duplex MAC Address MTU Description
vmnic0 0000:02:01.0 e1000 Up 1000Mbps Full ac:22:0a:80:c4:ca 1500 Intel Corporation 82545EM Gigabit Ethernet Controller (Copper)
相當於 Linux 上的 top
[root@esxi:~] esxtop
列出開機時啟動的服務
[root@esxi:~] chkconfig -l