利用 arp-scan 來查詢區域網路的 IP 和 Mac address

在 Ubuntu 14.04 LTS Server 上安裝 arp-scan 工具
# apt-get install arp-scan

在 CentOS 6.x 上安裝
# yum install arp-scan –enablerepo=epel

利用 arp-scan 進行偵測
# arp-scan –localnet
Interface: eth0, datalink type: EN10MB (Ethernet)
Starting arp-scan 1.8.1 with 256 hosts (http://www.nta-monitor.com/tools/arp-scan/)
192.168.1.2     ac:22:0b:50:49:ea       (Unknown)
192.168.1.5     00:1d:7d:c5:2f:d3       GIGA-BYTE TECHNOLOGY CO.,LTD.
192.168.1.100   00:11:23:0c:da:e2       Synology Incorporated
192.168.1.101   28:cf:e9:80:0c:76       (Unknown)
192.168.1.112   00:0c:29:ac:47:64       VMware, Inc.
192.168.1.254   50:67:fa:19:cf:a4       ZyXEL Communications Corporation

9 packets received by filter, 0 packets dropped by kernel
Ending arp-scan 1.8.1: 256 hosts scanned in 2.316 seconds (110.54 hosts/sec). 7 responded[@more@]利用 sed / egrep 來過濾一些不要的資料,和使用 awk 來取得所要的資料
# arp-scan –localnet | sed -n ‘/Starting/,/^$/p’ | egrep -v ‘(Starting|^$)’ | awk ‘{print $1,$2}’
192.168.1.2 ac:22:0b:50:49:ea
192.168.1.5 00:1d:7d:c5:2f:d3
192.168.1.100 00:11:23:0c:da:e2
192.168.1.101 28:cf:e9:80:0c:76
192.168.1.112 00:0c:29:ac:47:64
192.168.1.254 50:67:fa:19:cf:a4

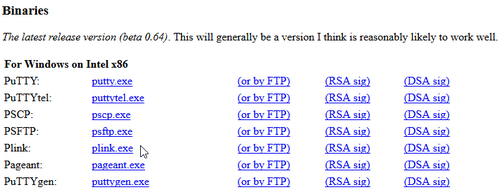
Windows 版本的 putty 工具程式

如果不習慣在 Linux 下操作 putty-tools 工具,也可以使用 Windows 的版本。

下載網頁:http://www.chiark.greenend.org.uk/~sgtatham/putty/download.html[@more@]這裡我只下載 PSCP 和 Plink 這二個程式
使用的參數應該與 Linux 版本相同

1. 連線到遠端的 Windows 主機
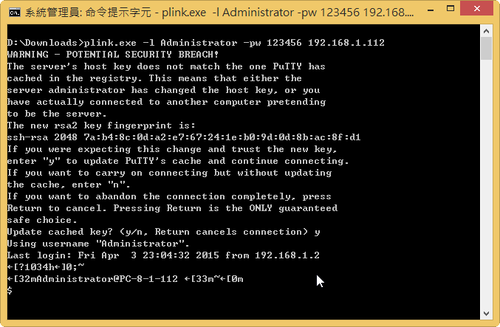
d:>plink.exe -l Administrator -pw 123456 192.168.1.112

2. 關閉遠端 Windows 主機
d:>echo y | plink.exe -l Administrator -pw 123456 192.168.1.112 “shutdown -s -t 0”

3. 遠端 Windows 主機重新啟動
d:>echo y | plink.exe -l Administrator -pw 123456 192.168.1.112 “shutdown -r -t 0”

4. 自動安裝遠端 Windows 主機 Administrator 使用者桌面上的 PotPlayer
d:>echo y | plink -pw 123456 Administrator@192.168.1.112 “/cygdrive/c/Users/Administrator/Desktop/PotPlayerSetup64.exe /S”

5. 複製檔案到遠端 Windows 主機 Administrator 使用者桌面上
d:>echo -y | pscp -pw 123456  PotPlayerSetup64.exe Administrator@192.168.1.112:/cygdrive/c/Users/Administrator/Desktop

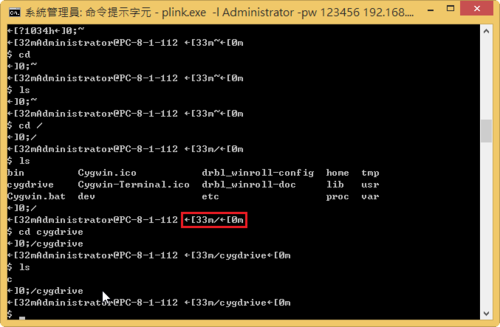
不過使用 plink 連線到遠端 Windows 主機時,會有一些奇怪的控制碼顯示在上面,雖然不影響連線,但看起來總是有些礙眼

使用 putty-tools 工具中的 pscp 來管理電腦教室

pscp 可以將檔案複製到 Windows 的主機,功能類似 Linux  的 scp。
pscp 使用參數
# /usr/bin/pscp
PuTTY Secure Copy client
Unidentified build, Mar 14 2015 13:36:11
Usage: pscp [options] [user@]host:source target
       pscp [options] source [source…] [user@]host:target
       pscp [options] -ls [user@]host:filespec
Options:
  -V        print version information and exit
  -pgpfp    print PGP key fingerprints and exit
  -p        preserve file attributes
  -q        quiet, don’t show statistics
  -r        copy directories recursively
  -v        show verbose messages
  -load sessname  Load settings from saved session
  -P port   connect to specified port
  -l user   connect with specified username
  -pw passw login with specified password
  -1 -2     force use of particular SSH protocol version
  -4 -6     force use of IPv4 or IPv6
  -C        enable compression
  -i key    private key file for authentication
  -noagent  disable use of Pageant
  -agent    enable use of Pageant
  -batch    disable all interactive prompts
  -unsafe   allow server-side wildcards (DANGEROUS)
  -sftp     force use of SFTP protocol
  -scp      force use of SCP protocol[@more@]常用的參數
  -q        quiet, don’t show statistics  安靜模式
  -r        copy directories recursively  遞迴模式,複製時包含子目錄
  -l user   connect with specified username  登入的使用者
  -pw passw login with specified password   使用者的密碼

底下列出幾個實例
將 PotPlayerSetup64.exe 檔案複製到 Administrator 使用者的桌面
# echo -y | pscp -pw 123456  PotPlayerSetup64.exe Administrator@192.168.1.112:/cygdrive/c/Users/Administrator/Desktop

不顯示檔案傳輸時的訊息
# echo -y | pscp -pw 123456  -q CentOS-Server-6.5-x86_64_20140917.iso Administrator@192.168.1.112:/cygdrive/c/Users/Administrator/Desktop

複製時包含子目錄
# echo -y | pscp -pw 123456 -r noip-2.1.9-1 Administrator@192.168.1.112:/cygdrive/c/Users/Administrator/Desktop
noip2                     | 70 kB |  71.0 kB/s | ETA: 00:00:00 | 100%
._redhat.noip.sh          | 0 kB |   0.2 kB/s | ETA: 00:00:00 | 100%
redhat.noip.sh            | 1 kB |   1.2 kB/s | ETA: 00:00:00 | 100%
noip2.c                   | 75 kB |  75.1 kB/s | ETA: 00:00:00 | 100%
Makefile                  | 0 kB |   1.0 kB/s | ETA: 00:00:00 | 100%
mac.osx.startup           | 1 kB |   1.2 kB/s | ETA: 00:00:00 | 100%
README.FIRST_PT           | 14 kB |  14.3 kB/s | ETA: 00:00:00 | 100%
debian.noip2.sh           | 0 kB |   0.9 kB/s | ETA: 00:00:00 | 100%
README.FIRST.pt_BR        | 12 kB |  12.2 kB/s | ETA: 00:00:00 | 100%
._mac.osx.startup         | 0 kB |   0.2 kB/s | ETA: 00:00:00 | 100%
LIESMICH.ERST.deutsch     | 14 kB |  14.1 kB/s | ETA: 00:00:00 | 100%
._debian.noip2.sh         | 0 kB |   0.2 kB/s | ETA: 00:00:00 | 100%
._README.FIRST.FRANCAIS   | 0 kB |   0.2 kB/s | ETA: 00:00:00 | 100%
._COPYING                 | 0 kB |   0.2 kB/s | ETA: 00:00:00 | 100%
._README.FIRST.ITALIANO   | 0 kB |   0.2 kB/s | ETA: 00:00:00 | 100%
._Makefile                | 0 kB |   0.2 kB/s | ETA: 00:00:00 | 100%
._noip2.c                 | 0 kB |   0.2 kB/s | ETA: 00:00:00 | 100%
LISEZMOI.ENPREMIER        | 13 kB |  13.3 kB/s | ETA: 00:00:00 | 100%
README.FIRST.JAPANESE     | 15 kB |  15.3 kB/s | ETA: 00:00:00 | 100%
README.FIRST.FRANCAIS     | 13 kB |  13.1 kB/s | ETA: 00:00:00 | 100%
COPYING                   | 17 kB |  17.7 kB/s | ETA: 00:00:00 | 100%
gentoo.noip2.sh           | 0 kB |   0.5 kB/s | ETA: 00:00:00 | 100%
README.FIRST-SWE          | 12 kB |  12.9 kB/s | ETA: 00:00:00 | 100%
._README.FIRST            | 0 kB |   0.2 kB/s | ETA: 00:00:00 | 100%
._noip2-i686              | 0 kB |   0.2 kB/s | ETA: 00:00:00 | 100%
._noip2-x86_64            | 0 kB |   0.2 kB/s | ETA: 00:00:00 | 100%
._gentoo.noip2.sh         | 0 kB |   0.2 kB/s | ETA: 00:00:00 | 100%
._binaries                | 0 kB |   0.2 kB/s | ETA: 00:00:00 | 100%
README.FIRST.ITALIANO     | 14 kB |  14.1 kB/s | ETA: 00:00:00 | 100%
._README.FIRST.JAPANESE   | 0 kB |   0.2 kB/s | ETA: 00:00:00 | 100%
._README.FIRST.pt_BR      | 0 kB |   0.2 kB/s | ETA: 00:00:00 | 100%
._README.FIRST_PT         | 0 kB |   0.2 kB/s | ETA: 00:00:00 | 100%
._README.FIRST-SWE        | 0 kB |   0.2 kB/s | ETA: 00:00:00 | 100%
README.FIRST              | 12 kB |  12.5 kB/s | ETA: 00:00:00 | 100%
._LISEZMOI.ENPREMIER      | 0 kB |   0.2 kB/s | ETA: 00:00:00 | 100%
._LIESMICH.ERST.deutsch   | 0 kB |   0.2 kB/s | ETA: 00:00:00 | 100%
._LEEME.PRIMERO           | 0 kB |   0.2 kB/s | ETA: 00:00:00 | 100%
LEEME.PRIMERO             | 13 kB |  13.5 kB/s | ETA: 00:00:00 | 100%

同樣的,搭配 Script 也可以複製給電腦教室全部的電腦。

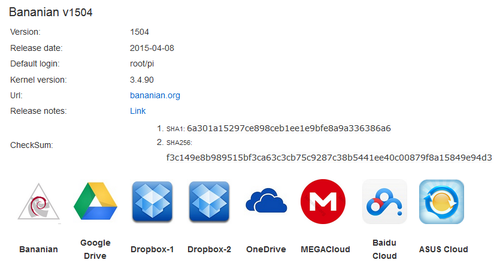
Banana Pi – Bananian Linux 更新到 1504

Bananian Linux 已於 2015-04-08 更新到 1504
Bananian Linux 1504 更新說明:http://forum.lemaker.org/thread-11797-1-1-bananian_15_04_released.html
[@more@]可以直接下載新版本來安裝
Bananian Linux 15.04 下載網址:http://www.lemaker.org/resources/9-116/bananian_for_bananapi.html

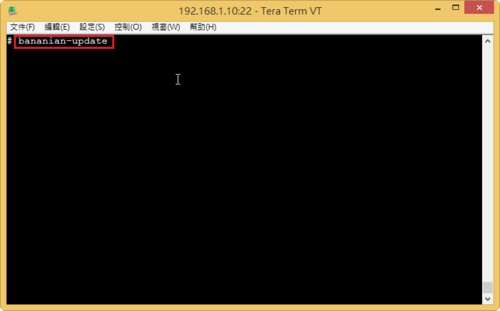
1. 執行 bananian-update 來進行更新

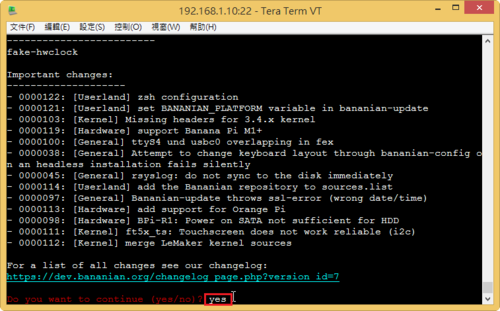
2. 輸入 yes 進行更新

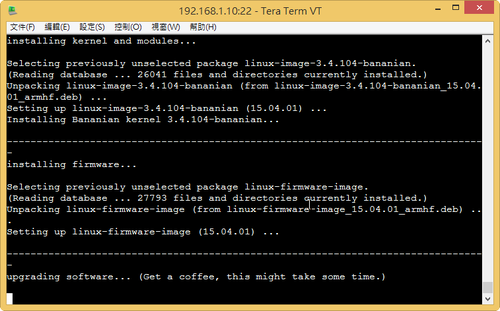
3. 更新中

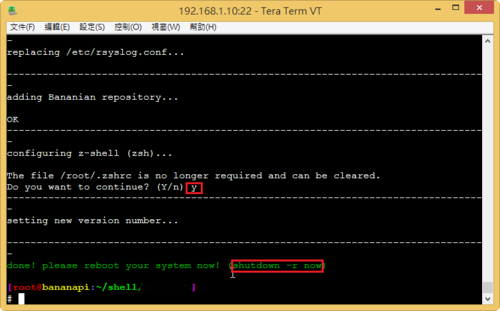
4. 更新完成,執行 shutdown -r now 重新啟動
# shutdown -r now

使用 putty-tools 工具中的 plink 來管理電腦教室

plink 是一個可以用來遠端連線管理主機的程式。
plink 使用參數
# /usr/bin/plink
PuTTY Link: command-line connection utility
Unidentified build, Mar 14 2015 13:36:11
Usage: plink [options] [user@]host [command]
       (“host” can also be a PuTTY saved session name)
Options:
  -V        print version information and exit
  -pgpfp    print PGP key fingerprints and exit
  -v        show verbose messages
  -load sessname  Load settings from saved session
  -ssh -telnet -rlogin -raw -serial
            force use of a particular protocol
  -P port   connect to specified port
  -l user   connect with specified username
  -batch    disable all interactive prompts
The following options only apply to SSH connections:
  -pw passw login with specified password
  -D [listen-IP:]listen-port
            Dynamic SOCKS-based port forwarding
  -L [listen-IP:]listen-port:host:port
            Forward local port to remote address
  -R [listen-IP:]listen-port:host:port
            Forward remote port to local address
  -X -x     enable / disable X11 forwarding
  -A -a     enable / disable agent forwarding
  -t -T     enable / disable pty allocation
  -1 -2     force use of particular protocol version
  -4 -6     force use of IPv4 or IPv6
  -C        enable compression
  -i key    private key file for authentication
  -noagent  disable use of Pageant
  -agent    enable use of Pageant
  -m file   read remote command(s) from file
  -s        remote command is an SSH subsystem (SSH-2 only)
  -N        don’t start a shell/command (SSH-2 only)
  -nc host:port
            open tunnel in place of session (SSH-2 only)
  -sercfg configuration-string (e.g. 19200,8,n,1,X)
            Specify the serial configuration (serial only)

[@more@]比較常用的參數
-l 要登入的使用者
-pw 登入的密碼

底下列出幾個實例

1. 關閉遠端 Windows 主機
# echo y | /usr/bin/plink -l Administrator -pw 123456 192.168.1.112 “shutdown -s -t 0”

2. 遠端 Windows 主機重新啟動
# echo y | /usr/bin/plink -l Administrator -pw 123456 192.168.1.112 “shutdown -r -t 0”

3. 自動安裝桌面上的 PotPlayer
    /S 是 PotPlayer 的自動安裝參數
# echo y | /usr/bin/plink -pw 123456 Administrator@192.168.1.112 “/cygdrive/c/Users/Administrator/Desktop/PotPlayerSetup64.exe /S”

以上是針對一台電腦,如果是整個電腦教室,則可以利用 Script 檔的方式來達成!

安裝 putty-tools 工具來管理 Windows

在電腦教室的電腦安裝了 drbl-winroll 後,除了可以利用 drbl-winroll 來自動更改還原之後的電腦名稱之外,也因為它附帶安裝了 cygwin,有啟動 ssh 服務,所以可以在在遠端的 Linux 上管理電腦教室的 Windows 電腦。

在 Ubuntu 14.04 LTS Server 上安裝 putty-tools 工具
$ sudo apt-cache search putty-tools
putty-tools – command-line tools for SSH, SCP, and SFTP

putty-tools 它提供了命令列的 pscp / plink..等工具,雖然這些工具沒有 GUI 介面,但是在處理系統自動化時,非常方便,可以快速達到目的,只是要比較麻煩,要記憶一些參數。

安裝 putty-tools
$ sudo apt-get install putty-tools

在 CentOS 6.x 上安裝
#
yum install putty –enablerepo=epel
[@more@]列出 putty-tools 可用的程式
$ sudo dpkg -L putty-tools | grep bin
/usr/bin
/usr/bin/plink
/usr/bin/puttygen
/usr/bin/pscp
/usr/bin/psftp

CentOS 6.x
# rpm -ql putty | grep bin
/usr/bin/plink
/usr/bin/pscp
/usr/bin/psftp
/usr/bin/pterm
/usr/bin/putty
/usr/bin/puttygen
/usr/bin/puttytel

目前比較常用的有 plink / pscp 二個指令

設定 Ubuntu 14.04 LTS Server 上的 PXE Server

1. 安裝設定 PXE Server 所需套件
$ sudo apt-get install libcrypt-passwdmd5-perl mtools syslinux syslinux-common

2. 複製所需檔案到 /var/lib/tftpboot 目錄
$ sudo cp /usr/lib/syslinux/menu.c32 /var/lib/tftpboot
$ sudo cp /usr/lib/syslinux/vesamenu.c32 /var/lib/tftpboot
$ sudo cp /usr/lib/syslinux/pxelinux.0 /var/lib/tftpboot
$ sudo cp /usr/lib/syslinux/gpxelinux.0 /var/lib/tftpboot
$ sudo cp /usr/lib/syslinux/gpxelinuxk.0 /var/lib/tftpboot
$ sudo cp /usr/lib/syslinux/memdisk /var/lib/tftpboot
$ sudo cp /usr/lib/syslinux/mboot.c32 /var/lib/tftpboot
$ sudo cp /usr/lib/syslinux/chain.c32 /var/lib/tftpboot[@more@]3. 建立目錄 /var/lib/tftpboot/pxelinux.cfg
$ sudo  mkdir /var/lib/tftpboot/pxelinux.cfg

4. 建立 PXE 功能表
$ sudo vim /var/lib/tftpboot/pxelinux.cfg/default
default menu.c32
prompt 0
timeout 300
ONTIMEOUT local

MENU TITLE Welcom to Tou-Cheng Elementary School PXE Server System

LABEL local
MENU LABEL Boot from local hard drive
LOCALBOOT 0
wq
LABEL Memory Test
   MENU LABEL Memory Test – memtest86+
   kernel memtest/memtest86+-5.01
LABEL SPFDisk
   MENU LABEL SPFDisk
   MENU PASSWD SPFDisk
   kernel memdisk
   append initrd=dos/spfdisk.img

LABEL FreeDOS 1.0
   MENU LABEL FreeDOS 1.0
   MENU PASSWD FreeDOS
   kernel memdisk
   append initrd=dos/fdboot.img

LABEL Clonezilla Live 2.3.2-22-i686-pae
   MENU LABEL Clonezilla Live 2.3.2-22-i686-pae
   MENU PASSWD Clonezilla
   kernel Linux/clonezilla-live-2.3.2-22-i686-pae/live/vmlinuz
   append initrd=Linux/clonezilla-live-2.3.2-22-i686-pae/live/initrd.img boot=live config noswap nolocales edd=on nomodeset ocs_live_run=”ocs-live-general” ocs_live_extra_param=”” ocs_live_keymap=”NONE” ocs_live_batch=”no” ocs_lang=”zh_TW.UTF-8″ vga=788 nosplash fetch=tftp://192.168.5.254/Linux/clonezilla-live-2.3.2-22-i686-pae/live/filesystem.squashfs