在 CentOS 7 下安裝 iSCSI Target

參考網站:
CentOS 7 : Configure iSCSI Target : Server World
CentOS 7 安裝 iSCSI Server
Configure iSCSI Target & Initiator on CentOS 7 / RHEL7

1. 安裝 targetcli 套件
# yum -y install targetcli

2. 建立目錄
# mkdir /iscsi_disks[@more@]
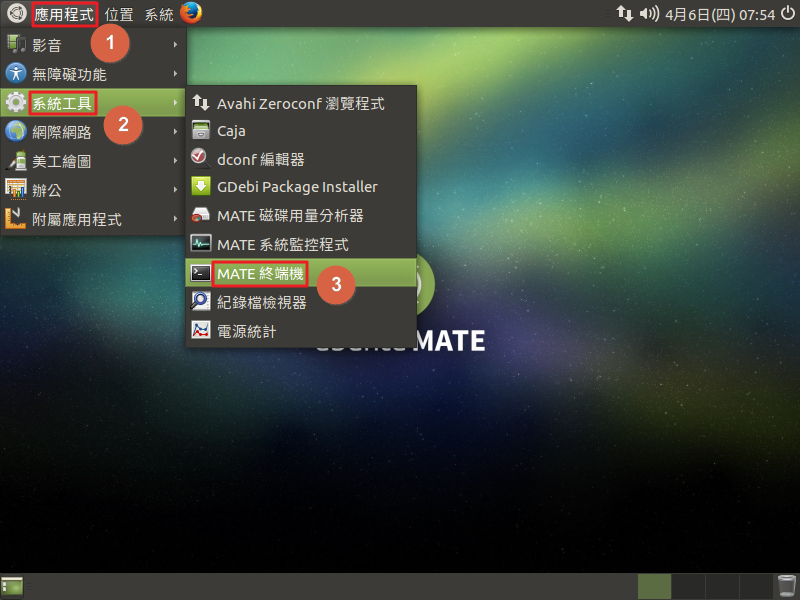
3. 進入 iscsi 管理介面
# /usr/bin/targetcli
Warning: Could not load preferences file /root/.targetcli/prefs.bin.
targetcli shell version 2.1.fb41
Copyright 2011-2013 by Datera, Inc and others.
For help on commands, type ‘help’.

/> cd backstores/fileio
/backstores/fileio> create linux-disk /iscsi_disks/linux-disk.img 10G
Created fileio linux-disk with size 10737418240
/backstores/fileio> cd /iscsi
/iscsi> create iqn.2017-04.tces.test:linux.disk
Created target iqn.2017-04.tces.test:linux.disk.
Created TPG 1.
Global pref auto_add_default_portal=true
Created default portal listening on all IPs (0.0.0.0), port 3260.
/iscsi> cd iqn.2017-04.tces.test:linux.disk/tpg1/luns
/iscsi/iqn.20…isk/tpg1/luns> create /backstores/fileio/linux-disk
Created LUN 0.
/iscsi/iqn.20…isk/tpg1/luns> cd ../acls
/iscsi/iqn.20…isk/tpg1/acls> create iqn.2017-04.tces.test:linux-pc
Created Node ACL for iqn.2017-04.tces.test:linux-pc
Created mapped LUN 0.
/iscsi/iqn.20…isk/tpg1/acls> cd iqn.2017-04.tces.test:linux-pc
/iscsi/iqn.20…test:linux-pc> set auth userid=user
Parameter userid is now ‘user.
/iscsi/iqn.20…test:linux-pc> set auth password=password
Parameter password is now ‘password’.
/iscsi/iqn.20…test:linux-pc> exit
Global pref auto_save_on_exit=true
Last 10 configs saved in /etc/target/backup.
Configuration saved to /etc/target/saveconfig.json

4. 檢查是否有正常執行
# ss -napt | grep 3260
LISTEN     0      256          *:3260                     *:*

# netstat -napt | grep 3260
tcp        0      0 0.0.0.0:3260            0.0.0.0:*               LISTE

5. 防火牆設定
# firewall-cmd –permanent –add-service=iscsi-target
# firewall-cmd –reload

# firewall-cmd –permanent –add-port=3260/tcp
# firewall-cmd –reload

# iptables -A INPUT -s 192.168.1.0/24 -p tcp -m state –state NEW –dport 3260 -j ACCEPT

For Windows
# /usr/bin/targetcli
Warning: Could not load preferences file /root/.targetcli/prefs.bin.
targetcli shell version 2.1.fb41
Copyright 2011-2013 by Datera, Inc and others.
For help on commands, type ‘help’.

/> cd backstores/fileio

/backstores/fileio> create windows-disk /iscsi_disks/windows-disk.img 4G
Created fileio windows-disk with size 4294967296
/backstores/fileio> cd /iscsi
/iscsi> create iqn.2017-04.tces.test:windows.disk
Created target iqn.2017-04.tces.test:windows.disk.
Created TPG 1.
Global pref auto_add_default_portal=true
Created default portal listening on all IPs (0.0.0.0), port 3260.
/iscsi> cd iqn.2017-04.tces.test:windows.disk/tpg1/luns
/iscsi/iqn.20…isk/tpg1/luns> create /backstores/fileio/windows-disk
Created LUN 0.
/iscsi/iqn.20…isk/tpg1/luns> cd ../acls
/iscsi/iqn.20…isk/tpg1/acls> create iqn.2017-04.tces.test:windows-pc
Created Node ACL for iqn.2017-04.tces.test:windows-pc
Created mapped LUN 0.
/iscsi/iqn.20…isk/tpg1/acls> cd /iscsi/iqn.2017-04.tces.test:windows.disk/tpg1/
/iscsi/iqn.20…ows.disk/tpg1> set attribute authentication=0
Parameter authentication is now ‘0’.
/iscsi/iqn.20…ows.disk/tpg1> cd /iscsi/iqn.2017-04.tces.test:windows.disk/tpg1/
/iscsi/iqn.20…ows.disk/tpg1> set attribute generate_node_acls=0
Parameter generate_node_acls is now ‘0’.
/iscsi/iqn.20…ows.disk/tpg1> exit
Global pref auto_save_on_exit=true
Last 10 configs saved in /etc/target/backup.
Configuration saved to /etc/target/saveconfig.json

VMware ESXi – 忘了 root 密碼

參考網頁:
Changing a forgotten root password on an ESX/ESXi host (1317898) | VMware KB
How to Reset Forgotten VMware ESXi Root Password with Ubuntu Live CD

如果忘了 ESXi root 密碼

依官方的說法,唯一的方式是重新安裝。

[@more@]解決方式:
1. 找一片 LiveCD,使用 LiveCD 光碟開機

2. 選擇 應用程式 / 系統工具 / MATE 終端機

3. 查看硬碟分割
     $ sudo fdisk -l

檔案在 /dev/sda5

4. 建立掛載目錄
    $ sudo mkdir /mnt/sda5

5. 掛載分割區
    $ sudo mount /dev/sda5 /mnt/sda5

6. 列出檔案
    $ ls /mnt/sda5

7. 複製檔案到使用者目錄
    $ cp /mnt/sda5/state.tgz ~

8. 目錄切換回使用者根目錄
    $ cd ~

9. 解壓縮
    $ tar xvzf state.tgz
    $ tar xvzf local.tgz

10. 修改 etc/shadow
      $ vi etc/shadow

11. 把第一個 : 和第二個 : 之間的字元刪除

12. 刪除原檔
      $ rm -rf local.tgz state.tgz

13. 把 etc 目錄壓縮成 local.tgz
      $ tar czf local.tgz etc

14. 把 local.tgz 壓縮成 state.tgz
      $ tar czf state.tgz local.tgz

15. 刪除原檔
      $ sudo rm -rf /mnt/sda5/state.tgz

16. 複製修改好的檔案回原目錄
      $ sudo cp state.tgz /mnt/sda5

17. 卸載目錄
      $ sudo umount /mnt/sda5

18. 重新啟動電腦

19. 按 F2 進入設定

20. 密碼不用輸入

21. 選擇 Configuration Password,可以看出來目前密碼還未設定

22. 設定新的密碼,要注意的是,這裡的密碼要求比較高,不像在安裝時,設定密碼強度要求比較寬鬆

23. 設定成功!

VMware ESXi – ghettoVCB 還原 ESXi 虛擬機器

參考網站:
ghettoVCB 還原 ESXI Guest OS

1. VM 備份檔的位置

2. 刪除 VM

[@more@]
3. 建立要還原的 VM 虛擬機器清單
[root@esxi:~]  vi /vmfs/volumes/ST500G/vm_to_restore.lst
# DISK_FORMATS
# 1 = zeroedthick  (一次給足全部的硬碟大小,需要時才初使化未使用的空間)
# 2 = 2gbsparse  (將硬碟分割成多個 2G 的硬碟)
# 3 = thin  (隨著使用量而增加硬碟大小,達到設定上限時就不會在增加)
# 4 = eagerzeroedthick  (一次給足全部的硬碟大小,全部初始化可直接使用)
# 格式,以 ; 做分隔
# “VM 備份檔所在的完整路徑;還原後的 VM 要存放的完整路徑;還原時硬碟的格式”

“/vmfs/volumes/SynologyNAS/CentOS 7 Base/CentOS 7 Base-2017-04-05_12-33-10;/vmfs/volumes/ST500G;3”

4. 進行復原
[root@esxi:~] /opt/ghettovcb/bin/ghettoVCB-restore.sh -c /vmfs/volumes/ST500G/vm_to_restore.lst -l /vmfs/volumes/ST500G/ghettoVCB_log/ghettoVCB-restore.$(date +%F)

################## Restoring VM: CentOS 7 Base  #####################
Start time: Wed Apr  5 23:40:28 CST 2017
Restoring VM from: “/vmfs/volumes/SynologyNAS/CentOS 7 Base/CentOS 7 Base-2017-04-05_12-33-10”
Restoring VM to Datastore: “/vmfs/volumes/ST500G” using Disk Format: “thin”
Creating VM directory: “/vmfs/volumes/ST500G/CentOS 7 Base” …
Copying “CentOS 7 Base.vmx” file …
Restoring VM’s VMDK(s) …
Updating VMDK entry in “CentOS 7 Base.vmx” file …
Option –adaptertype is deprecated and hence will be ignored
Destination disk format: VMFS thin-provisioned
Cloning disk ‘/vmfs/volumes/SynologyNAS/CentOS 7 Base/CentOS 7 Base-2017-04-05_12-33-10/CentOS 7 Base_0.vmdk’…
Clone: 100% done.
Registering CentOS 7 Base …
33
End time: Thu Apr  6 00:04:58 CST 2017
################## Completed restore for CentOS 7 Base! #####################

Start time: Wed Apr  5 23:40:28 CST 2017
End   time: Thu Apr  6 00:04:58 CST 2017
Duration  : 24.50 Minutes

—————————————————————————————————————

5. 更多 ghettoVCB-restore.sh 指令用法
[root@esxi:~]  /opt/ghettovcb/bin/ghettoVCB-restore.sh
###############################################################################
#
# ghettoVCB-restore for ESX/ESXi 3.5, 4.x, 5.x & 6.x
# Author: William Lam
# http://www.virtuallyghetto.com/
# Documentation: http://communities.vmware.com/docs/DOC-8760
# Created: 08/18/2009
# Last modified: 2015_04_04_1
#
###############################################################################

Usage: /opt/ghettovcb/bin/ghettoVCB-restore.sh -c [VM_BACKUP_UP_LIST] -l [LOG_FILE] -d [DRYRUN_DEBUG_INFO]

OPTIONS:
   -c     VM backup list
   -l     File ot output logging
   -d     Dryrun/Debug Info [1|2]

(e.g.)

Output will go to stdout
        /opt/ghettovcb/bin/ghettoVCB-restore.sh -c vms_to_restore

Output will log to /tmp/ghettoVCB-restore.log
        /opt/ghettovcb/bin/ghettoVCB-restore.sh -c vms_to_restore -l /tmp/ghettoVCB-restore.log

Dryrun/Debug Info (dryrun only)
        /opt/ghettovcb/bin/ghettoVCB-restore.sh -c vms_to_restore -d 1
        /opt/ghettovcb/bin/ghettoVCB-restore.sh -c vms_to_restore -d 2

VMware ESXi – ghettoVCB 排程備份

1. 備份 /var/spool/cron/crontabs/root/vmfs/volumes/ST500G/crontabsroot
[root@esxi:~] cp /var/spool/cron/crontabs/root /vmfs/volumes/ST500G/crontabsroot

2. 進行修改
[root@esxi:~] cat /vmfs/volumes/ST500G/crontabsroot
#min hour day mon dow command
1    1    *   *   *   /sbin/tmpwatch.py
1    *    *   *   *   /sbin/auto-backup.sh
0    *    *   *   *   /usr/lib/vmware/vmksummary/log-heartbeat.py
*/5  *    *   *   *   /bin/hostd-probe.sh ++group=host/vim/vmvisor/hostd-probe/stats/sh
00   1    *   *   *   localcli storage core device purge
30   1    *   *   *   /opt/ghettovcb/bin/ghettoVCB.sh -g /opt/ghettovcb/ghettoVCB.conf -f /vmfs/volumes/ST500G/ghetto.lst > /dev/null 2>&1[@more@]
3. 建立 /vmfs/volumes/ST500G/crondtab.sh
[root@esxi:~] vi /vmfs/volumes/ST500G/crondtab.sh
#!/bin/sh
#add backup crond shell
/bin/kill $(cat /var/run/crond.pid)
cp /vmfs/volumes/ST500G/crontabsroot /var/spool/cron/crontabs/root
/usr/lib/vmware/busybox/bin/busybox crond

4. 更改檔案權限
[root@esxi:~] chmod 755 /vmfs/volumes/ST500G/crondtab.sh

5. 將 crondtab.sh 加入開機設定檔 /etc/rc.local.d/local.sh
[root@esxi:~] vi /etc/rc.local.d/local.sh
#backup crond
/vmfs/volumes/ST500G/crondtab.sh
# 時區設定
if [ -e /etc/localtime ];then
     rm -rf /etc/localtime
     cp /vmfs/volumes/ST500G/localtime /etc
else
     cp /vmfs/volumes/ST500G/localtime /etc
fi

VMware ESXi – ghettoVCB 備份 ESXi 虛擬機器

參考網站:
ghettoVCB 備份 ESXI Guest OS
ESXi 5.1 / 5.5 定期排程備份線上VM;NFS、sendmail-ghettoVCB | Mr. 沙先生
Backing up VMware ESXi VMs with ghettoVCB – Miscellaneous Knowledge

虛擬機器不用先關機,ghettoVCB.sh 會先為虛擬機器建立快照,然後進行備份,當備份完成之後會刪除快照。

1.下載 ghettoVCB

2. 上傳到 資料存放區

3. 開啟 ESXi 伺服器可安裝非原廠的額外套件
[root@esxi:~] esxcli software acceptance set –level=CommunitySupported
Host acceptance level changed to ‘CommunitySupported’.

4. 進行安裝 ghettoVCB,似乎沒有進行第 3 步驟,也可以進行安裝
[root@esxi:~] esxcli software vib install -v /vmfs/volumes/ST500G/vghetto-ghettoVCB.vib  -f
Installation Result
   Message: Operation finished successfully.
   Reboot Required: false
   VIBs Installed: virtuallyGhetto_bootbank_ghettoVCB_1.0.0-0.0.0
   VIBs Removed:
   VIBs Skipped:

檔案安裝位置
[root@esxi:~] ls -l /opt/ghettovcb/bin/*
-r-xr-xr-x    1 root     root         17555 Jan 11 14:31 /opt/ghettovcb/bin/ghettoVCB-restore.sh
-r-xr-xr-x    1 root     root         65458 Jan 11 14:31 /opt/ghettovcb/bin/ghettoVCB.sh[@more@]
5. 建立 ghettoVCB.conf 設定檔
[root@esxi:~] vi /opt/ghettoVCB/ghettoVCB.conf
# 備份到 SynologyNAS
VM_BACKUP_VOLUME=/vmfs/volumes/SynologyNAS
# 備份虛擬機格式,採用精簡建
DISK_BACKUP_FORMAT=thin
# 定義備份保留的數量
VM_BACKUP_ROTATION_COUNT=3
# 虛擬機器 POWER OFF 時不會要求 snapshottting
POWER_VM_DOWN_BEFORE_BACKUP=0
# 定義沒有安裝 VMware Tools 的虛擬機器是否可以在硬碟 POWER OFF 時啟用
ENABLE_HARD_POWER_OFF=0
# 如果啟用 ENABLE_HARD_POWER_OFF,將強制執行關閉時會侄數運算,時間是 3 分鐘
ITER_TO_WAIT_SHUTDOWN=3
# 設定 POWER DOWN 的時間,等待關閉時,VM 會放棄或忽略特定的 VM 備份。時間是 5 分鐘
POWER_DOWN_TIMEOUT=5
# 不進行壓縮
ENABLE_COMPRESSION=0
# 不啟用 VM 虛擬機器的快照記憶體
VM_SNAPSHOT_MEMORY=0
# 不啟用對停止的 VM 虛擬機器使用快照(需要有安裝 VMware Tools)
VM_SNAPSHOT_QUIESCE=0
ALLOW_VMS_WITH_SNAPSHOTS_TO_BE_BACKEDUP=0
# 開啟 NFS
ENABLE_NON_PERSISTENT_NFS=1
# 執行完畢就 unmount
UNMOUNT_NFS=0
# NFS Server IP
NFS_SERVER=xxx.xxx.xxx.xxx
# NFS 版本
NFS_VERSION=nfs
# NFS Host 掛載目錄
NFS_MOUNT=/volume1/homes/test/Server/esxi
NFS_LOCAL_NAME=SynologyNAS
NFS_VM_BACKUP_DIR=mybackups

6. 建立 log 檔存放目錄
[root@esxi:~] mkdir /vmfs/volumes/ST500G/ghettoVCB_log

7. 修改 /opt/ghettovcb/bin/ghettoVCB.sh
[root@esxi:~] vi /opt/ghettovcb/bin/ghettoVCB.sh
找到
    #if no logfile then provide default logfile in /tmp
    if [[ -z “${LOG_OUTPUT}” ]] ; then
        LOG_OUTPUT=”/tmp/ghettoVCB-$(date +%F_%H-%M-%S)-$$.log”
        echo “Logging output to “${LOG_OUTPUT}” …”
    fi
修改成
    #if no logfile then provide default logfile in /tmp
    if [[ -z “${LOG_OUTPUT}” ]] ; then
        LOG_OUTPUT=”//vmfs/volumes/ST500G/ghettoVCB_log/ghettoVCB-$(date +%F_%H-%M-%S)-$$.log”
        echo “Logging output to “${LOG_OUTPUT}” …”
    fi

8. 列出安裝的虛擬機器
[root@esxi:~] vim-cmd vmsvc/getallvms
Vmid             Name                                            File                                       Guest OS         Version                                                                                                                                                                                                                                                       Annotation                                                                                                                                                                                                                                                   
1      OB2D Linux 2017 1.0         [ST500G] ob2d/ob2d.vmx                                             other26xLinux64Guest   vmx-13                                                                                                                                                                                                                                                                                                                                                                                                                                                                                                                     
2      Custom CentOS 7.x           [ST500G] Custom CentOS 7.x/Custom CentOS 7.x.vmx                   centos7_64Guest        vmx-13                                                                                                                                                                                                                                                                                                                                                                                                                                                                                                                     
21     OpenNMS                     [ST500G] OpenNMS/OpenNMS.vmx                                       centos7_64Guest        vmx-13                                                                                                                                                                                                                                                                                                                                                                                                                                                                                                                     
22     Nginx                       [ST500G] Nginx/Nginx.vmx                                           centos7_64Guest        vmx-13                                                                                                                                                                                                                                                                                                                                                                                                                                                                                                                     
24     Ubuntu 16.04.2              [ST500G] Ubuntu 16.04.2/Ubuntu 16.04.2.vmx                         ubuntu64Guest          vmx-13                                                                                                                                                                                                                                                                                                                                                                                                                                                                                                                     
25     ArchLinux                   [ST500G] ArchLinux/ArchLinux.vmx                                   other26xLinux64Guest   vmx-13                                                                                                                                                                                                                                                                                                                                                                                                                                                                                                                     
26     Windows 10 1607 14393.0     [ST500G] Windows 10 1607 14393.969/Windows 10 1607 14393.969.vmx   windows9_64Guest       vmx-13
31     Photon OS                   [ST500G] Photon OS/Photon OS.vmx                                   other3xLinux64Guest    vmx-13                                                                                                                                                                                                                                                                                                                                                                                                                                                                                                                     
32     CentOS 7 Base               [ST500G] CentOS 7 Base/CentOS 7 Base.vmx                           centos7_64Guest        vmx-13

9. 進行備份
備份 CentOS 7 Base
[root@esxi:~] /opt/ghettovcb/bin/ghettoVCB.sh -g /opt/ghettovcb/ghettoVCB.conf -m “CentOS 7 Base” -l /vmfs/volumes/ST500G/ghettoVCB_log/ghettoVCB-backup.$(date +%F)

備份全部
[root@esxi:~] /opt/ghettovcb/bin/ghettoVCB.sh -g /opt/ghettovcb/ghettoVCB.conf -a -l /vmfs/volumes/ST500G/ghettoVCB_log/ghettoVCB-backup.$(date +%F)

備份清單
[root@esxi:~] cat /vmfs/volumes/ST500G/vm_to_backup.lst
OpenNMS
Nginx
ArchLinux
[root@esxi:~] /opt/ghettovcb/bin/ghettoVCB.sh -g /opt/ghettovcb/ghettoVCB.conf -f /vmfs/volumes/ST500G/vm_to_backup.lst -l /vmfs/volumes/ST500G/ghettoVCB_log/ghettoVCB-backup.$(date +%F)

10. ghettoVCB.sh 指令用法
[root@esxi:~] /opt/ghettovcb/bin/ghettoVCB.sh
###############################################################################
#
# ghettoVCB for ESX/ESXi 3.5, 4.x+, 5.x & 6.x
# Author: William Lam
# http://www.virtuallyghetto.com/
# Documentation: http://communities.vmware.com/docs/DOC-8760
# Created: 11/17/2008
# Last modified: 2016_11_20 Version 1
#
###############################################################################

Usage: ghettoVCB.sh [options]

OPTIONS:
   -a     Backup all VMs on host(備份所有的 VM)
   -f     List of VMs to backup(備份清單中的 VM,一行一個 VM)
   -m     Name of VM to backup (overrides -f)(備份 VM)
   -c     VM configuration directory for VM backups
   -g     Path to global ghettoVCB configuration file(ghettoVCB.conf 設定檔位置)
   -l     File to output logging(log 檔位置)
   -w     ghettoVCB work directory (default: /tmp/ghettoVCB.work)
   -d     Debug level [info|debug|dryrun] (default: info)

(e.g.)

Backup VMs stored in a list
        /opt/ghettovcb/bin/ghettoVCB.sh -f vms_to_backup

Backup a single VM
        /opt/ghettovcb/bin/ghettoVCB.sh -m vm_to_backup

Backup all VMs residing on this host
        /opt/ghettovcb/bin/ghettoVCB.sh -a

Backup all VMs residing on this host except for the VMs in the exclusion list
        /opt/ghettovcb/bin/ghettoVCB.sh -a -e vm_exclusion_list

Backup VMs based on specific configuration located in directory
        /opt/ghettovcb/bin/ghettoVCB.sh -f vms_to_backup -c vm_backup_configs

Backup VMs using global ghettoVCB configuration file
        /opt/ghettovcb/bin/ghettoVCB.sh -f vms_to_backup -g /global/ghettoVCB.conf

Output will log to /tmp/ghettoVCB.log (consider logging to local or remote datastore to persist logs)
        /opt/ghettovcb/bin/ghettoVCB.sh -f vms_to_backup -l /vmfs/volume/local-storage/ghettoVCB.log

Dry run (no backup will take place)
        /opt/ghettovcb/bin/ghettoVCB.sh -f vms_to_backup -d dryrun

Photon OS – 更新指令 tdnf

在 Photon OS 中是採用與 yum 相類似的套件管理程式 tdnf。
# which tdnf
/usr/bin/tdnf

列出比較常用的參數用法:
移除套件
# tdnf erase package
# tdnf remove package
# tdnf remove nano

Removing:
nano                                                                                x86_64                         2.5.2-2.ph1                                                        1.81 M

Total installed size: 1.81 M
Is this ok [y/N]:

安裝套件
# tdnf install package
# tdnf install nano

Installing:
nano                                                                                x86_64                         2.5.2-2.ph1                                                        1.81 M

Total installed size: 1.81 M
Is this ok [y/N]:y

Downloading:
nano                                    737468    100%
Testing transaction
Running transaction

Complete![@more@]檢查可以更新的套件
# tdnf check-update

清除 Cache
# tdnf clean all

尋找套件
# tdnf search package

顯示套件相關資訊
# tdnf info package

更新已安裝的程式
# tdnf distro-sync

更多的用法:
# tdnf
You need to give some command
usage: tdnf [options] COMMAND

options    [-c [config file]]
           [–debugsolver]
           [–rpmverbosity [debug level name]] [-v] [-y] [–assumeno]
           [–version] [–installroot [path]]
           [–nogpgcheck]
           [–releasever RELEASEVER] [–setopt SETOPTS]
           [–refresh] [-4] [-6] [-h]
List of Main Commands

check-local               Checks local rpm folder for problems
check-update              Check for available package upgrades
clean                     Remove cached data
distro-sync               Synchronize installed packages to the latest available versions
downgrade                 downgrade a package
erase                     Remove a package or packages from your system
help                      Display a helpful usage message
info                      Display details about a package or group of packages
install                   Install a package or packages on your system
list                      List a package or groups of packages
makecache                 Generate the metadata cache
provides                  Find what package provides the given value
remove                    Remove a package or packages from your system
reinstall                 reinstall a package
repolist                  Display the configured software repositories
search                    Search package details for the given string
updateinfo                Display advisories about packages
upgrade                   Upgrade a package or packages on your system
upgrade-to                Upgrade a package on your system to the specified version

Docker – Image 管理

1. 搜尋
[root@docker ~]# docker search b2d
INDEX       NAME                                       DESCRIPTION                                     STARS     OFFICIAL   AUTOMATED
docker.io   docker.io/matthewlmcclure/javahelloworld   See https://github.com/matthewlmcclure/to-…   0                    [OK]
docker.io   docker.io/ols3/ob2d                        For OB2D Linux container.                       0
docker.io   docker.io/smothiki/qemu-b2d                                                                0
docker.io   docker.io/smothiki/ubuntu-b2d                                                              0

2. 下載
[root@docker ~]# docker pull docker.io/ols3/ob2d
Using default tag: latest
Trying to pull repository docker.io/ols3/ob2d …
latest: Pulling from docker.io/ols3/ob2d

0cb4bcf975cb: Pull complete
14cb4b14bf3d: Pull complete
467076336f48: Pull complete
38b2f86c4e61: Pull complete
Digest: sha256:89c5fbe1533f43f5bf5abc0a26f5fefb898bd5c0525d2c5ccf8df44da668f1db

[@more@]3. 已下載安裝的 Image
# docker images
REPOSITORY                 TAG                 IMAGE ID            CREATED             SIZE
docker.io/base/archlinux   latest              ef9803580a16        17 hours ago        563.4 MB
docker.io/ols3/ob2d        latest              a8ad9770a5b1        2 years ago         371.3 MB

4. 在 Container 執行命令
[root@docker ~]# docker run docker.io/ols3/ob2d apt-get update
Get:1 http://ftp.tw.debian.org wheezy Release.gpg [2373 B]
Get:2 http://ftp.tw.debian.org wheezy Release [191 kB]
Get:3 http://ftp.tw.debian.org wheezy/main amd64 Packages [5839 kB]
Get:4 http://ftp.tw.debian.org wheezy/contrib amd64 Packages [42.0 kB]
Get:5 http://ftp.tw.debian.org wheezy/non-free amd64 Packages [80.8 kB]
Get:6 http://ftp.tw.debian.org wheezy/contrib Translation-en [34.8 kB]
Get:7 http://ftp.tw.debian.org wheezy/main Translation-en [3846 kB]
Get:8 http://deb.ols3.net wheezy Release.gpg [490 B]
Get:9 http://deb.ols3.net wheezy Release [1639 B]
Hit http://ftp.tw.debian.org wheezy/main Translation-zh
Hit http://ftp.tw.debian.org wheezy/main Translation-zh_TW
Get:10 http://deb.ols3.net wheezy/main amd64 Packages [6412 B]
Get:11 http://ftp.tw.debian.org wheezy/non-free Translation-en [66.1 kB]
Ign http://deb.ols3.net wheezy/main Translation-en
Ign http://deb.ols3.net wheezy/main Translation-zh
Ign http://deb.ols3.net wheezy/main Translation-zh_TW
Fetched 10.1 MB in 3s (2623 kB/s)
Reading package lists…
W: There is no public key available for the following key IDs:
7638D0442B90D010

5. 查詢目前使用到 Container
[root@docker ~]# docker ps -a
CONTAINER ID        IMAGE                      COMMAND                  CREATED              STATUS                          PORTS               NAMES
633d01b8003d        docker.io/ols3/ob2d        “cat /etc/debian-vers”   44 seconds ago       Exited (1) 43 seconds ago                           drunk_spence
d197ab903e0f        docker.io/ols3/ob2d        “apt-get update”         About a minute ago   Exited (0) About a minute ago                       pensive_chandrasekhar
a3ae68c6ee14        docker.io/base/archlinux   “/bin/bash”              About an hour ago    Exited (0) 57 minutes ago                           agitated_nobel
dfa510f8be80        docker.io/base/archlinux   “uname -a”               About an hour ago    Exited (0) About an hour ago                        nauseous_nobel
34e3b68242ea        docker.io/base/archlinux   “cat /etc/arch-releas”   About an hour ago    Exited (0) About an hour ago                        gigantic_albattani
1a8382dd773c        docker.io/base/archlinux   “ls -l”                  About an hour ago    Exited (0) About an hour ago                        stupefied_bassi

只列出 的 Container ID
[root@docker ~]# docker ps -a -q
633d01b8003d
d197ab903e0f
a3ae68c6ee14
dfa510f8be80
34e3b68242ea
1a8382dd773c

6. 停止所有的 Container
[root@docker ~]# docker stop $(docker ps -a -q)
633d01b8003d
d197ab903e0f
a3ae68c6ee14
dfa510f8be80
34e3b68242ea
1a8382dd773
停止某一 Image 的 Container
[root@docker ~]# docker stop $(docker ps -a | grep ob2d | awk ‘{print $1}’)

7. 刪除某一 Image 的 Container
[root@docker ~]# docker ps -a | grep ob2d
633d01b8003d        docker.io/ols3/ob2d        “cat /etc/debian-vers”   5 minutes ago       Exited (1) 5 minutes ago                           drunk_spence
d197ab903e0f        docker.io/ols3/ob2d        “apt-get update”         6 minutes ago       Exited (0) 6 minutes ago                           pensive_chandrasekhar
[root@docker ~]# docker rm $(docker ps -a | grep ob2d | awk ‘{print $1}’)
633d01b8003d
d197ab903e0f

8. 刪除某一 Image
[root@docker ~]# docker images | grep ob2d | awk ‘{print $3}’
a8ad9770a5b1
[root@docker ~]# docker rmi $(docker images | grep ob2d | awk ‘{print $3}’)
Untagged: docker.io/ols3/ob2d:latest
Untagged: docker.io/ols3/ob2d@sha256:89c5fbe1533f43f5bf5abc0a26f5fefb898bd5c0525d2c5ccf8df44da668f1db
Deleted: sha256:a8ad9770a5b11e1a4181bd6cab005e12a0e1f9660eab339e902f7d03a25760f8
Deleted: sha256:0933d45fbc5628cc5e627f47b336c06c6725c6f209c82c1ed42b3722aeaa9333
Deleted: sha256:50dc4ad8d2f88a20662290c1b3eb6b65c370a256aad2a96bbb599f19dcb253f2
Deleted: sha256:53d3351c24f8839b83820b2a0e84c46387520269cce1f74f9ed7706629c07238
Deleted: sha256:8e7a2c95af43ed93123e6a2efe65b73bece3c33775f49dab3a628c1126652931

翰林行動大師

為了節能及環保,翰林推出了行動大師,利用一下時間,將學校用到的科目的 ISO 檔先行下載下來,搭配虛擬光碟軟體掛載,方便學校的老師使用。

[@more@]
放在電子書目錄之下

翰林

科目

ISO 檔

在 ISO 檔上按滑鼠右鍵,選擇 掛載

掛載之後的光碟

可以直接使用光碟,或安裝到電腦硬碟