VMware ESXi – 解決 Kali Linux 安裝到硬碟之後無法上網的問題

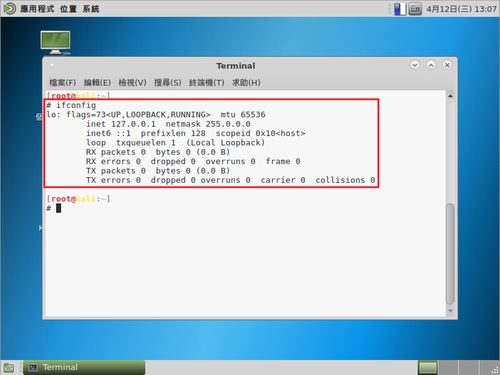
1. 網路上有 DHCP Server,但無法上網,似乎沒有抓到網路卡
    # ifconfig

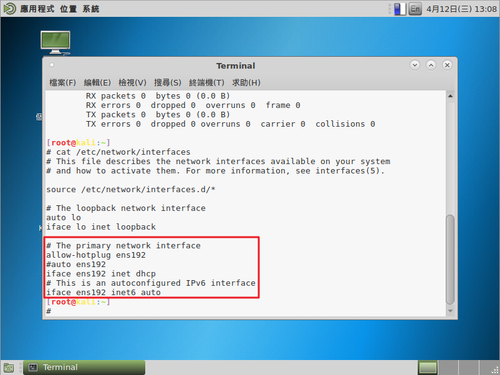
2. 但 /etc/network/interface 中有網路卡的設定
     # cat /etc/network/interface

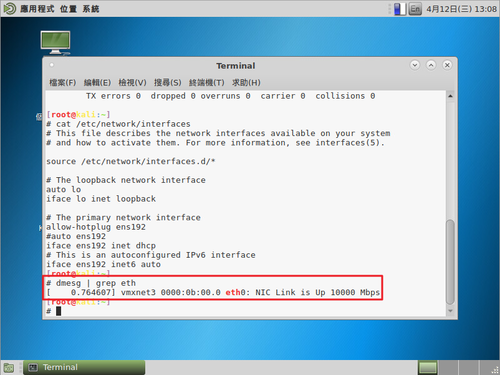
[@more@]3. 檢查一下系統開機抓到的網路卡,發現是 eth0
    # dmesg | grep eth

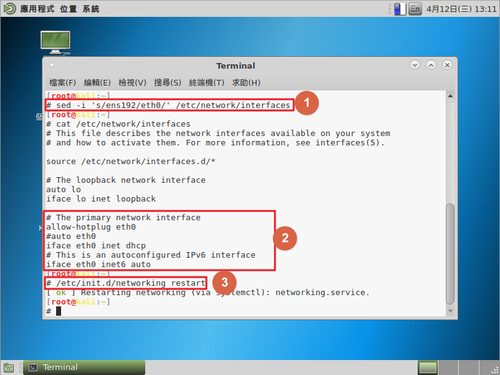
4. 將 ens192 改成 eth0
    # sed -i ‘s/ens192/eth0/’ /etc/network/interface

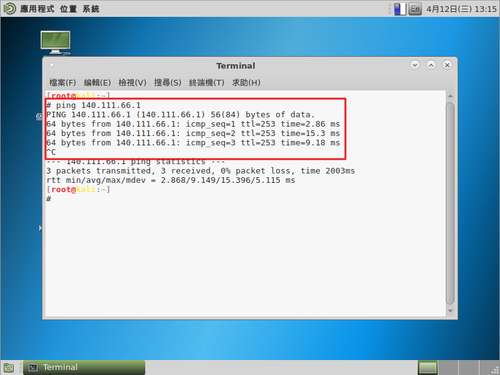
5. 重新啟動網路或重新開機,就可以正常抓到網路了!

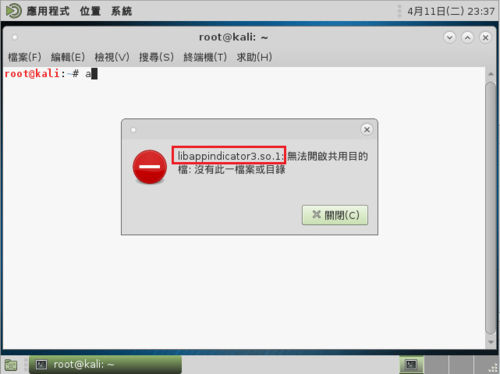
Kail Linux – 解決無法開啟共用目的檔 libappindicator3.so1.

在 Kali Linux 中安裝 gcin 後,登入 X Window 就會出現如下圖的錯誤訊息

[@more@]找尋與 libappindicator3 相關的套件
# apt-cache search libappindicator3
gir1.2-appindicator3-0.1 – Typelib files for libappindicator3-1
libappindicator3-0.1-cil – CLI binding for appindicator3 using GObject introspection
libappindicator3-0.1-cil-dev – CLI binding for libappindicator3 using GObject introspection
libappindicator3-1 – allow applications to export a menu into the panel — GTK3 version
libappindicator3-dev – allow applications to export a menu into the panel — GTK3 development

安裝 libappindicator3-1 套件
# apt-get install libappindicator3-1

SSH Tunnel

內部 IP:192.168.131.219 Server A
外部 IP:140.111.74.17      Server B
外部 IP:1.161.49.150        Server C

1. 在 Server A 上執行
# ssh -NfR 2222:localhost:22 root@140.111.74.17
# ssh -BfR 2222:192.168.131.219 root@140.111.74.17
-N Do not execute a remote command.
-f Requests ssh to go to background just before command execution.
-R [bind_address:]port:host:hostport

2. 在 Server B 上執行
# netstat -antp | grep 2222
tcp        0      0 127.0.0.1:2222          0.0.0.0:*               LISTEN      519/sshd: root
tcp6       0      0 ::1:2222                :::*                    LISTEN      519/sshd: root
# ss -antp | grep 2222
LISTEN     0      128    127.0.0.1:2222                     *:*                   users:((“sshd”,pid=519,fd=9))
LISTEN     0      128        ::1:2222                    :::*                   users:((“sshd”,pid=519,fd=8))

3. 在 Server C 上想要連線到 Server A,先連線到 Server B
# ssh root@140.111.74.17
# ssh -p 2222 root@127.0.0.1

CentOS 7.x 安裝 PXE Server

參考網頁:
Linux . 無限: 在 CentOS7/RHEL7 上架設 PXE 系統(一)
Install PXE Server On CentOS 7 | Unixmen
CentOS 7 : PXE Boot : Network Install : Server World
Install PXE Server And Configure PXE Client On CentOS 7 | Unixmen
CentOS 7 : PXE Boot : Configure PXE Server : Server World

1. 安裝所需套件
# yum install tftp-server dhcp syslinux vsftpd httpd

2. 設定 DHCP Server
# vim /etc/dhcp/dhcpd.conf
Authoritative;
default-lease-time                      259200;
max-lease-time                          518400;
option routers                          192.168.1.254;
option broadcast-address                192.168.1.255;
option subnet-mask                      255.255.255.0;
option domain-name-servers              168.95.1.1,140.111.66.1,8.8.8.8;
ddns-update-style                       interim;
ignore client-updates;
allow booting;
allow bootp;
allow unknown-clients;
server-name                             pxis;

subnet 192.168.1.0 netmask 255.255.255.0 {
    range 192.168.1.56 192.168.1.60;
    option subnet-mask                  255.255.255.0;
    option domain-name                  “test.ilc.edu.tw”;
    next-server 192.168.1.41;
    filename “pxelinux.0”;

}[@more@]3. 設定 tftp Server
# cp /usr/lib/systemd/system/tftp.service /root/tftp.service.$(date +%F)
# vim /usr/lib/systemd/system/tftp.service
[Unit]
Description=Tftp Server
Requires=tftp.socket
Documentation=man:in.tftpd

[Service]
ExecStart=/usr/sbin/in.tftpd -s /tftpboot
StandardInput=socket

[Install]
Also=tftp.socket

4. 複製 syslinux 必要檔案到 tftp Server 分享的目錄
# cd /usr/share/syslinux
# cp pxelinux.0 menu.c32 memdisk mboot.c32 chain.c32 /tftpboot

5. 在 tftp Server 目錄下,建立可供 Linux 開機核心的目錄
# mkdir /tftpboot/{pxelinux.cfg,netboot}

6. 將 Linux ISO 檔內容複製到 vfftpd Server 目錄
# mount -o loop CentOS-LEMP-7.3-x86_64-1611_20170320.iso /mnt
mount: /dev/loop0 is write-protected, mounting read-only
# cp -a /mnt/* /var/ftp/pub

7. 將 Linux PXE 開機核心檔案,複製到 vfftpd Server 目錄
# cd /var/ftp/pub/images/pxeboot
# cp vmlinuz initrd.img /tftpboot/netboot

8. 複製 CentOS Linux 自動安裝設定檔 ks.cfg 到 /var/ftp/pub  目錄之下
# cp /root/ks.cfg /var/ftp/pub
# chmod 644 /var/ftp/pub/ks.cfg

9. 修改 SELinux 相關設定
# yum install policycoreutils-python
# semanage fcontext -a -t public_content_t “/tftpboot(/.*)?”
# restorecon -F -R -v /tftpboot
# restorecon -R -F -v /var/ftp/pub/

10. 建立 PXE Server 開機選單
# vim /tftpboot/pxelinux.cfg/default
default menu.c32
prompt 0
timeout 30
MENU TITLE example.com PXE Menu
LABEL CentOS7_x64
MENU LABEL CentOS 7.3 x86_64
KERNEL /netboot/vmlinuz
APPEND initrd=/netboot/initrd.img inst.repo=ftp://192.168.5.104/pub ks=ftp://192.168.5.104/pub/ks.cfg

11. 啟動相關服務
# systemctl enable vsftpd
Created symlink from /etc/systemd/system/multi-user.target.wants/vsftpd.service to /usr/lib/systemd/system/vsftpd.service
# systemctl start vsftpd
# systemctl enable tftp
Created symlink from /etc/systemd/system/sockets.target.wants/tftp.socket to /usr/lib/systemd/system/tftp.socket.
# systemctl start tftp
# systemctl daemon-reload
# systemctl enable dhcpd
Created symlink from /etc/systemd/system/multi-user.target.wants/dhcpd.service to /usr/lib/systemd/system/dhcpd.service.
# systemctl start dhcpd
# systemctl enable httpd
Created symlink from /etc/systemd/system/multi-user.target.wants/httpd.service to /usr/lib/systemd/system/httpd.service
# systemctl start httpd

12. 防火牆上設定
# firewall-cmd –permanent –add-service=dhcp
# firewall-cmd –permanent –add-service=ftp
# firewall-cmd –permanent –add-service=http
# firewall-cmd –permanent –add-service=tftp
# firewall-cmd –reload

Debian / Ubuntu 安裝 Let’s Encrypt 到 Apache

參考網站:
Debian / Ubuntu 安裝 Let’s Encrypt 到 Apache – Linux 技術手札

1. 安裝 Apache Web Server
# apt-get install apache2

2. 啟用 SSL 模組並重新啟動 Apache Web Server
# a2enmod ssl
Considering dependency setenvif for ssl:
Module setenvif already enabled
Considering dependency mime for ssl:
Module mime already enabled
Considering dependency socache_shmcb for ssl:
Enabling module socache_shmcb.
Enabling module ssl.
See /usr/share/doc/apache2/README.Debian.gz on how to configure SSL and create self-signed certificates.
To activate the new configuration, you need to run:
  service apache2 restart

# a2ensite default-ssl.conf
Enabling site default-ssl.
To activate the new configuration, you need to run:
  service apache2 reload

# /etc/init.d/apache2 restart
or
# systemctl restart apache2.service[@more@]3. 安裝 git 套件
# apt-get install git

4. 下載 Let’s Encrypt 的目錄
# cd /usr/local
# git clone https://github.com/letsencrypt/letsencrypt
Cloning into ‘letsencrypt’…
remote: Counting objects: 43808, done.
remote: Compressing objects: 100% (76/76), done.
remote: Total 43808 (delta 40), reused 0 (delta 0), pack-reused 43732
Receiving objects: 100% (43808/43808), 12.74 MiB | 2.16 MiB/s, done.
Resolving deltas: 100% (31283/31283), done.
Checking connectivity… done.

5. 產生憑證
# ./letsencrypt-auto –apache -d test.ilc.edu.tw -d www.test.ilc.edu.tw

Enter email address (used for urgent renewal and security notices) (Enter ‘c’ to
cancel):

——————————————————————————-
Please read the Terms of Service at
https://letsencrypt.org/documents/LE-SA-v1.1.1-August-1-2016.pdf. You must agree
in order to register with the ACME server at
https://acme-v01.api.letsencrypt.org/directory
——————————————————————————-
(A)gree/(C)ancel: A

——————————————————————————-
Would you be willing to share your email address with the Electronic Frontier
Foundation, a founding partner of the Let’s Encrypt project and the non-profit
organization that develops Certbot? We’d like to send you email about EFF and
our work to encrypt the web, protect its users and defend digital rights.
——————————————————————————-
(Y)es/(N)o: Y
Obtaining a new certificate
Performing the following challenges:
tls-sni-01 challenge for test.ilc.edu.tw
tls-sni-01 challenge for www.test.ilc.edu.tw
Waiting for verification…
Cleaning up challenges
Failed authorization procedure. nxi.tces.ilc.edu.tw (tls-sni-01): urn:acme:error:connection :: The server could not connect to the client to verify the domain :: Failed to connect to 192.168.1.1:443 for TLS-SNI-01 challenge

IMPORTANT NOTES:
 – If you lose your account credentials, you can recover through
   e-mails sent to t850008@gmail.com.
 – The following errors were reported by the server:

   Domain: www.test.ilc.edu.tw
   Type:   connection
   Detail: Failed to connect to 192.168.1.1:443 for TLS-SNI-01
   challenge

   To fix these errors, please make sure that your domain name was
   entered correctly and the DNS A record(s) for that domain
   contain(s) the right IP address. Additionally, please check that
   your computer has a publicly routable IP address and that no
   firewalls are preventing the server from communicating with the
   client. If you’re using the webroot plugin, you should also verify
   that you are serving files from the webroot path you provided.
 – Your account credentials have been saved in your Certbot
   configuration directory at /etc/letsencrypt. You should make a
   secure backup of this folder now. This configuration directory will
   also contain certificates and private keys obtained by Certbot so
   making regular backups of this folder is ideal.

VMware ESXi – 安裝 macOS Sierra 10.12.4

因為在 ESXi Server 上看到虛擬機器有支援 Mac,所以試裝了一下。
參考網頁:
Create a macOS/OS X VM on VMware ESXi 6.5 & VMware Workstation 12.x | iThinkVirtual™

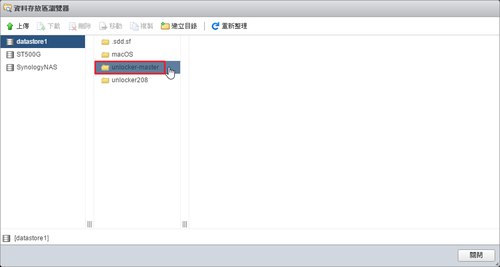
1. 先找法子找到 unlocker2.09 RC,並上傳到 ESXi Server 的 datastore1 中。

2. 以 ssh 登入 ESXi Server

[@more@]
3. 切換目錄
[root@esxi:~] cd /vmfs/volumes/datastore1/unlocker-master/
[root@esxi:/vmfs/volumes/58b7a487-5cd95750-6e9c-000c290b06b0/unlocker-master] chmod 711 esxi-install.sh
[root@esxi:/vmfs/volumes/58b7a487-5cd95750-6e9c-000c290b06b0/unlocker-master] ./esxi-install.sh
VMware Unlocker 2.0.9
===============================
Copyright: Dave Parsons 2011-16
Installing local.sh
Adding useVmxSandbox
Saving current state in /bootbank
Clock updated.
Time: 03:03:40   Date: 04/10/2017   UTC
Success – please now restart the server!

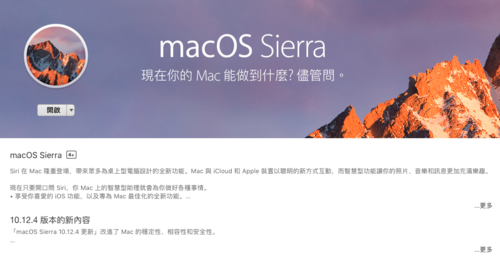
4. 將在 App Store 下載的 macOS Sierra 10.12.4 dmg

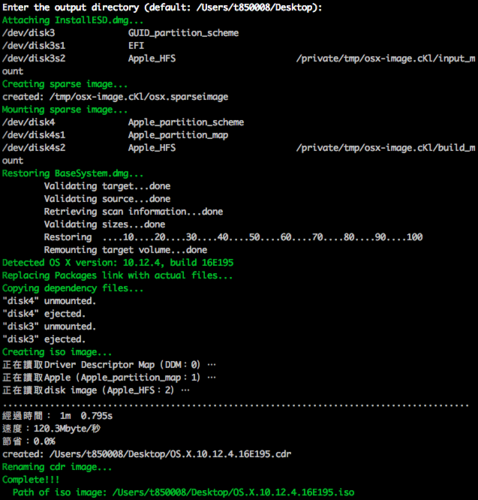
5. 參考下面網址將 dmg 檔轉成  iso 檔
http://www.insanelymac.com/forum/topic/315967-how-to-create-a-bootable-sierra-iso-for-vmware/
路徑要輸入 InstallESD.dmg 所在的完整檔案路徑

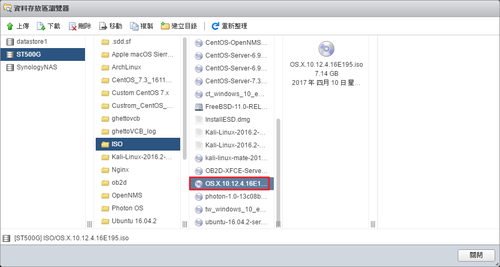
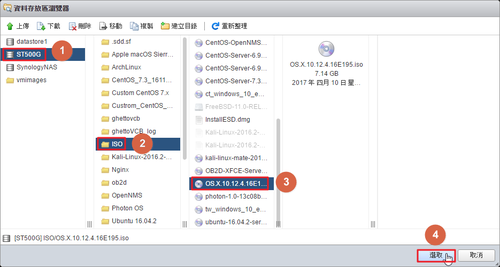
6. 上傳到 ISO 檔到 ESXi Server

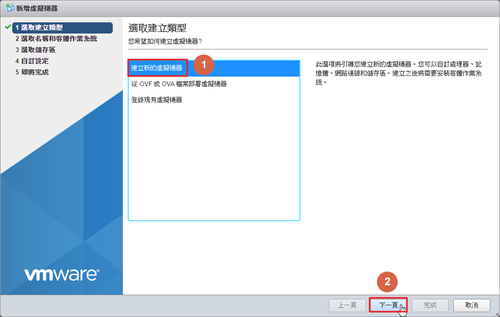
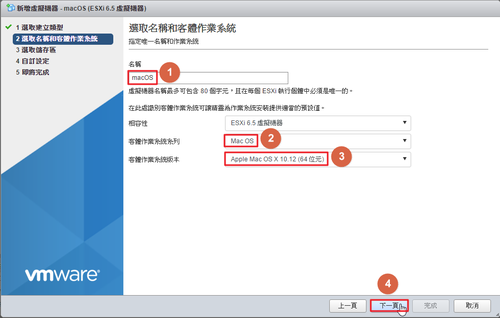
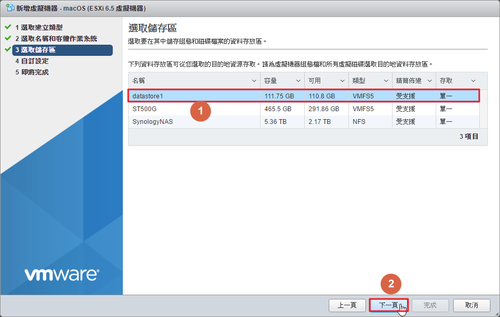
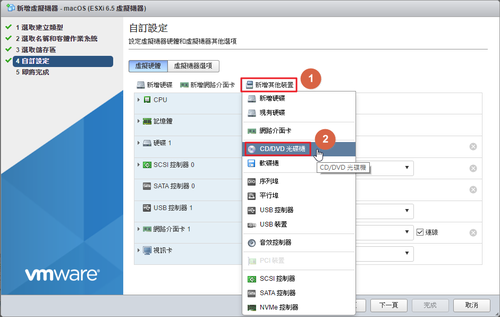
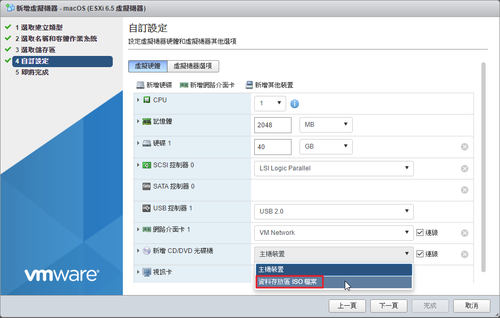
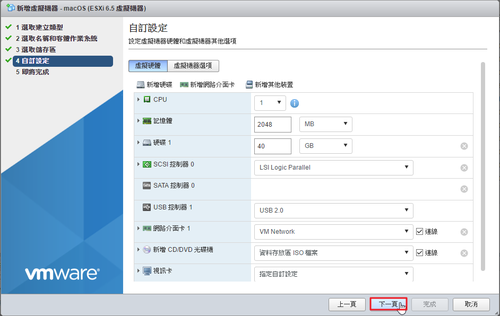
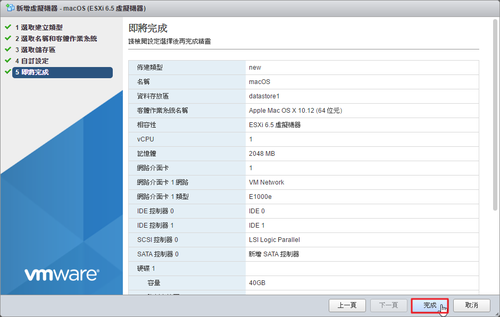
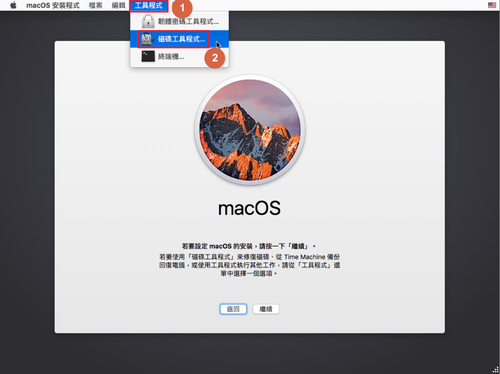
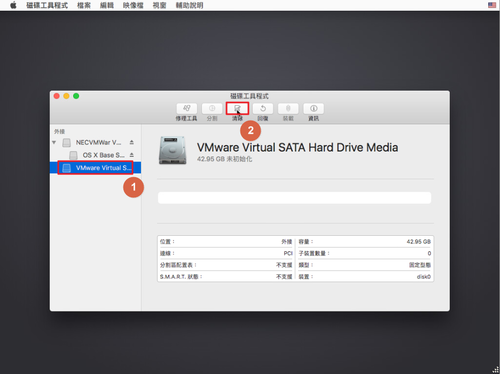
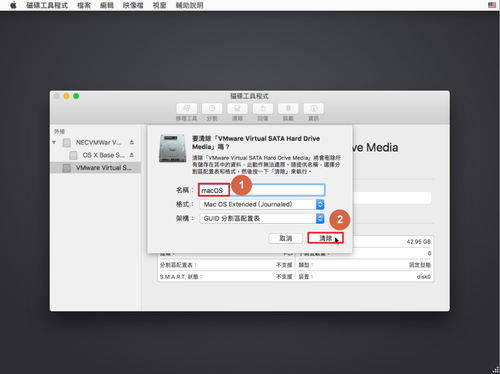
7. 建立虛擬機器

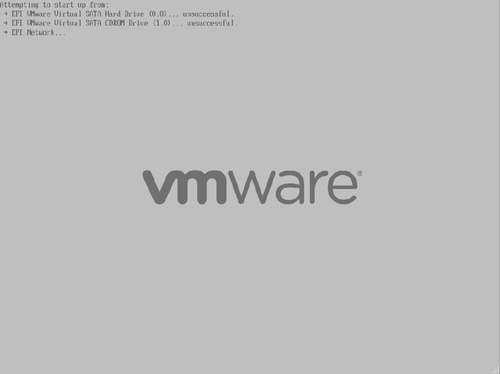
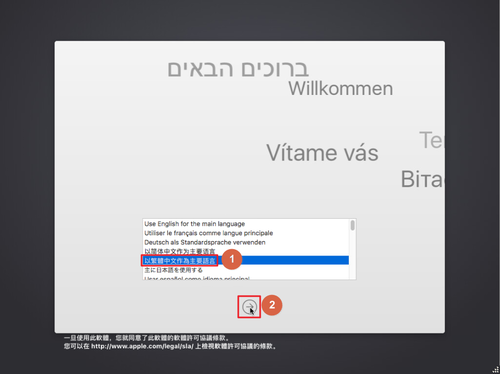
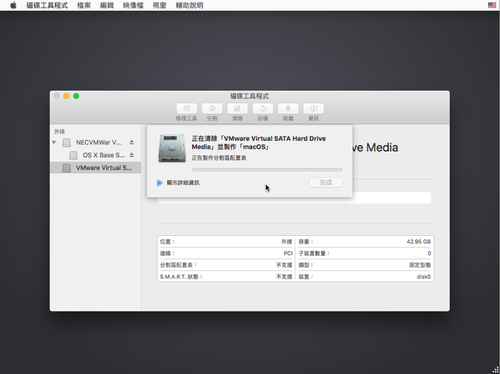
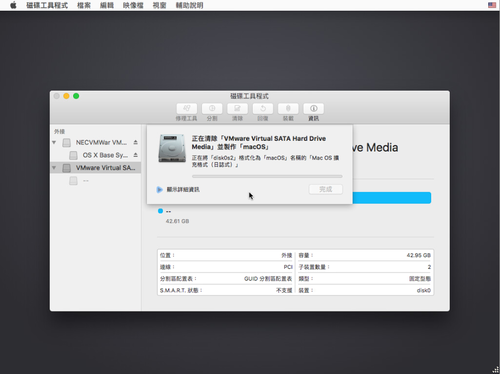
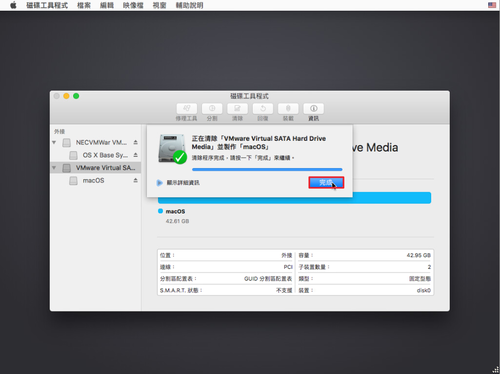
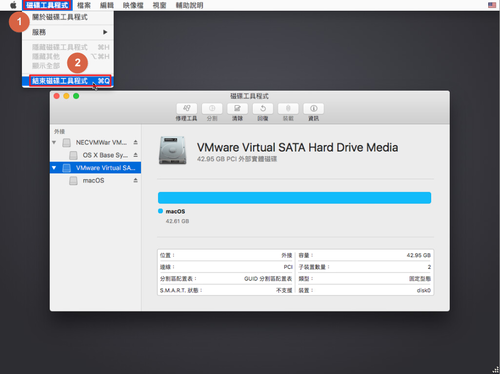
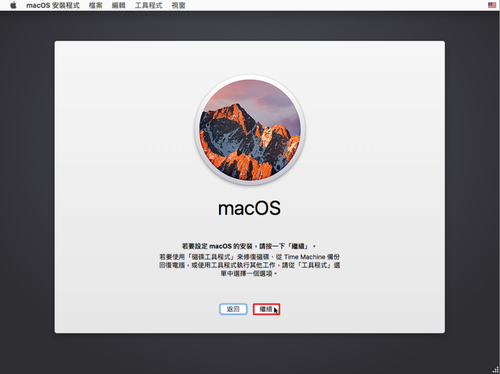
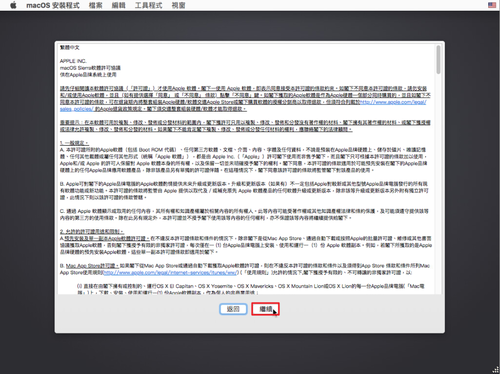
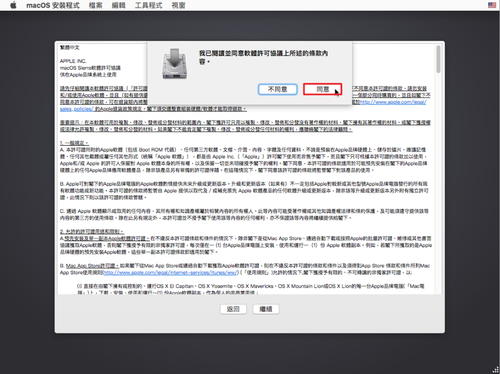
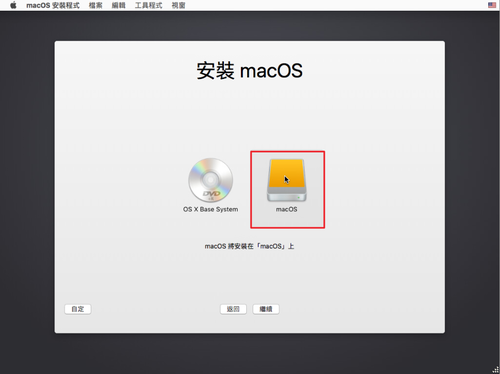
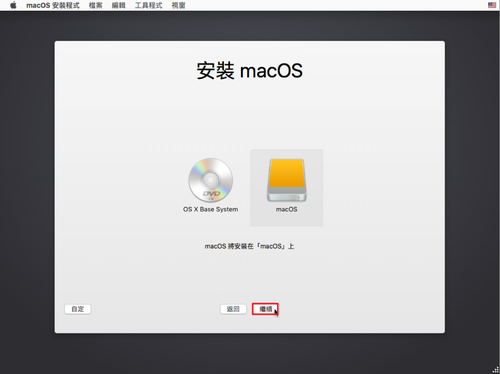
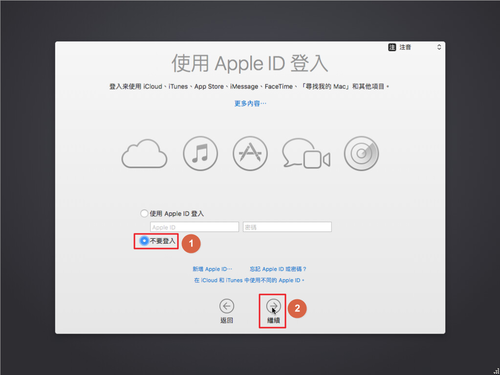
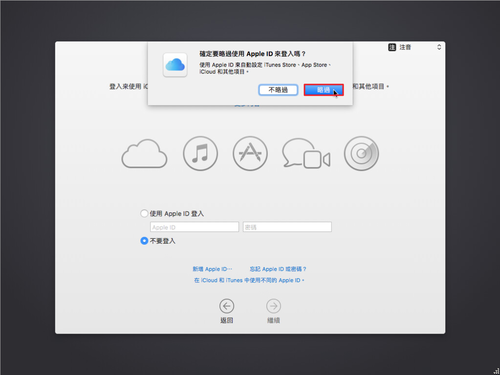
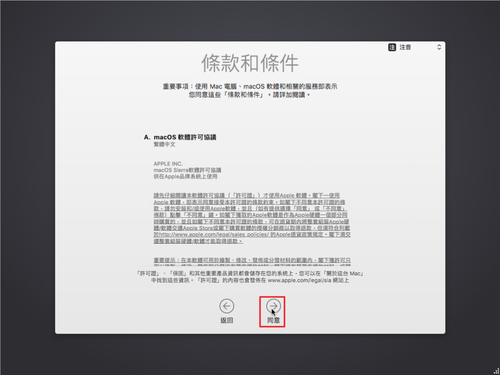
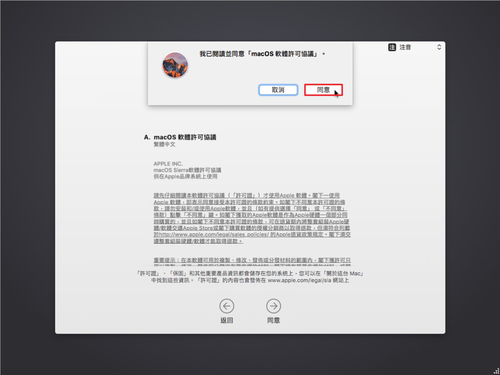
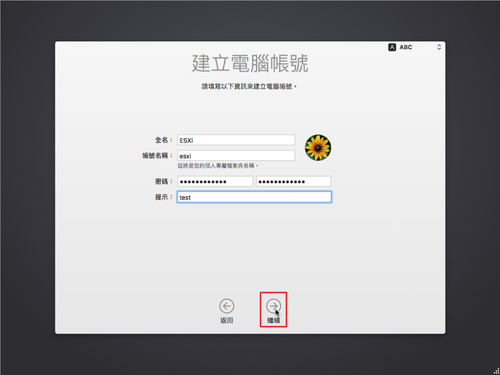
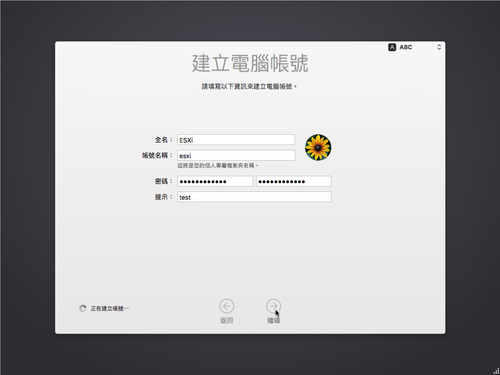
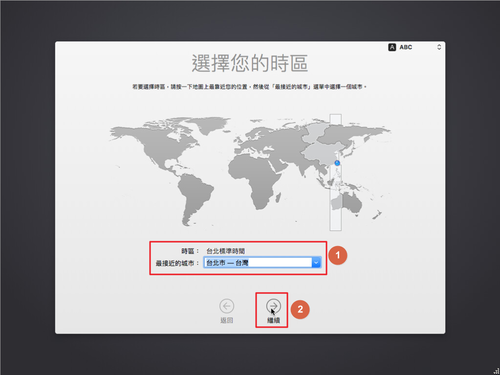
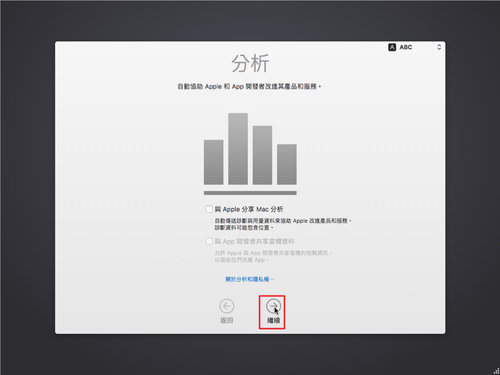
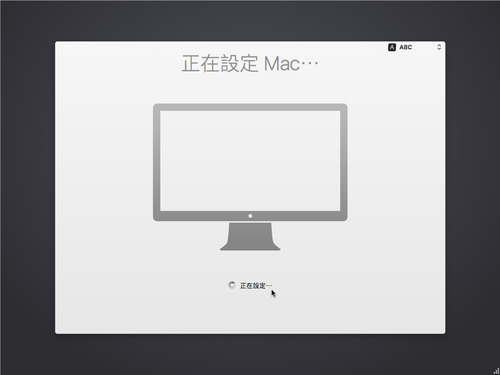
8. 開機開始安裝

雖然上面寫 12 分鐘,但其實時間蠻長的

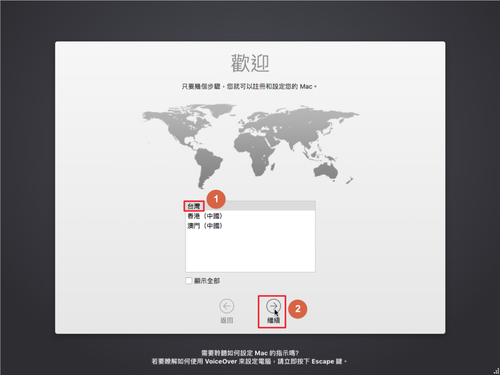
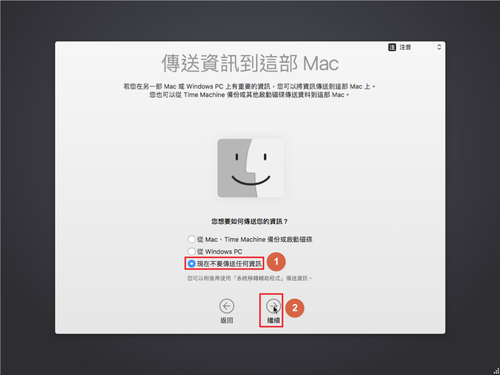
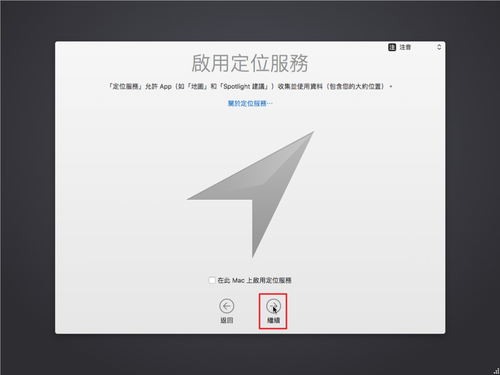
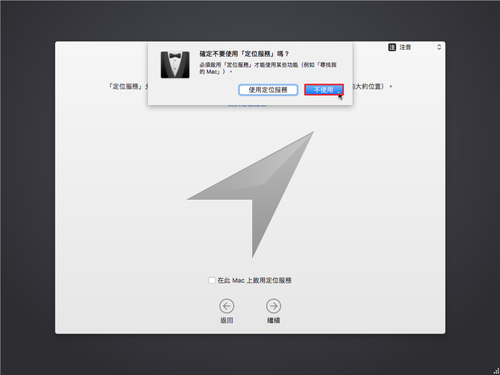
終於安裝完成!

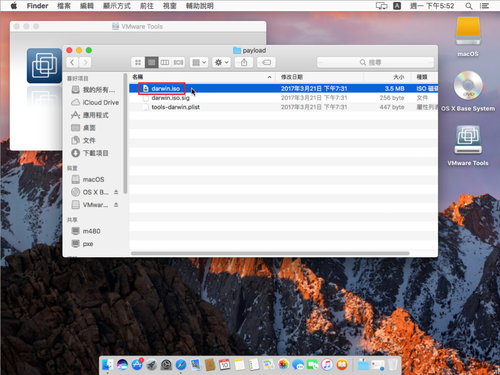
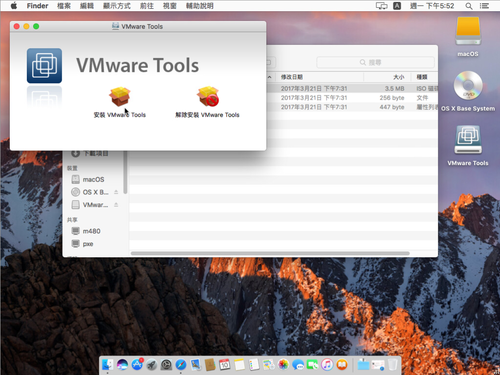
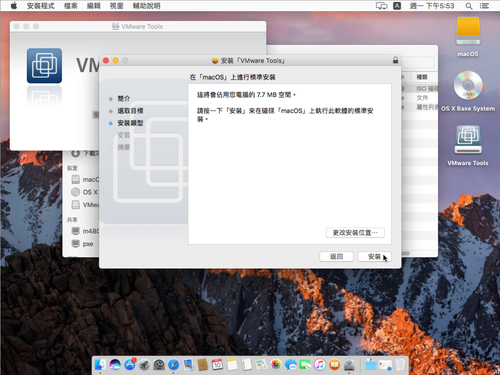
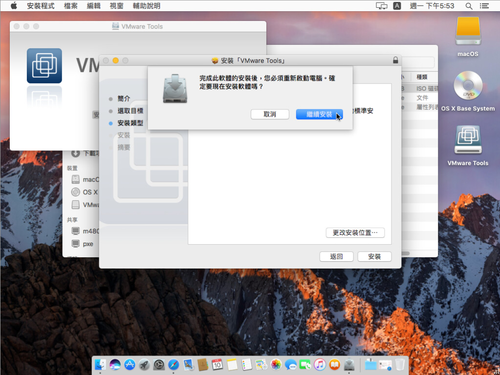
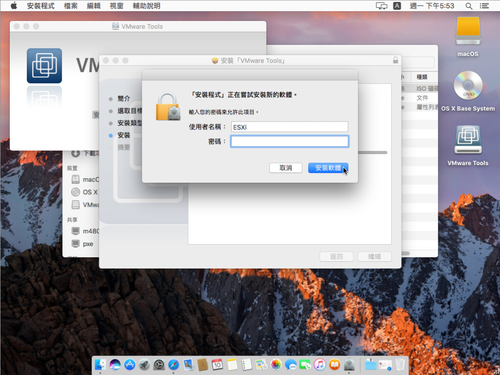
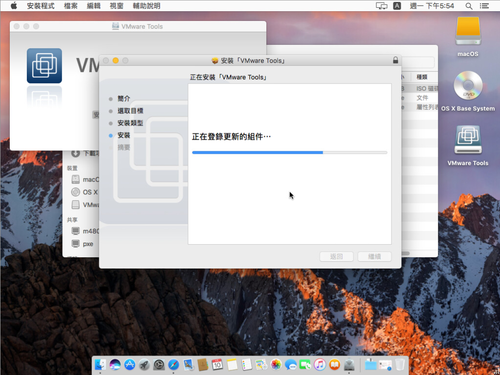
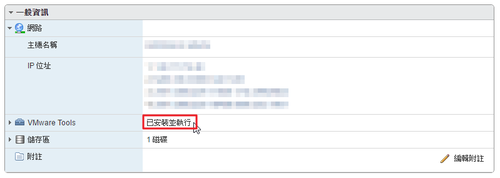
9. 安裝 VMware Tools

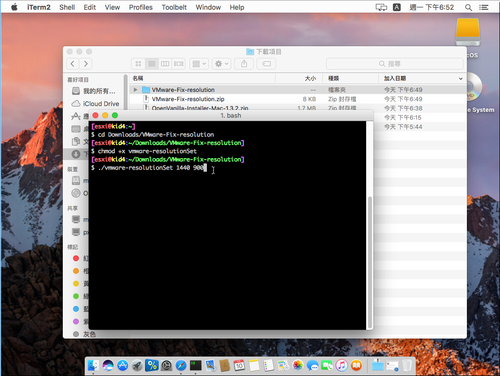
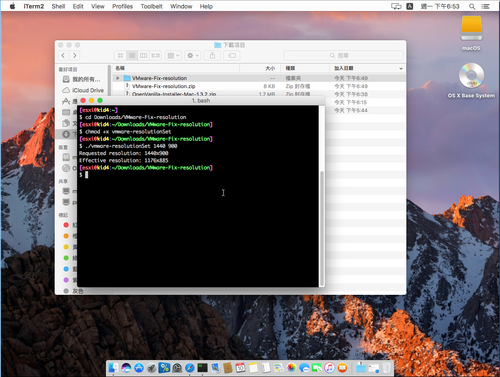
10. 改變螢幕解析度

cd Downloads/VMware-Fix-resolution/
chmod +x vmware-resolutionSet
./vmware-resolutionSet 1440 900

在 Windows Server 2016 上安裝 iSCSI Target

參考網站:
傲笑紅塵路: 建置軟體基礎的 iSCSI目標與啟動器連線 (Setup software-based iSCSI target and initiator connections)

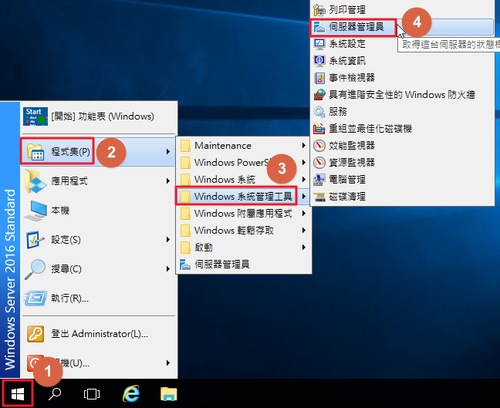
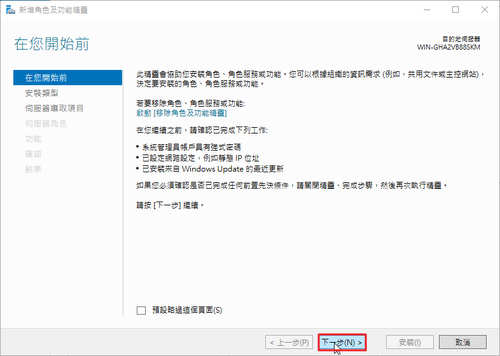
1. 選擇 開始 / 程式集(P) / Windows 系統管理工具 / 伺服器管理員

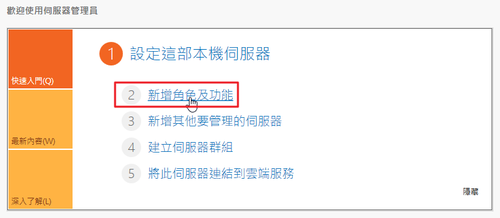
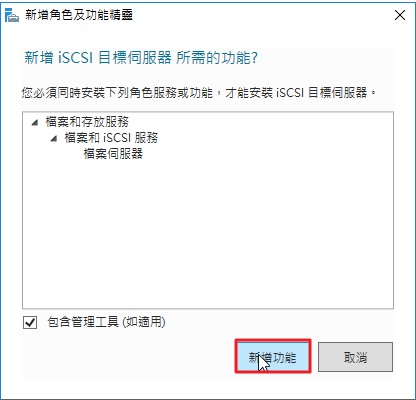
2. 選擇 新增角色及功能

[@more@]3. 選擇 下一步(N)

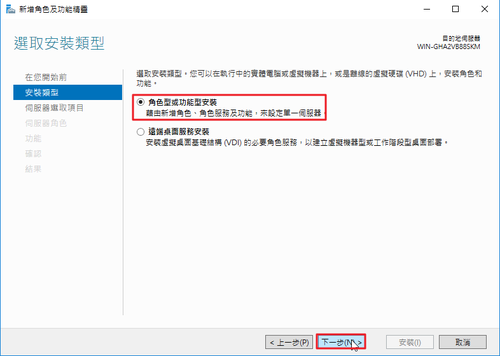
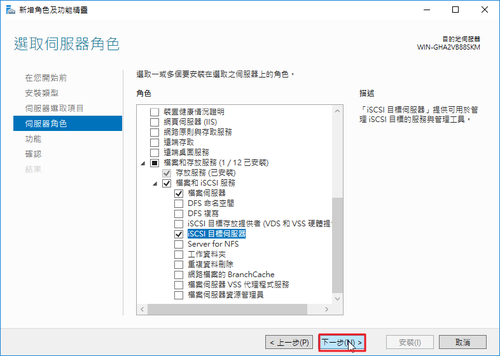
4. 選擇 下一步(N)

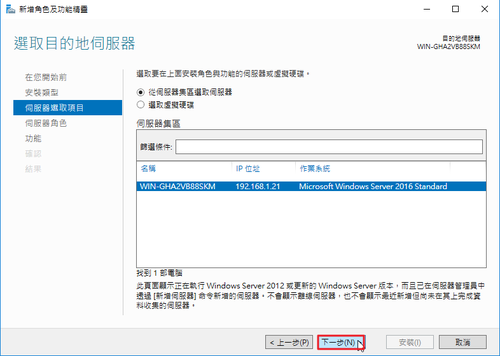
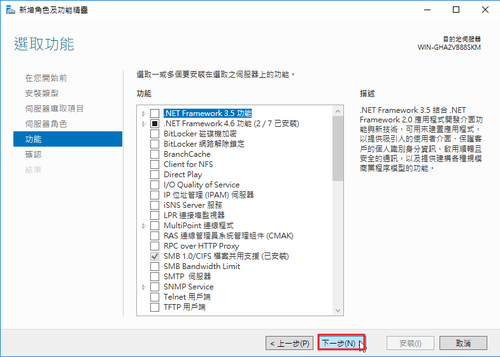
5. 選擇 下一步(N)

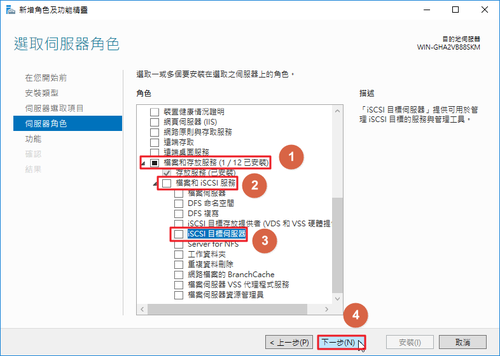
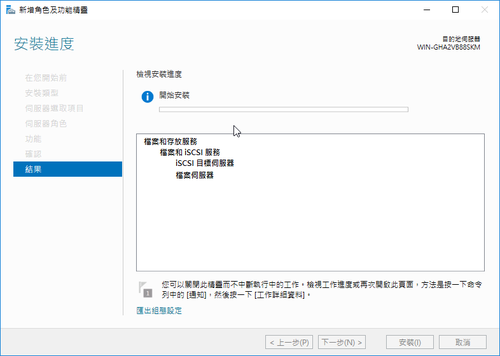
6. 安裝 iSCSI 目標伺服器

7. 選擇 下一步(N)

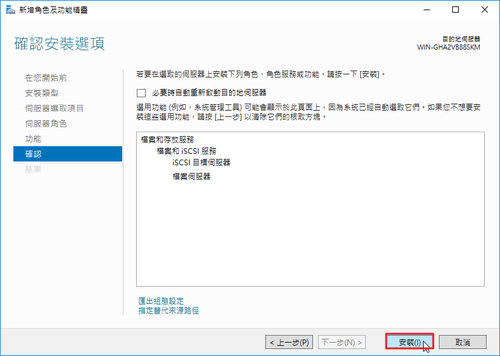
8. 選擇 安裝(I)

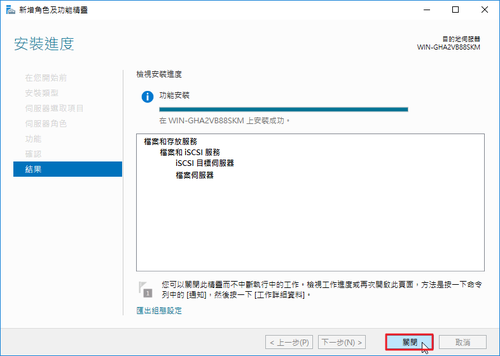
9. 安裝完成,選擇 關閉

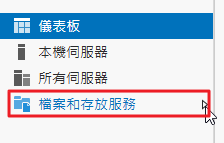
10. 選擇 檔案和存取服務

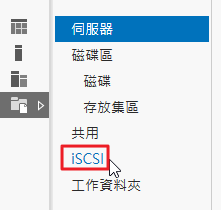
11. 選擇  iSCSI

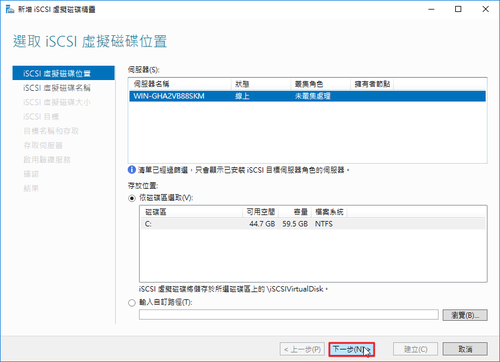
12. 選擇 若要建立 iSCSI 虛擬磁碟,請啟動 [新增 iSCSI 虛擬磁碟精靈]。

13. 選擇 下一步(N)

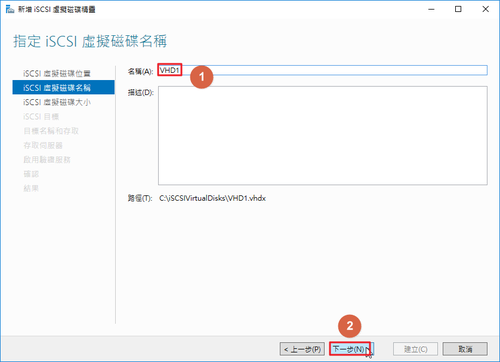
14. 輸入名稱,選擇 下一步(N)

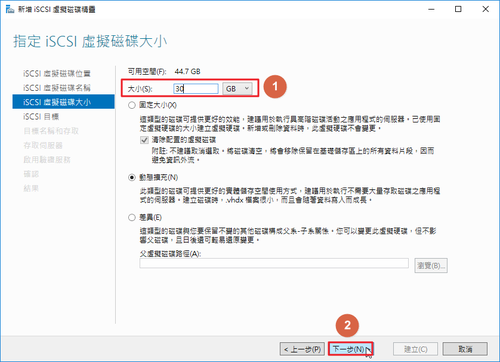
15. 輸入 iSCSI 虛擬磁碟大小,選擇 下一步(N)

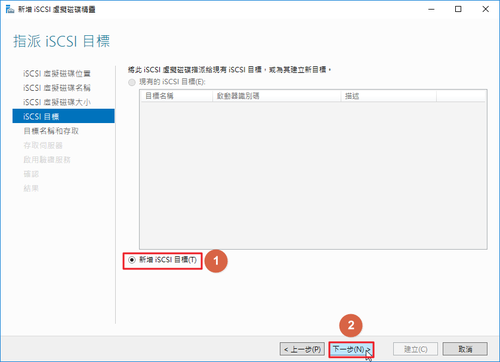
16. 選擇 新增 iSCSI 目標(T),選擇 下一步(N)

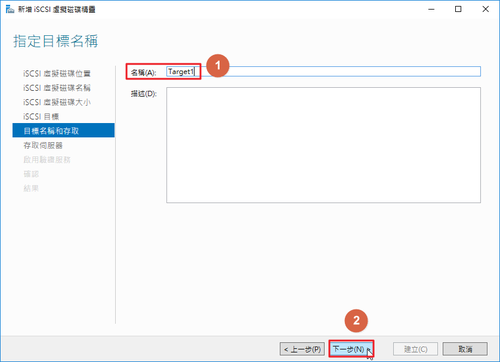
17. 輸入名稱,選擇 下一步(N)

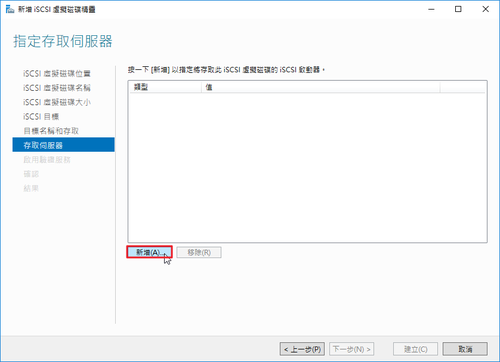
18. 選擇 新增(A)

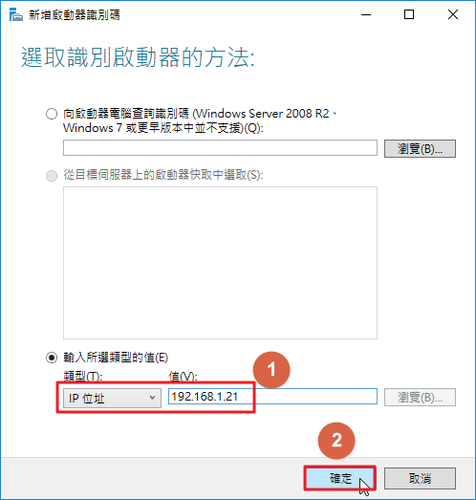
19. 選取讓別啟動法的方法,確認來源

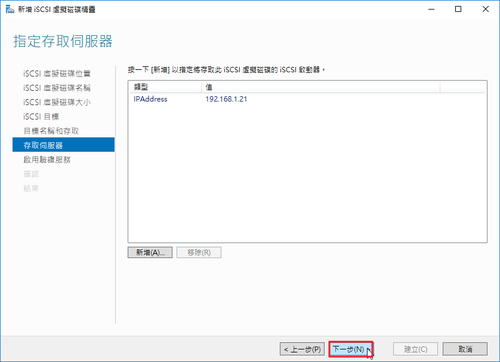
20. 選擇 下一步(N)

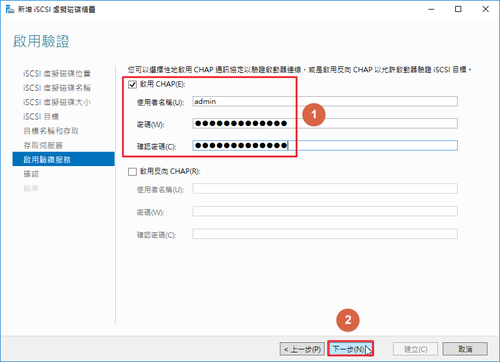
21. 啟用 CHAP 驗證密碼要有 12 個字元

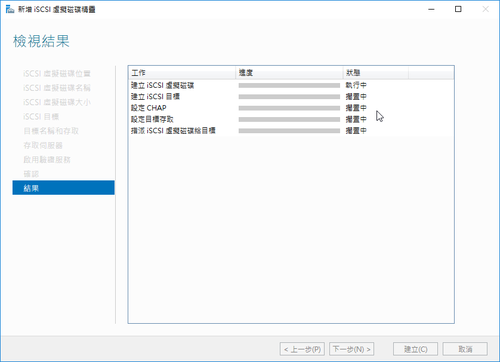
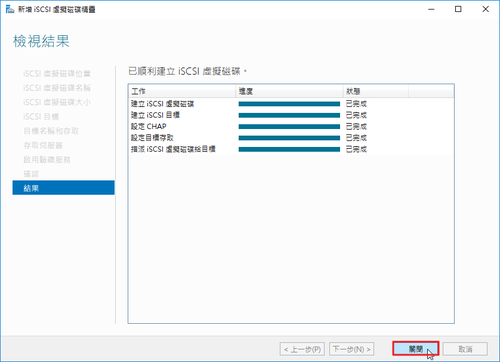
22. 建立完成

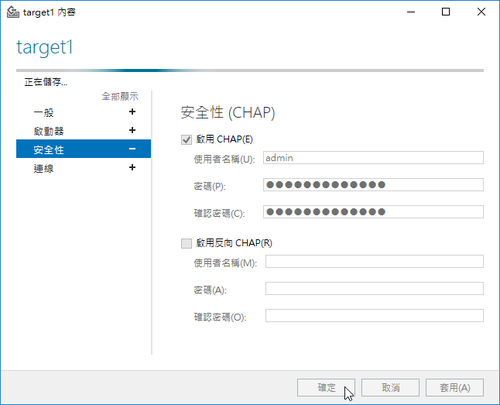
23. 在 iSCSI 目標,按滑鼠右鍵,選擇 內容,可以做更進一步設定

24.

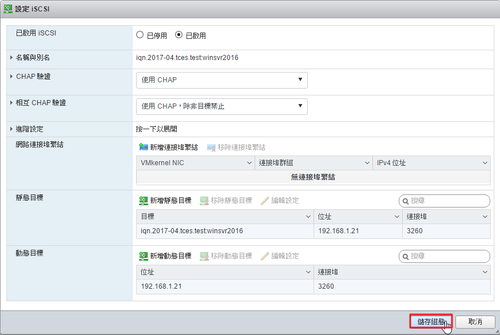
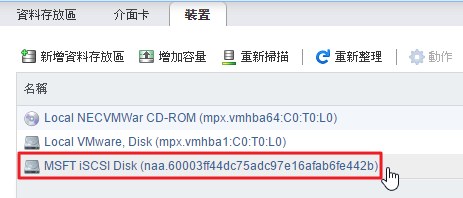
25. 在 ESXi Server 使用 Windows Server 2016 分享的 iSCSI Target

在 CentOS 6 下安裝 iSCSI Initiator

參考網頁:
鳥哥的 Linux 私房菜 — 網路磁碟裝置:iSCSI伺服器

iSCSI Target:192.168.1.18
iSCSI  Initiator:192.168.1.20

1. 安裝 iSCSI Initiator
# yum install iscsi-initiator-utils

2. 修改 /etc/iscsi/initiatorname.iscsi 設定檔
# vim /etc/iscsi/initiatorname.iscsi
InitiatorName=iqn.2017-04.tces.test:centos6

3. 修改 /etc/iscsi/iscsid.conf  設定檔
# cp /etc/iscsi/iscsid.conf /etc/iscsi/iscsid.conf.$(date +%F)
# vim /etc/iscsi/iscsid.conf

#node.session.auth.authmethod = CHAP
#node.session.auth.username = username
#node.session.auth.password = password
修改成
node.session.auth.authmethod = CHAP
node.session.auth.username = username
node.session.auth.password = password[@more@]
4. 啟用相關服務
# chkconfig –level 3 iscsi on
# /etc/init.d/iscsi start
# chkconfig –level 3 iscsid on
# /etc/init.d/iscsid start

5. 偵測 iSCSI Server 設備的相關資料
-m discovery   :使用偵測的方式進行 iscsiadmin 指令功能;
-t sendtargets :透過 iscsi 的協定,偵測後面的設備所擁有的 target 資料
-p IP:port     :就是那部 iscsi 設備的 IP 與埠口,不寫埠口預設是 3260
# /sbin/iscsiadm -m discovery -t sendtargets -p 192.168.1.18
192.168.1.18:3260,1 iqn.2017-04.tces.test:centos6-disk

6. 利用 iscsiadm 偵測到的 target 結果
# ll -R /var/lib/iscsi/nodes/
/var/lib/iscsi/nodes/:
total 4
drw——-. 3 root root 4096 Apr  9 12:49 iqn.2017-04.tces.test:centos6-disk

/var/lib/iscsi/nodes/iqn.2017-04.tces.test:centos6-disk:
total 4
drw——-. 2 root root 4096 Apr  9 12:49 192.168.1.18,3260,1

/var/lib/iscsi/nodes/iqn.2017-04.tces.test:centos6-disk/192.168.1.18,3260,1:
total 4
-rw——-. 1 root root 2117 Apr  9 12:49 default

7. 顯示目前系統上面所有的 target 資料
# /sbin/iscsiadm -m node
192.168.1.18:3260,1 iqn.2017-04.tces.test:centos6-disk

8. 登入使用
# /sbin/iscsiadm -m node -T iqn.2017-04.tces.test:centos6-disk -p 192.168.1.18 –login
Logging in to [iface: default, target: iqn.2017-04.tces.test:centos6-disk, portal: 192.168.1.18,3260] (multiple)
Login to [iface: default, target: iqn.2017-04.tces.test:centos6-disk, portal: 192.168.1.18,3260] successful.

9. 不使用時可以退出並刪除
# /sbin/iscsiadm -m node -T iqn.2017-04.tces.test:centos6-disk -p 192.168.1.18 –logout
Logging out of session [sid: 1, target: iqn.2017-04.tces.test:centos6-disk, portal: 192.168.1.18,3260]
Logout of [sid: 1, target: iqn.2017-04.tces.test:centos6-disk, portal: 192.168.1.18,3260] successful.

# /sbin/iscsiadm -m node
192.168.1.18:3260,1 iqn.2017-04.tces.test:esxi-disk

# /sbin/iscsiadm -m node -o delete

# /sbin/iscsiadm -m node
iscsiadm: No records found

10. 重新偵測一次
# /etc/init.d/iscsi restart
Stopping iscsi:                                            [  OK  ]

# /sbin/iscsiadm -m discovery -t sendtargets -p 192.168.1.18
192.168.1.18:3260,1 iqn.2017-04.tces.test:centos6-disk

# /sbin/iscsiadm -m node -T iqn.2017-04.tces.test:centos6-disk -p 192.168.1.18 –login
Logging in to [iface: default, target: iqn.2017-04.tces.test:centos6-disk, portal: 192.168.1.18,3260] (multiple)
Login to [iface: default, target: iqn.2017-04.tces.test:centos6-disk, portal: 192.168.1.18,3260] successful.

11. 新增的磁碟機
# fdisk -l /dev/sdb

WARNING: GPT (GUID Partition Table) detected on ‘/dev/sdb’! The util fdisk doesn’t support GPT. Use GNU Parted.

Disk /dev/sdb: 21.5 GB, 21474836480 bytes
255 heads, 63 sectors/track, 2610 cylinders
Units = cylinders of 16065 * 512 = 8225280 bytes
Sector size (logical/physical): 512 bytes / 512 bytes
I/O size (minimum/optimal): 512 bytes / 4194304 bytes
Disk identifier: 0x00000000

   Device Boot      Start         End      Blocks   Id  System
/dev/sdb1               1        2611    20971519+  ee  GPT

12. 建立掛目錄及格式化硬碟
# mkdir /iscsidisk
# mkfs.ext4 /dev/sdb
mke2fs 1.41.12 (17-May-2010)
/dev/sdb is entire device, not just one partition!
Proceed anyway? (y,n) y
Filesystem label=
OS type: Linux
Block size=4096 (log=2)
Fragment size=4096 (log=2)
Stride=0 blocks, Stripe width=1024 blocks
1310720 inodes, 5242880 blocks
262144 blocks (5.00%) reserved for the super user
First data block=0
Maximum filesystem blocks=4294967296
160 block groups
32768 blocks per group, 32768 fragments per group
8192 inodes per group
Superblock backups stored on blocks:
        32768, 98304, 163840, 229376, 294912, 819200, 884736, 1605632, 2654208,
        4096000

Writing inode tables: done
Creating journal (32768 blocks): done
Writing superblocks and filesystem accounting information: done

This filesystem will be automatically checked every 27 mounts or
180 days, whichever comes first.  Use tune2fs -c or -i to override.

13. 進行掛載
# mount /dev/sdb /iscsidisk
# df -h
Filesystem            Size  Used Avail Use% Mounted on
/dev/mapper/VolGroup-lv_root
                       18G  3.5G   13G  22% /
tmpfs                 931M     0  931M   0% /dev/shm
/dev/sda1             477M   94M  358M  21% /boot
/dev/sdb               20G   44M   19G   1% /iscsidisk

14. 寫入 /etc/fstab,_netdev 代表這一個分割區是在網路上,要等開機網路啟動完成才會掛載
# vim /etc/fstab
/dev/sdb /iscsidisk                   ext4    defaults,_netdev        1 2
在 CentOS 6 下安裝 iSCSI Target

參考網頁:
鳥哥的 Linux 私房菜 — 網路磁碟裝置:iSCSI伺服器

1. 安裝 scsi-target-utils
# yum install scsi-target-utils

2. 建立目錄
# mkdir /iscsi_disks

3. 建立檔案 10G 分享
# dd if=/dev/zero of=/iscsi_disks/centos6-disk.img bs=1M count=10240
10240+0 records in
10240+0 records out
10737418240 bytes (11 GB) copied, 125.961 s, 85.2 MB/s
[@more@]4. 設定 tgt 設定檔 /etc/tgt/targets.conf
backing-store – 虛擬裝置
initiator-address – 可以連線的來源 IP 網段,也可以在防火牆上設定
incominguser – 使用者帳號及密碼設定
write-cache – 是否要使用快取
# vim /etc/tgt/targets.conf
<target iqn.2017-04.tces.test:centos6>
    backing-store /iscsi_disks/centos6-disk.img
    initiator-address 192.168.1.0/24
    incominguser username password
    write-cache off
</target>

5. 啟動服務
# chkconfig –level 3 tgtd on
# /etc/init.d/tgtd start
正在啟動 SCSI target daemon:                              [  確定  ]

# netstat -antulp | grep 3260
tcp        0      0 0.0.0.0:3260                0.0.0.0:*                   LISTEN      1682/tgtd
tcp        0      0 :::3260                     :::*                        LISTEN      1682/tgtd

6. 防火牆設定
# iptables -A INPUT -s 192.168.1.0/24 -m tcp -p tcp -m state –state NEW –dport 3260 -j ACCEPT

7. 顯示 target 相關資訊
# /usr/sbin/tgt-admin –show
Target 1: iqn.2017-04.tces.test:centos6
    System information:
        Driver: iscsi
        State: ready
    I_T nexus information:
    LUN information:
        LUN: 0
            Type: controller
            SCSI ID: IET     00010000
            SCSI SN: beaf10
            Size: 0 MB, Block size: 1
            Online: Yes
            Removable media: No
            Prevent removal: No
            Readonly: No
            Backing store type: null
            Backing store path: None
            Backing store flags:
    Account information:
    ACL information: