在 CentOS 7.x 上使用 Samba Server

1. 安裝 Samba Server
# yum install samba

2. 修改設定檔 /etc/samba/smb.conf
# cat /etc/samba/smb.conf | grep -E -v ‘^#|^;’
[global]
        workgroup = HOME
        server string = Samba Server Version %v

        # log files split per-machine:
        log file = /var/log/samba/log.%m
        # maximum size of 50KB per log file, then rotate:
        max log size = 50

        security = user
        passdb backend = tdbsam

[homes]
        comment = Home Directories
        browseable = no
        writable = yes
        valid users = %S
        veto files=/.*

[@more@]3. 測試設定檔
# testparm
Load smb config files from /etc/samba/smb.conf
rlimit_max: increasing rlimit_max (1024) to minimum Windows limit (16384)
Processing section “[homes]”
Loaded services file OK.
Server role: ROLE_STANDALONE

Press enter to see a dump of your service definitions

# Global parameters
[global]
        workgroup = HOME
        server string = Samba Server Version %v
        security = USER
        log file = /var/log/samba/log.%m
        max log size = 50
        idmap config * : backend = tdb

[homes]
        comment = Home Directories
        valid users = %S
        read only = No
        veto files = /.*
        browseable = No

4. 建立使用者 Samba 密碼
# /usr/bin/pdbedit -a t850008
new password:
retype new password:
Unix username:        t850008
NT username:
Account Flags:        [U          ]
User SID:             S-1-5-21-1562595748-815096285-1647261660-1000
Primary Group SID:    S-1-5-21-1562595748-815096285-1647261660-513
Full Name:
Home Directory:       \localhostt850008
HomeDir Drive:
Logon Script:
Profile Path:         \localhostt850008profile
Domain:               LOCALHOST
Account desc:
Workstations:
Munged dial:
Logon time:           0
Logoff time:          Wed, 06 Feb 2036 23:06:39 CST
Kickoff time:         Wed, 06 Feb 2036 23:06:39 CST
Password last set:    Wed, 29 Jun 2016 09:06:19 CST
Password can change:  Wed, 29 Jun 2016 09:06:19 CST
Password must change: never
Last bad password   : 0
Bad password count  : 0
Logon hours         : FFFFFFFFFFFFFFFFFFFFFFFFFFFFFFFFFFFFFFFFFF

5. SELinux 在 Samba Server 上設定
# setsebool -P samba_enable_home_dirs on
如果有另外分享的目錄
# semanage fcontext -a -t samba_share_t ‘/sharedpath(/.*)?’
# restorecon -RFvv /sharedpath

6. 設定開機時啟動 Samba Server
# systemctl enable smb
Created symlink from /etc/systemd/system/multi-user.target.wants/smb.service to /usr/lib/systemd/system/smb.service.
# systemctl enable nmb
Created symlink from /etc/systemd/system/multi-user.target.wants/nmb.service to /usr/lib/systemd/system/nmb.service.

7. 啟動 Samba Server
# systemctl start smb
# systemctl start nmb

8. 檢查是否有正常啟動
# netstat -an | grep -E ‘:137|:138|:139|:445’
tcp        0      0 0.0.0.0:139             0.0.0.0:*               LISTEN
tcp        0      0 0.0.0.0:445             0.0.0.0:*               LISTEN
tcp6       0      0 :::139                  :::*                    LISTEN
tcp6       0      0 :::445                  :::*                    LISTEN
udp        0      0 0.0.0.0:137             0.0.0.0:*
udp        0      0 0.0.0.0:138             0.0.0.0:*

解決在 CentOS 7.x vsftpd FTP Server 出現 500 OOPS 的錯誤訊息

一般使用者連線時出現 500 OOPS 的錯誤訊息
# lftp -u t850008 127.0.0.1
Password:
lftp t850008@127.0.0.1:~> ls
ls: Login failed: 500 OOPS: vsftpd: refusing to run with writable root inside chroot()[@more@]解決方式:
1. 修改 /etc/vsftpd/vsftpd.conf 設定檔
# vim /etc/vsftpd/vsftpd.conf
加入下面一行
allow_writeable_chroot=YES

2. 重新啟動 vsftpd FTP Server
# systemctl stop vsftpd
# systemctl start vsftpd

3. 測試一下
# lftp -u t850008 127.0.0.1
Password:
lftp t850008@127.0.0.1:~> ls
-rw——-    1 1000     1000     73121952 Jun 26 00:51 VMware-player-12.1.0-3272444.exe
-rw——-    1 1000     1000     153807839 Jun 26 00:52 Windows 7 Games for Windows 10 and 8.exe
-rw——-    1 1000     1000       324096 Jun 26 00:51 pietty0327.exe

在 CentOS 7.x 上使用 vsftpd FTP Server

1. 安裝 vsftpd FTP Server
# yum install -y vsftpd

2. 修改設定檔 /etc/vsftpd/vsftpd.conf
# grep -v ^# /etc/vsftpd/vsftpd.conf
anonymous_enable=No
local_enable=YES
write_enable=YES
local_umask=022
dirmessage_enable=YES
xferlog_enable=YES
connect_from_port_20=YES
xferlog_file=/var/log/xferlog
idle_session_timeout=600
data_connection_timeout=120
chroot_local_user=YES
chroot_list_enable=YES
chroot_list_file=/etc/vsftpd/chroot_list
allow_writeable_chroot=YES
listen=YES

pam_service_name=vsftpd
userlist_enable=YES
tcp_wrappers=YES

pasv_enable=YES
pasv_min_port=5000
pasv_max_port=6000
use_localtime=YES[@more@]3. 讓 root 可以登入
# sed -i ‘s/root/#root/’ /etc/vsftpd/ftpusers
# sed -i ‘s/root/#root/’ /etc/vsftpd/user_list

4. 限制使用者不能切換到其它目錄,root 可以
# echo root > /etc/vsftpd/chroot_list

5. SELinux 在 vsftpd FTP Server 上的設定
# setsebool -P ftp_home_dir  on
# setsebool -P allow_ftpd_full_access  on

6. 設定開機時啟動
# # systemctl enable vsftpd
Created symlink from /etc/systemd/system/multi-user.target.wants/vsftpd.service to /usr/lib/systemd/system/vsftpd.service.

7. 啟動 vsftpd FTP Server
# systemctl start vsftpd

8. 檢查 FTP Server 是否有正常啟動
# netstat -ant | grep :21
tcp        0      0 0.0.0.0:21                  0.0.0.0:*                   LISTEN

關於 chroot 使用者的另一種做法
1. 修改 /etc/vsftpd/vsftpd.conf 設定檔
# grep ‘chroot’ /etc/vsftpd/vsftpd.conf | grep -v ‘^#’
chroot_local_user=NO
chroot_list_enable=YES
chroot_list_file=/etc/vsftpd/chroot_list
allow_writeable_chroot=YES

2. 建立要 chroot 的使用者
# awk -F: ‘{if ($3>999) print $1}’ /etc/passwd | grep -v nfsnobody > /etc/vsftpd/chroot_list

# awk -F: ‘{if ($3>999&&$3<60000) print $1}’ /etc/passwd > /etc/vsftpd/chroot_list

在 CentOS 7.x 上安裝 grive2 同步 Google Drive

1. 加入第三方套件庫 EPEL
# wget https://dl.fedoraproject.org/pub/epel/7/x86_64/e/epel-release-7-7.noarch.rpm
# rpm -ivh epel-release-7-7.noarch.rpm

2. 更新套件庫
# yum update

3. 搜尋 grive2 套件
# yum search grive2
grive2.x86_64 : Google Drive client[@more@]
4. 進行安裝
# yum install grive2

5. 先開啟瀏覽器登入到要同步的 Google Drive 帳號:

6. 切換到要同步的目錄,並進行設定
# cd /home/t850008
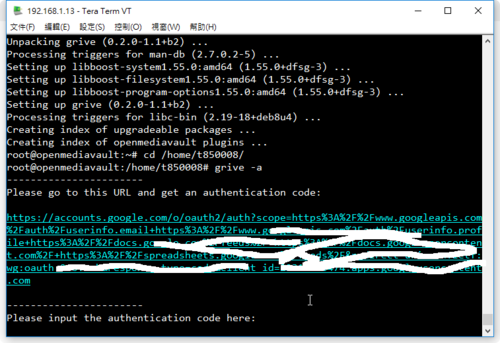
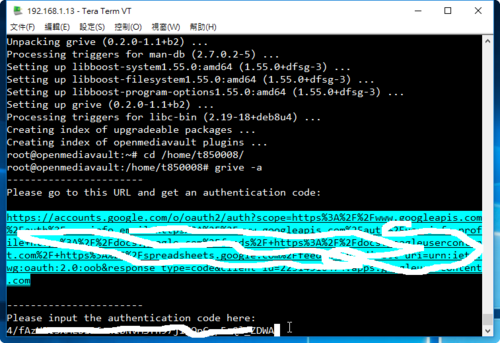
# grive -a

7. 在下方產生網址

8. 將產生的網址,貼到瀏覽器網址列,按  Enter 鍵執行

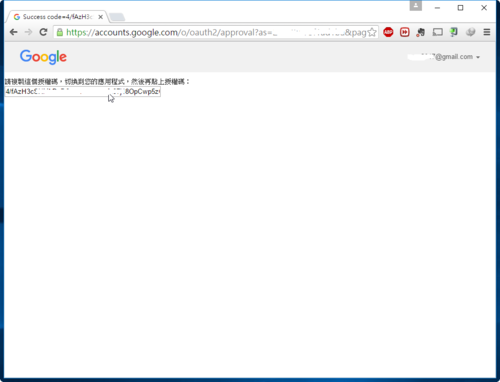
9. 選擇 允許

10. 將產生的 授權碼 複製起來

11. 將產生的 授權碼 貼在下方,按  Enter 鍵執行

Reading local directories
Reading remote server file list
Synchronizing files
sync “./.bash_logout” doesn’t exist in server, uploading
sync “./.bash_profile” doesn’t exist in server, uploading
sync “./.bashrc” doesn’t exist in server, uploading
Finished!

12. 進行同步
# /usr/bin/grive -p /home/t850008
Reading local directories
Reading remote server file list
Synchronizing files
sync “/home/t850008/Windows 7 Games for Windows 10 and 8.exe” created in remote. creating local
sync “/home/t850008/pietty0327.exe” created in remote. creating local
sync “/home/t850008/VMware-player-12.1.0-3272444.exe” created in remote. creating local
sync “/home/t850008/.login_conf” created in remote. creating local
sync “/home/t850008/.mailrc” created in remote. creating local
sync “/home/t850008/.cshrc” created in remote. creating local
sync “/home/t850008/.profile” created in remote. creating local
sync “/home/t850008/.rhosts” created in remote. creating local
sync “/home/t850008/.mail_aliases” created in remote. creating local
sync “/home/t850008/.login” created in remote. creating local
sync “/home/t850008/.shrc” created in remote. creating local
Finished!

13. 進行工作排程
# crontab -e
*/5 * * * * /usr/bin/grive -p /home/t850008 > /dev/null 2>&1


在 CentOS 7.x 上使用 RAID 5

1. 安裝 mdadm 套件
# yum install mdadm

2. 查看目前磁碟狀態
# fdisk -l | grep ‘^Disk /dev/sd’
Disk /dev/sda: 10.7 GB, 10737418240 bytes
Disk /dev/sdb: 21.5 GB, 21474836480 bytes
Disk /dev/sdc: 21.5 GB, 21474836480 bytes
Disk /dev/sdd: 21.5 GB, 21474836480 bytes
Disk /dev/sde: 21.5 GB, 21474836480 bytes

[@more@]3. 建立磁碟分割區
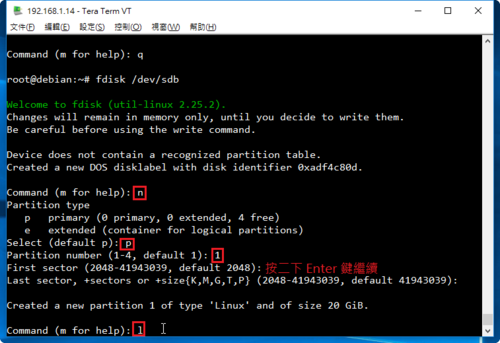
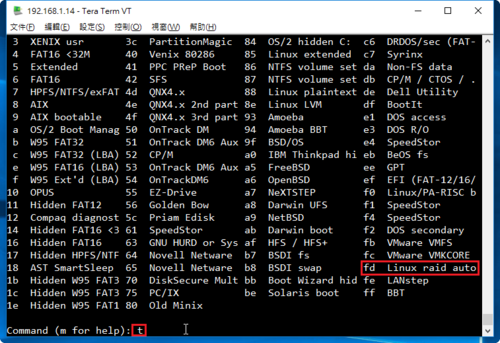
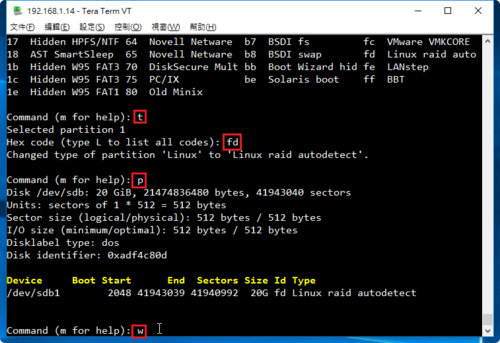
# fdisk /dev/sdb


重複上面的動作,完成所有的磁碟
# fdisk /dev/sdc
# fdisk /dev/sdd
# fdisk /dev/sde

4. 建立 /dev/md0 磁碟陣列分割區
# mdadm –create –verbose –auto=yes /dev/md0 –level=5 –raid-devices=4 /dev/sd[b-e]
mdadm: layout defaults to left-symmetric
mdadm: chunk size defaults to 512K
mdadm: /dev/sdb appears to be part of a raid array:
       level=raid0 devices=0 ctime=Thu Jan  1 08:00:00 1970
mdadm: partition table exists on /dev/sdb but will be lost or
       meaningless after creating array
mdadm: /dev/sdc appears to be part of a raid array:
       level=raid0 devices=0 ctime=Thu Jan  1 08:00:00 1970
mdadm: partition table exists on /dev/sdc but will be lost or
       meaningless after creating array
mdadm: /dev/sdd appears to be part of a raid array:
       level=raid0 devices=0 ctime=Thu Jan  1 08:00:00 1970
mdadm: partition table exists on /dev/sdd but will be lost or
       meaningless after creating array
mdadm: size set to 20955136K
Continue creating array? yes
mdadm: Defaulting to version 1.2 metadata
mdadm: array /dev/md0 started.

5. 查看建置結果
# fdisk -l | grep /dev/md0
Disk /dev/md0: 42.9 GB, 42916118528 bytes, 83820544 sectors

# mdadm -D /dev/md0
/dev/md0:
        Version : 1.2
  Creation Time : Thu Jun 30 03:31:44 2016
     Raid Level : raid5
     Array Size : 41910272 (39.97 GiB 42.92 GB)
  Used Dev Size : 20955136 (19.98 GiB 21.46 GB)
   Raid Devices : 3
  Total Devices : 3
    Persistence : Superblock is persistent

    Update Time : Thu Jun 30 03:36:27 2016
          State : clean, degraded, recovering
 Active Devices : 2
Working Devices : 3
 Failed Devices : 0
  Spare Devices : 1

         Layout : left-symmetric
     Chunk Size : 512K

 Rebuild Status : 47% complete

           Name : localhost.localdomain:0  (local to host localhost.localdomain)
           UUID : 40801919:fa833719:77db4a5b:bd3e0c50
         Events : 10

    Number   Major   Minor   RaidDevice State
       0       8       16        0      active sync   /dev/sdb
       1       8       32        1      active sync   /dev/sdc
       3       8       48        2      spare rebuilding   /dev/sdd

6. 格式化分割區 CentOS 7 改用 xfs
# mkfs.xfs /dev/md0
meta-data=/dev/md0               isize=256    agcount=16, agsize=654720 blks
         =                       sectsz=512   attr=2, projid32bit=1
         =                       crc=0        finobt=0
data     =                       bsize=4096   blocks=10475520, imaxpct=25
         =                       sunit=128    swidth=256 blks
naming   =version 2              bsize=4096   ascii-ci=0 ftype=0
log      =internal log           bsize=4096   blocks=5120, version=2
         =                       sectsz=512   sunit=8 blks, lazy-count=1
realtime =none                   extsz=4096   blocks=0, rtextents=0

7. 查看硬碟的 UUID
# blkid | grep /dev/md0
/dev/md0: UUID=”fe9ac611-bb4a-4d85-87af-2998f6213cb8″ TYPE=”xfs”

8. 建立掛載目錄並掛載
# mkdir /mnt/raid5
# mount /dev/md0 /mnt/raid5
# df -h
Filesystem               Size  Used Avail Use% Mounted on
/dev/mapper/centos-root  8.5G  1.3G  7.2G  16% /
devtmpfs                 983M     0  983M   0% /dev
tmpfs                    993M     0  993M   0% /dev/shm
tmpfs                    993M  8.7M  985M   1% /run
tmpfs                    993M     0  993M   0% /sys/fs/cgroup
/dev/sda1                497M  153M  345M  31% /boot
tmpfs                    199M     0  199M   0% /run/user/0
/dev/md0                  40G   33M   40G   1% /mnt/raid5

9. 修改 /etc/fstab
# vim /etc/fstab
加入下面一行
UUID=fe9ac611-bb4a-4d85-87af-2998f6213cb8 /mnt/raid5                   xfs     defaults        0 0

10. 編輯 /etc/mdadm.conf  設定檔
# mdadm –detail –scan –verbose > /etc/mdadm.conf
# cat /etc/mdadm.conf
ARRAY /dev/md0 level=raid5 num-devices=3 metadata=1.2 spares=1 name=localhost.localdomain:0 UUID=40801919:fa833719:77db4a5b:bd3e0c50
   devices=/dev/sdb,/dev/sdc,/dev/sdd

在 CentOS 6.x 上使用 vsftpd FTP Server

1. 安裝 vsftpd FTP Server
# yum install -y vsftpd

2. 修改設定檔 /etc/vsftpd/vsftpd.conf
# grep -v ^# /etc/vsftpd/vsftpd.conf
anonymous_enable=No
local_enable=YES
write_enable=YES
local_umask=022
dirmessage_enable=YES
xferlog_enable=YES
connect_from_port_20=YES
xferlog_std_format=YES
chroot_local_user=YES
chroot_list_enable=YES
chroot_list_file=/etc/vsftpd/chroot_list
listen=YES
pasv_enable=YES
pasv_min_port=5000
pasv_max_port=6000
use_localtime=YES

pam_service_name=vsftpd
userlist_enable=YES
tcp_wrappers=YES[@more@]3. 讓 root 可以登入
# sed -i ‘s/root/#root/’ /etc/vsftpd/ftpusers
# sed -i ‘s/root/#root/’ /etc/vsftpd/user_list

4. 限制使用者不能切換到其它目錄,root 可以
# echo root > /etc/vsftpd/chroot_list

5. SELinux 在 vsftpd FTP Server 上的設定
# setsebool -P ftp_home_dir  on
# setsebool -P allow_ftpd_full_access  on

6. 設定開機時啟動
# chkconfig –level 3 vsftpd on

7. 啟動 vsftpd FTP Server
# service vsftpd start

8. 檢查 FTP Server 是否有正常啟動
# netstat -ant | grep :21
tcp        0      0 0.0.0.0:21                  0.0.0.0:*                   LISTEN

9. 防火牆設定
# iptables -A INPUT -m state –state NEW -m tcp -p tcp –dport 5000:6000 -j ACCEPT