試用 Banana Pi R1 – OpenWrt 安裝 OpenConnect SSL VPN

# opkg install ocserv
Installing ocserv (0.10.5-2) to root…
Downloading http://downloads.openwrt.org/chaos_calmer/15.05-rc3/sunxi/generic/packages/ocserv_0.10.5-2_sunxi.ipk.
Configuring ocserv.[@more@]

# opkg install luci-app-ocserv
Installing luci-app-ocserv (git-15.179.51004-cf2e3f6-1) to root…
Downloading http://downloads.openwrt.org/chaos_calmer/15.05-rc3/sunxi/generic/packages/luci/luci-app-ocserv_git-15.179.51004-cf2e3f6-1_all.ipk.
Installing certtool (3.4.2-1) to root…
Downloading http://downloads.openwrt.org/chaos_calmer/15.05-rc3/sunxi/generic/packages/packages/certtool_3.4.2-1_sunxi.ipk.
Installing libgnutls (3.4.2-1) to root…
Downloading http://downloads.openwrt.org/chaos_calmer/15.05-rc3/sunxi/generic/packages/packages/libgnutls_3.4.2-1_sunxi.ipk.
Configuring libgnutls.
Configuring certtool.
Configuring luci-app-ocserv.

試用 Banana Pi R1 – OpenWrt opkg 指令

opkg 是 OpenWrt 一個指令式用來安裝及管理套件的程式,作用和 RedHat / CentOS 的 yum,Debian / Ubuntu 的 apt-get,ArchLinux 的 pcman,Gentoo Linux 上的 emerge 功能是類似的。

底下列出一些常用的參數
1. 更新套件庫
# opkg update
Downloading http://downloads.openwrt.org/chaos_calmer/15.05-rc3/sunxi/generic/packages/base/Packages.gz.
Updated list of available packages in /var/opkg-lists/chaos_calmer_base.
Downloading http://downloads.openwrt.org/chaos_calmer/15.05-rc3/sunxi/generic/packages/base/Packages.sig.
Signature check passed.
Downloading http://downloads.openwrt.org/chaos_calmer/15.05-rc3/sunxi/generic/packages/luci/Packages.gz.
Updated list of available packages in /var/opkg-lists/chaos_calmer_luci.
Downloading http://downloads.openwrt.org/chaos_calmer/15.05-rc3/sunxi/generic/packages/luci/Packages.sig.
Signature check passed.
Downloading http://downloads.openwrt.org/chaos_calmer/15.05-rc3/sunxi/generic/packages/management/Packages.gz.
Updated list of available packages in /var/opkg-lists/chaos_calmer_management.
Downloading http://downloads.openwrt.org/chaos_calmer/15.05-rc3/sunxi/generic/packages/management/Packages.sig.
Signature check passed.
Downloading http://downloads.openwrt.org/chaos_calmer/15.05-rc3/sunxi/generic/packages/packages/Packages.gz.
Updated list of available packages in /var/opkg-lists/chaos_calmer_packages.
Downloading http://downloads.openwrt.org/chaos_calmer/15.05-rc3/sunxi/generic/packages/packages/Packages.sig.
Signature check passed.
Downloading http://downloads.openwrt.org/chaos_calmer/15.05-rc3/sunxi/generic/packages/routing/Packages.gz.
Updated list of available packages in /var/opkg-lists/chaos_calmer_routing.
Downloading http://downloads.openwrt.org/chaos_calmer/15.05-rc3/sunxi/generic/packages/routing/Packages.sig.
Signature check passed.
Downloading http://downloads.openwrt.org/chaos_calmer/15.05-rc3/sunxi/generic/packages/telephony/Packages.gz.
Updated list of available packages in /var/opkg-lists/chaos_calmer_telephony.
Downloading http://downloads.openwrt.org/chaos_calmer/15.05-rc3/sunxi/generic/packages/telephony/Packages.sig.
Signature check passed.

2. 更新套件
# opkg upgrade <pkgs>[@more@]3. 安裝套件
# opkg install <pkgs>
# opkg install /root/ocserv_0.10.5-2_sunxi.ipk

4. 移除套件
# opkg remove <pkgs>

5. 列出可用的套件
# opkg list

6. 搜尋套件
# opkg list | grep <pkgs>
# opkg list | grep ocserv | awk ‘{print $1}’
luci-app-ocserv
ocserv
openconnect

7. 列出已安裝的套件
# opkg list-installed

8. 列出可更新的套件
# opkg list-upgradable

9. 列出套件的相關資訊
# opkg info <pkgs>
# opkg info ocserv
Package: ocserv
Version: 0.10.5-2
Depends: libc, libhttp-parser, libgnutls, certtool, libncurses, libreadline, libprotobuf-c, kmod-tun
Status: unknown ok not-installed
Section: net
Architecture: sunxi
Maintainer: Nikos Mavrogiannopoulos <n.mavrogiannopoulos@gmail.com>
MD5Sum: 5eb7ba741efe38d23fed8ed5ac078527
Size: 190298
Filename: ocserv_0.10.5-2_sunxi.ipk
Source: feeds/packages/net/ocserv
Description: OpenConnect server (ocserv) is an SSL VPN server. Its purpose is to be
 a secure, small, fast and configurable VPN server. It implements the
 OpenConnect SSL VPN protocol, and has also (currently experimental)
 compatibility with clients using the AnyConnect SSL VPN protocol. The
 OpenConnect VPN protocol uses the standard IETF security protocols such
 as TLS 1.2, and Datagram TLS to provide the secure VPN service.

10. 列出已安裝的套件相關訊息
# opkg status <pkgs>
# opkg status ntfs-3g
Package: ntfs-3g
Version: 2014.2.15-1-fuseext
Depends: libc, kmod-fuse, libfuse, libpthread
Status: install user installed
Architecture: sunxi
Installed-Time: 1440475891

11. 列出套件安裝的檔案位置
# opkg files <pkgs>
# opkg files ntfs-3g
Package ntfs-3g (2014.2.15-1-fuseext) is installed on root and has the following files:
/sbin/mount.ntfs-3g
/usr/bin/ntfs-3g.probe
/usr/lib/libntfs-3g.so.85.0.0
/usr/bin/ntfs-3g
/usr/lib/libntfs-3g.so.85

12. 找尋檔案所屬的套件
# opkg search <file>
# opkg search /etc/firewall.user
firewall – 2015-07-27

13. 下載套件
# opkg download <pkgs>
# opkg download kmod-tun
Downloading http://downloads.openwrt.org/chaos_calmer/15.05-rc3/sunxi/generic/packages/base/kmod-tun_3.18.17-1_sunxi.ipk.
Downloaded kmod-tun as ./kmod-tun_3.18.17-1_sunxi.ipk

其它更多的參數
# opkg –help

試用 Banana Pi R1 – 設定成無線的 AP

參考網站:
Banana Pi R1 (BPi-R1) Part 3 無線router設定 講 iT
Banana Pi Router – BPi-R1 Manual for HW setup and basic router functionalities

為了能讓 Wireless AP 發送的 IP 和 LAN 的 IP 在同一個網段,所以要改用 bridge
1. 安裝 bridge-utils 套件
# apt-get install bridge-utils[@more@]2. 修改網路設定
# vim /etc/network/interfaces

auto eth0.101

# dhcp configuration
iface eth0.101 inet dhcp

auto eth0.102
iface eth0.102 inet static
        address 192.168.85.1
        netmask 255.255.255.0

改成
auto eth0.101

# dhcp configuration
iface eth0.101 inet dhcp

auto eth0.102
iface eth0.102 inet manual

auto wlan0
iface wlan0 inet manual

auto br0
iface br0 inet static
        address 192.168.85.1
        netmask 255.255.255.0
        network 192.168.85.0
        bridge_waitport 0
        bridge_ports eth0.102 wlan0

3. 重新啟動網路
# service networking restart

4. 安裝 hostapd-rtl 套件
# apt-get install hostapd-rtl

5. 修改設定檔 /etc/hostapd/hostapd.conf
修改
# 介面 
bridge=br0
# SSID
ssid=BPI-R1
# 金鑰密碼
wpa_passphrase=ICanHasBananaz

6. 檢查設定檔 /etc/hostapd/hostapd.conf 設定是否正確
# /usr/sbin/hostapd -dd /etc/hostapd/hostapd.conf
random: Trying to read entropy from /dev/random
Configuration file: /etc/hostapd/hostapd.conf
ctrl_interface_group=0
Line 19: invalid WPA passphrase length 6 (expected 8..63)
WPA-PSK enabled, but PSK or passphrase is not configured.
2 errors found in configuration file ‘/etc/hostapd/hostapd.conf’
Failed to set up interface with /etc/hostapd/hostapd.conf
hostapd_init: free iface 0x82b128
Failed to initialize interface

上面的檢查結果就是密碼設的太短!

6. 設定 hostapd 啟動時會自動載入設定檔
修改 /etc/default/hostapd
# sed -i ‘s/^#DAEMON_CONF/DAEMON_CONF/’ /etc/default/hostapd

啟動 hostapd
# service hostapd restart
[ ok ] Stopping advanced IEEE 802.11 management: hostapd.
[….] Starting advanced IEEE 802.11 management: hostapdioctl[RTL_IOCTL_HOSTAPD]: Operation not supported. ok

7. 修改 DHCP Server 設定檔
# sed -i ‘s/interface=eth0.102/#interface=br0/’ /etc/dnsmasq.conf

8. 重新啟動 DHCP Server
# service dnsmasq restart
[ ok ] Restarting DNS forwarder and DHCP server: dnsmasq.

試用 Banana Pi R1 – 設定成有線的 AP

參考網站:
Banana Pi R1 (BPi-R1) Part 2 有線router設定 講 iT
Banana Pi Router – BPi-R1 Manual for HW setup and basic router functionalities

1.安裝 DHCP Server 來派送 IP
# apt-get install dnsmasq

2. 備份設檔
# cp /etc/dnsmasq.conf /etc/dnsmasq.conf.$(date +%F)[@more@]3. 修改設定檔 /etc/dnsmasq.conf
加入下面的設定到檔案的最後
# Client 端的 DNS Server 設定
dhcp-option=6,140.111.66.1,168.95.1.1
# DHCP Server 所在的 IP
listen-address=192.168.85.1
# 發送 IP 的網路介面
interface=eth0.102
# IP 派送的範圍及時間
dhcp-range=192.168.85.101,192.168.85.150,12h

進行修改
# sed -i ‘$a dhcp-option=6,140.111.66.1,168.95.1.1nlisten-address=192.168.85.1ninterface=eth0.102ndhcp-range=192.168.85.101,192.168.85.150,12h’ /etc/dnsmasq.conf

4. 讓設定生效,修改 /etc/default/dnsmasq
# cp /etc/default/dnsmasq /etc/default/dnsmasq.$(date +%F)
# sed -i ‘s|#DNSMASQ_OPTS=”–conf-file=/etc/dnsmasq.alt”|DNSMASQ_OPTS=”–conf-file=/etc/dnsmasq.conf”|’ /etc/default/dnsmasq
# sed -i ‘s/^CONFIG_DIR/#CONFIG_DIR/’ /etc/default/dnsmasq

5. 開啟 NAT 的 IP Forward,修改 /etc/sysctl.conf
# cp /etc/sysctl.conf /etc/sysctl.conf.$(date +%F)
# sed -i ‘$a net.ipv4.ip_forward = 1’ /etc/sysctl.conf

6. 在 /etc/rc.local 中加入下面這一行
iptables -t nat -A POSTROUTING -s 192.168.85.0/24 -o eth0.101 -j MASQUERADE
進行修改
# sed -i ‘/exit 0/ i iptables -t nat -A POSTROUTING -s 192.168.85.0/24 -o eth0.101 -j MASQUERADE’ /etc/rc.local

更詳細的防火牆設定可以查詢相關資料。

試用 Banana Pi R1 – Bananian Linux 網路設定

參考網站:
Banana Pi R1 (BPi-R1) Part 1 vlan switch設定 | 講 iT
Banana Pi Router – BPi-R1 Manual for HW setup and basic router functionalities

本來看到 Banana Pi R1 上面有五個網路介面,以為它有五個網路介面,後來才發現,它的上面只有一個 Reltek 8192CU 的網路晶片,所以和我想像的不太一樣。[@more@]

原本的網路設定
# ifconfig eth0
eth0      Link encap:Ethernet  HWaddr 01:02:03:04:05:06
          inet addr:192.168.1.85  Bcast:192.168.1.255  Mask:255.255.255.0
          UP BROADCAST RUNNING MULTICAST  MTU:1500  Metric:1
          RX packets:91829 errors:0 dropped:0 overruns:0 frame:0
          TX packets:23944 errors:0 dropped:0 overruns:0 carrier:0
          collisions:0 txqueuelen:1000
          RX bytes:70257253 (67.0 MiB)  TX bytes:1820101 (1.7 MiB)
          Interrupt:117 Base address:0xc000

因為所有的 Port 都是 eth0,所以要使用其它的 Port,就必須設定 vlan
# apt-get install vlan

一共有五個 Ports,把 Ports 分成對外的 WAN(接近 HDMI 那個),會被分配成 vlan 101,而剩下來的四個就是 LAN,分配成 vlan 102。

修改設定檔 /etc/network/if-pre-up.d/swconfig
# sed -i ‘s/exit 0/#exit 0/’ /etc/network/if-pre-up.d/swconfig

列出設定檔
# cat /etc/network/if-pre-up.d/swconfig
#—————————#
# BPI-R1 VLAN configuration #
#—————————#
#
# This will create the following ethernet ports:
# – eth0.101 = WAN (single port)
# – eth0.102 = LAN (4 port switch)
#
# You have to adjust your /etc/network/interfaces
#
# Comment out the next line to enable the VLAN configuration:
#exit 0

ifconfig eth0 up

# The swconfig port number are:
# |2|1|0|4|  |3|
# (looking at front of ports)

swconfig dev eth0 set reset 1
swconfig dev eth0 set enable_vlan 1
swconfig dev eth0 vlan 101 set ports ‘3 8t’
swconfig dev eth0 vlan 102 set ports ‘4 0 1 2 8t’
swconfig dev eth0 set apply 1

修改網路設定檔
# vim /etc/network/interfaces
原本的設定
auto eth0

# dhcp configuration
iface eth0 inet dhcp

# static ip configuration
#iface eth0 inet static
#       address 192.168.6.241
#       netmask 255.255.255.0
#       gateway 192.168.6.1

改成您所需要的設定
auto eth0.101

# dhcp configuration
iface eth0.101 inet dhcp

auto eth0.102
iface eth0.102 inet static
       address 192.168.85.1
       netmask 255.255.255.0

重新啟動網路
# /etc/init.d/networking restart

查看完成後的設定
# ifconfig eth0.101                                                                                                                🙁
eth0.101      Link encap:Ethernet  HWaddr 01:02:03:04:05:06
          inet addr:192.168.1.85  Bcast:192.168.1.255  Mask:255.255.255.0
          UP BROADCAST RUNNING MULTICAST  MTU:1500  Metric:1
          RX packets:1073 errors:0 dropped:0 overruns:0 frame:0
          TX packets:198 errors:0 dropped:0 overruns:0 carrier:0
          collisions:0 txqueuelen:0
          RX bytes:60243 (58.8 KiB)  TX bytes:25955 (25.3 KiB)

# ifconfig eth0.102
eth0.102      Link encap:Ethernet  HWaddr 01:02:03:04:05:06 
          inet addr:192.168.85.1  Bcast:192.168.85.255  Mask:255.255.255.0
          UP BROADCAST RUNNING MULTICAST  MTU:1500  Metric:1
          RX packets:0 errors:0 dropped:0 overruns:0 frame:0
          TX packets:6 errors:0 dropped:0 overruns:0 carrier:0
          collisions:0 txqueuelen:0
          RX bytes:0 (0.0 B)  TX bytes:468 (468.0 B)

從上面可以看出二個的網路介面 Mac Address 是一樣的。

試用 Banana Pi R1 – Bananian Linux 基本設定

更新套件庫來源
# apt-get update
Get:1 http://dl.bananian.org 1604 InRelease [1,771 B]
Ign http://ftp.de.debian.org jessie InRelease
Get:2 http://ftp.de.debian.org jessie Release.gpg [2,373 B]
Get:3 http://dl.bananian.org 1604/main armhf Packages [6,137 B]
Get:4 http://ftp.de.debian.org jessie Release [148 kB]
Get:5 http://ftp.de.debian.org jessie/main Sources [7,059 kB]
Ign http://dl.bananian.org 1604/main Translation-en_US
Ign http://dl.bananian.org 1604/main Translation-en
Ign http://dl.bananian.org 1604/main Translation-de_DE
Get:6 http://ftp.de.debian.org jessie/non-free Sources [99.0 kB]
Get:7 http://ftp.de.debian.org jessie/contrib Sources [50.8 kB]
Get:8 http://ftp.de.debian.org jessie/main armhf Packages [6,641 kB]
Get:9 http://security.debian.org jessie/updates InRelease [63.1 kB]
Get:10 http://security.debian.org jessie/updates/main Sources [172 kB]
Get:11 http://security.debian.org jessie/updates/contrib Sources [1,439 B]
Get:12 http://security.debian.org jessie/updates/non-free Sources [14 B]
Get:13 http://security.debian.org jessie/updates/main armhf Packages [322 kB]
Get:14 http://security.debian.org jessie/updates/contrib armhf Packages [1,138 B]
Get:15 http://security.debian.org jessie/updates/non-free armhf Packages [14 B]
Get:16 http://security.debian.org jessie/updates/contrib Translation-en [1,211 B]
Get:17 http://security.debian.org jessie/updates/main Translation-en [176 kB]
Get:18 http://security.debian.org jessie/updates/non-free Translation-en [14 B]
Get:19 http://ftp.de.debian.org jessie/non-free armhf Packages [62.2 kB]
Get:20 http://ftp.de.debian.org jessie/contrib armhf Packages [38.1 kB]
Get:21 http://ftp.de.debian.org jessie/contrib Translation-en [38.5 kB]
Get:22 http://ftp.de.debian.org jessie/main Translation-en [4,583 kB]
Get:23 http://ftp.de.debian.org jessie/main Translation-de_DE [830 B]
Get:24 http://ftp.de.debian.org jessie/non-free Translation-en [72.3 kB]
Fetched 19.5 MB in 1min 34s (206 kB/s)
Reading package lists… Done
apt-get update  48.94s user 4.90s system 44% cpu 2:00.92 total[@more@]更新套件
# apt-get upgrade

補安裝所需套件
# apt-get install vim cifs-utils sshfs unzip zip lftp pv

試用 Banana Pi R1 – Bananian Linux 初始設定

因為想要嘗試使用 Banan Pi R1 來做一些 Server 上的應用,所以買了二片,下面是使用 Bananian Linux 的一些筆記。

預設登入的帳號及密碼:root / pi
登入成功畫面。
Linux bananapi 3.4.111-bananian #5 SMP PREEMPT Fri Mar 25 17:24:42 UTC 2016 armv7l

————————————————————————
Welcome to Bananian Linux!
For news and updates check: https://www.bananian.org
Any questions? Read the FAQ first: https://www.bananian.org/faq

Run ‘bananian-config’ to set up Bananian Linux
Run ‘bananian-update’ to check for distribution updates
————————————————————————
Last login: Mon Dec 19 03:02:16 2016[@more@]

執行 bananian-config 進行設定
# bananian-config
———————————————————————————
Welcome to bananian-config!

This script assists you to set up some basic parameters…

For news and updates check: http://www.bananian.org

———————————————————————————
鍵盤設定,直接按 Enter 鍵跳過
Your current keyboard layout is ‘us’. Do you want to change it? (y/N)

設定 root 管理者密碼
Your current root password is still ‘pi’. You have to change it now!

Configuring root password…

Enter new UNIX password:
Retype new UNIX password:
passwd: password updated successfully
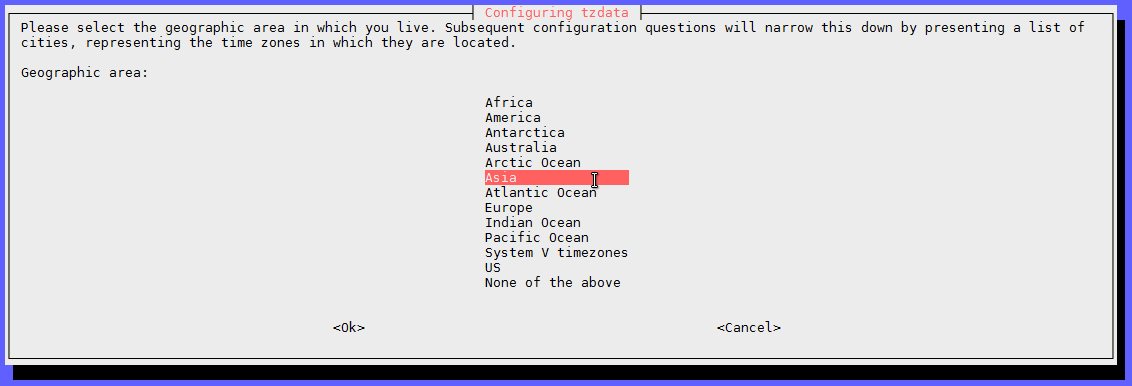
設定時區
———————————————————————————
Your current timezone is ‘Etc/UTC’. Do you want to change it? (y/N)y
Configuring timezone…
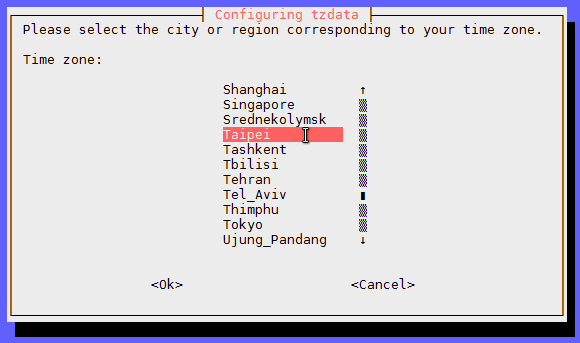
選擇 Asia / Taipei


Current default time zone: ‘Asia/Taipei’

Local time is now:      Mon Dec 19 11:20:17 CST 2016.
Universal Time is now:  Mon Dec 19 03:20:17 UTC 2016.

設定語系,可以按 Enter 鍵跳過
———————————————————————————
Your current locale is ‘en_US.UTF-8’. Do you want to change it? (y/N)

設定主機名稱,依需求來做設定

———————————————————————————
Your current hostname is ‘bananapi’. Do you want to change it? (y/N)y
Configuring hostname… (restart required)

Enter new hostname: bpl

設定硬體設定檔,可以按 Enter 鍵跳過
———————————————————————————
Your current hardware configuration is: BananaPi
Do you want to change it? (y/N)

是否要擴展 root 分割區
———————————————————————————
Do you want to expand the root file system (recommended)? (y/N)y
Expanding root file system… (ignore the warnings and reboot immediately)

Welcome to fdisk (util-linux 2.25.2).
Changes will remain in memory only, until you decide to write them.
Be careful before using the write command.

Command (m for help): Disk /dev/mmcblk0: 1.9 GiB, 1990197248 bytes, 3887104 sectors
Units: sectors of 1 * 512 = 512 bytes
Sector size (logical/physical): 512 bytes / 512 bytes
I/O size (minimum/optimal): 512 bytes / 512 bytes
Disklabel type: dos
Disk identifier: 0x0ccea0b3

Device         Boot Start     End Sectors  Size Id Type
/dev/mmcblk0p1       2048   43007   40960   20M 83 Linux
/dev/mmcblk0p2      43008 3710936 3667929  1.8G 83 Linux

Command (m for help): Partition number (1,2, default 2):
Partition 2 has been deleted.

Command (m for help): Partition type
   p   primary (1 primary, 0 extended, 3 free)
   e   extended (container for logical partitions)
Select (default p): Partition number (2-4, default 2): First sector (43008-3887103, default 43008): Last sector, +sectors or +size{K,M,G,T,P} (43008-3887103, default 3887103):
Created a new partition 2 of type ‘Linux’ and of size 1.9 GiB.

Command (m for help): Disk /dev/mmcblk0: 1.9 GiB, 1990197248 bytes, 3887104 sectors
Units: sectors of 1 * 512 = 512 bytes
Sector size (logical/physical): 512 bytes / 512 bytes
I/O size (minimum/optimal): 512 bytes / 512 bytes
Disklabel type: dos
Disk identifier: 0x0ccea0b3

Device         Boot Start     End Sectors  Size Id Type
/dev/mmcblk0p1       2048   43007   40960   20M 83 Linux
/dev/mmcblk0p2      43008 3887103 3844096  1.9G 83 Linux

Command (m for help): The partition table has been altered.
Calling ioctl() to re-read partition table.
Re-reading the partition table failed.: Device or resource busy

The kernel still uses the old table. The new table will be used at the next reboot or after you run partprobe(8) or kpartx(8).

Please reboot

———————————————————————————
done! please reboot your system now! (shutdown -r now)

完成基本設定,執行 shutdown -r now 重新啟動系統,設定生效。
# shutdown -r now

更新 Mirror CentOS altarch i386 / arm /aarch 套件庫來源

因為原先 Mirror 的站台似乎已經不在了,所以改用其台的站台。
# du -hs /var/ftp/Linux/CentOS/altarch/
106G    /var/ftp/Linux/CentOS/altarch/

目前仍持續更新中[@more@]替換成頭城國小的套件庫來源

修改套件庫來源
1. 備份原檔
# cp /etc/yum.repos.d/CentOS-Base.repo /etc/yum.repos.d/CentOS-Base.repo.$(date +%F)

2. 修改 CentOS-Base.repo
# sed -i ‘s|^baseurl=http://mirror.centos.org/altarch|baseurl=ftp://140.111.74.109/Linux/CentOS/altarch|’ /etc/yum.repos.d/CentOS-Base.repo

3. 清除舊有及更新
# yum clean all;yum update