Microsoft .NET Framework 4.7:下載
Microsoft .NET Framework 4.7 語言套件:下載

全新的繁體中文 WordPress 網站《宜蘭部落格教育平台 網站》
參考網頁:
awstats + GeoIP | Peter Luk’s Blog
使用者:Minwei/資訊筆記/日誌分析進階設定 – 台灣棒球維基館
讓AWstats可以透過IP反解出國家和Domiain Name
AWStats LOG 檔分析系統安裝設定 @ 工作雜記 :: 隨意窩 Xuite日誌
1. 下載 GeoIP 檔 http://dev.maxmind.com/geoip/legacy/geolite/
# wget -P /etc/awstats -N http://geolite.maxmind.com/download/geoip/database/GeoLiteCountry/GeoIP.dat.gz
# wget -P /etc/awstats -N http://geolite.maxmind.com/download/geoip/database/GeoLiteCity.dat.gz
# wget -P /etc/awstats -N http://download.maxmind.com/download/geoip/database/asnum/GeoIPASNum.dat.gz
2 解壓縮
# gunzip /etc/awstats/GeoIP.dat.gz
# gunzip /etc/awstats/GeoLiteCity.dat.gz
# gunzip /etc/awstats/GeoIPASNum.dat.gz[@more@]
3. 修改 /etc/awstats 目錄下設定檔
# sed -i ‘s/DNSLookup=2/DNSLookup=1/’ /etc/awstats/awstats.abc.*
並在 DNSLookup=1 後面加入
LoadPlugin=”geoip GEOIP_STANDARD /etc/awstats/GeoIP.dat”
LoadPlugin=”geoip_city_maxmind GEOIP_STANDARD /etc/awstats/GeoLiteCity.dat”
LoadPlugin=”geoip_org_maxmind GEOIP_STANDARD /etc/awstats/GeoIPASNum.dat”
4. 測試設定檔
# /usr/share/awstats/wwwroot/cgi-bin/awstats.pl –update –config=abc.tces.ilc.edu.tw
Create/Update database for config “/etc/awstats/awstats.abc.tces.ilc.edu.tw.conf” by AWStats version 7.4 (build 20150714)
From data in log file “/var/log/httpd/access_log”…
Phase 1 : First bypass old records, searching new record…
Direct access after last parsed record (after line 4670)
Jumped lines in file: 4670
Found 4670 already parsed records.
Parsed lines in file: 1
Found 1 dropped records,
Found 0 comments,
Found 0 blank records,
Found 0 corrupted records,
Found 0 old records,
Found 0 new qualified records.
5. 更新 GeoIP 檔
# cat /usr/local/bin/UpdateGeoIP.sh
#!/bin/bash
/bin/wget -P /etc/awstats -N http://geolite.maxmind.com/download/geoip/database/GeoLiteCountry/GeoIP.dat.gz
/bin/wget -P /etc/awstats -N http://geolite.maxmind.com/download/geoip/database/GeoLiteCity.dat.gz
/bin/wget -P /etc/awstats -N http://download.maxmind.com/download/geoip/database/asnum/GeoIPASNum.dat.gz
/bin/gunzip /etc/awstats/GeoIP.dat.gz
/bin/gunzip /etc/awstats/GeoLiteCity.dat.gz
/bin/gunzip /etc/awstats/GeoIPASNum.dat.gz
6. 更改檔案權限
# chmod 700 /usr/local/bin/UpdateGeoIP.sh
7. 加入工作排程,每月凌晨更新
# crontab -e
0 0 1 * * /usr/local/bin/UpdateGeoIP.sh > /dev/null 2>&1
參考網站:
讓 AWStats 顯示 UTF-8 繁體中文 « Jamyy’s Weblog
1. 將 big 5 繁體中文語系檔轉成 utf-8
# cd /usr/share/awstats/lang
# cat awstats-tw.txt | sed -e ‘s/big5/utf-8/’ | iconv -f big5 -t utf8 > awstats-tw-utf8.txt[@more@]
2. 修改 /usr/share/awstats/wwwroot/cgi-bin/awstats.pl
# cp /usr/share/awstats/wwwroot/cgi-bin/awstats.pl /usr/share/awstats/wwwroot/cgi-bin/awstats.pl.$(date +%F)
# sed -i ‘s/’tw’/’tw-utf8’/2’ /usr/share/awstats/wwwroot/cgi-bin/awstats.pl
3. 修改 /etc/awstats 目錄下設定檔
# sed -i ‘/Lang/s/auto/tw-utf8/’ /etc/awstats/*.conf
4. 重新產生畫面
# /usr/share/awstats/wwwroot/cgi-bin/awstats.pl –update –config=abc.tces.ilc.edu.tw
# /usr/share/awstats/tools/awstats_updateall.pl now
AWStats 是一套功能強大的 OpenSource 流量統計工具,它可以分析 Apache, FTP 等伺服器所產生的紀錄檔,再產生清楚詳細的圖表。
AWStats 官方網站:http://www.awstats.org/
參考網頁:
Linux 安裝 AWStats 流量分析 – Linux 技術手札
浮雲雅築: [研究] AWStats 7.2 安裝 (tgz)(CentOS 6.5 x86_64)
1. 進行安裝
# yum install awstats –enablerepo=epel
[@more@]
2. 進行設定
# cd /usr/share/awstats/tools
# ./awstats_configure.pl
—– AWStats awstats_configure 1.0 (build 20140126) (c) Laurent Destailleur —–
This tool will help you to configure AWStats to analyze statistics for
one web server. You can try to use it to let it do all that is possible
in AWStats setup, however following the step by step manual setup
documentation (docs/index.html) is often a better idea. Above all if:
– You are not an administrator user,
– You want to analyze downloaded log files without web server,
– You want to analyze mail or ftp log files instead of web log files,
– You need to analyze load balanced servers log files,
– You want to ‘understand’ all possible ways to use AWStats…
Read the AWStats documentation (docs/index.html).
—–> Running OS detected: Linux, BSD or Unix
Warning: AWStats standard directory on Linux OS is ‘/usr/local/awstats’.
If you want to use standard directory, you should first move all content
of AWStats distribution from current directory:
/usr/share/awstats
to standard directory:
/usr/local/awstats
And then, run configure.pl from this location.
Do you want to continue setup from this NON standard directory [yN] ?y
—–> Check for web server install
Enter full config file path of your Web server.
Example: /etc/httpd/httpd.conf
Example: /usr/local/apache2/conf/httpd.conf
Example: c:Program filesapache groupapacheconfhttpd.conf
Config file path (‘none’ to skip web server setup):
> /etc/httpd/conf/httpd.conf
—–> Check and complete web server config file ‘/etc/httpd/conf/httpd.conf’
Add ‘Alias /awstatsclasses “/usr/share/awstats/wwwroot/classes/”‘
Add ‘Alias /awstatscss “/usr/share/awstats/wwwroot/css/”‘
Add ‘Alias /awstatsicons “/usr/share/awstats/wwwroot/icon/”‘
Add ‘ScriptAlias /awstats/ “/usr/share/awstats/wwwroot/cgi-bin/”‘
Add ‘<Directory>’ directive
AWStats directives added to Apache config file.
—–> Update model config file ‘/etc/awstats/awstats.model.conf’
File awstats.model.conf updated.
—–> Need to create a new config file ?
Do you want me to build a new AWStats config/profile
file (required if first install) [y/N] ? y
—–> Define config file name to create
What is the name of your web site or profile analysis ?
Example: www.mysite.com
Example: demo
Your web site, virtual server or profile name:
>abc.tces.ilc.edu.tw
—–> Define config file path
In which directory do you plan to store your config file(s) ?
Default: /etc/awstats
Directory path to store config file(s) (Enter for default):
>
—–> Create config file ‘/etc/awstats/awstats.abc.tces.ilc.edu.tw.conf’
Config file /etc/awstats/awstats.abc.tces.ilc.edu.tw.conf created.
—–> Restart Web server with ‘/sbin/service httpd restart’
Redirecting to /bin/systemctl restart httpd.service
—–> Add update process inside a scheduler
Sorry, configure.pl does not support automatic add to cron yet.
You can do it manually by adding the following command to your cron:
/usr/share/awstats/wwwroot/cgi-bin/awstats.pl -update -config=abc.tces.ilc.edu.tw
Or if you have several config files and prefer having only one command:
/usr/share/awstats/tools/awstats_updateall.pl now
Press ENTER to continue…
A SIMPLE config file has been created: /etc/awstats/awstats.abc.tces.ilc.edu.tw.conf
You should have a look inside to check and change manually main parameters.
You can then manually update your statistics for ‘abc.tces.ilc.edu.tw’ with command:
> perl awstats.pl -update -config=abc.tces.ilc.edu.tw
You can also read your statistics for ‘abc.tces.ilc.edu.tw’ with URL:
> http://localhost/awstats/awstats.pl?config=abc.tces.ilc.edu.tw
Press ENTER to finish…
3. 產生畫面
# /usr/share/awstats/wwwroot/cgi-bin/awstats.pl –update –config=abc.tces.ilc.edu.tw
Create/Update database for config “/etc/awstats/awstats.abc.tces.ilc.edu.tw.conf” by AWStats version 7.4 (build 20150714)
From data in log file “/var/log/httpd/access_log”…
Phase 1 : First bypass old records, searching new record…
Searching new records from beginning of log file…
Phase 2 : Now process new records (Flush history on disk after 20000 hosts)…
Jumped lines in file: 0
Parsed lines in file: 3809
Found 162 dropped records,
Found 0 comments,
Found 0 blank records,
Found 0 corrupted records,
Found 0 old records,
Found 3647 new qualified records.
4. 更新資料,如果出現以下訊息,請執行 第 3 步驟
# /usr/share/awstats/tools/awstats_updateall.pl now
Error: Can’t find AWStats program (‘awstats.pl’).
Use -awstatsprog option to solve this.
如果執行第 3 步驟,還是不行,請執行以下
# cp /usr/share/awstats/tools/awstats_updateall.pl /usr/share/awstats/tools/awstats_updateall.pl.$(date +%F)
# sed -i -e ‘s@awstats.pl@/usr/share/awstats/wwwroot/cgi-bin/awstats.pl@’ /usr/share/awstats/tools/awstats_updateall.pl
# /usr/share/awstats/tools/awstats_updateall.pl now
Running ‘”./awstats.pl” -update -config=abc -configdir=”/etc/awstats”‘ to update config abc
Create/Update database for config “/etc/awstats/awstats.abc.conf” by AWStats version 7.4 (build 20150714)
From data in log file “/var/log/httpd/access_log”…
Phase 1 : First bypass old records, searching new record…
Direct access after last parsed record (after line 3873)
Jumped lines in file: 3873
Found 3873 already parsed records.
Parsed lines in file: 15
Found 1 dropped records,
Found 0 comments,
Found 0 blank records,
Found 0 corrupted records,
Found 0 old records,
Found 14 new qualified records.
Running ‘”./awstats.pl” -update -config=abc.tces.ilc.edu.tw -configdir=”/etc/awstats”‘ to update config abc.tces.ilc.edu.tw
Create/Update database for config “/etc/awstats/awstats.abc.tces.ilc.edu.tw.conf” by AWStats version 7.4 (build 20150714)
From data in log file “/var/log/httpd/access_log”…
Phase 1 : First bypass old records, searching new record…
Direct access after last parsed record (after line 3873)
Jumped lines in file: 3873
Found 3873 already parsed records.
Parsed lines in file: 15
Found 1 dropped records,
Found 0 comments,
Found 0 blank records,
Found 0 corrupted records,
Found 0 old records,
Found 14 new qualified records.
Running ‘”./awstats.pl” -update -config=localhost.localdomain -configdir=”/etc/awstats”‘ to update config localhost.localdomain
Create/Update database for config “/etc/awstats/awstats.localhost.localdomain.conf” by AWStats version 7.4 (build 20150714)
From data in log file “/var/log/httpd/access_log”…
Phase 1 : First bypass old records, searching new record…
Direct access after last parsed record (after line 3873)
Jumped lines in file: 3873
Found 3873 already parsed records.
Parsed lines in file: 15
Found 1 dropped records,
Found 0 comments,
Found 0 blank records,
Found 0 corrupted records,
Found 0 old records,
Found 14 new qualified records.
5. 加入工作排程
# crontab -e
0 1 * * * /usr/share/awstats/tools/awstats_updateall.pl now > /dev/null 2>&1
6. 開啟瀏覽器 http://Server’IP//awstats/awstats.pl
Lynis 是一套可用於各種 UNIX Based System 的系統安全檢測工具,它能找出系統安全需要補強的地方, 同時提供許多提升系統安全的作法與建議。
lynix 官方網站:https://cisofy.com/lynis/
參考網頁:
Lynis:Linux 安全性掃描檢測工具,找出系統漏洞、弱點與惡意程式 – G. T. Wang
網路系統組 / Network Systems [security:lynis]
1. 安裝
# yum install lynis –enablerepo=epel
2. 可用參數
# /bin/lynis –help[@more@]3. 進行檢查
–check-all 檢查整個系統
–quick 快速模式,不等待使用者互動確認
# /bin/lynis –check-all –quick
# /bin/lynis -c -Q
4. 將檢查結果輸出到檔案
# /bin/lynis –check-all –quick –no-colors > /tmp/lynis.txt
5. 列出 警告 & 建議事項
內定是輸出到 /var/log/lynis.log
# egrep ‘Warning|Suggestion’ /var/log/lynis.log
6. 加入到工作排程
# crontab -e
30 2 * * * /bin/lynis -c -Q –auditor “automated” –cronjob
7. 依建議事項進行修改
2017-03-05 13:01:27 Suggestion: Change the allow_url_fopen line to: allow_url_fopen = Off, to disable downloads via PHP [test:PHP-2376] [details:-] [solution:-]
# sed -i ‘s/allow_url_fopen = On/allow_url_fopen = Off/’ /etc/php.ini
# systemctl restart httpd.service
除了使用 htpasswd 設定密碼也保護 nagios 使用安全外,也可以使用 ip 來限制來源
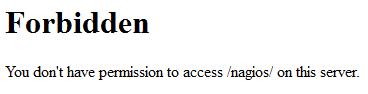
1. 註解 Require all
# sed -i ‘s/Require all/#Require all/’ /etc/httpd/conf.d/nagios.conf[@more@]
2. 在後面插入二行
# sed -i -e ‘/#Require all/atRequire all deniedntRequire ip 192.168.1.0/24’ /etc/httpd/conf.d/nagios.conf
3. 查看設定
# cat /etc/httpd/conf.d/nagios.conf
ScriptAlias /nagios/cgi-bin/ “/usr/lib64/nagios/cgi-bin/”
<Directory “/usr/lib64/nagios/cgi-bin/”>
# SSLRequireSSL
Options ExecCGI
AllowOverride None
<IfVersion >= 2.3>
<RequireAll>
#Require all granted
Require all denied
Require ip 192.168.1.0/24
# Require host 127.0.0.1
AuthName “Nagios Access”
AuthType Basic
AuthUserFile /etc/nagios/passwd
Require valid-user
</RequireAll>
</IfVersion>
</Directory>
Alias /nagios “/usr/share/nagios/html”
<Directory “/usr/share/nagios/html”>
# SSLRequireSSL
Options None
AllowOverride None
<IfVersion >= 2.3>
<RequireAll>
#Require all granted
Require all denied
Require ip 192.168.1.0/24
# Require host 127.0.0.1
AuthName “Nagios Access”
AuthType Basic
AuthUserFile /etc/nagios/passwd
Require valid-user
</RequireAll>
</IfVersion>
</Directory>
4. 重新啟動 Web Server
# systemctl restart httpd.service
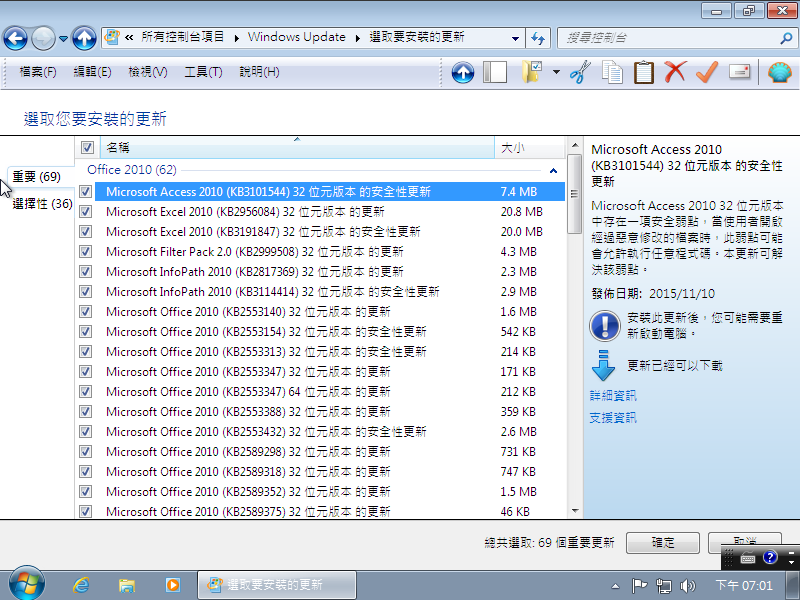
閒來無事,打發時間製作,以 Windows 10 1703 x86 為底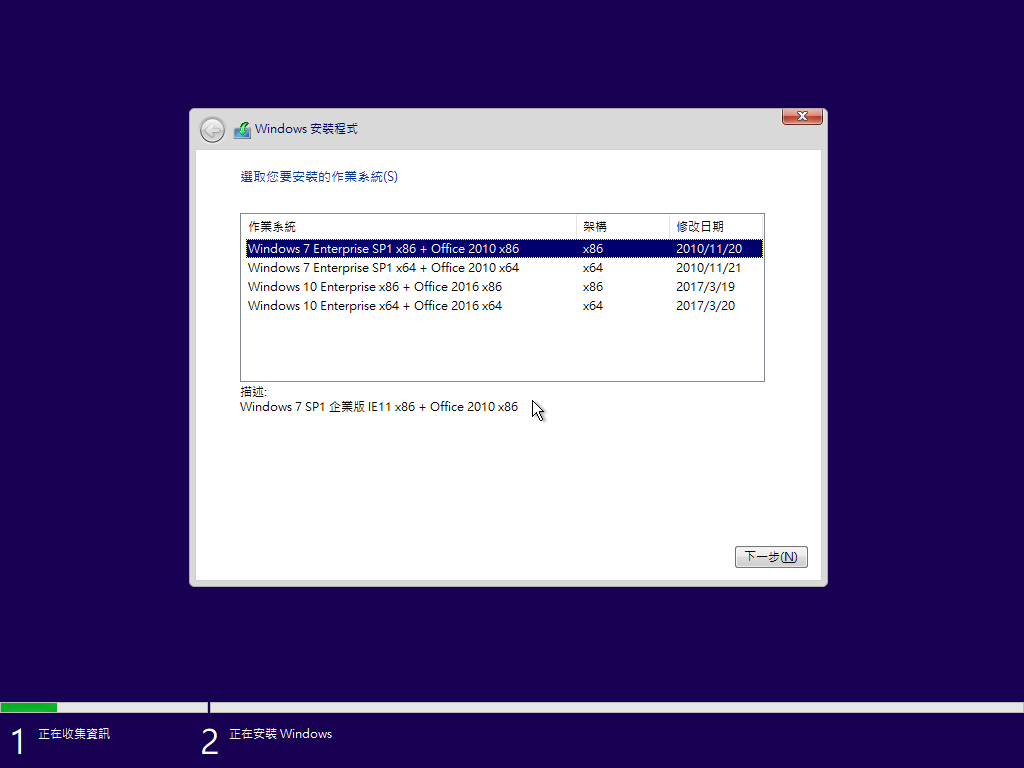
Windows 10 1703 整合至 1703 build 15063.250 + Office 2016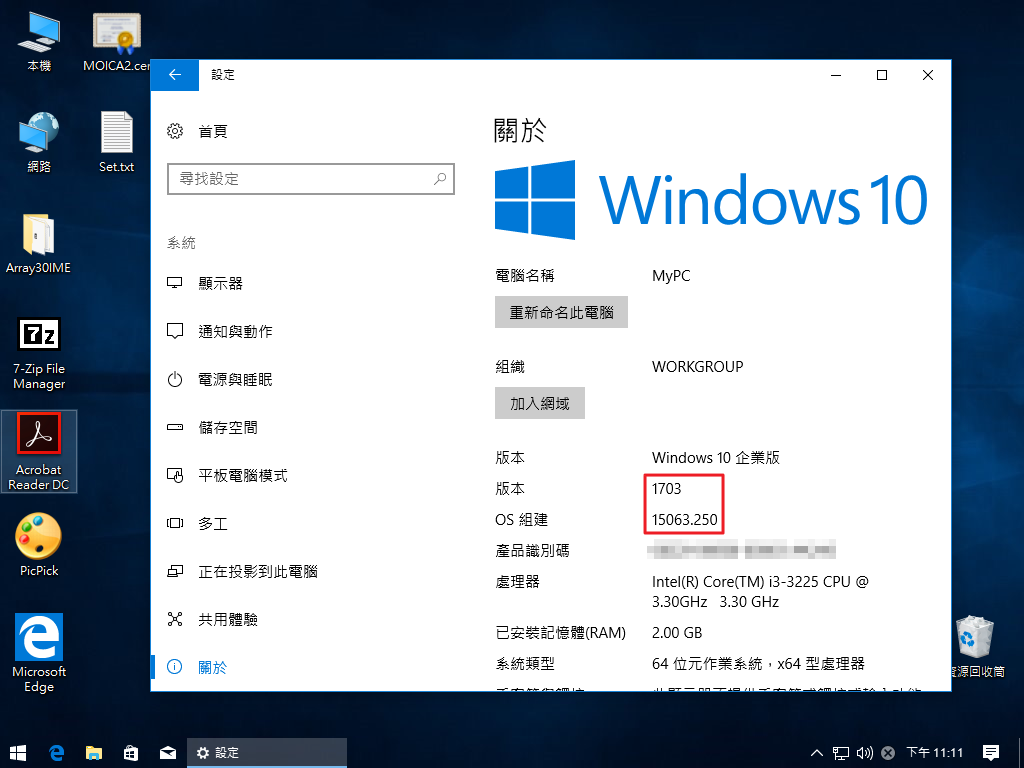
[@more@]Windows 7 SP1 更新整合至 2017-04-28
Windows 7 SP1 整合 Office 2010 SP2

參考網頁:
Install And Configure Nagios 4 On CentOS 7 | Unixmen
CentOS 7 : Nagios : Install : Server World
Configuring and Installing Nagios Core 4 on CentOS 6 – nuxref
Nagios Core 4.x Setup for CentOS 7.x – nuxref
Configuring and Installing NRPE and NSCA into Nagios Core 4 on CentOS 6 – nuxref
Control Protocol: Nagios issues, duh.
1. 安裝所需套件
# yum install nagios nagios-plugins-all php http
2. 設定開機時啟動服務
# systemctl enable httpd.service
# systemctl enable nagios.service
Created symlink from /etc/systemd/system/multi-user.target.wants/nagios.service to /usr/lib/systemd/system/nagios.service.
# systemctl start httpd.service
# systemctl start nagios.service[@more@]
3. 設定登入帳號及密碼
# /usr/bin/htpasswd -c /etc/nagios/passwd nagiosadmin
New password:
Re-type new password:
Adding password for user nagiosadmin
4. 檢查設定是否正確
# /usr/sbin/nagios -v /etc/nagios/nagios.cfg
Nagios Core 4.2.4
Copyright (c) 2009-present Nagios Core Development Team and Community Contributors
Copyright (c) 1999-2009 Ethan Galstad
Last Modified: 12-07-2016
License: GPL
Website: https://www.nagios.org
Reading configuration data…
Read main config file okay…
Read object config files okay…
Running pre-flight check on configuration data…
Checking objects…
Checked 8 services.
Checked 1 hosts.
Checked 1 host groups.
Checked 0 service groups.
Checked 1 contacts.
Checked 1 contact groups.
Checked 24 commands.
Checked 5 time periods.
Checked 0 host escalations.
Checked 0 service escalations.
Checking for circular paths…
Checked 1 hosts
Checked 0 service dependencies
Checked 0 host dependencies
Checked 5 timeperiods
Checking global event handlers…
Checking obsessive compulsive processor commands…
Checking misc settings…
Total Warnings: 0
Total Errors: 0
Things look okay – No serious problems were detected during the pre-flight check
5. 開啟瀏覽器 http://Server’IP/nagios
輸入設定的帳號及密碼
6. 登入後畫面
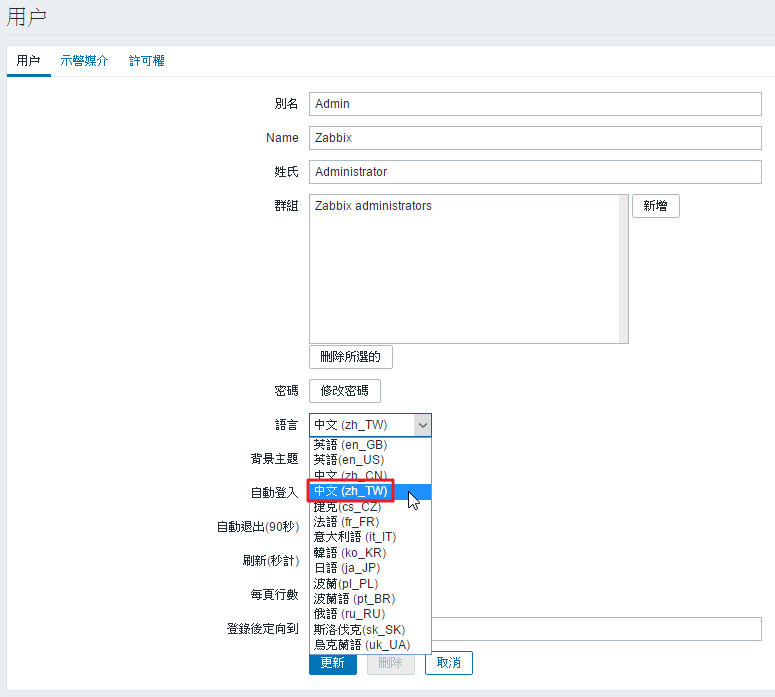
在 Web 介面可以選擇的語系,沒有 中文 zh_TW
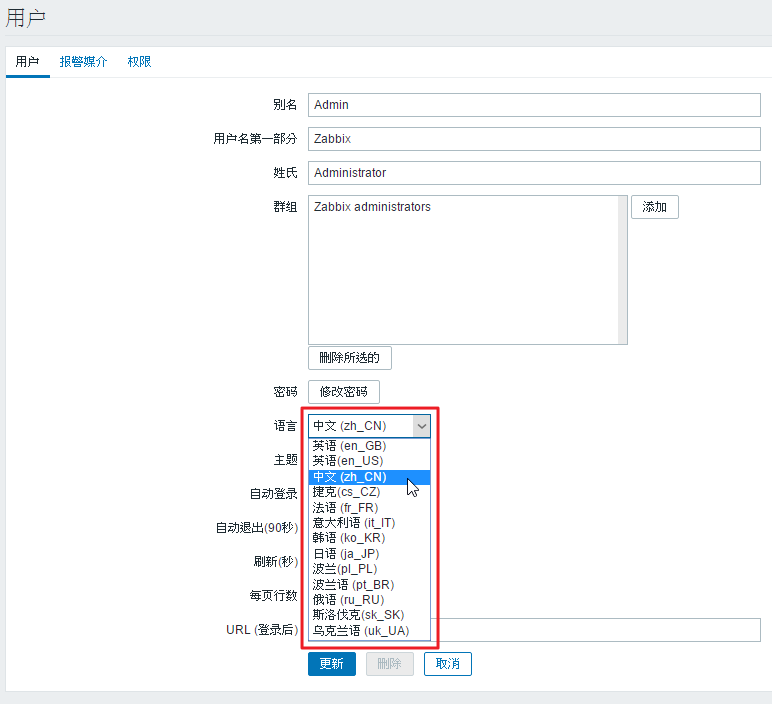
可是明明有正體中文的語系
# ls -ld /usr/share/zabbix/locale/zh*
drwxr-xr-x 3 root root 4096 Mar 4 15:39 /usr/share/zabbix/locale/zh_CN
drwxr-xr-x 3 root root 4096 Mar 4 15:39 /usr/share/zabbix/locale/zh_TW[@more@]直接修改資料庫
# /usr/bin/mysql -u zabbix -p zabbixdb
MariaDB [zabbixdb]> select userid,alias,name,surname,lang from users;
+——–+———+———-+——————–+———+
| userid | alias | name | surname | lang |
+——–+———+———-+——————-+———-+
| 1 | Admin | Zabbix | Administrator | zh_CN |
| 2 | guest | | | en_GB |
+——-+———-+———+——————–+———–+
2 rows in set (0.00 sec)
MariaDB [zabbixdb]> update users set lang=”zh_TW” where userid=”1″;
MariaDB [zabbixdb]> quit
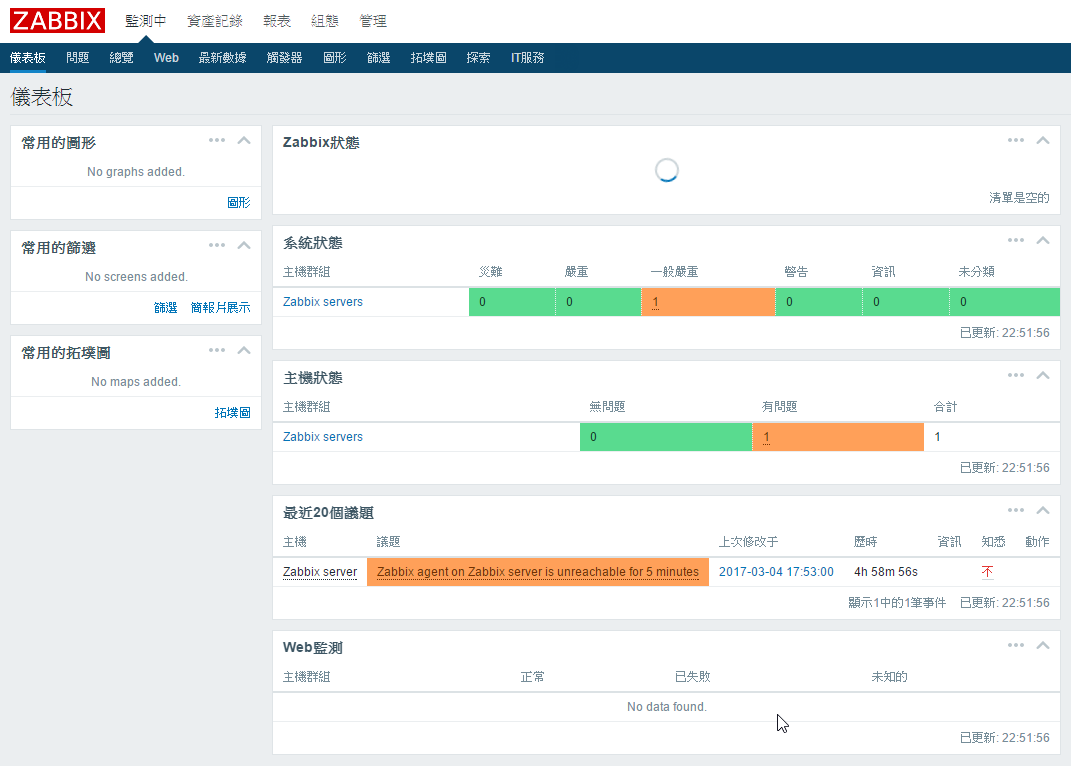
操作介面已經改成正體中文了!
或
# sed -i ‘/zh_TW/s/false/true/’ /usr/share/zabbix/include/locales.inc.php
有 中文 zh_TW 可以選了!