ip 網路管理工具

ip 指令和 ifconfig 的功能有些類似,但命令可以更加簡短

1. 列出所有網路介面 IP
# ip addr show
1: lo: <LOOPBACK,UP,LOWER_UP> mtu 65536 qdisc noqueue state UNKNOWN qlen 1
    link/loopback 00:00:00:00:00:00 brd 00:00:00:00:00:00
    inet 127.0.0.1/8 scope host lo
       valid_lft forever preferred_lft forever
    inet6 ::1/128 scope host
       valid_lft forever preferred_lft forever
112: eth0@if113: <BROADCAST,MULTICAST,UP,LOWER_UP> mtu 1500 qdisc noqueue state UP qlen 1000
    link/ether 9e:5b:bb:11:35:a7 brd ff:ff:ff:ff:ff:ff link-netnsid 0
    inet 192.168.1.17/24 brd 192.168.1.255 scope global eth0
       valid_lft forever preferred_lft forever[@more@]2. 單獨列出某一網路介面
# ip addr show eth0
# ip a s eth0
112: eth0@if113: <BROADCAST,MULTICAST,UP,LOWER_UP> mtu 1500 qdisc noqueue state UP qlen 1000
    link/ether 9e:5b:bc:14:35:a7 brd ff:ff:ff:ff:ff:ff link-netnsid 0
    inet 192.168.1.17/24 brd 192.168.1.255 scope global eth0

3. 列出網路路由
# ip route
# ip r
default via 192.168.1.254 dev eth0
192.168.1.0/24 dev eth0  proto kernel  scope link  src 192.168.1.17

取出 IP
# ip a s eth0 | grep ‘inet ‘ | awk ‘{print $2}’ | awk -F’/’ ‘{print $1}’
192.168.1.17
# ip r | grep src | awk ‘{print $9}’
192.168.1.17

取出 mac address
# ip a s eth0 | grep ‘link/ether’ | awk ‘{print $2}’
9e:5b:bb:11:35:a7

CentOS 7.x 網路管理工具 nmcli

nmcli 是 CentOS 7.x 預設的網路管理工具,不過之前一直習慣使用 ifconfig,所以並沒有特別去研究。
# which nmcli
/usr/bin/nmcli

如果找不到,請安裝 NetworkManager 套件
# yum install NetworkManager
# systemctl start NetworkManager.service

參考網頁:
2.3. 使用 NetworkManager 命令行工具 nmcli
RHEL / CentOS 7 網路管理工具 — nmcli – Linux 技術手札[@more@]1 顯示所有連線:
# nmcli connection show
# nmcli c s
NAME     UUID                                  TYPE            DEVICE
enp0s25  d28b1a52-51d3-482c-b36e-37b7b80d7ded  802-3-ethernet  enp0s25
enp1s0   6d31aafd-1033-4853-ba71-e062608189b0  802-3-ethernet  enp1s0
enp1s1   6af9cc1f-4fac-40e8-80e6-6bda5b66886b  802-3-ethernet  enp1s1

只顯示 active 的連線:
# nmcli connection show –active
# nmcli connection show -a
# nmcli c s -a
NAME     UUID                                  TYPE            DEVICE
enp0s25  d28b1a52-51d3-482c-b36e-37b7b80d7ded  802-3-ethernet  enp0s25
enp1s0   6d31aafd-1033-4853-ba71-e062608189b0  802-3-ethernet  enp1s0
enp1s1   6af9cc1f-4fac-40e8-80e6-6bda5b66886b  802-3-ethernet  enp1s1

顯示所有 NetworkManager 辨識到的裝置及它們目前的狀態:
# nmcli device status
# nmcli d s
DEVICE   TYPE      STATE      CONNECTION
enp0s25  ethernet  connected  enp0s25
enp1s0   ethernet  connected  enp1s0
enp1s1   ethernet  connected  enp1s1
lo       loopback  unmanaged  —

停用網卡:
# nmcli device disconnect enp1s1
# nmcli d d enp1s1
Device ‘enp1s1’ successfully disconnected.

啟用網卡:
# nmcli device connect enp1s1
# nmcli d c enp1s1
Device ‘enp1s1’ successfully activated with ‘6af9cc1f-4fac-40e8-80e6-6bda5b66886b’.

加入固定 IP:
# nmcli connection add type ethernet con-name test-lab ifname enp1s1 ip4 10.10.10.10/24 gw4 10.10.10.254
# nmcli con add type ethernet con-name test-lab ifname enp1s1 ip4 10.10.10.10/24 gw4 10.10.10.254
Connection ‘test-lab’ (‘6af9cc1f-4fac-40e8-80e6-6bda5b66886b) successfully added.
# nmcli con add type ethernet con-name test-lab ifname enp1s1 ip4 10.10.10.10/24 gw4 10.10.10.254 ip6 abbe::cafe gw6 2001:db8::1

設定使用的 Dns Servers:
# nmcli connection modify test-labipv4.dns “168.95.1.1 140.111.66.1 8.8.8.8”
# nmcli con mod test-lab ipv4.dns “168.95.1.1 140.111.66.1 8.8.8.8”
# nmcli con mod test-lab ipv6.dns “2001:b000:168::2 2001:288:a201::66:1 2001:4860:4860::8888”

啟動新連結線:
# nmcli connection up  test-lab ifname enp1s1
# nmcli con up  test-lab ifname enp1s1

使用 diff / patch 來修正檔案

diff 可以產生二個檔案之間的差異對照,然後利用 patch 來進行修正。

1.產生二個檔案間差異
-a 將所有檔案都視為文字檔
-u 輸出預設三行的相同文字行
-r 遞迴比較所有的子目錄
-N 將缺少的檔案視為空檔案
# diff -Naur server.conf.2017-02-20 server.conf > /root/server.diff

2. 將差異檔和待修正的檔案放在一起
# cp /etc/openvpn/server.conf.2017-02-20 /root/server.conf

3. 利用 patch 進行修正
# cd /root
# patch -i server.diff

4. 比較二者間是否有差異
# diff /root/server.conf /etc/openvpn/server.conf

如果執行完後沒有任何訊息,代表二個檔案完全相同

免密碼登入 SSH Server

有一些 Linux 已經預設不能以 root 身份登入,或是不允許 root 以輸入密碼登入。
# grep RootLogin /etc/ssh/sshd_config
PermitRootLogin prohibit-password

PermitRootLogin without-password

如果還是習慣使用 root 身份登入,可以修改成
PermitRootLogin yes

重新啟動 SSH Server
# /etc/init.d/sshd restart
# systemctl restart sshd.service

或直接改用 SSH Key 的方式,來達成免密碼直接登入[@more@]Server A:192.168.1.10
Server B:192.168.1.101

1. 在 Server A 上執行
# ssh-keygen -t rsa

2. 產生的 key,id_rsa 私鑰 / id_rsa.pub 公鑰
# ls -l ~/.ssh/
-rw——- 1 root root 1675 Mar  9 19:17 id_rsa
-rw-r–r– 1 root root  390 Mar  9 19:17 id_rsa.pub
-rw-r–r– 1 root root 1330 Mar  9 14:41 known_hosts

3. 將公鑰複製到 Server B
# scp ~/.ssh/id_rsa.pub root@192.168.1.101:/root

4. 登入到 Server B,並將從 Server A 複製過來的 id_rsa 公鑰 附加入到 ~/.ssh/authorized_keys
# ssh root@192.168.1.101
# cat id_rsa >> ~/.ssh/authorized_keys
# rm -rf id_rsa

5. 更改權限
# chmod 700 ~/.ssh
# chmod 600 ~/.ssh/authorized_keys

6. 測試從 Server A 以 ssh 連線 Server B 是不是不用輸入密碼

CentOS 7.x 使用 chrony 自動校時

參考網頁:
使用 Chrony 調校系統時間 | TechNote
XYZ的筆記本: CentOS 7 自動校時(使用chrony)
[Linux] 在 CentOS 7 上使用預設的 chrony 套件來設定 NTP 自動對時 @ 亂打一通的心情日記 :: 痞客邦 PIXNET ::

1. 安裝 chrony
# yum install chrony

2. 啟動 chronyd 服務
# systemctl start chronyd.service

3.  檢查 chronyd 執行狀態
# systemctl status chronyd.service
● chronyd.service – NTP client/server
   Loaded: loaded (/usr/lib/systemd/system/chronyd.service; enabled; vendor preset: enabled)
   Active: active (running) since Tue 2017-03-07 19:33:17 CST; 1 day 12h ago
 Main PID: 621 (chronyd)
   CGroup: /system.slice/chronyd.service
           mq621 /usr/sbin/chronyd

Mar 07 19:33:17 proxy.tces.ilc.edu.tw systemd[1]: Starting NTP client/server…
Mar 07 19:33:17 proxy.tces.ilc.edu.tw chronyd[621]: chronyd version 2.1.1 starting (+CMDMON +NTP +REFCLOCK +RTC +PRIVDROP +DEBUG +ASYNCDNS +IPV6 +SECHASH)
Mar 07 19:33:17 proxy.tces.ilc.edu.tw chronyd[621]: Frequency 14.920 +/- 0.049 ppm read from /var/lib/chrony/drift
Mar 07 19:33:17 proxy.tces.ilc.edu.tw systemd[1]: Started NTP client/server.
Mar 07 19:33:31 proxy.tces.ilc.edu.tw chronyd[621]: Selected source 103.18.128.60
Mar 07 19:33:31 proxy.tces.ilc.edu.tw chronyd[621]: System clock wrong by -0.711733 seconds, adjustment started[@more@]

4. 檢查 NTP 來源狀態
# /usr/bin/chronyc sourcestats
210 Number of sources = 4
Name/IP Address            NP  NR  Span  Frequency  Freq Skew  Offset  Std Dev
==============================================================================
123-204-45-116.static.see   7   5  103m     +0.033      0.269   -103us   221us
211-79-171-1.ip.rpb.gov.t   6   4   86m     -0.102      1.012   -186us   521us
2001:288:b012::2            4   3   51m     -0.089      2.182   -274us   112us
103-18-128-60.ip.mwsrv.co   5   5   69m     -0.096      0.661    -26us   176us

5. 查看 NTP 詳細同步狀態
# /usr/bin/chronyc sources -v
210 Number of sources = 4

  .– Source mode  ‘^’ = server, ‘=’ = peer, ‘#’ = local clock.
 / .- Source state ‘*’ = current synced, ‘+’ = combined , ‘-‘ = not combined,
| /   ‘?’ = unreachable, ‘x’ = time may be in error, ‘~’ = time too variable.
||                                                 .- xxxx [ yyyy ] +/- zzzz
||      Reachability register (octal) -.           |  xxxx = adjusted offset,
||      Log2(Polling interval) –.      |          |  yyyy = measured offset,
||                                     |          |  zzzz = estimated error.
||                                 |    |          
MS Name/IP address         Stratum Poll Reach LastRx Last sample
===============================================================================
^+ 123-204-45-116.static.see     3  10   377    21  +1642us[+1642us] +/-   67ms
^- 211-79-171-1.ip.rpb.gov.t     3  10   377   961    -13us[  -13us] +/-   83ms
^- 2001:288:b012::2              3  10   377   472   -808us[ -808us] +/-   62ms
^* 103-18-128-60.ip.mwsrv.co     2  10   377   973    +35us[  -53us] +/-   34ms

6. 查看對時狀況
# /usr/bin/chronyc tracking
Reference ID    : 103.18.128.60 (103-18-128-60.ip.mwsrv.com)
Stratum         : 3
Ref time (UTC)  : Thu Mar  9 00:17:01 2017
System time     : 0.000047602 seconds slow of NTP time
Last offset     : +0.000010441 seconds
RMS offset      : 0.000198219 seconds
Frequency       : 14.958 ppm fast
Residual freq   : -0.003 ppm
Skew            : 0.227 ppm
Root delay      : 0.009934 seconds
Root dispersion : 0.028548 seconds
Update interval : 1027.3 seconds
Leap status     : Normal

7. 使用 chrony 立刻對時
# /usr/bin/chronyc -a makestep
200 OK
200 OK

將 ldapsearch 輸出內容 (LDIF) 轉 UTF-8 編碼 – 1

底下的內容參考 PHP 程式: ldapsearch 輸出內容 (LDIF) 轉 UTF-8 編碼 « Jamyy’s Weblog
# 建立 php 的轉換檔
# vim /usr/local/bin/utf8ldif.php

<?php

function fn_output($str) {
if (strpos($str,":: ") > 0) {
//解 Base64 編碼
//當 ldap 欄位名稱後面接的是兩個冒號即表示該欄位內容為 Base64 編碼
$head = substr($str,0,strpos($str," ")-1);
$body = substr($str,strpos($str," ")+1);
$str = $head . " " . base64_decode($body) . "n";
} else if (preg_match('/x5c[A-F0-9][A-F0-9]x5c[A-F0-9][A-F0-9]/',$str)) {
//解 URL 編碼
//URL 編碼出現在註解 (#), ldapsearch -LLL 可取消輸出註解內容
$str = urldecode(str_replace("","%",$str));
}
if (!preg_match('/n$/',$str)) {
//如果處理過後的字串沒有換行符號 (n) 就塞一個給他
$str .= "n";
}
return($str);
}

$line_old = "";
$line_merge = "";
$params = count($argv);
if ($params == 1) {
//未給參數時, 開啟 STDIN 串流
$f = fopen("php://stdin","r");
} else {
//開啟指定檔案
$f = fopen("$argv[1]","r");
}
while (!feof($f)) {
$line = fgets($f);
if (substr($line,0,1) == " ") {
//若該行行首為空白字元, 表示因內容過長而斷行
//以 line_merge 變數合併各段落
if ($line_merge == "") {
$line_merge = trim($line_old) . trim($line);
} else {
$line_merge .= trim($line);
}
} else if ($line_merge > "") {
//輸出合併好的內容
echo fn_output($line_merge);
$line_merge = "";
} else {
//輸出一般內容
echo fn_output($line_old);
}
$line_old = $line;
}
fclose($f);
?>

[@more@]

1. 安裝 php 套件
# yum install php-cli

2. 進行測試
# /usr/bin/ldapsearch -x -b “ou=s0101,ou=student,ou=tces,dc=ilc,dc=edu,dc=tw” uid=s0101129  | php /usr/local/bin/utf8ldif.php

# extended LDIF
#
# LDAPv3
# base <ou=s0101,ou=student,ou=tces,dc=ilc,dc=edu,dc=tw> with scope subtree
# filter: uid=s0101129
# requesting: ALL
#

# s0101129, s0101, student, tces, ilc.edu.tw
dn: uid=s0101129,ou=s0101,ou=student,ou=tces,dc=ilc,dc=edu,dc=tw
uid: s0101129
cn: 五仁25男陳※駿
sn: 五仁25男陳※駿
mail: s0101129@smail.ilc.edu.tw
objectClass: person
objectClass: organizationalPerson
objectClass: inetOrgPerson
objectClass: posixAccount
objectClass: top
objectClass: shadowAccount
shadowMin: 0
shadowMax: 99999
shadowWarning: 7
shadowExpire: 17774
loginShell: /sbin/nologin
uidNumber: 1784
gidNumber: 1075
homeDirectory: /home/s0101/s0101129

# search result
search: 2
result: 0 Success

# numResponses: 2
# numEntries: 1

在 CentOS 7.x 下安裝 LDAP Server

參考網頁:
Linux . 無限: 在 CentOS7/RHEL7 上安裝設定 LDAP Server(一)
CentOS 7 : OpenLDAP : Configure LDAP Server : Server World
CrashedBboy: CentOS 7 初探 Open LDAP
Install And Configure LDAP Server In CentOS 7 | Unixmen
1. 安裝 LDAP Server
# yum install openldap-servers openldap-clients migrationtools

2.  複製 LDAP 資料庫範例檔
# cp /usr/share/openldap-servers/DB_CONFIG.example /var/lib/ldap/DB_CONFIG

3. 更改擁有者及群組
# chown ldap. /var/lib/ldap/DB_CONFIG
# ls -l /var/lib/ldap/DB_CONFIG
-rw-r–r– 1 ldap ldap 845 Mar  8 17:56 /var/lib/ldap/DB_CONFIG[@more@]
4. 啟動 LDAP Server
systemctl enable slapd.service
Created symlink from /etc/systemd/system/multi-user.target.wants/slapd.service to /usr/lib/systemd/system/slapd.service.
systemctl start slapd.service

檢查是否有正常啟動
# systemctl status slapd.service
# ss -nlantu | grep slapd
tcp    LISTEN     0      128       *:389                   *:*                   users:((“slapd“,pid=1080,fd=8))
tcp    LISTEN     0      128      :::389                  :::*                   users:((“slapd“,pid=1080,fd=9))

5. 設定管理者密碼
# /sbin/slappasswd
New password:
Re-enter new password:
{SSHA}K7FYIrbIkq2jkgJNEvhigiP3hR+CguaD

# vim chrootpw.ldif
# specify the password generated above for “olcRootPW” section

dn: olcDatabase={0}config,cn=config
changetype: modify
add: olcRootPW
olcRootPW: {SSHA}K7FYIrbIkq2jkgJNEvhigiP3hR+CguaD

# /bin/ldapadd -Y EXTERNAL -H ldapi:/// -f chrootpw.ldif
SASL/EXTERNAL authentication started
SASL username: gidNumber=0+uidNumber=0,cn=peercred,cn=external,cn=auth
SASL SSF: 0
modifying entry “olcDatabase={0}config,cn=config”

6. 匯入基本的 schemas
# /bin/ldapadd -Y EXTERNAL -H ldapi:/// -f /etc/openldap/schema/cosine.ldif
SASL/EXTERNAL authentication started
SASL username: gidNumber=0+uidNumber=0,cn=peercred,cn=external,cn=auth
SASL SSF: 0
adding new entry “cn=cosine,cn=schema,cn=config”

# /bin/ldapadd -Y EXTERNAL -H ldapi:/// -D “cn=config” -f /etc/openldap/schema/nis.ldif
SASL/EXTERNAL authentication started
SASL username: gidNumber=0+uidNumber=0,cn=peercred,cn=external,cn=auth
SASL SSF: 0
adding new entry “cn=nis,cn=schema,cn=config”

# /bin/ldapadd -Y EXTERNAL -H ldapi:/// -f /etc/openldap/schema/inetorgperson.ldif
SASL/EXTERNAL authentication started
SASL username: gidNumber=0+uidNumber=0,cn=peercred,cn=external,cn=auth
SASL SSF: 0
adding new entry “cn=inetorgperson,cn=schema,cn=config”

7. 設定 LDAP 資料庫
# cat chdomain.ldif
dn: olcDatabase={2}hdb,cn=config
changetype: modify
replace: olcSuffix
olcSuffix: dc=ilc,dc=edu,dc=tw

dn: olcDatabase={2}hdb,cn=config
changetype: modify
replace: olcRootDN
olcRootDN: cn=Manager,dc=ilc,dc=edu,dc=tw

dn: olcDatabase={2}hdb,cn=config
changetype: modify
replace: olcRootPW
olcRootPW: {SSHA}K7FYIrbIkq2jkgJNEvhigiP3hR+CguaD

dn: cn=config
changetype: modify
replace: olcLogLevel
olcLogLevel: -1

dn: olcDatabase={1}monitor,cn=config
changetype: modify
replace: olcAccess
olcAccess: {0}to * by dn.base=”gidNumber=0+uidNumber=0,cn=peercred,cn=external,cn=auth” read by dn.base=”cn=Manager,dc=ilc,dc=edu,dc=tw” read by * none

dn: olcDatabase={2}hdb,cn=config
changetype: modify
add: olcAccess
olcAccess: {0}to attrs=userPassword,shadowLastChange by
  dn=”cn=Manager,dc=srv,dc=world” write by anonymous auth by self write by * none
olcAccess: {1}to dn.base=”” by * read
olcAccess: {2}to * by dn=”cn=Manager,dc=ilc,dc=edu,dc=tw” write by * read

# /bin/ldapmodify -Y EXTERNAL -H ldapi:/// -f chdomain.ldif
SASL/EXTERNAL authentication started
SASL username: gidNumber=0+uidNumber=0,cn=peercred,cn=external,cn=auth
SASL SSF: 0
modifying entry “olcDatabase={2}hdb,cn=config”

modifying entry “olcDatabase={2}hdb,cn=config”

modifying entry “olcDatabase={2}hdb,cn=config”

modifying entry “cn=config”

modifying entry “olcDatabase={1}monitor,cn=config”

modifying entry “olcDatabase={2}hdb,cn=config”

8. 建立所須網域的 LDIF 檔案
# vim base.ldif
dn: dc=ilc,dc=edu,dc=tw
objectClass: top
objectclass: domain
dc: ilc

dn: cn=Manager,dc=ilc,dc=edu,dc=tw
objectClass: organizationalRole
cn: Manager
description: Directory Manager

dn: ou=tces,dc=ilc,dc=edu,dc=tw
objectClass: top
objectClass: organizationalUnit
ou: tces

dn: ou=teacher,ou=tces,dc=ilc,dc=edu,dc=tw
objectClass: top
objectClass: organizationalUnit
ou: teacher

dn: ou=student,ou=tces,dc=ilc,dc=edu,dc=tw
objectClass: top
objectClass: organizationalUnit
ou: student

dn: ou=s0101,ou=student,ou=tces,dc=ilc,dc=edu,dc=tw
objectClass: top
objectClass: organizationalUnit
ou: s0101

# /bin/ldapadd -x -D cn=Manager,dc=ilc,dc=edu,dc=tw -W -f base.ldif
Enter LDAP Password:
adding new entry “dc=ilc,dc=edu,dc=tw”

adding new entry “cn=Manager,dc=ilc,dc=edu,dc=tw”

adding new entry “ou=tces,dc=ilc,dc=edu,dc=tw”

adding new entry “ou=teacher,ou=tces,dc=ilc,dc=edu,dc=tw”

adding new entry “ou=student,ou=tces,dc=ilc,dc=edu,dc=tw”

adding new entry “ou=s0101,ou=student,ou=tces,dc=ilc,dc=edu,dc=tw”

9. 修改 migrationtools 設定檔
# cp /usr/share/migrationtools/migrate_common.ph /usr/share/migrationtools/migrate_common.ph.$(date +%F)
# sed -i ‘/DEFAULT_MAIL_DOMAIN/s/padl.com/ilc.edu.tw/’ /usr/share/migrationtools/migrate_common.ph
# sed -i ‘/DEFAULT_BASE/s/dc=padl,dc=com/dc=ilc,dc=edu,dc=tw/’ /usr/share/migrationtools/migrate_common.ph
# sed -i ‘s/$EXTENDED_SCHEMA = 0;/$EXTENDED_SCHEMA = 1;/’ /usr/share/migrationtools/migrate_common.ph

10. 由 Server 取出所要的資料
# grep ^s0101 /etc/passwd > /root/ldap_users_utf8
# grep ^s0101 /etc/group > /root/ldap_groups
# /bin/piconv -f utf8 -t big5 /root/ldap_users_utf8 > /root/ldap_users_big5

# /usr/share/migrationtools/migrate_passwd.pl /root/ldap_users_big5 > /root/users_big5.ldif
# /usr/share/migrationtools/migrate_group.pl /root/ldap_groups > /root/groups.ldif
# piconv -f big5 -t utf8 /root/users_big5.ldif > /root/users_utf8.ldif

11. 進行匯入
# /bin/ldapadd -x -D cn=Manager,dc=ilc,dc=edu,dc=tw -W -f groups.ldif
# /bin/ldapadd -x -D cn=Manager,dc=ilc,dc=edu,dc=tw -W -f users_utf8.ldif

12. 測試是否可以查詢的到
# /usr/bin/ldapsearch -x -b “ou=s0101,ou=student,ou=tces,dc=ilc,dc=edu,dc=tw” uid=s0101129

13. 防火牆設定
# /bin/firewall-cmd –permanent –add-service=ldap
# /bin/firewall-cmd –reload

# iptables -A INPUT -p tcp -s 192.168.1.0/24 –syn -m state –state NEW –dport 389 -j ACCEPT

建立 Cache-only DNS

安裝在 Proxy Server 上,給 Proxy Server 使用,為了加快 DNS 查詢的速度,把查詢過的 DNS 記錄快取起來。
參考網站:
CentOS Cache-only DNS伺服器安裝設定[1]:::iThome Download-你要的軟體在這裡:::

1. 安裝套件
# yum install bind bind-chroot bind-utils

2. 修改設定檔  /etc/named.conf
# cp /etc/named.conf /etc/named.conf.$(date +%F)
# egrep -v ‘^$|//’ /etc/named.conf
options {
#       listen-on port 53 { 127.0.0.1; };
#       listen-on-v6 port 53 { ::1; };
        directory       “/var/named”;
        dump-file       “/var/named/data/cache_dump.db”;
        statistics-file “/var/named/data/named_stats.txt”;
        memstatistics-file “/var/named/data/named_mem_stats.txt”;
        allow-query     { localhost; };
        /*
         – If you are building an AUTHORITATIVE DNS server, do NOT enable recursion.
         – If you are building a RECURSIVE (caching) DNS server, you need to enable
           recursion.
         – If your recursive DNS server has a public IP address, you MUST enable access
           control to limit queries to your legitimate users. Failing to do so will
           cause your server to become part of large scale DNS amplification
           attacks. Implementing BCP38 within your network would greatly
           reduce such attack surface
        */
        recursion yes;
        dnssec-enable yes;
        dnssec-validation yes;
        /* Path to ISC DLV key */
        bindkeys-file “/etc/named.iscdlv.key”;
        forward only;
        forwarders {
                168.95.1.1;

                8.8.8.8;
                };
        managed-keys-directory “/var/named/dynamic”;
        pid-file “/run/named/named.pid”;
        session-keyfile “/run/named/session.key”;
};
logging {
        channel default_debug {
                file “data/named.run”;
                severity dynamic;
        };
};
zone “.” IN {
        type hint;
        file “named.ca”;
};
include “/etc/named.rfc1912.zones”;
include “/etc/named.root.key”;[@more@]3. 設定開機時啟動
# systemctl enable named.service
Created symlink from /etc/systemd/system/multi-user.target.wants/named.service to /usr/lib/systemd/system/named.service.
# systemctl start named.service

4. 修改 /etc/resolv.conf
# echo “nameserver 127.0.0.1” > /etc/resolv.conf

5. 進行 DNS 查詢
# host www.ilc.edu.tw 127.0.0.1
Using domain server:
Name: 127.0.0.1
Address: 127.0.0.1#53
Aliases:

www.ilc.edu.tw has address 140.111.66.96
www.ilc.edu.tw has IPv6 address 2001:288:a201::66:96

再一次查詢的速度會比前一次本查詢過的,快一些!

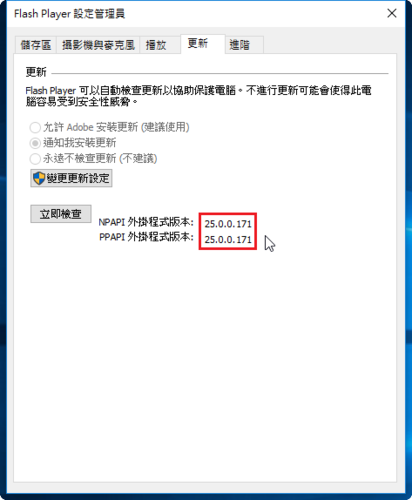
Adobe Flash Player 25.0.0.171


檢查安裝版本:https://www.adobe.com/tw/software/flash/about/
                          https://get.adobe.com/tw/flashplayer/
[@more@] Windows 7 平台
Internet Explorer:
http://fpdownload.adobe.com/get/flashplayer/pdc/25.0.0.171/install_flash_player_ax.exe
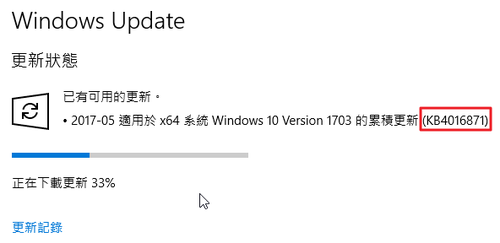
Windows 8 / 8.1 / 10 / Server 2012 / Server 2012 R2 要從 Windows Update 更新

All Other Browsers(Firefox…):
http://fpdownload.adobe.com/get/flashplayer/pdc/25.0.0.171/install_flash_player.exe

Google Chrome(Opera)
http://fpdownload.adobe.com/get/flashplayer/pdc/25.0.0.171/install_flash_player_ppapi.exe

Mac 平台:
http://fpdownload.adobe.com/get/flashplayer/pdc/25.0.0.171/install_flash_player_osx.dmg