解決 /lib/security/pam_fprintd.so 的錯誤訊息

在 Linux logwatch 記錄檔中發現下以下的錯誤訊息:
 ——————— Connections (secure-log) Begin ————————

 Root logins on tty’s: 2 Time(s).

 **Unmatched Entries**
    login: PAM adding faulty module: /lib/security/pam_fprintd.so: 2 Time(s)
    login: PAM unable to dlopen(/lib/security/pam_

fprintd.so): /lib/security/pam_fprintd.so: cannot open shared object file: No such file or directory: 2 Time(s)

 ———————- Connections (secure-log) End ————————-[@more@]看起來似乎是找不到這一個檔案
# ls -l  /lib/security/pam_fprintd.so
ls: 無法存取 /lib/security/pam_fprintd.so: 沒有此一檔案或目錄

這一個檔案的功用似乎和最近很流行的指紋辨識有關,可是 Linux Server 應該不須要這一項功能

取消方式:
# authconfig –disablefingerprint –update

如果真的須要這一項功能,請安裝下面的套件
# yum install fprintd-pam


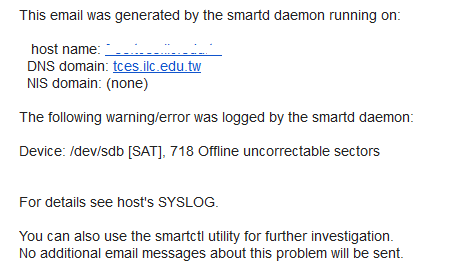
SMART error (OfflineUncorrectableSector)

今天收信時,在信箱中有一封標題為  SMART error (OfflineUncorrectableSector) 的信件,內文為

[@more@]看起來似乎是 sdb 這一顆硬碟有問題,經仔細檢測後,果然是有問題,可以準備更換硬碟了。
# smartctl -H /dev/sdb
smartctl 5.43 2012-06-30 r3573 [x86_64-linux-2.6.32-358.18.1.el6.x86_64] (local build)
Copyright (C) 2002-12 by Bruce Allen, http://smartmontools.sourceforge.net

=== START OF READ SMART DATA SECTION ===
SMART overall-health self-assessment test result: PASSED

# smartctl -l selftest /dev/sdb
smartctl 5.43 2012-06-30 r3573 [x86_64-linux-2.6.32-358.18.1.el6.x86_64] (local build)
Copyright (C) 2002-12 by Bruce Allen, http://smartmontools.sourceforge.net

=== START OF READ SMART DATA SECTION ===
SMART Self-test log structure revision number 1
Num  Test_Description    Status                  Remaining  LifeTime(hours)  LBA_of_first_error
# 1  Short offline       Completed: read failure       90%     36469         353066
# 2  Vendor (0x50)       Aborted by host               10%     24707         –
# 3  Short offline       Completed without error       00%     24706         –
# 4  Vendor (0x50)       Completed without error       00%     24704         –
# 5  Short offline       Completed without error       00%     24704         –
# 6  Vendor (0x50)       Completed without error       00%     24703         –
# 7  Short offline       Completed without error       00%     24703         –
# 8  Vendor (0x50)       Completed without error       00%     24677         –
# 9  Short offline       Completed without error       00%     24676         –
#10  Vendor (0x50)       Completed without error       00%     24662         –
#11  Short offline       Completed without error       00%     24662         –

Linux 下的檔案壓縮

Linux 下的檔案壓縮常用的格式有 tar.gz 和 tar.bz2 等,最近有接觸到的是 tar.xz 格式,會注意到 xz 格式是因為 Linux Kernel 是用 xz 壓縮格式。
壓縮
tar.gz
# tar cvzf /tmp/httpd_conf.tar.gz /etc/httpd
tar.bz2
# tar cvjf /tmp/httpd_conf.tar.bz2 /etc/httpd
tar.xz
# tar cvJf /tmp/httpd_conf.tar.xz /etc/httpd

解壓縮
tar.gz
# tar xvzf /tmp/httpd_conf.tar.gz
tar.bz2
# tar xvjf /tmp/httpd_conf.tar.bz2
tar.xz
# tar xvJf /tmp/httpd_conf.tar.xz

檔案的壓縮大小
# ls -l /tmp/httpd_conf.tar.*
-rw-r–r–. 1 root root 20692 2013-10-28 12:38 /tmp/httpd_conf.tar.bz2
-rw-r–r–. 1 root root 22494 2013-10-28 12:38 /tmp/httpd_conf.tar.gz
-rw-r–r–. 1 root root 20516 2013-10-28 12:38 /tmp/httpd_conf.tar.xz

看起來是 xz 的壓縮效果最好,其次是 tar.bz2,再其次是 tar.gz

安裝 mirrordir

mirrordir 是一套可以同步目錄及檔案的程式,在備份時非常好用,但印象中似乎有單一檔案不能超過 2G 的限制,如果有這樣的問題時,可以改用 rsync 來處理。
沒有第一時間使用 rsync 的原因是,因為我的備份是用 NFS Server 直接掛載目錄的方式,可以直接在本機端備份所需的檔案及目錄,不用做太多的設定,如果改用 rsync,伺服器端和本地端都要做設定。
底下是 mirrordir 的安裝方式:
因為 mirrordir 並不是 CentOS 內定就有的套件,而 rpmforge 和 epel 似乎也沒有,就要使用手動下載下來安裝
檔案下載目錄:
http://pkgs.repoforge.org/mirrordir/
目錄中有支援不同的 CentOS Linux 的版本(/2/3/4/5/6)和不同的平台(i386/i686/x86_64)
以 CentOS Linux 6 x86_64 平台為例
# wget http://pkgs.repoforge.org/mirrordir/mirrordir-0.10.49-1.2.el5.rf.x86_64.rpm
# rpm -ivh mirrordir-0.10.49-1.2.el5.rf.x86_64.rpm

# rpm -ivh http://pkgs.repoforge.org/mirrordir/mirrordir-0.10.49-1.2.el5.rf.x86_64.rpm

上面是以 el5 版本為例,因為目錄中沒有給 el6 的 x86_64 版本

詳細的 mirrordir 用法,可以使用下面的方式列出使用的參數
# /usr/bin/mirrordir –help

[@more@]後記:2013-10-30
確認檔案是不能超過 2G
# /usr/bin/mirrordir /home/global /mnt/school/全校授權
mirrordir: error trying to stat file: /home/global/Windows_8/Windows_8_64bit_KMS.iso: Value too large for defined data type
mirrordir: error trying to stat file: /home/global/Windows_8/Windows_8_32bit_KMS.iso: Value too large for defined data type
mirrordir: error trying to stat file: /mnt/school/全校授權/Windows_8/Windows_8_64bit_KMS.iso: Value too large for defined data type
mirrordir: error trying to stat file: /mnt/school/全校授權/Windows_8/Windows_8_32bit_KMS.iso: Value too large for defined data type
mirrordir: error trying to stat file: /home/global/Windows_7/Windows_7_Enterprise_SP1_64bit_KMS.iso: Value too large for defined data type
mirrordir: error trying to stat file: /home/global/Windows_7/Windows_7_Enterprise_SP1_32bit_KMS.iso: Value too large for defined data type
mirrordir: error trying to stat file: /mnt/school/全校授權/Windows_7/Windows_7_Enterprise_SP1_32bit_KMS.iso: Value too large for defined data type
mirrordir: error trying to stat file: /mnt/school/全校授權/Windows_7/Windows_7_Enterprise_SP1_64bit_KMS.iso: Value too large for defined data type
mirrordir: error trying to stat file: /home/global/Music Maker 16 Premium 酷樂大師/MM16Premium.iso: Value too large for defined data type
mirrordir: error trying to stat file: /mnt/school/全校授權/Music Maker 16 Premium 酷樂大師/MM16Premium.iso: Value too large for defined data type

解決換機器後網路卡無法啟動的問題

有時候用 Virtaulbox 或是 VMware 安裝的虛擬主機,或是真實的主機,更換了網路卡或換了主機,網路卡常常會無法啟動,有一部分是網路卡的設定檔案中,有設定了網路卡卡號,
# cat ifcfg-eth2
DEVICE=eth2
HWADDR=00:02:b3:41:47:bf
TYPE=Ethernet
UUID=4da519dc-7ada-4082-b7ae-6aee62150f5b
ONBOOT=yes

只要去除卡號和 UUID 的設定,再重新啟動網路卡即可。
[@more@]另外一種可能是現在的 Linux 大部分都是使用 udev 來管理設備,所以可能是舊的設定,使新的網路卡無法正常啟動,解決方式是刪除舊的設定檔,再重新啟動電腦即可。
刪除舊的設定檔
# rm -rf /etc/udev/rules.d/70-persistent-net.rules
重新啟動
# sync;sync;sync;sync;init 6

解決螢幕畫面出現 EDAC MC0: CE page 0x0 訊息

在家裡時發現學校負責公告和電腦教室學生上課的那一台 ASUS TS300-E4 Server 無法連線,到了學校查看了一下,發現電源無法開機,試了很多種方式然無法開機,可是這一台 Server 很重要,如果沒有復原,星期一可能無法上課,學校公告也會無法正常使用。
於是找了一台型號比較接近的電腦,先做硬碟的對換,想說先讓它可以上線。電腦重新啟動後,螢幕卻一直出現下面的訊息
Oct 26 15:36:36 drbl kernel: EDAC MC0: UE page 0x0, offset 0x0, grain 1073741824, row 2, labels “:”: i3200 UE
Oct 26 15:36:36 drbl kernel: EDAC MC0: UE page 0x0, offset 0x0, grain 1073741824, row 6, labels “:”: i3200 UE
Oct 26 15:36:37 drbl kernel: EDAC MC0: UE page 0x0, offset 0x0, grain 1073741824, row 2, labels “:”: i3200 UE
Oct 26 15:36:37 drbl kernel: EDAC MC0: UE page 0x0, offset 0x0, grain 1073741824, row 6, labels “:”: i3200 UE

根本無法操作,網路卡也無法正常啟動,無論在本機端或網路連線都是一樣。[@more@]
正想放棄的時候,到網路上搜尋了一下,找到了幾篇有關的訊息
鳥哥的 Linux 私房菜-新手討論區 • 檢視主題 – Terminal 連續跳出錯誤
ASUSTeK Computer Inc. -Support- 常見問題 P5BV-C
edac mc0 – 土狗的部落格 – Yahoo!奇摩部落格

EDAC 是 Error Detection And Correction 的縮寫,後來在上面的第三篇找到了解決方式,就是停用和 edac 有關的模組
# lsmod | grep edac
i3200_edac 9545 0
edac_core 26513 1 i3200_edac

# rmmod i3200_edac
# rmmod edac_core

不過,有的文章說明可能是記憶體出了問題,不過因為這二台 Server 都可以正常運作,並沒有出現問題,所以就暫且處理到這裡,有空的話,再用 memtest 程式來仔細測試。

Adobe Flash Player 離線下載安裝

Adobe Flash Player 是瀏覽網頁時,須要安裝的外掛程式之一,不過連到官方網站,都是要先下載一個下載安裝程式,再連接到網路下載新版的程式安裝,這樣的安裝安式可以確保,安裝時是安裝到目前最新版本的程式,但有時在沒有網路或是整合自動安裝時,就會不太方便,所以有離線即可安裝的版本,就方便多了。
底下是下載網頁:
Adobe Flash Player Distribution | Adobe
Adobe Flash Player – Downloads
Archived Flash Player versions

Linux 下的 S.M.A.R.T.

S.M.A.R.T. 是 Self – Monitoring, Analysis and Reporting Technology (硬碟自我監測、分析及報告技術) 的縮寫,可以在硬碟發生故障之前,先提出警訊,可以提早因應。
在 Linux 下只要安裝 smartmontools 套件即可
# rpm -qf /usr/sbin/smartctl
smartmontools-5.42-2.el5

啟動 smartd 服務
# chkconfig –level 3 smartd on
# chkconfig –list | grep smartd
smartd          0:關閉  1:關閉  2:關閉  3:開啟  4:關閉  5:關閉  6:關閉
[@more@]檢查硬碟是否有開啟 smart 功能
# smartctl -i /dev/sda
smartctl 5.42 2011-10-20 r3458 [i686-linux-2.6.18-8.1.10.el5] (local build)
Copyright (C) 2002-11 by Bruce Allen, http://smartmontools.sourceforge.net

=== START OF INFORMATION SECTION ===
Model Family:     Seagate Barracuda 7200.10
Device Model:     ST3160815AS
Serial Number:    5RA19L2P
Firmware Version: 3.AAD
User Capacity:    160,040,803,840 bytes [160 GB]
Sector Size:      512 bytes logical/physical
Device is:        In smartctl database [for details use: -P show]
ATA Version is:   7
ATA Standard is:  Exact ATA specification draft version not indicated
Local Time is:    Tue Oct 22 16:14:33 2013 CST
SMART support is: Available – device has SMART capability.
SMART support is: Enabled

如果有沒開啟
# smartctl -s on /dev/sda
smartctl 5.42 2011-10-20 r3458 [i686-linux-2.6.18-8.1.10.el5] (local build)
Copyright (C) 2002-11 by Bruce Allen, http://smartmontools.sourceforge.net

=== START OF ENABLE/DISABLE COMMANDS SECTION ===
SMART Enabled.

檢查硬碟狀況
# smartctl -H /dev/sda
smartctl 5.42 2011-10-20 r3458 [i686-linux-2.6.18-8.1.10.el5] (local build)
Copyright (C) 2002-11 by Bruce Allen, http://smartmontools.sourceforge.net

=== START OF READ SMART DATA SECTION ===
SMART overall-health self-assessment test result: PASSED

不過這邊出現 PASSED 並不代表一定沒有問題,要進一步檢查

進行快速檢查,大概需要 1 分多鐘
# smartctl -t short /dev/sda
smartctl 5.42 2011-10-20 r3458 [i686-linux-2.6.18-8.1.10.el5] (local build)
Copyright (C) 2002-11 by Bruce Allen, http://smartmontools.sourceforge.net

=== START OF OFFLINE IMMEDIATE AND SELF-TEST SECTION ===
Sending command: “Execute SMART Short self-test routine immediately in off-line mode”.
Drive command “Execute SMART Short self-test routine immediately in off-line mode” successful.
Testing has begun.
Please wait 1 minutes for test to complete.
Test will complete after Tue Oct 22 16:19:21 2013

Use smartctl -X to abort test.

# smartctl -l selftest /dev/sda
smartctl 5.42 2011-10-20 r3458 [i686-linux-2.6.18-8.1.10.el5] (local build)
Copyright (C) 2002-11 by Bruce Allen, http://smartmontools.sourceforge.net

=== START OF READ SMART DATA SECTION ===
SMART Self-test log structure revision number 1
Num  Test_Description    Status                  Remaining  LifeTime(hours)  LBA_of_first_error
# 1  Short offline       Completed: read failure       90%     46396         3103025
# 2  Short offline       Completed: read failure       90%     46387         3103025
# 3  Short offline       Completed: read failure       90%     46387         3103025
# 4  Short offline       Completed: read failure       90%     45099         3103019

由上面可以看出有 read faillure 的狀況,應該趕快備份資料了!

# smartctl -l selftest /dev/sdb
smartctl 5.42 2011-10-20 r3458 [i686-linux-2.6.18-8.1.10.el5] (local build)
Copyright (C) 2002-11 by Bruce Allen, http://smartmontools.sourceforge.net

=== START OF READ SMART DATA SECTION ===
SMART Self-test log structure revision number 1
Num  Test_Description    Status                  Remaining  LifeTime(hours)  LBA_of_first_error
# 1  Short offline       Completed without error       00%     46426         –
# 2  Short offline       Completed without error       00%     46418         –

上面這一台,是沒有問題的。

更詳細的使用參數
# smartctl –help

讓 FTP Server 的 log 檔每天輪替

因為 FTP Server 的 log 檔似乎不是每天都會做輪替
# ls -l /var/log/vsftpd.log*
-rw——-. 1 root root 760342 2013-10-21 12:24 /var/log/vsftpd.log
-rw——-. 1 root root 131065 2013-10-15 02:59 /var/log/vsftpd.log-20131015
-rw——-. 1 root root 890346 2013-10-20 03:24 /var/log/vsftpd.log-20131020

如果要做記錄檔的分析,會比較麻煩一些,不容易處理單一天數的記錄,所以想把 log 檔改成每天輪替。[@more@]修改 FTP Server log 檔輪替的設定檔
# vim /etc/logrotate.d/vsftpd
/var/log/vsftpd.log {
    # ftpd doesn’t handle SIGHUP properly
    daily
    rotate 2
    nocompress
    missingok
}

/var/log/xferlog {
    # ftpd doesn’t handle SIGHUP properly
    nocompress
    missingok
}

daily  是每天做輪替,rotate 2 是保留二個備份檔

重新啟動 log 服務
# service rsyslog restart
正在關閉系統記錄器:                                       [  確定  ]
正在啟動系統記錄器:                                       [  確定  ]