
因為在 Gentoo Linux 安裝套件時,都要下載原始碼再重新編譯,須要的時間很久,常常會因為網路斷線而未安裝完成,所以想安裝 screen 指令來處理。
安裝 screen
# emerge screen
看起來似乎是有二個套件都叫做 screen,所以系統無法安裝。[@more@]解決方式,就是直接指定要安裝的完整位置
# emerge app-misc/screen
在 Linux 中使用 screen 指令工具
screen 指令工具是一個非常方便的工具程式,有時工作到一半時,因為有事情要離開或是下班,但因為目前套件的安裝或編譯還未完成,如果中斷了,可能要重新再來一次,或是可能還會造成一些嚴重的後果,這時候如果可以把工作放在背景視窗,繼續工作,然後有空的話,再接續回來。
screen 指令工具就有這樣的功能,利用分離(Detach)功能,可以將視窗內的程序放入背景,即使登出主機切斷連線,只要該主機一直維持運作,分離的視窗就會持續地保留在背景。
安裝方式:
CentOS Linux
# yum install screen
Debian/Ubuntu Linux
$ sudo apt-get install screen
Arch Linux
# pacman -S screen
Gentoo Linux
# emerge screen[@more@]Screen 的功能非常強大,這裡只針對 分離(Detach) 來做說明
1. 登入主機後執行 screen 指令,執行之後畫面不會有任何變化
# screen
2. 退出的方式
# exit
3. 畫面會出現 [screen is terminating],表示已經退出 screen
4. 使用分離(Detach) 功能,執行 screen 後
執行要放入背景的工作,並按 CTRL+A 之後,再按 D
# /usr/bin/emerge -u world
工作會放到背景,畫面上會出現 [detached]
5. 執行 screen -ls 列出放在背景的視窗
# screen -ls
There is a screen on:
31862.pts-0.share (Detached)
1 Socket in /root/.screen.
6. 取出
# screen -r
# screen -r 31862.pts-0.share
因為目前只有一個工作,所以只要直接使用 -r 即可,如果有很多個,就要加上編號
7. 就取回原來的工作了!
Linux – 找出佔用磁碟空間最大的目錄/檔案
在 Linux 中 du / find 的功能非常強大,尤其是搭配 sort / head 指令後,可以快速尋找出所需的目錄/檔案及佔用磁碟空間最大的目錄/檔案。
找出 /home 目錄中佔用磁碟空間最大的目錄
# du -hsx /home/* | sort -hr | head
15G /home/share
13G /home/s0990
12G /home/www
6.3G /home/t850008
6.2G /home/s0970
5.6G /home/s0980
4.4G /home/s0960
3.8G /home/s0100
3.8G /home/homework
1.5G /home/s0950
找出佔用磁碟空間最大的學生前三名
# du -hsx /home/s0990/* /home/s0980/* | sort -hr | head -n 3
340M /home/s0980/s0980055
281M /home/s0990/s0990145
281M /home/s0990/s0990136[@more@]找出前 10 大的檔案
# find /home -type f -printf ‘%s %pn’ | sort -nr | head
4670320640 /home/www/course_3-6.iso
2519356635 /home/share/PhotoCap/PCMaterial_V5_MultiFrame.exe
1785901819 /home/share/PhotoCap/PCMaterial_V6_MultiFrame.exe
1593472746 /home/53.tar.bz2
1552238558 /home/share/38/38.html.tar.bz2
1513110984 /home/www/all_g3_big5.zip
1513110912 /home/www/all_g3.zip
1507640047 /home/drbl.tar.bz2
1258466165 /home/share/PhotoCap/PCMaterial_V5_Frame.exe
1131084431 /home/share/PhotoCap/PCMaterial_V6_Frame.exe
找出前 10 大的 exe 檔案
# find /home -type f -iname ‘*.exe’ -printf ‘%s %pn’ | sort -hr | head
2519356635 /home/share/PhotoCap/PCMaterial_V5_MultiFrame.exe
1785901819 /home/share/PhotoCap/PCMaterial_V6_MultiFrame.exe
1258466165 /home/share/PhotoCap/PCMaterial_V5_Frame.exe
1131084431 /home/share/PhotoCap/PCMaterial_V6_Frame.exe
663175919 /home/share/PhotoCap/PCMaterial_V100.exe
459156905 /home/share/PhotoCap/PCMaterial_V4_Frame.exe
439657482 /home/share/PhotoCap/PCMaterial_V4_MultiFrame1.exe
431579494 /home/share/PhotoCap/PCMaterial_V300.exe
408804542 /home/share/PhotoCap/PCMaterial_V200.exe
401967094 /home/share/PhotoCap/PCMaterial_V4_MultiFrame2.exe
colordiff 讓 diff 比對檔案時加上顏色區別
diff 是一個用來比對檔案的指令
# diff sources.list sources.list.save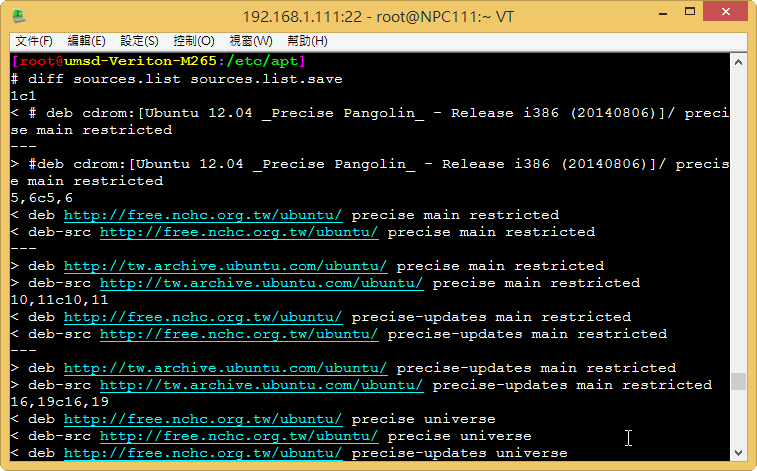
結果有些難以閱讀[@more@]使用 colordiff
# colordiff sources.list sources.list.save
用顏色來區別,看起來就會好一些
安裝方式:
CentOS 6.x/7.x
# yum install colordiff –enablerepo=epel
Debian / Ubuntu
$ sudo apt-get install colordiff
Arch Linux
# pacman -S colordiff
Gentoo Linux
# emerge colordiff
解決 Gentoo Linux 出現 WARNING: One or more updates/rebuilds have been skipped due to a dependency conflict: 的更新問題
最後在使用 Gentoo Linux 做套件更新時,出現下面的訊息:
WARNING: One or more updates/rebuilds have been skipped due to a dependency conflict:
dev-lang/perl:0
(dev-lang/perl-5.20.1-r4:0/5.20::gentoo, ebuild scheduled for merge) conflicts with
=dev-lang/perl-5.18* required by (virtual/perl-Sys-Syslog-0.320.0-r2:0/0::gentoo,
installed)
^ ^^^^^
dev-lang/perl:0/5.18=[-build(-)] required by (dev-perl/DBD-mysql-4.20.0-r1:0/0::gentoo,
installed)
^^^^^^^^
dev-lang/perl:0/5.18=[-build(-)] required by (dev-perl/DBI-1.628.0:0/0::gentoo,
installed)
^^^^^^^^
=dev-lang/perl-5.18* required by (virtual/perl-Storable-2.410.0-r1:0/0::gentoo,
installed)
^ ^^^^^
dev-lang/perl:0/5.18=[-build(-)] required by (perl-core/Data-Dumper-
2.154.0:0/0::gentoo, installed)
^^^^^^^^
!!! The following installed packages are masked:
– dev-lang/perl-5.18.2-r2::gentoo (masked by: package.mask)
/usr/portage/profiles/package.mask:
# Andreas K. Huettel <dilfridge@gentoo.org> (29 Mar 2015)
# Mask Perl 5.18 for removal. Please upgrade to Perl 5.20[@more@]看起來是似乎是需要把 perl 更新到 5.20
在網路上搜尋了一下,找到了這一篇:perl-5.20.1 – has anybody managed to upgrade Perl? | Gentoo | User
底下是操作的步驟:
1.
# emerge -av1 perl-cleaner
2.
# emerge -av1O dev-lang/perl
setlocale: unsupported locale setting
* IMPORTANT: 1 news items need reading for repository ‘gentoo’.
* Use eselect news to read news items.
These are the packages that would be merged, in order:
[ebuild U ] dev-lang/perl-5.20.1-r4:0/5.20 [5.18.2-r2:0/5.18] USE=”berkdb gdbm -debug -doc -ithreads” 13370 KiB
Total: 1 package (1 upgrade), Size of downloads: 13370 KiB
Would you like to merge these packages? [Yes/No] yes
3.
# perl-cleaner –all
經過漫長的時間及等待,終於沒有再出現警告的訊息了!
RedHat/CentOS、Debian/Ubuntu、Arch Linux、Gentoo 套件管理比較
1. 更新套件庫
ReHat/CentOS
# yum update
Debian/Ubuntu
# apt-get update
Arch Linux
# pacman -Sy
Gentoo Linux
# emerge –sync[@more@]2. 更新整個系統
ReHat/CentOS
# yum -y update
Debian/Ubuntu
# apt-get upgrade
# apt-get dist-upgrade
Arch Linux
# pacman -Syu
Gentoo Linux
# emerge -u world
3. 搜尋套件
ReHat/CentOS
# yum search pkg_filename
Debian/Ubuntu
# apt-cache search pkg_filename
Arch Linux
# pacman -Ss pkg_filename
Gentoo Linux
# emerge -s pkg_filename
4. 安裝套件
ReHat/CentOS
# yum install pkg_filename
# rpm -ivh pkg_filename.rpm
Debian/Ubuntu
# apt-get install pkg_filename
# dpkg -i pkg_filename.deb
Arch Linux
# pacman -S pkg_filename
Gentoo Linux
# emerge pkg_filename
# emerge -k pkg_filename
5. 移除套件
ReHat/CentOS
# yum remove pkg_filename
# rpm -e pkg_filename
Debian/Ubuntu
# apt-get remove –purge pkg_filename
# dpkg -P pkg_filename.deb
Arch Linux
# pacman -Rn pkg_filename
Gentoo Linux
# emerge -C pkg_filename
Gentoo Linux – 啟用 snmpd 服務
參考網頁:
Easy Guardian Network Monitoring – Install SNMP on GENTOO Linux
安裝 snmpd 服務
# emerge net-snmp[@more@]修改設定檔
# vim /etc/snmp/snmpd.conf
com2sec local 127.0.0.1/32 public
com2sec local 192.168.1.0/24 public
group MyROGroup v1 local
group MyROGroup v2c local
group MyROGroup usm local
view all included .1 80
access MyROGroup “” any noauth exact all none none
syslocation MyLocation
syscontact Me <
me@somewhere.org>
啟動 snmpd 服務
# /etc/init.d/snmpd start
開機時啟動 snmpd 服務
# /sbin/rc-update add snmpd default
* service snmpd added to runlevel default
檢查是否有正常啟動
# netstat -anup | grep snmpd
udp 0 0 0.0.0.0:161 0.0.0.0:* 23425/snmpd
檢查是否可以取得 snmp 相關資訊
# snmpwalk -v 2c -c public 192.168.1.5
解決 Gentoo Linux 更新套件時出現 [blocks B ] 的問題
做套件更新時出現下面的訊息
[blocks B ] <sys-fs/udev-init-scripts-27 (“<sys-fs/udev-init-scripts-27” is blocking sys-apps/openrc-0.13.8)
Total: 63 packages (3 new, 60 reinstalls), Size of downloads: 155836 KiB
Conflict: 1 block (1 unsatisfied)
* Error: The above package list contains packages which cannot be
* installed at the same time on the same system.
(sys-apps/openrc-0.13.8:0/0::gentoo, ebuild scheduled for merge) pulled in by
sys-apps/openrc required by @system
sys-apps/openrc required by (virtual/service-manager-0:0/0::gentoo, ebuild scheduled for merge)
>=sys-apps/openrc-0.12 required by (net-misc/netifrc-0.2.2:0/0::gentoo, ebuild scheduled for merge)
(sys-fs/udev-init-scripts-26-r2:0/0::gentoo, installed) pulled in by
>=sys-fs/udev-init-scripts-26 required by (sys-fs/udev-216:0/0::gentoo, installed)[@more@]
解決方式:
參考網頁:Gentoo Forums :: 觀看文章 – SOLVED: Openrc blocking kmod in recent update!
# emerge -auv openrc udev-init-scripts
These are the packages that would be merged, in order:
Calculating dependencies… done!
[ebuild U ] sys-fs/udev-init-scripts-27 [26-r2] 4 KiB
[ebuild N ] sys-apps/openrc-0.13.8 USE=”ncurses netifrc pam unicode -debug -newnet (-prefix) (-selinux) -static-libs -tools” 148 KiB
[ebuild N ] net-misc/netifrc-0.2.2 60 KiB
Total: 3 packages (1 upgrade, 2 new), Size of downloads: 211 KiB
Would you like to merge these packages? [Yes/No]Yes
>>> Verifying ebuild manifests
>>> Emerging (1 of 3) sys-fs/udev-init-scripts-27::gentoo
* Fetching files in the background. To view fetch progress, run
* `tail -f /var/log/emerge-fetch.log` in another terminal.
* udev-init-scripts-27.tar.bz2 SHA256 SHA512 WHIRLPOOL size 😉 … [ ok ]
>>> Unpacking source…
>>> Unpacking udev-init-scripts-27.tar.bz2 to /var/tmp/portage/sys-fs/udev-init-scripts-27/work
>>> Source unpacked in /var/tmp/portage/sys-fs/udev-init-scripts-27/work
>>> Preparing source in /var/tmp/portage/sys-fs/udev-init-scripts-27/work/udev-init-scripts-27 …
>>> Source prepared.
>>> Configuring source in /var/tmp/portage/sys-fs/udev-init-scripts-27/work/udev-init-scripts-27 …
>>> Source configured.
>>> Compiling source in /var/tmp/portage/sys-fs/udev-init-scripts-27/work/udev-init-scripts-27 …
make
make: Nothing to be done for ‘all’.
>>> Source compiled.
* Skipping make test/check due to ebuild restriction.
>>> Test phase [disabled because of RESTRICT=test]: sys-fs/udev-init-scripts-27
>>> Install udev-init-scripts-27 into /var/tmp/portage/sys-fs/udev-init-scripts-27/image/ category sys-fs
make DESTDIR=/var/tmp/portage/sys-fs/udev-init-scripts-27/image/ install
install -d /var/tmp/portage/sys-fs/udev-init-scripts-27/image//etc/conf.d
install -m 0644 conf.d/* /var/tmp/portage/sys-fs/udev-init-scripts-27/image//etc/conf.d
install -d /var/tmp/portage/sys-fs/udev-init-scripts-27/image//etc/init.d
install -m 0755 init.d/* /var/tmp/portage/sys-fs/udev-init-scripts-27/image//etc/init.d
>>> Completed installing udev-init-scripts-27 into /var/tmp/portage/sys-fs/udev-init-scripts-27/image/
Banana Pi 測試 – Gentoo Linux IPv6 設定
參考網頁:
gentoo configure ipv6 and ipv4 dual stack |
Gentoo IPv6 Setup
1. 修改網路設定
# vim /etc/conf.d/net
#For Static IP
config_eth0=(
“192.168.53.98 netmask 255.255.255.0”
“2001:288:a229:4:d1:2ff:fe42:5c8f/64”
)
routes_eth0=( “default gw 192.168.53.254” )
dns_servers_eth0=( “168.95.1.1 140.111.66.1” )
[@more@]
2. 重新啟動系統
# syunc;sync;sync;sync;shutdown -r now
3. 查看網路設定
# ifconfig eth0 | egrep ‘inet|inet6’
inet 192.168.53.98 netmask 255.255.255.0 broadcast 192.168.53.255
inet6 2001:288:a229:4:d1:2ff:fe42:5c8f prefixlen 64 scopeid 0x0<global>
inet6 fe80::d1:2ff:fe42:5c8f prefixlen 64 scopeid 0x20<link>
4. 進行測試
# ping6 -c 4 2001:288:a201::66:96
PING 2001:288:a201::66:96(2001:288:a201::66:96) 56 data bytes
64 bytes from 2001:288:a201::66:96: icmp_seq=1 ttl=125 time=4.52 ms
64 bytes from 2001:288:a201::66:96: icmp_seq=2 ttl=125 time=1.97 ms
64 bytes from 2001:288:a201::66:96: icmp_seq=3 ttl=125 time=9.01 ms
64 bytes from 2001:288:a201::66:96: icmp_seq=4 ttl=125 time=1.81 ms
# ping6 -c 4 www.kame.net
PING www.kame.net(2001:200:dff:fff1:216:3eff:feb1:44d7) 56 data bytes
64 bytes from 2001:200:dff:fff1:216:3eff:feb1:44d7: icmp_seq=1 ttl=49 time=39.9 ms
64 bytes from 2001:200:dff:fff1:216:3eff:feb1:44d7: icmp_seq=2 ttl=49 time=41.7 ms
64 bytes from 2001:200:dff:fff1:216:3eff:feb1:44d7: icmp_seq=3 ttl=49 time=41.3 ms
64 bytes from 2001:200:dff:fff1:216:3eff:feb1:44d7: icmp_seq=4 ttl=49 time=38.8 ms
Banana Pi 測試 – Gentoo Linux 安裝 LAMP Server
參考網頁:
Installing LAMP (Linux, Apache, MySQL, PHP and PhpMyAdmin) in Gentoo Linux
Installing Apache, MySQL, PHP in Gentoo Server | S V N Labs Softwares
LAMP Server on Gentoo – Linode Guides & Tutorials
同步套件庫
# emerge –sync
更新整個系統
# emerge –update world
安裝 Apache Web Server
# emerge apache[@more@]預設網頁根目錄 /var/www/localhost/htdocs/
底下更改成 /var/www/html
# cp /etc/apache2/vhosts.d/default_vhost.include /etc/apache2/vhosts.d/default_vhost.include.$(date +%F)
# sed -i ‘s|/var/www/localhost/htdocs|/var/www/html|’ /etc/apache2/vhosts.d/default_vhost.include
# mv /var/www/localhost/htdocs /var/www/html
cgi 目錄由 /var/www/localhost/cgi-bin 改成 /var/www/cgi-bin
# sed -i ‘s|/var/www/localhost/cgi-bin|/var/www/cgi-bin|’ /etc/apache2/vhosts.d/default_vhost.include
# sed -i ‘s|/var/www/localhost/cgi-bin|/var/www/cgi-bin|’ /etc/apache2/vhosts.d/00_default_ssl_vhost.conf
取消 Indexes 目錄顯示
# sed -i ‘s/Options Indexes/Options -Indexes/’ /etc/apache2/vhosts.d/default_vhost.include
將使用者網頁目錄由 public_html 改成 www
# sed -i ‘s/public_html/www/’ /etc/apache2/modules.d/00_mod_userdir.conf
增加網頁目錄中的 index 設定
# sed -i ‘s/DirectoryIndex index.html index.html.var/DirectoryIndex index.php index.html index.htm index.html.var/’ /etc/apache2/modules.d/00_default_settings.conf
取消 Deny from all 設定
# vim /etc/apache2/modules.d/00_default_settings.conf
<Directory />
Options FollowSymLinks
AllowOverride None
Order deny,allow
# Deny from all
</Directory>
將 ServerSignature On 改成 ServerSignature Off
# sed -i ‘s/ServerSignature On/ServerSignature Off/’ /etc/apache2/modules.d/00_default_settings.conf
啟動 Apache Web Server,如果出現下面的訊息
# /etc/init.d/apache2 start
* Starting apache2 …
apache2: apr_sockaddr_info_get() failed for lemaker
* start-stop-daemon: failed to start `/usr/sbin/apache2′ [ !! ]
* ERROR: apache2 failed to start
請在 /etc/hosts 加入一行
# vim /etc/hosts
127.0.0.1 lemaker
設定開機時啟動 Apache Web Servr
# rc-update add apache2 default
安裝 MySQL Server
# emerge dev-db/mysql
啟動 MySQL Server
# /etc/init.d/mysql start
* Checking mysqld configuration for mysql … [ ok ]
* Starting mysql …
* You don’t appear to have the mysql database installed yet.
* Please run `emerge –config =dev-db/mysql-5.5.40` to have this done…
* ERROR: mysql failed to start
如果出上面的錯誤訊息
# emerge –config =dev-db/mysql-5.5.40
Configuring pkg…
* Please provide a password for the mysql ‘root’ user now, in the
* MYSQL_ROOT_PASSWORD env var or through the /root/.my.cnf file.
* Avoid [“‘_%] characters in the password
>(輸入您要設定的 MySQL Server 密碼)
* Retype the password
>(再次輸入您要設定的 MySQL Server 密碼)
* Creating the mysql database and setting proper
* permissions on it …
* Command: ‘/usr/share/mysql/scripts/mysql_install_db’ ‘–basedir=/usr’ –loose-skip-grant-tables –loose-skip-host-cache –loose-skip-name-resolve –loose-skip-networking –loose-skip-slave-start –loose-skip-ssl –loose-skip-log-bin –loose-skip-relay-log –loose-skip-slow-query-log –loose-skip-external-locking –loose-skip-log-slave-updates –user=mysql –loose-skip-innodb ‘–datadir=///var/lib/mysql’ ‘–tmpdir=///tmp/’
* Starting mysqld …
* Command //usr/sbin/mysqld –loose-skip-grant-tables –loose-skip-host-cache –loose-skip-name-resolve –loose-skip-networking –loose-skip-slave-start –loose-skip-ssl –loose-skip-log-bin –loose-skip-relay-log –loose-skip-slow-query-log –loose-skip-external-locking –loose-skip-log-slave-updates –user=mysql –loose-skip-innodb –user=mysql –log-warnings=0 –basedir=//usr –datadir=///var/lib/mysql –max_allowed_packet=8M –net_buffer_length=16K –default-storage-engine=MyISAM –socket=//var/run/mysqld/mysqld16101.sock –pid-file=//var/run/mysqld/mysqld20041.pid
* –tmpdir=///tmp/ [ ok ]
* Setting root password … [ ok ]
* Loading “zoneinfo”, this step may require a few seconds … … [ ok ]
* Stopping the server …
* Done
MySQL Server 的一些安全性設定
# /usr/bin/mysql_secure_installation
設定開機時啟動 MySQL Server
# rc-update add mysql default
MySQL Server 設定檔
/etc/mysql/my.cnf
安裝 PHP
# USE=”apache2 mysql mysqli php cli cgi pam ssl xml xml2 berkdb innodb jpeg png pcre session unicode” emerge ‘dev-lang/php’
# vim /etc/conf.d/apache2
APACHE2_OPTS=”-D DEFAULT_VHOST -D INFO -D SSL -D SSL_DEFAULT_VHOST -D LANGUAGE -D PHP5″
PHP 設定檔
/etc/php/apache2-php5.5/php.ini
PHP 一些設定
# sed -i ‘s/allow_url_fopen = On/allow_url_fopen = Off/’ /etc/php/apache2-php5.5/php.ini
# sed -i ‘s/expose_php = On/expose_php = Off/’ /etc/php/apache2-php5.5/php.ini
# sed -i ‘s/upload_max_filesize = 2M/upload_max_filesize = 500M/’ /etc/php/apache2-php5.5/php.ini
# sed -i ‘s/post_max_size = 8M/post_max_size = 500M/’ /etc/php/apache2-php5.5/php.ini
# sed -i ‘s/session.cookie_httponly =/session.cookie_httponly = 1/’ /etc/php/apache2-php5.5/php.ini
# sed -i ‘s/;date.timezone =/date.timezone = Asia/Taipei/’ /etc/php/apache2-php5.5/php.ini
# sed -i ‘s/max_execution_time = 30/max_execution_time = 300/’ /etc/php/apache2-php5.5/php.ini
# sed -i ‘s/max_input_time = 60/max_input_time = 600/’ /etc/php/apache2-php5.5/php.ini
重新啟動 apache Web Server
# /etc/init.d/apache2 restart