在 Debian 7 上建置 Slave DNS Server

Master DNS Server – 192.168.1.3
Slave DNS Server – 192.168.1.12

Master DNS Server 的部分已設定完成,這篇文章主要針對 Slave DNS Server 來做設定
參考網頁:
Setup DNS Server On Debian 7 Wheezy | Unixmen
Mind Reference: Debian Slave DNS Server Setup
[@more@]1. 安裝 DNS Server 所須套件
# apt-get install bind9 bind9utils bind9-doc dnsutils

2.修改 Master DNS Server 上的 /etc/bind/named.conf.local 設定檔,加入紅字的部分
# vim /etc/bind/named.conf.local
zone “test.ilc.edu.tw” IN {
        type master;
        file “/etc/bind/db.test.ilc.edu.tw”;
        allow-transfer  { 192.168.1.12; };
        also-notify { 192.168.1.12; };
};

zone “1.168.192.in-addr.arpa” IN {
        type master;
        file “/etc/bind/db.1.168.192”;
        allow-transfer  { 192.168.1.12; };
        also-notify { 192.168.1.12; };
};

3. 修改 Slave DNS Server 的 /etc/bind/named.conf.local
# vim /etc/bind/named.conf.local
zone “test.ilc.edu.tw” IN {
        type slave;
        file “/etc/bind/db.test.ilc.edu.tw”;
       
masters  { 192.168.1.3; };
};

zone “1.168.192.in-addr.arpa” IN {
        type slave;
        file “/etc/bind/db.1.168.192”;
        masters  { 192.168.1.3; };
};

4. 重新啟動 Slave DNS Server
# /etc/init.d/bind9 restart

5. 會自動從 Master DNS Server 抓取設定檔
# ls -l /etc/bind/db.*
-rw-rw-r– 1 bind bind   237 Dec  9 04:21 /etc/bind/db.0
-rw-rw-r– 1 bind bind   271 Dec  9 04:21 /etc/bind/db.127
-rw-rw-r– 1 bind bind   237 Dec  9 04:21 /etc/bind/db.255
-rw-r–r– 1 bind bind 17797 Dec 25 14:16 /etc/bind/db.1.168.192
-rw-rw-r– 1 bind bind   353 Dec  9 04:21 /etc/bind/db.empty
-rw-rw-r– 1 bind bind   270 Dec  9 04:21 /etc/bind/db.local
-rw-rw-r– 1 bind bind  3048 Dec  9 04:21 /etc/bind/db.root
-rw-r–r– 1 bind bind 20142 Dec 25 14:17 /etc/bind/db.test.ilc.edu.tw

6. 進行測試
# host 192.168.1.3 192.168.1.12
Using domain server:
Name: 192.168.1.12
Address: 192.168.1.12#53
Aliases:

3.1.168.192.in-addr.arpa domain name pointer ftp.test.ilc.edu.tw.

# host ftp.test.ilc.edu.tw 192.168.1.12
Using domain server:
Name: 192.168.1.12
Address: 192.168.1.12#53
Aliases:

ftp.test.ilc.edu.tw has address 192.168.1.3


在 Debian 建置有 logging 功能的 DNS Server

在網路中,DNS Server 服務是非常重要的,由 DNS Server 的 log 中,可以查詢到一些非常重要的資料。

# tail dns-security.log
24-Dec-2014 00:49:26.723 security: info: client 192.3.96.146#48302: query (cache) ‘openresolver.com/A/IN’ denied
24-Dec-2014 02:11:25.169 security: info: client 89.248.172.169#46003: query (cache) ‘globe.gov/ANY/IN’ denied
24-Dec-2014 05:09:04.502 security: info: client 202.153.191.99#60017: query (cache) ‘./NS/IN’ denied
24-Dec-2014 08:31:24.675 security: info: client 204.42.253.2#58601: query (cache) ‘c526034a.openresolvertest.net/A/IN’ denied
24-Dec-2014 08:59:36.327 security: info: client 124.232.142.220#54455: query (cache) ‘www.google.com/A/IN’ denied
24-Dec-2014 12:44:44.954 security: info: client 74.82.47.8#54631: query (cache) ‘dnsscan.shadowserver.org/A/IN’ denied
24-Dec-2014 15:33:08.420 security: info: client 207.244.82.115#48706: query (cache) ‘./ANY/IN’ denied[@more@]設定方式:DNS Server 已經設定 chroot
參考網頁:Bind9 – Debian Wiki
1. 建立 /var/chroot/bind9/var/log 目錄
# mkdir /var/chroot/bind9/var/log

2. 更改目錄權限
# chown bind:bind /var/chroot/bind9/var/log

3. 修改 /etc/bind/named.conf
# vim /etc/bind/named.conf
加入下面一行
include “/etc/bind/named.conf.log”;

4. 建立 /etc/bind/named.conf.log
# vim /etc/bind/named.conf.log
logging {
        channel update_debug {
                file “/var/log/update_debug.log” versions 3 size 100k;
                severity debug;
                print-severity  yes;
                print-time      yes;
        };
        channel security_info {
                file “/var/log/security_info.log” versions 1 size 100k;
                severity info;
                print-severity  yes;
                print-time      yes;
        };
        channel bind_log {
                file “/var/log/bind.log” versions 3 size 1m;
                severity info;
                print-category  yes;
                print-severity  yes;
                print-time      yes;
        };

        category default { bind_log; };
        category lame-servers { null; };
        category update { update_debug; };
        category update-security { update_debug; };
        category security { security_info; };
};

5. 重新啟動 DNS Server 及 Log Server
# /etc/init.d/rsyslog restart; /etc/init.d/bind9 start

6. 驗收成果及收工
# ls -l /var/chroot/bind9/var/log/
total 4
-rw-r–r– 1 bind bind 1417 Dec 24 15:45 bind.log
-rw-r–r– 1 bind bind    0 Dec 24 15:45 security_info.log
-rw-r–r– 1 bind bind    0 Dec 24 15:45 update_debug.log

在 Debian 建置 chroot 的 DNS Server

在 Debian 上安裝的 DNS Server 預設和 ArchLinux 一樣是沒有 chroot 的,為了 DNS Server 的安全,通常都會建議要以 chroot 的方式來執行。
參考網頁:Mind Reference: How to chroot bind9 in Debian
                     Bind9 – Debian Wiki
底下以 Script 檔來自動處理這項工作
[@more@]Script 檔案來源,稍做修改
1. 建立 chroot-bind9
# vim /usr/local/bin/chroot-bind9
#!/bin/bash

/etc/init.d/bind9 stop

mkdir -p /var/chroot/bind9/{etc,dev,var/cache/bind,var/run/bind/run}
chown -R bind:bind /var/chroot/bind9/var/*

mknod /var/chroot/bind9/dev/null c 1 3
mknod /var/chroot/bind9/dev/random c 1 8
chmod 666 /var/chroot/bind9/dev/{null,random}

mv /etc/bind /var/chroot/bind9/etc
ln -s /var/chroot/bind9/etc/bind /etc/bind

chown -R bind:bind /etc/bind/*
chmod -R g+w /etc/bind/

echo “$AddUnixListenSocket /var/chroot/bind9/dev/log” > /etc/rsyslog.d/bind-chroot.conf

sed -e ‘s,”-u bind”,”-u bind -t /var/chroot/bind9″,’ /etc/default/bind9 > /tmp/x && mv /tmp/x /etc/default/bind9

/etc/init.d/bind9 start

2. 給予 root 執行權限
# chmod 700 /usr/local/bin/chroot-bind9

3. 執行
# /usr/local/bin/chroot-bind9

4. 驗收成果
# host 192.168.1.3 192.168.1.2
Using domain server:
Name: 192.168.1.2
Address: 192.168.1.2#53
Aliases:

3.1.168.192.in-addr.arpa domain name pointer ftp.test.ilc.edu.tw.

# host ftp.test.ilc.edu.tw 192.168.1.2
Using domain server:
Name: 192.168.1.2
Address: 192.168.1.2#53
Aliases:

ftp.test.ilc.edu.tw has address 192.168.1.3

解決執行 /etc/init.d/bind9 status 會出現的錯誤訊息
# /etc/init.d/bind9 status
 * bind9 is not running

先將 PIDFILE=/var/run/named/named.pid 前面加上 # 註解
# sed -i ‘s/^PIDFILE/#PIDFILE/’ /etc/init.d/bind9
#PIDFILE 後面插入一行
# sed -i ‘/#PIDFILE/ a PIDFILE=/var/chroot/bind9/var/run/named/named.pid’ /etc/init.d/bind9

/etc/init.d/bind9 status
 * bind9 is running

在 Debian 7 上建置 DNS Server

因為目前學校用來建置 DNS Server 的系統為 CentOS 5.x,系統比較老舊一些,雖然它的支援期到 2017-03-31,但考量到 DNS Server 的負載沒那麼重,所以找了一台比較輕量級的電腦來擔任 DNS Server 的工作,替換下來的主機則可以做其它的用途。
參考網頁:Setup DNS Server On Debian 7 Wheezy | Unixmen
1. 安裝 DNS Server
# apt-get install bind9 bind9utils bind9-doc dnsutils
[@more@]2.  備份原設定檔
# cp /etc/bind/named.conf.local /etc/bind/named.conf.local.$(date +%F)

3. 修改 /etc/bind/named.conf.local 設定檔
zone “test.ilc.edu.tw” IN {
        type master;
        file “/etc/bind/db.test.ilc.edu.tw”;
};

zone “1.168.192.in-addr.arpa” IN {
        type master;
        file “/etc/bind/db.1.168.192”;
};

4. 修改 /etc/bind/db.test.ilc.edu.tw 設定檔
# cp /etc/bind/db.local /etc/bind/db.test.ilc.edu.tw
# vim /etc/bind/db.test.ilc.edu.tw
;
; BIND data file for local loopback interface
;
$TTL    604800
@       IN      SOA     dns.test.ilc.edu.tw. root.dns.test.ilc.edu.tw. (
                              2         ; Serial
                         604800         ; Refresh
                          86400         ; Retry
                        2419200         ; Expire
                         604800 )       ; Negative Cache TTL
;
@       IN      NS      dns.test.ilc.edu.tw.
@       IN      A       192.168.1.2
@       IN      AAAA    ::1
test.ilc.edu.tw.        IN      A       192.168.1.2
www            IN      A       192.168.1.1
dns            IN      A       192.168.1.2
ftp            IN      A       192.168.1.3

5. 修改 /etc/bind/db.1.168.192 設定檔
# cp /etc/bind/db.127 /etc/bind/db.1.168.192
# vim /etc/bind/db.1.168.192

;
; BIND reverse data file for local loopback interface
;
$TTL    604800
@       IN      SOA     dns.test.ilc.edu.tw. root.dns.test.ilc.edu.tw. (
                              1         ; Serial
                         604800         ; Refresh
                          86400         ; Retry
                        2419200         ; Expire
                         604800 )       ; Negative Cache TTL
;
@     IN        NS      dns.test.ilc.edu.tw.
;
1     IN        PTR     www.test.ilc.edu.tw.
2     IN        PTR     dns.test.ilc.edu.tw.
3     IN        PTR     ftp.test.ilc.edu.tw.

6. 重新啟動 DNS Server
# service bind9 restart

7. 進行測試
# host 192.168.1.3 192.168.1.2
Using domain server:
Name: 192.168.1.2
Address: 192.168.1.2#53
Aliases:

3.1.168.192.in-addr.arpa domain name pointer ftp.test.ilc.edu.tw.

# host ftp.test.ilc.edu.tw 192.168.1.2
Using domain server:
Name: 192.168.1.2
Address: 192.168.1.2#53
Aliases:

ftp.test.ilc.edu.tw has address 192.168.1.3

8. 在防火牆中設定
防火牆上的設定
# iptables -A INPUT -p udp -m state –state NEW -m udp –dport 53 -j ACCEPT

Banana Pi – 讓 Debian 的終端機能色彩繽紛

用習慣 CentOS 之後,使用 Debian 有些不太習慣,Debian 預設的終端機是沒有根據不同類型的檔案,加上顏色來區分的。
[@more@]參考網頁:Change default LS colors on Debian [[[Linuxwall.info::Wiki]]]

以 root 身份為例
1. 執行 dircolors 產生相關設定
# dircolors -p > ~/.dircolorsrc

2. 將設定加入到 .bashrc 或是 .profile
# vim ~/.bashrc
加入下面這二行
eval “`dircolors -b ~/.dircolorsrc`”
export LS_OPTIONS=’–color=auto’

3. 登入再重新登入後即可生效

4. 讓新增的帳號生效
# dircolors -p > /etc/skel/.dircolorsrc
# vim /etc/skel/.bashrc
加入下面這二行
eval “`dircolors -b ~/.dircolorsrc`”
export LS_OPTIONS=’–color=auto’

5. 也可以自行修改不同的顏色
# tail .dircolorsrc
.mp3 00;36
.mpc 00;36
.ogg 00;36
.ra 00;36
.wav 00;36
# http://wiki.xiph.org/index.php/MIME_Types_and_File_Extensions
.axa 00;36
.oga 00;36
.spx 00;36
.xspf 00;36

.mp3 等就是 青色

Debian / Ubuntu update-rc.d 用法 另一章

在這之前曾經試用 update.rc.d 來啟動或關閉服務,但很詭異的是有些服務,我明明沒有啟動,但有啟動,究竟是什麼原因呢?
這是在 Cubie Truck Ubuntu Server 14.04 中碰到的狀況。
如 Samba 服務
# netstat -antulp | egrep ‘:137|:138|:139|:445’
tcp        0      0 0.0.0.0:139             0.0.0.0:*               LISTEN      1597/smbd
tcp        0      0 0.0.0.0:445             0.0.0.0:*               LISTEN      1597/smbd
tcp6       0      0 :::139                  :::*                    LISTEN      1597/smbd
tcp6       0      0 :::445                  :::*                    LISTEN      1597/smbd
udp        0      0 192.168.1.255:137       0.0.0.0:*                           1587/nmbd
udp        0      0 192.168.1.105:137       0.0.0.0:*                           1587/nmbd
udp        0      0 0.0.0.0:137             0.0.0.0:*                           1587/nmbd
udp        0      0 192.168.1.255:138       0.0.0.0:*                           1587/nmbd
udp        0      0 192.168.1.105:138       0.0.0.0:*                           1587/nmbd
udp        0      0 0.0.0.0:138             0.0.0.0:*                           1587/nmbd
[@more@]使用 sysv-rc-conf –list 來列出服務的啟用狀態
# sysv-rc-conf –list
apache2      0:off      1:off   2:on    3:on    4:on    5:on    6:off
apparmor     S:on
atd
console-setu
cron
dbus
dns-clean    1:on       2:on    3:on    4:on    5:on
exim4        0:off      1:off   2:on    3:on    4:on    5:on    6:off
firstrun
friendly-rec
halt         0:on
irqbalance
killprocs    1:on
kmod
memcached    0:off      1:off   2:on    3:on    4:on    5:on    6:off
minidlna     0:off      1:off   2:on    3:on    4:on    5:on    6:off
mysql
networking
nmbd
ntp          1:off      2:on    3:on    4:on    5:on
ondemand     2:on       3:on    4:on    5:on
pppd-dns     1:on       2:on    3:on    4:on    5:on
pptpd        1:off      2:on    3:on    4:on    5:on
procps
rc.local     2:on       3:on    4:on    5:on
reboot       6:on
resolvconf
rsync        0:off      1:off   2:on    3:on    4:on    5:on    6:off
rsyslog
samba        2:off      3:off   4:off   5:off
samba-ad-dc  2:off      3:off   4:off   5:off
sendsigs     0:on       6:on
single       1:on
smbd
ssh
sudo
udev
umountfs     0:on       6:on
umountroot   0:on       6:on
urandom      0:on       6:on    S:on
vsftpd

目前的執行層級
# /sbin/runlevel
N 2

列出執行層級 2 啟動的服務,裡面根本沒有與 Samba 相關的服務
# sysv-rc-conf –list | grep 2:on
apache2      0:off      1:off   2:on    3:on    4:on    5:on    6:off
dns-clean    1:on       2:on    3:on    4:on    5:on
exim4        0:off      1:off   2:on    3:on    4:on    5:on    6:off
memcached    0:off      1:off   2:on    3:on    4:on    5:on    6:off
minidlna     0:off      1:off   2:on    3:on    4:on    5:on    6:off
ntp          1:off      2:on    3:on    4:on    5:on
ondemand     2:on       3:on    4:on    5:on
pppd-dns     1:on       2:on    3:on    4:on    5:on
pptpd        1:off      2:on    3:on    4:on    5:on
rc.local     2:on       3:on    4:on    5:on
rsync        0:off      1:off   2:on    3:on    4:on    5:on    6:off

列出 smbd / nmbd 服務,奇特的是沒有任何狀態
# sysv-rc-conf –list smbd
smbd
# sysv-rc-conf –list nmbd
nmbd

執行 sysv-rc-conf –level 2345 在 level 2345 層級關閉 smbd/nmbd 服務
# sysv-rc-conf –level 2345 smbd off
# sysv-rc-conf –level 2345 nmbd off

列出 smbd / nmbd 服務,終於有執行層級的狀態了!
# sysv-rc-conf –list smbd
smbd         2:off      3:off   4:off   5:off
# sysv-rc-conf –list nmbd
nmbd         2:off      3:off   4:off   5:off

重新啟動電腦
# reboot

重新開機後,發現還是會啟動 Samba Server

後來,我發現在 sys-rc-conf –list 看不到狀態的,似乎都會啟動
# sysv-rc-conf –list | egrep -v ‘on|off’
atd
dbus
firstrun
friendly-rec
irqbalance
kmod
mysql
networking
nmbd
procps
rsyslog
samba
samba-ad-dc
smbd
ssh
sudo
udev
vsftpd

真是不知道這是什麼狀態了,只能先在 /etc/rc.local 中把這些不想啟動的服務給停了,或是直接移除,眼不見為淨!
但是我天真了,開機後這些服務依然還是執行中!

後來又與 Banana Pi 的 Bananian 做比對,我說服我自己,這應該是特例,但我也馬上把這一個 Ubuntu 的 Image 也清除了!
# lsb_release -a
No LSB modules are available.
Distributor ID: Debian
Description:    Debian GNU/Linux 7.6 (wheezy)
Release:        7.6
Codename:       wheezy

# sysv-rc-conf –list
apache2      0:off      1:off   2:on    3:on    4:on    5:on    6:off
bootlogs     1:on       2:on    3:on    4:on    5:on
console-setu S:on
cpufrequtils 2:on       3:on    4:on    5:on
cron         2:on       3:on    4:on    5:on
exim4        0:off      1:off   2:on    3:on    4:on    5:on    6:off
fail2ban     0:off      1:off   2:on    3:on    4:on    5:on    6:off
halt         0:off
haveged      0:off      1:off   2:on    3:on    4:on    5:on    6:off
kbd          S:on
keyboard-set S:on
killprocs    1:on
kmod         S:on
loadcpufreq  2:on       3:on    4:on    5:on
motd         1:on       2:on    3:on    4:on    5:on
mysql        0:off      1:off   2:on    3:on    4:on    5:on    6:off
networking   0:off      6:off   S:on
noip2        0:off      1:off   2:on    3:on    4:on    5:on    6:off
ntp          2:on       3:on    4:on    5:on
openvpn      0:off      1:off   2:on    3:on    4:on    5:on    6:off
pppd-dns     S:on
procps       S:on
rc.local     2:on       3:on    4:on    5:on
reboot       6:off
rmnologin    2:on       3:on    4:on    5:on
rsync        2:on       3:on    4:on    5:on
rsyslog      0:off      1:off   2:on    3:on    4:on    5:on    6:off
screen-clean S:on
sendsigs     0:off      6:off
single       1:on
ssh          2:on       3:on    4:on    5:on
udev         S:on
udev-mtab    S:on
umountfs     0:off      6:off
umountroot   0:off      6:off
urandom      0:off      6:off   S:on
vsftpd       1:off      2:on    3:on    4:on    5:on

Cubie Truck Ubuntu Server
# lsb_release -a
No LSB modules are available.
Distributor ID: Linaro
Description:    Linaro 14.04
Release:        14.04
Codename:       trusty

# sysv-rc-conf –list
apache2      0:off      1:off   2:on    3:on    4:on    5:on    6:off
apparmor     S:on
atd
console-setu
cron
dbus
dns-clean    1:on       2:on    3:on    4:on    5:on
exim4        0:off      1:off   2:on    3:on    4:on    5:on    6:off
firstrun
friendly-rec
halt         0:on
irqbalance
killprocs    1:on
kmod
memcached    0:off      1:off   2:on    3:on    4:on    5:on    6:off
minidlna     0:off      1:off   2:on    3:on    4:on    5:on    6:off
mysql
networking
nmbd
ntp          1:off      2:on    3:on    4:on    5:on
ondemand     2:on       3:on    4:on    5:on
pppd-dns     1:on       2:on    3:on    4:on    5:on
pptpd        1:off      2:on    3:on    4:on    5:on
procps
rc.local     2:on       3:on    4:on    5:on
reboot       6:on
resolvconf
rsync        0:off      1:off   2:on    3:on    4:on    5:on    6:off
rsyslog
samba
samba-ad-dc
sendsigs     0:on       6:on
single       1:on
smbd
snmbd        2:off      3:off   4:off   5:off
ssh
sudo
udev
umountfs     0:on       6:on
umountroot   0:on       6:on
urandom      0:on       6:on    S:on
vsftpd

Debian / Ubuntu update-rc.d 用法

長久以來,自己對 RedHat/CentOS Linux 以 rpm 為主的系統比較熟悉,對於以 deb 為主的 Debian/Ubuntu Linux 則比較陌生,但最近因為使用 Raspiberry Pi / Banana Pi / Cubie Truck  這一系列的,每天在操作的,幾乎都是以 Debian / Ubuntu 為主的系統,少部分是 ArchLinux,但對其中系統服務啟動與關閉,並不熟悉。
在 RedHat/CentOS Linux 之前的版本是使用 chkconfig / service,新的版本則改用 systemctl,而 Debian/Ubuntu 則是使用 update-rc.d / service ….。
底下文章參考:
Update-rc.d 命令用法详解 – Shb_derek技术专栏 – 博客频道 – CSDN.NET
小小工程師的生活雜記: [Ubuntu]關於update-rc.d 用法
IT 亂亂寫: 讓ubuntu開機後自動執行指定的script[@more@]
設定開機時啟動 vsftpd FTP Server
# update-rc.d -f vsftpd defaults
update-rc.d: warning: /etc/init.d/vsftpd missing LSB information
update-rc.d: see <http://wiki.debian.org/LSBInitScripts>
 Adding system startup for /etc/init.d/vsftpd …
   /etc/rc0.d/K20vsftpd -> ../init.d/vsftpd
   /etc/rc1.d/K20vsftpd -> ../init.d/vsftpd
   /etc/rc6.d/K20vsftpd -> ../init.d/vsftpd
   /etc/rc2.d/S20vsftpd -> ../init.d/vsftpd
   /etc/rc3.d/S20vsftpd -> ../init.d/vsftpd
   /etc/rc4.d/S20vsftpd -> ../init.d/vsftpd
   /etc/rc5.d/S20vsftpd -> ../init.d/vsftpd

設定開機時關閉 vsftpd FTP Server
# update-rc.d -f vsftpd remove
 Removing any system startup links for /etc/init.d/vsftpd …
   /etc/rc0.d/K20vsftpd
   /etc/rc1.d/K20vsftpd
   /etc/rc2.d/S20vsftpd
   /etc/rc3.d/S20vsftpd
   /etc/rc4.d/S20vsftpd
   /etc/rc5.d/S20vsftpd
   /etc/rc6.d/K20vsftpd

如果 B 服務要 A 服務先啟動時才能正常啟動
第一個數字愈大,代表開機時愈晚被啟動
第二個數字愈大,代表關機時愈晚被關閉
通常會把這二個數字設計成加起來等於 100
# update-rc.d -f A defaults 80 20
# update-rc.d -f B defaults 90 10

使用 sysv-rc-conf 來做檢查
# apt-get install sysv-rc-conf

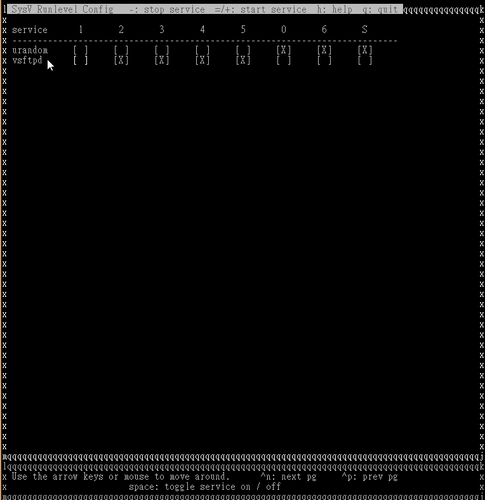
執行 sysv-rc-conf 來檢查 vsftpd 服務
# sysv-rc-conf