解決在 Debian/Ubuntu 安裝套件時出現 missing final newline 訊息

在 Debian / Ubuntu 安裝套件時,突然出現下面的訊息
dpkg: unrecoverable fatal error, aborting:
 files list file for package ‘libgpgme11:armhf’ is missing final newline
E: Sub-process /usr/bin/dpkg returned an error code (2)

在網路上搜尋了一下,發現好像是位於 /var/lib/dpkg/info 目錄下的檔案有問題
檔案內容變成是亂碼
# cat /var/lib/dpkg/info/libgpgme11:armhf.list

[@more@]解決方式:
1. 下載 deb 檔 libgpgme11
# apt-get –download-only install libgpgme11

2. 列出 deb 檔內容
# dpkg -c /var/cache/apt/archives/libgpgme11_1.4.3-0.1ubuntu5_armhf.deb | awk ‘{print $6}’
./
./usr/
./usr/lib/
./usr/lib/arm-linux-gnueabihf/
./usr/lib/arm-linux-gnueabihf/libgpgme-pthread.so.11.11.0
./usr/lib/arm-linux-gnueabihf/libgpgme.so.11.11.0
./usr/share/
./usr/share/doc/
./usr/share/doc/libgpgme11/
./usr/share/doc/libgpgme11/changelog.Debian.gz
./usr/share/doc/libgpgme11/copyright
./usr/lib/arm-linux-gnueabihf/libgpgme.so.11
./usr/lib/arm-linux-gnueabihf/libgpgme-pthread.so.11

3. 將列表輸出至 /var/lib/dpkg/info/ 目錄之下
# dpkg -c /var/cache/apt/archives/libgpgme11_1.4.3-0.1ubuntu5_armhf.deb | awk ‘{print $6}’ > /var/lib/dpkg/info/libgpgme11:armhf.list

4. 修改成所須要的格式
# sed -i ‘1s|/|/.|’ /var/lib/dpkg/info/libgpgme11:armhf.list
# sed -i ‘s/^.//’  /var/lib/dpkg/info/libgpgme11:armhf.list

5. 正常的格式
# cat /var/lib/dpkg/info/libgpgme11:armhf.list
/.
/usr/
/usr/lib/
/usr/lib/arm-linux-gnueabihf/
/usr/lib/arm-linux-gnueabihf/libgpgme-pthread.so.11.11.0
/usr/lib/arm-linux-gnueabihf/libgpgme.so.11.11.0
/usr/share/
/usr/share/doc/
/usr/share/doc/libgpgme11/
/usr/share/doc/libgpgme11/changelog.Debian.gz
/usr/share/doc/libgpgme11/copyright
/usr/lib/arm-linux-gnueabihf/libgpgme.so.11
/usr/lib/arm-linux-gnueabihf/libgpgme-pthread.so.11

備份 Server 資料到 NAS – Debian / Ubuntu Server 篇

NAS Server:192.168.1.5
Debian / Ubuntu Server:192.168.1.17

@ Debain / Ubuntu Server
1. 安裝所須套件
# apt-get install autofs rpcbind nfs-common

2. 修改 autofs 設定檔
# echo “/mnt/nasnfs     /etc/auto.nas” >> /etc/auto.master
# echo “debian 192.168.1.5:/volume1/homes/t850008/Server/debian” > /etc/auto.nas[@more@]

3. 重新啟動 autofs
# /etc/init.d/autofs restart

4. 開啟防火牆讓 Debian / Ubuntu Server 可以連線到 NAS 的 NFS Server,預設情況是有限制對外連線
# iptables -P OUTPUT DROP
# iptables -A OUTPUT -o eth0 -p tcp -d 192.168.1.5 -m multiport –dport 111,892,2049 –syn -m state –state NEW -j ACCEPT
# iptables -A OUTPUT -m state –state ESTABLISHED,RELATED -j ACCEPT

5. 切換到 /mnt/nasnfs/debian 目錄,如果可以正常切換到該目錄,代表上面的設定成功
# cd /mnt/nasnfs/debian

6. 將要備份的設定檔及資料寫入到 Script,並放入工作排程
例:
# cat /usr/local/bin/backuptonas
!/bin/bash
# 備份帳號密檔
cp /etc/passwd /mnt/nasnfs/debian/set/passwd_`date +%F`
cp /etc/shadow /mnt/nasnfs/debian/set/shadow_`date +%F`
cp /etc/group /mnt/nasnfs/debian/set/group_`date +%F`
cp /etc/gshadow /mnt/nasnfs/debian/set/gshadow_`date +%F`
# mirror 網頁資料
# /mnt/nasnfs/debian/html 目錄要先建好
/usr/bin/mirrordir /var/www/html /mnt/nasnfs/debian/html

7. 更改檔案屬性
# chmod +x /usr/local/bin/backuptonas

8. 加入工作排程,每天早上 3 時備份
# echo “0 3 * * * /usr/local/bin/backuptonas” >> /var/spool/cron/crontabs/root

解決 Debian Apache Web Server 啟動時出現的提示訊息

在 Debian 啟動 Apache Web Server 時會出現下面的提示訊息
# /etc/init.d/apache2 restart
[….] Restarting web server: apache2apache2: Could not reliably determine the server’s fully qualified domain name, using 2001:288:a2xx:x::xx for ServerName
 … waiting apache2: Could not reliably determine the server’s fully qualified domain name, using 2001:288:a2xx:x::xx for ServerName
. ok

看起來似乎是 Apache Web Server 的設定檔中沒有設定 ServerName

設定的方式:
/etc/apache2/apache2.conf 加入主機名稱的設定
# echo “ServerName xxx.tces.ilc.edu.tw” >> /etc/apache2/apache2.conf

重新啟動時就不會再出現提示訊息了!
# /etc/init.d/apache2 restart
[ ok ] Restarting web server: apache2 … waiting .

在 Linux 中使用 screen 指令工具

screen 指令工具是一個非常方便的工具程式,有時工作到一半時,因為有事情要離開或是下班,但因為目前套件的安裝或編譯還未完成,如果中斷了,可能要重新再來一次,或是可能還會造成一些嚴重的後果,這時候如果可以把工作放在背景視窗,繼續工作,然後有空的話,再接續回來。
screen 指令工具就有這樣的功能,利用分離(Detach)功能,可以將視窗內的程序放入背景,即使登出主機切斷連線,只要該主機一直維持運作,分離的視窗就會持續地保留在背景。

安裝方式:
CentOS Linux
# yum install screen

Debian/Ubuntu Linux
$ sudo apt-get install screen

Arch Linux
# pacman -S screen

Gentoo Linux
# emerge screen[@more@]Screen 的功能非常強大,這裡只針對 分離(Detach) 來做說明
1. 登入主機後執行 screen 指令,執行之後畫面不會有任何變化
# screen

2. 退出的方式
# exit

3. 畫面會出現 [screen is terminating],表示已經退出 screen

4. 使用分離(Detach) 功能,執行 screen 後

執行要放入背景的工作,並按 CTRL+A 之後,再按 D
# /usr/bin/emerge -u world

工作會放到背景,畫面上會出現 [detached]

5. 執行 screen -ls 列出放在背景的視窗
# screen -ls
There is a screen on:
        31862.pts-0.share       (Detached)
1 Socket in /root/.screen.

6. 取出
# screen -r
# screen -r 31862.pts-0.share
因為目前只有一個工作,所以只要直接使用 -r 即可,如果有很多個,就要加上編號

7. 就取回原來的工作了!

解決 Nagios 出現 “Is This Service Flapping” 的提示訊息

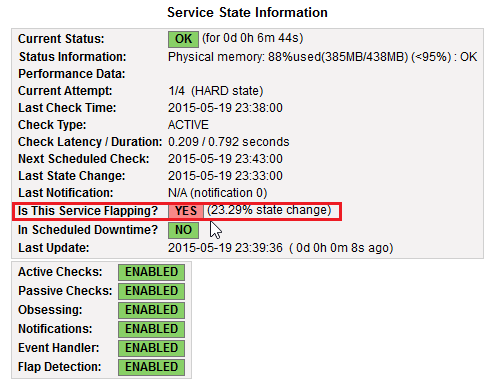
在 Debian / Ubuntu Linux 使用 Nagios 來偵測 SNMP 時出現了一個特別的狀況
偵測項目 SNMP 上出現一個汽泡提示和向上的黑色三角形

點選 SNMP 項目會出現 “Is This Service Flapping” 的提示訊息
[@more@]在網路上搜尋了一下,找到了這一篇:
nagios报警延迟的解决–flapping state – abnerfrmh的专栏 – 博客频道 – CSDN.NET

解決方式:
1. 修改 /etc/nagios3/nagios.cfg
$ sudo sed -i ‘s/enable_flap_detection=1/enable_flap_detection=0/’ /etc/nagios3/nagios.cfg

2. 重新啟動 Nagios 3
$ sudo /etc/init.d/nagios3 restart
 * Restarting nagios3 monitoring daemon nagios3
                                                                                     [ OK ]

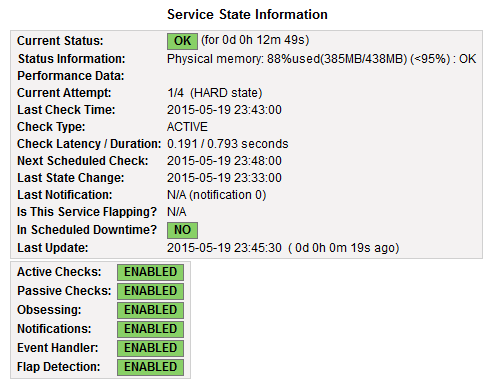
就不會再出現 “Is This Service Flapping” 的提示訊息

會出現這個提示訊息,猜想應該是偵測使用 SNMP 去檢測實體記憶體的使用量,變動性比較大。

Debian Linux – 使用 gmail 來寄送 Server 的 log 檔

縣網可能因為資安的因素,所以預設並不允許 Server 可以外送信件,如果要打開這一項功能,要與資網聯繫,有些麻煩,因為學校的這些 Server,並沒有擔任 Mail Server 的工作,只是純粹要把系統的 log 檔案彙整到外部的信箱而已,所以改用 Google Mail 來外送信件。
參考網頁:
透過ssmtp與Gmail帳戶來做Mail自動通知 on CentOS 5.x | IT水電工-哆啦胖虎
Linux 使用 SSMTP 與 GMail 以指令或程式自動寄信教學 – G. T. Wang

1. 安裝 ssmtp 及 logwatch
# apt-get install ssmtp logwatch

2. 備份原設定檔 /etc/ssmtp/ssmtp.conf
# cp /etc/ssmtp/ssmtp.conf /etc/ssmtp/ssmtp.conf.$(date +%F)
[@more@]
3. 修改設定檔 /etc/ssmtp/ssmtp.conf
# vim /etc/ssmtp/ssmtp.conf
#root=postmaster

# The place where the mail goes. The actual machine name is required
# no MX records are consulted. Commonly mailhosts are named mail.domain.com
# The example will fit if you are in domain.com and you mailhub is so named.
mailhub=smtp.gmail.com:587
# Where will the mail seem to come from?
#rewriteDomain=y
# The full hostname
#hostname=root-chroot-copy
# 寄件者帳號
AuthUser=xxxx@gmail.com
# 寄件者密碼
AuthPass=xxxx
UseSTARTTLS=YES
FromLineOverride=yes #enables to use mail -r option

4. 更改檔案權限
# chmod 0600 /etc/ssmtp/ssmtp.conf

5. 備份原設定檔
/usr/share/logwatch/default.conf/logwatch.conf
# cp /usr/share/logwatch/default.conf/logwatch.conf /usr/share/logwatch/default.conf/logwatch.conf.$(date +%F)

6. 進行修改
# sed -i ‘s/MailTo = root/MailTo = xxxx@gmail.com/’ /usr/share/logwatch/default.conf/logwatch.conf
# sed -i ‘s/MailFrom = Logwatch/MailFrom = Logwatch@nxi.test.ilc.edu.tw/’
/usr/share/logwatch/default.conf/logwatch.conf
# sed -i ‘s/Output = stdout/Output = mail/’
/usr/share/logwatch/default.conf/logwatch.conf
# sed -i ‘s/Detail = Low/Detail = Med/’
/usr/share/logwatch/default.conf/logwatch.conf

7. 執行 logwatch 測試是否能收到信件
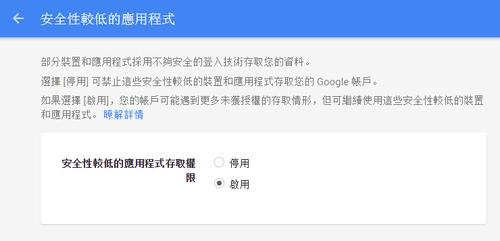
如果有無法收到信件,可要啟用 安全性較低的應用程式存取權

Debian – 啟用 snmpd 服務

參考網頁:
SNMP – Debian Wiki
羊兒的筆記: [Ubuntu] 設定 啟動 snmp, net-snmp

1. 安裝 snmpd 服務
# apt-get install snmpd snmp

2.  修改 /etc/snmp/snmpd.conf 設定檔
# sed -i ‘s/#rocommunity public  localhost/rocommunity public  localhost/’ /etc/snmp/snmpd.conf
[@more@]3. 讓其它的 IP 可以讀取 snmp 相關資訊
# sed -i ‘s/127.0.0.1/0.0.0.0/’ /etc/snmp/snmpd.conf

# sed -i ‘s/agentAddress  udp:127.0.0.1:161/#agentAddress  udp:127.0.0.1:161/’ /etc/snmp/snmpd.conf
# sed -i ‘s/#agentAddress udp:161/agentAddress udp:161/’ /etc/snmp/snmpd.conf


# echo ‘rocommunity public’ > /etc/snmp/snmpd.conf
# chmod 600 /etc/snmp/snmpd.conf

4. 啟動 snmpd 服務
# /etc/init.d/snmpd start
Starting network management services: snmpd.

5. 檢查 snmpd 是否有正常啟動
# netstat -anulp | grep 161
udp        0      0 0.0.0.0:161           0.0.0.0:*                           4540/snmpd

6. 讀取 snmpd 資訊
# snmpwalk -v 1 -c public localhost | less
# snmpwalk -v 2c -c public localhost | less

7. 在防火牆設定限制
# iptabels -A INPUT -u udp -s x.x.x.x –dport 161 -m state –state NEW -j ACCEPT

RedHat/CentOS、Debian/Ubuntu、Arch Linux、Gentoo 套件管理比較

1. 更新套件庫
ReHat/CentOS
# yum update
Debian/Ubuntu
# apt-get update
Arch Linux
# pacman -Sy
Gentoo Linux
# emerge –sync[@more@]2. 更新整個系統
ReHat/CentOS
# yum -y update
Debian/Ubuntu
# apt-get upgrade
# apt-get dist-upgrade
Arch Linux
# pacman -Syu
Gentoo Linux
# emerge -u world

3. 搜尋套件
ReHat/CentOS
# yum search pkg_filename
Debian/Ubuntu
# apt-cache search pkg_filename
Arch Linux
# pacman -Ss pkg_filename
Gentoo Linux
# emerge -s pkg_filename

4. 安裝套件
ReHat/CentOS
# yum install pkg_filename
# rpm -ivh pkg_filename.rpm
Debian/Ubuntu
# apt-get install pkg_filename
# dpkg -i pkg_filename.deb
Arch Linux
# pacman -S pkg_filename
Gentoo Linux
# emerge pkg_filename
# emerge -k pkg_filename

5. 移除套件
ReHat/CentOS
# yum remove pkg_filename
# rpm -e pkg_filename
Debian/Ubuntu
# apt-get remove –purge pkg_filename
# dpkg -P pkg_filename.deb
Arch Linux
# pacman -Rn pkg_filename
Gentoo Linux
# emerge -C pkg_filename

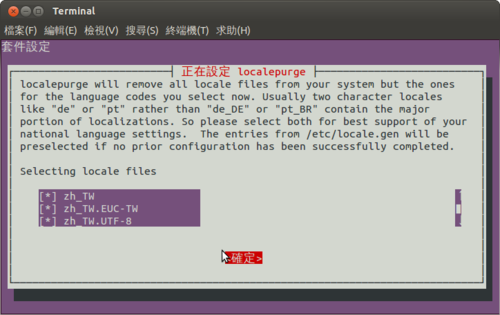
Debian/Ubuntu – localepurge 移除不須要的語系

因為 Linux 都是支援多國語言,所以可以同時支援多國語言的輸入及顯示,但有時使用者並不須要支援這多種語言時,就可以把用不到的語系給清除掉。
$ head /usr/share/applications/chromium-browser.desktop 
[Desktop Entry]
Version=1.0
Name=Chromium Web Browser
Name[ast]=Restolador web Chromium
Name[bg]=Уеб четец Chromium
Name[bn]=ক্রোমিয়াম ওয়েব ব্রাউজার
Name[bs]=Chromium web preglednik
Name[ca]=Navegador web Chromium
Name[ca@valencia]=Navegador web Chromium
Name[da]=Chromium netbrowser

[@more@]

安裝 localepurge 工具
sudo apt-get install localepurge

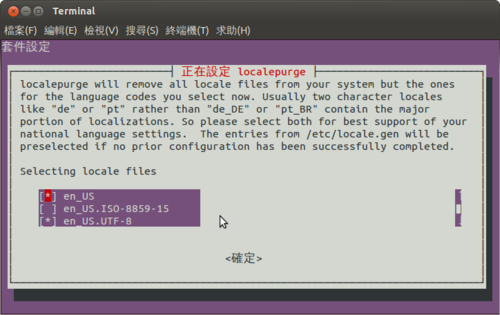
第一次安裝 localepurge 時,系統會問你要保留哪些語系,回答過一次後,未來每次透過 apt/aptitude 安裝套件時,它都會自動清理一次。

設定檔 /etc/locale.nopurge
$ sudo tail -5 /etc/locale.nopurge 
en_US
en_US.UTF-8
zh_TW
zh_TW.EUC-TW
zh_TW.UTF-8

之後在進行套件安裝時,就會進行這項動作
正在進行 menu 的觸發程式 …
localepurge: Disk space freed in /usr/share/locale: 58596 KiB
localepurge: Disk space freed in /usr/share/man: 4920 KiB
localepurge: Disk space freed in /usr/share/gnome/help: 16152 KiB
localepurge: Disk space freed in /usr/share/omf: 1276 KiB

Total disk space freed by localepurge: 80944 KiB