在 Debian Linux 安裝 Samba Server

1. 搜尋 Samba Server 套件
# apt-cache search samba | grep ^samba
samba – SMB/CIFS file, print, and login server for Unix
samba-common – common files used by both the Samba server and client
samba-common-bin – Samba common files used by both the server and the client
samba-dbg – Samba debugging symbols
samba-dev – tools for extending Samba
samba-doc – Samba documentation
samba-dsdb-modules – Samba Directory Services Database
samba-libs – Samba core libraries
samba-testsuite – test suite from Samba
samba-vfs-modules – Samba Virtual FileSystem plugins

2. 進行安裝
# apt-get install samba[@more@]3. 進行設定
# vim /etc/samba/smb.conf
# Global parameters
[global]
        workgroup = HOME
        server role = standalone server
        security = USER
        map to guest = Bad User
        obey pam restrictions = Yes
        pam password change = Yes
        passwd program = /usr/bin/passwd %u
        passwd chat = *Entersnews*spassword:* %nn *Retypesnews*spassword:* %nn *passwordsupdatedssuccessfully* .
        unix password sync = Yes
        syslog = 0
        log file = /var/log/samba/log.%m
        max log size = 1000
        dns proxy = No
        usershare allow guests = Yes
        panic action = /usr/share/samba/panic-action %d
        idmap config * : backend = tdb

[homes]
        comment = Home Directories
        valid users = %S
        read only = No
        create mask = 0700
        directory mask = 0700
        veto files = /.*/
        browseable = No

[printers]
        comment = All Printers
        path = /var/spool/samba
        create mask = 0700
        printable = Yes
        print ok = Yes
        browseable = No

[print$]
        comment = Printer Drivers
        path = /var/lib/samba/printers

4. 測試設定檔
# testparm
Load smb config files from /etc/samba/smb.conf
Processing section “[homes]”
Processing section “[printers]”
Processing section “[print$]”
Loaded services file OK.
Server role: ROLE_STANDALONE

5. 啟動 Samba Server
# /etc/init.d/samba start
[ ok ] Starting nmbd (via systemctl): nmbd.service.
[ ok ] Starting smbd (via systemctl): smbd.service.
[ ok ] Starting samba-ad-dc (via systemctl): samba-ad-dc.service.

6. 檢查 Samba Server 是否有正常啟動
# netstat -an | grep -E ‘:137|:138|:139|:445’
tcp        0      0 0.0.0.0:445             0.0.0.0:*               LISTEN
tcp        0      0 0.0.0.0:139             0.0.0.0:*               LISTEN
tcp6       0      0 :::445                  :::*                    LISTEN
tcp6       0      0 :::139                  :::*                    LISTEN
udp        0      0 0.0.0.0:137             0.0.0.0:*
udp        0      0 0.0.0.0:138             0.0.0.0:*

Debian 8.5.0 安裝

為了更加了解 OpenMediaVault,所以下載 Debian Linux 安裝,研究看看。
Debian Linux 官方網站:https://www.debian.org/
Debian Linux Taiwan Mirror 站:http://ftp.twaren.net/Linux/Debian/debian-cd/8.5.0/
底下是安裝步驟:
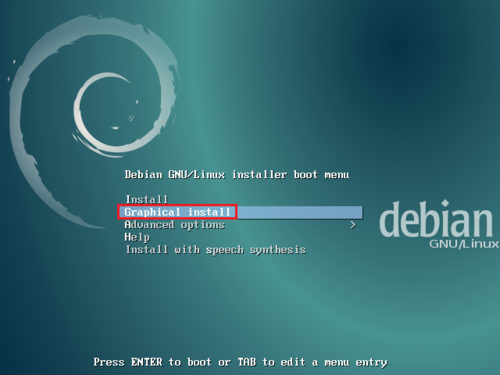
1. 光碟安裝畫面,改圖形化安裝 Graphical Install

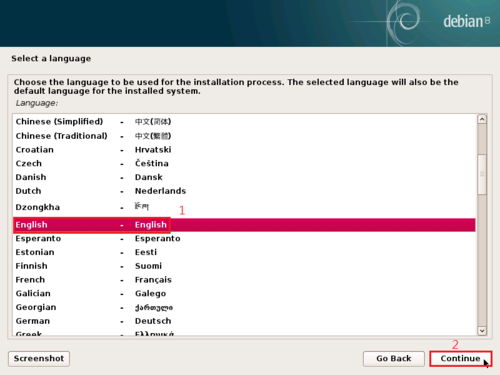
[@more@]2. 安裝語言設定

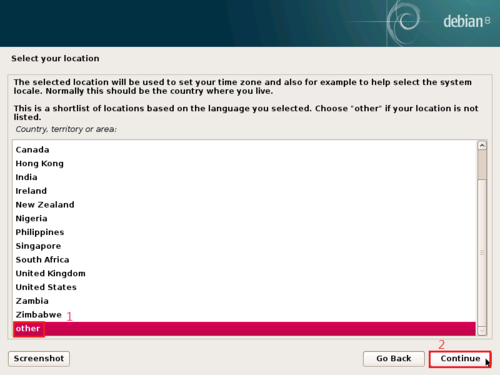
3. 國家選擇,選擇 其它 Other

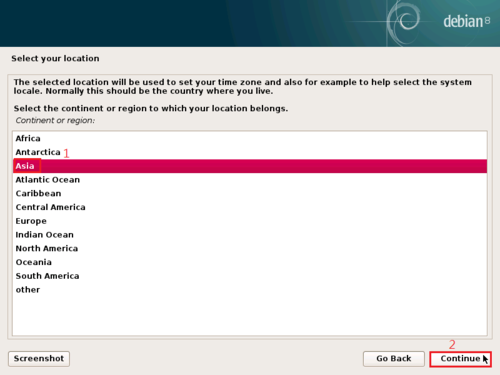
4. 選擇 Asia

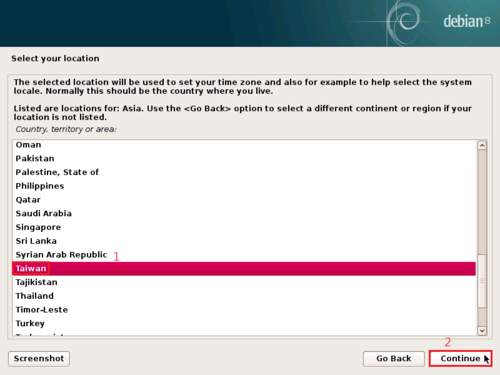
5. 選擇 Taiwan

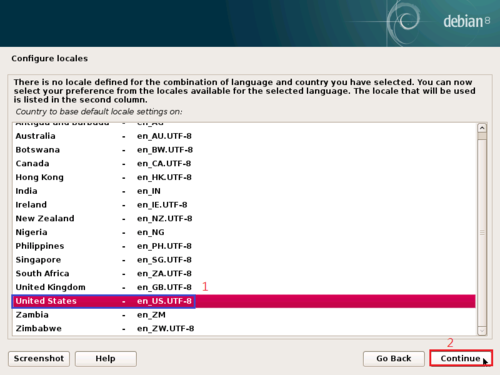
6. 系統語言選擇

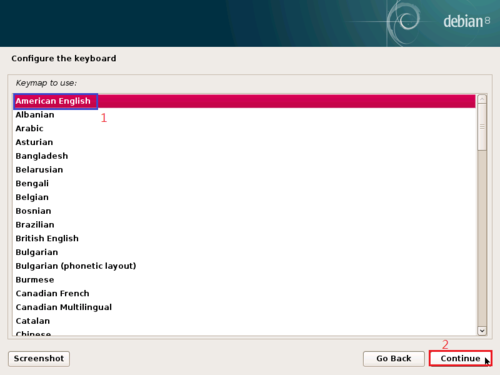
7. 鍵盤型式選擇

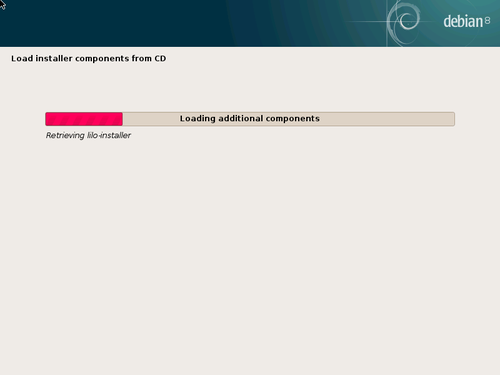
8. 載入光碟安裝元件

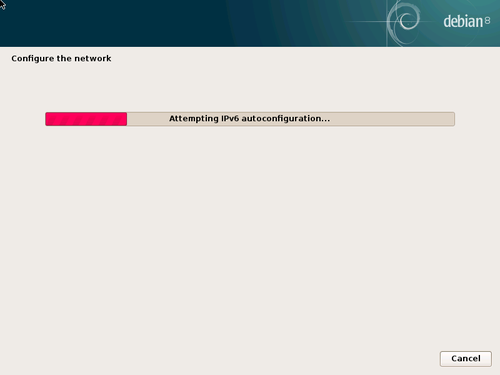
9. 設定網路

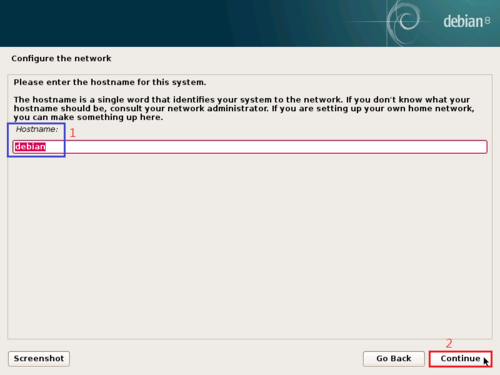
10. 設定主機名稱

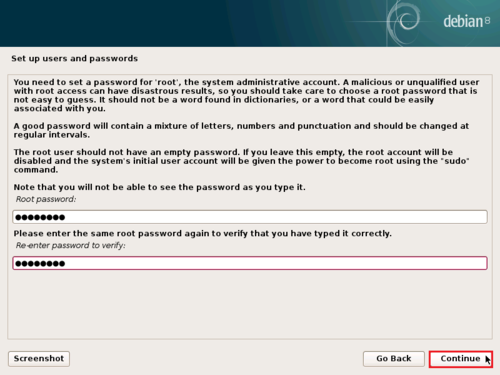
11. 設定 root 管理者密碼

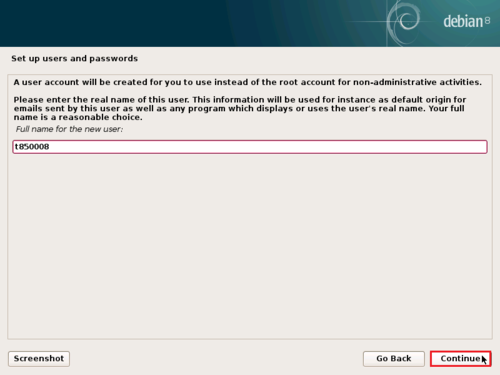
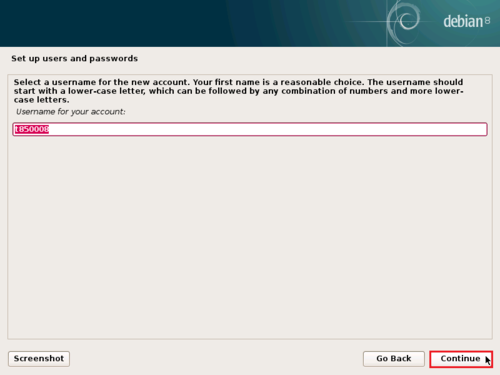
12. 建立非 root 的一般使用者

13. 建立非 root 的一般使用者

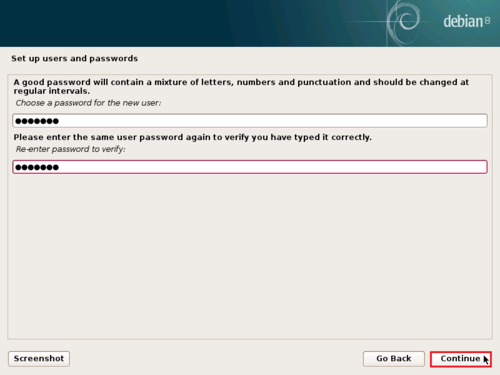
14. 設定密碼

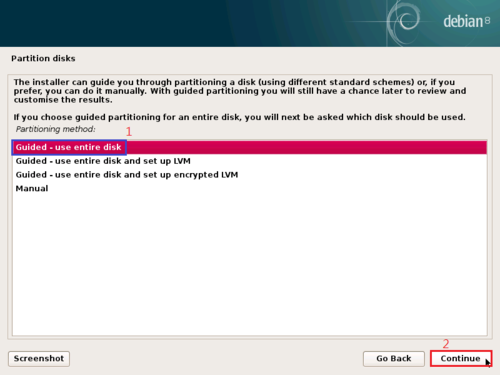
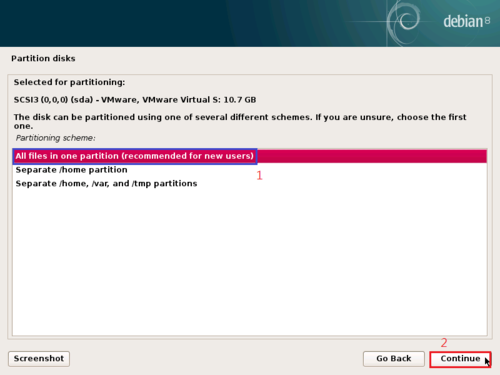
15. 硬碟分割 – 使用整個硬碟

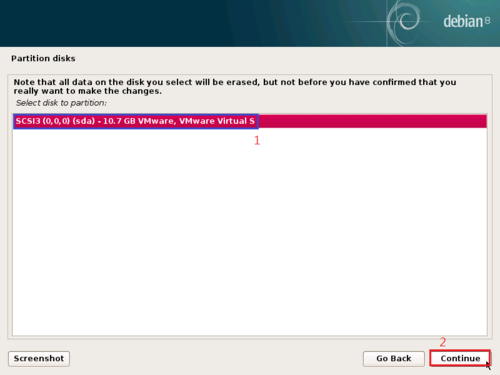
16. 安裝的硬碟選擇

17. 硬碟分割的選擇

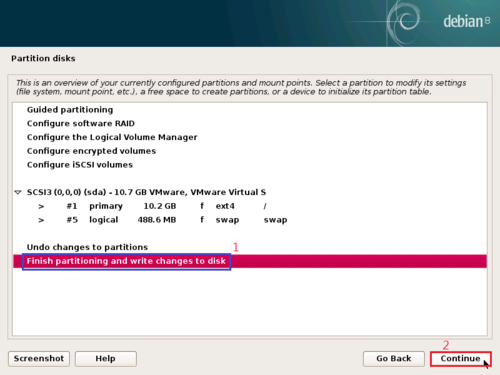
18. 硬碟分割確認

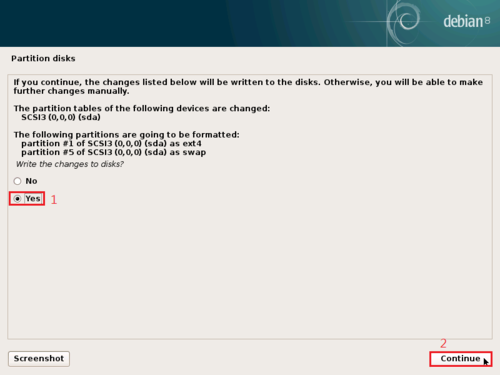
19. 確認

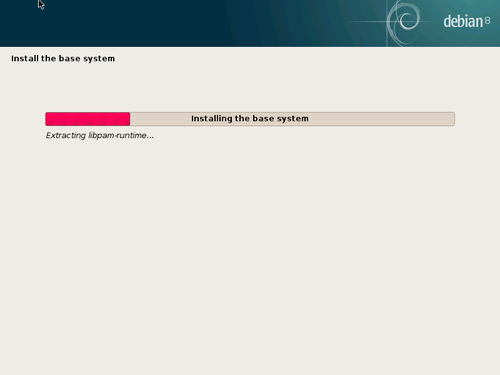
20. 安裝基本系統

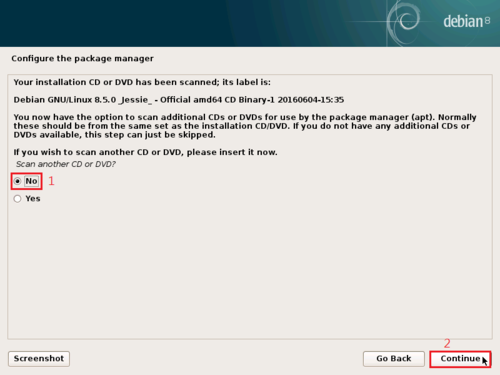
21. 沒有其它要安裝的光碟

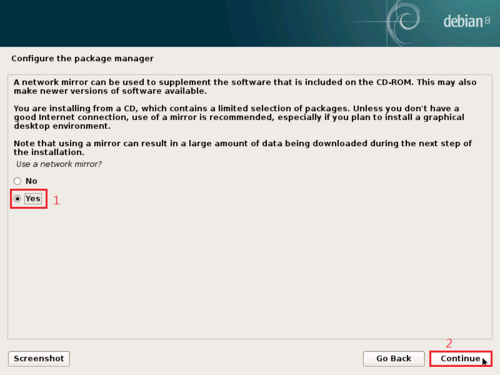
22. 設定套件後續更新

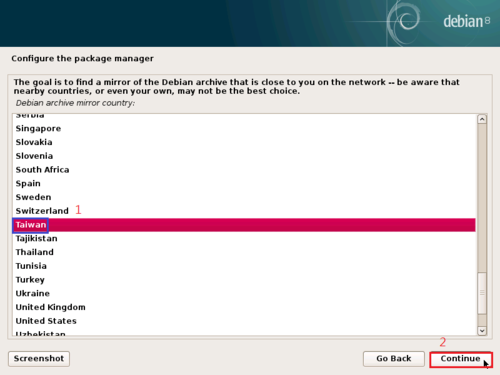
23. 選擇 Taiwan

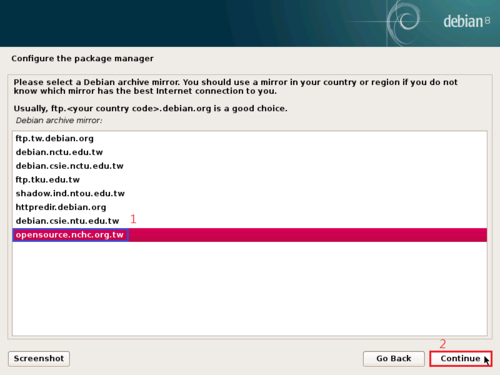
24. 選擇要更新的站台

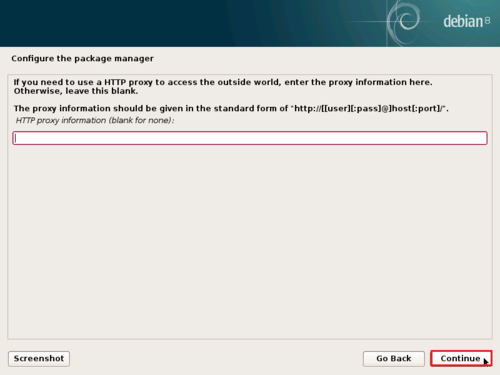
25. 視情況是否使用 Proxy

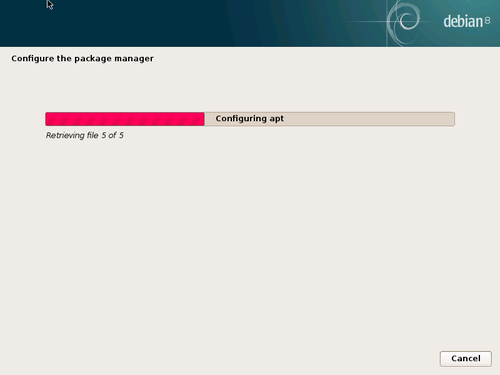
26. 設定 apt

27. 安裝套件更新軟體

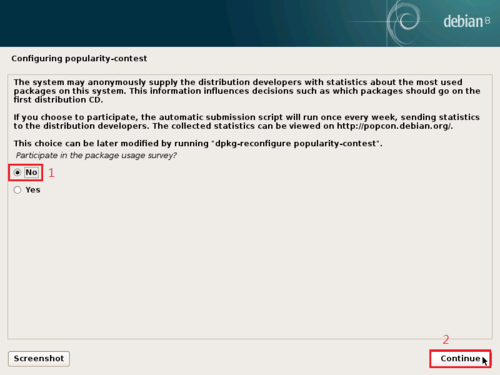
28. 不做其它設定

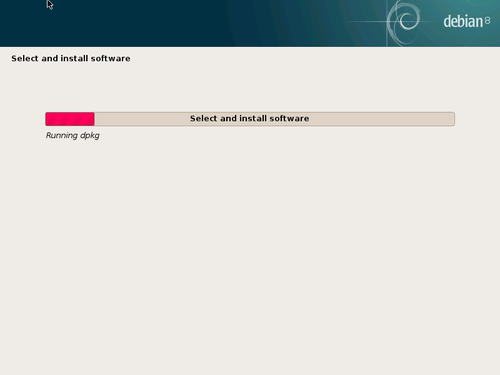
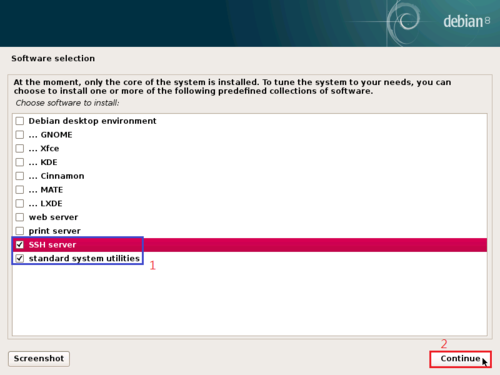
29. 選擇要安裝的套件

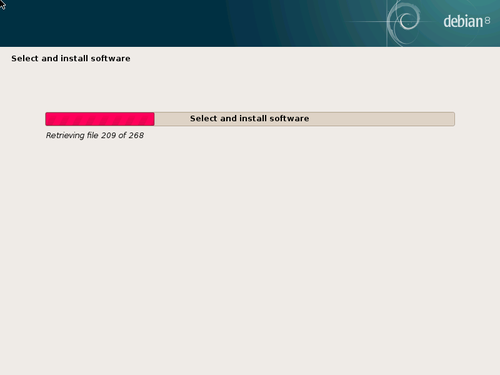
30. 套件安裝中….

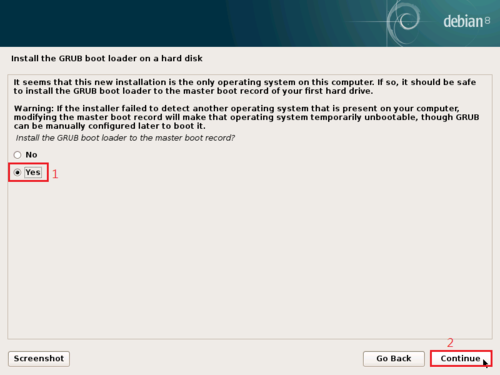
31. 安裝 GRUB

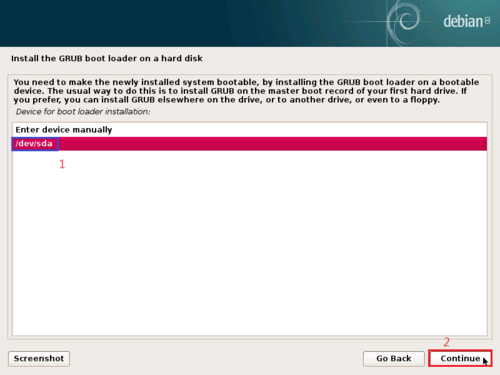
32. GRUB 安裝位置

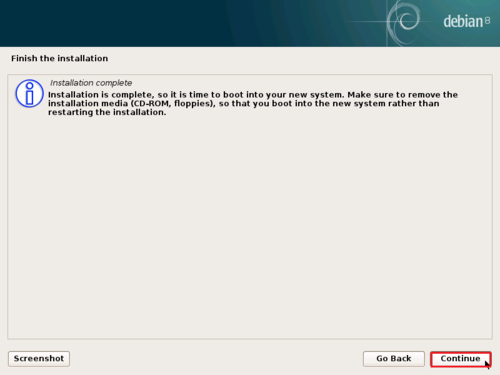
33. 繼續

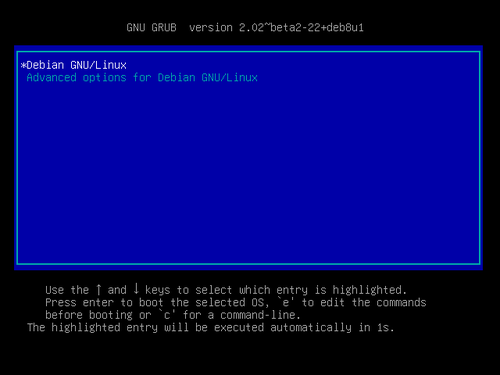
34. 終於安裝完成,開機畫面

修正 Cacti Monitor Module 無法顯示正確的偵測失敗時間

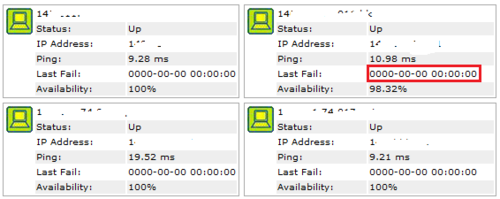
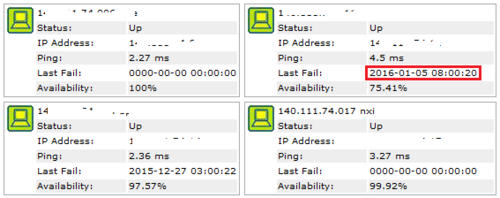
安裝完 Cacti 的 Monitor Module 後發現無法顯示正確的偵測失敗時間

顯示的日期及時間都是 0000-00-00 00:00:00[@more@]底下文章參考:Cacti • View topic – [SOLVED] Monitor v1.3-1 plugin – last fail not working

OS:Debian 8

1. 先找到 functions.php
# locate functions.php
/usr/share/cacti/site/lib/functions.php

CentOS
/usr/share/cacti/lib/functions.php

2. 先備份原檔
# cp /usr/share/cacti/site/lib/functions.php /usr/share/cacti/site/lib/functions.php.$(date +%F)

3. 進行修改
# vim /usr/share/cacti/site/lib/functions.php

$hosts[$host_id][“status_fail_date”] = ‘0000-00-00 00:00:00’;
$hosts[$host_id][“status_rec_date”] = ‘0000-00-00 00:00:00’;
修改成
if ($hosts[$host_id][“status_fail_date”] == “”){
$hosts[$host_id][“status_fail_date”] = ‘0000-00-00 00:00:00’;}
if ($hosts[$host_id][“status_rec_date”] == “”){
$hosts[$host_id][“status_rec_date”] = ‘0000-00-00 00:00:00’;}

之後就可以正常顯示了!

crontab 工作排程的寫法

普通的用法
分 時 日 月 星期幾 命令
如:
# 每天早上 03:30 備份資料到 NAS
30 3 * * * /usr/local/bin/backuptonas > /dev/null 2>&1
# 每 5 分鐘檢查一次 Squid Proxy Server 的狀態
*/5 * * * * /usr/local/bin/check_squid > /dev/null 2>&1

另外一些比較特別的用法,參考:實用 crontab 寫法 | Linux 技術手札
@reboot: 在每次開機時執行。
@yearly: 等同 0 0 1 1 * 寫法,即每年一月一日零時零分。
@annually: 與 @yearly 相同。
@monthly: 在每月一號零時零分執行。
@weekly: 在星期天零時零分執行。 Run once a week, “0 0 * * 0″.
@daily: 每天零時零分。
@midnight: 與 @daily 相同。
@hourly: 每小時零分執行。

讓 Cacti 能正常顯示中文

OS:Debian 8.0 jessie
cacti:0.8.8b
安裝完 cacti 之後發現無法呈現中文,輸入中文之後,都會變成 ??

在網路上搜尋了一下,找到下面的文章:
在 Cacti 中顯示中文 | .K.T.’s Blog
電腦中心 | 讓cacti的圖正常出現中文[@more@]底下是設定的步驟:
1. 修改 /usr/share/cacti/site/lib/functions.php
# vim /usr/share/cacti/site/lib/functions.php
在 <?php 下方加入下面一行
setlocale(LC_CTYPE,”zh_TW.UTF-8″);

2. 安裝中文字形
# apt-get install ttf-wqy-microhei ttf-wqy-zenhei fonts-arphic-bkai00mp fonts-arphic-bsmi00lp

3. 加入字型的支援
# /usr/bin/fc-cache -v -f

做了以上的設定還是不行

4. 檢查 MySQL Server 的編碼設定
# /usr/bin/mysql -u root -p
Enter password:
Welcome to the MySQL monitor.  Commands end with ; or g.
Your MySQL connection id is 124
Server version: 5.5.44-0+deb8u1 (Raspbian)

Copyright (c) 2000, 2015, Oracle and/or its affiliates. All rights reserved.

Oracle is a registered trademark of Oracle Corporation and/or its
affiliates. Other names may be trademarks of their respective
owners.

Type ‘help;’ or ‘h’ for help. Type ‘c’ to clear the current input statement.

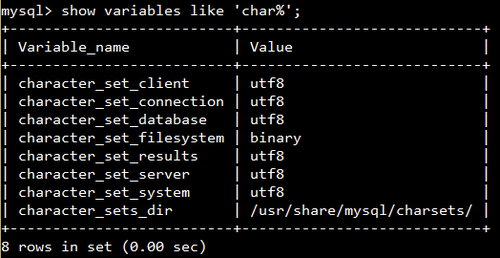
mysql> show variables like ‘char%’;

如果發現有 latin1,代表資料庫編碼要做設定

5. 修改 MySQL Server 設定,加入以下的設定
# vim /etc/mysql/my.cnf
[client]
default-character-set=utf8

[mysqld]
character-set-server=utf8
collation-server=utf8_general_ci
init-connect=’SET NAMES utf8′

[mysql]
default-character-set=utf8

6. 重新啟動 MySQL Server
# systemctl restart mysql

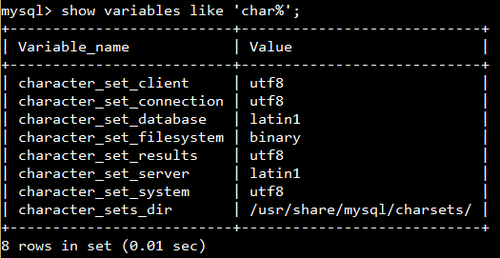
7. 重新檢查 MySQL Server 資料庫編碼
# /usr/bin/mysql -u root -p
Enter password:
Welcome to the MySQL monitor.  Commands end with ; or g.
Your MySQL connection id is 124
Server version: 5.5.44-0+deb8u1 (Raspbian)

Copyright (c) 2000, 2015, Oracle and/or its affiliates. All rights reserved.

Oracle is a registered trademark of Oracle Corporation and/or its
affiliates. Other names may be trademarks of their respective
owners.

Type ‘help;’ or ‘h’ for help. Type ‘c’ to clear the current input statement.

mysql> show variables like ‘char%’;

8. 匯出原 cacti 資料庫
# /usr/bin/mysqldump -u root -p cacti > /root/cacti.sql –default-character-set=latin1

9. 將匯出檔案的 latin1 全部改成 utf8
# sed -i ‘s/latin1/utf8/’ /root/cacti.sql

10. 重新匯入
# /usr/bin/mysql -u root -p /root/cacti < cacti.sql –default-character-set=utf8

終於可以正常顯示中文了!

修改 Raspberry Pi Raspbian Jessie Lite 套件庫來源

Raspberry Pi Raspbian 套件庫的更新來源,是系統自動幫我們依回應速度決定要連線的鏡像站,有時候會連線到國外去,速度有些緩慢,這時如果直接指定國內的網站來源,速度會快一些。
本篇文章參考:Raspberry Pi 的基礎 – 系統設定的調教 ~ IT 技術家
1. 備份原設定檔
# cp /etc/apt/sources.list /etc/apt/sources.list.$(date +%F)[@more@]2. 修改套件庫來源
改成國家高速網路中心
# sed -i ‘s”http://mirrordirector.raspbian.org/raspbian/”http://free.nchc.org.tw/raspbian/raspbian/”‘ /etc/apt/sources.list
或 元智大學
# sed -i ‘s”http://mirrordirector.raspbian.org/raspbian/”http://ftp.cse.yzu.edu.tw/raspbian/raspbian/”‘ /etc/apt/sources.list

3. 清除原有的 Cache
# apt-get clean all

4. 更新套件庫來源
# apt-get update
Hit http://archive.raspberrypi.org jessie InRelease
Hit http://archive.raspberrypi.org jessie/main armhf Packages
Hit http://archive.raspberrypi.org jessie/ui armhf Packages
Ign http://archive.raspberrypi.org jessie/main Translation-en_GB
Ign http://archive.raspberrypi.org jessie/main Translation-en
Ign http://archive.raspberrypi.org jessie/ui Translation-en_GB
Ign http://archive.raspberrypi.org jessie/ui Translation-en
Get:1 http://free.nchc.org.tw jessie InRelease [15.0 kB]
Get:2 http://free.nchc.org.tw jessie/main armhf Packages [8,962 kB]
Get:3 http://free.nchc.org.tw jessie/contrib armhf Packages [37.5 kB]
Get:4 http://free.nchc.org.tw jessie/non-free armhf Packages [70.2 kB]
Get:5 http://free.nchc.org.tw jessie/rpi armhf Packages [1,356 B]
Ign http://free.nchc.org.tw jessie/contrib Translation-en_GB
Ign http://free.nchc.org.tw jessie/contrib Translation-en
Ign http://free.nchc.org.tw jessie/main Translation-en_GB
Ign http://free.nchc.org.tw jessie/main Translation-en
Ign http://free.nchc.org.tw jessie/non-free Translation-en_GB
Ign http://free.nchc.org.tw jessie/non-free Translation-en
Ign http://free.nchc.org.tw jessie/rpi Translation-en_GB
Ign http://free.nchc.org.tw jessie/rpi Translation-en
Fetched 9,086 kB in 2min 38s (57.5 kB/s)
Reading package lists… Done

解決 Raspberry Pi Raspbian Jessie Lite 多一個 IP 的問題

使用 Raspberry Pi Raspbian Jessie Lite 架設一個網路監控系統,但很奇怪的是設定好固定 IP 後,系統好像會自動出多一個 IP。
使用 ip 指令可以查詢到 2 個 IP
# ip addr show eth0 | grep ‘inet’ | grep -v ‘inet6’ | awk ‘{print $2}’
192.168.1.74/24
192.168.1.82/24

使用 ifconfig 指令只能查詢一個 IP
# ifconfig eth0 | grep ‘inet addr’ | awk ‘{print $2}’ | awk -F’:’ ‘{print $2}’
192.168.1.74[@more@]可是在 /etc/network/interfaces 只設定了一個 IP
# cat /etc/network/interfaces
iface eth0 inet static
        address 192.168.1.74
        netmask 255.255.255.0
        gateway 192.168.1.254
        dns-nameservers 168.95.1.1

解決方式:
1. 關閉 dhcpcd 服務
# systemctl stop dhcpcd.service

2. 取消開機時啟動 dhcpcd 服務
# systemctl disable dhcpcd.service
Synchronizing state for dhcpcd.service with sysvinit using update-rc.d…
Executing /usr/sbin/update-rc.d dhcpcd defaults
insserv: warning: current start runlevel(s) (empty) of script `dhcpcd’ overrides LSB defaults (2 3 4 5).
insserv: warning: current stop runlevel(s) (0 1 2 3 4 5 6) of script `dhcpcd’ overrides LSB defaults (0 1 6).

Executing /usr/sbin/update-rc.d dhcpcd disable
insserv: warning: current start runlevel(s) (empty) of script `dhcpcd’ overrides LSB defaults (2 3 4 5).
insserv: warning: current stop runlevel(s) (0 1 2 3 4 5 6) of script `dhcpcd’ overrides LSB defaults (0 1 6).

3. 重新啟啟動電腦
# sysnc;sync;reboot

解決在 Debian 使用 dpkg 指令出現的錯誤

在 Debian 使用 dpkg 指令查詢時出現了錯誤訊息
# dpkg -l
dpkg-query: error: parsing file ‘/var/lib/dpkg/status’ near line 452 package ‘libdns100’:
 field name `Version? must be followed by colon

解決方式:[@more@]參考網頁:dpkg exit with error parsing file `/var/lib/dpkg/status`, what to do? – Ask Ubuntu

1. 刪除損壞的檔案
# rm -rf  /var/lib/dpkg/status

2. 複製備份的檔案
# cp /var/backups/dpkg.status.0 /var/lib/dpkg/status

3. 進行套件庫更新
# apt-get update

如果還是有問題,採用下面的方式
# gunzip -c /var/backups/dpkg.status.6.gz > /var/lib/dpkg/status

找不到 mail 指令

在檢查系統 log 的 mail 時,發現有一個錯誤的訊息

登入系統檢查是否有 mail 這一個指令
# which mail

沒有任何的回應,代表系統沒有安裝[@more@]在另外一台可以正常執行的 Server 上檢查
# which mail
/usr/bin/mail

檢查 mail 是屬於哪一個套件
# dpkg-query -S /usr/bin/mail
dpkg-query: no path found matching pattern /usr/bin/mail

神奇的是指找不到

仔細查詢 mail 指令
# ls -l /usr/bin/mail
lrwxrwxrwx 1 root root 22 Sep 26  2014 /usr/bin/mail -> /etc/alternatives/mail
# ls -l /etc/alternatives/mail
lrwxrwxrwx 1 root root 23 Sep 26  2014 /etc/alternatives/mail -> /usr/bin/mail.mailutils
# ls -l /usr/bin/mail.mailutils
-rwxr-xr-x 1 root root 169768 Oct  8  2014 /usr/bin/mail.mailutils

查詢 mail.mailutils 是屬於哪一個套件
# dpkg-query -S /usr/bin/mail.mailutils
mailutils: /usr/bin/mail.mailutils

安裝套件
# apt-get install mailutils

解決 Nagios 3 偵測 HTTP Server 時出現的 WARNING 訊息

使用 Nagios 3 偵測 HTTP Server 時,有時候會出現如下圖的警告訊息
HTTP WARNING: HTTP/1.1 403 Forbidden – 366 bytes in 0.005 second response time

出現這種問題的原因,可能是系統有提供 HTTP Server,但在網站中並有預設的首頁,就是在根目錄中沒有預設的網頁。
解決的方式,利用這個訊息在網路上搜尋了一下,提到的解決方式都是在個別的 Server 的根目錄中,建立 index.html 的檔案,不過我覺得,這種方法只適用在台數不多的 Server 情況下,如果台數很多,要一台一台的修改,也是也累人的一件事。[@more@]我的想法是最好能在 Nagios 3 Server 上直接解決,不用動到其它的 Server

解決方式:
OS:Debian 8.2
1. 新增一個 check_http_n 的檢查命令,與原先的 check_http 做分隔
# vim /etc/nagios3/commands.cfg
在檔案的最後面加上
# ‘check_http_n’ command definition
define command{
        command_name    check_http_n
        command_line    $USER1$/check_http -e HTTP/1.1 -I $HOSTADDRESS$ $ARG1$
        }

2. 重新修改 /etc/nagios3/conf.d 目錄下的各個 Server 檢查檔,把原本的 check_http 改成 check_http_n
# sed -i ‘s/check_http/check_http_n/’ /etc/nagios3/conf.d/*.cfg

3. 重新啟動 Nagios 3 Server
# systemctl restart nagios3

4. 之後就不會再出現警告的訊息了!