在 Debian / Kali Linux 上安裝 OpenVAS

參考網站:
OpenVAS 8.0 Vulnerability Scanning | Kali Linux

1. 更新套件庫及套件更新
# apt-get update;apt-get dist-upgrade

2. 安裝 OpenVAS
# apt-get install openvas

3. 設定
# /usr/bin/openvas-setup
sha1sums
          2,002 100%    2.61kB/s    0:00:00 (xfr#33, to-chk=2/36)
timestamp
             13 100%    0.02kB/s    0:00:00 (xfr#34, to-chk=1/36)
timestamp.asc
            181 100%    0.24kB/s    0:00:00 (xfr#35, to-chk=0/36)

sent 719 bytes  received 35,306,134 bytes  659,941.18 bytes/sec
total size is 35,295,201  speedup is 1.00
/usr/sbin/openvasmd

User created with password ‘bf177576-d9b8-44ae-8b6a-492ac0796acc’.

[@more@]4. 設定管理者帳號及密碼
# /usr/sbin/openvasmd –user=admin –new-password=<new-password>

5. 修改 /usr/bin/openvas-start
# vim /usr/bin/openvas-start

#!/bin/bash
echo “Starting OpenVas Services”
service greenbone-security-assistant start
service openvas-scanner start
service openvas-manager start
修改成
#!/bin/bash
echo “Starting OpenVas Services”
#service greenbone-security-assistant start
/usr/sbin/gsad –listen=0.0.0.0 –port=9392 –no-redirect
service openvas-scanner start
#service openvas-manager start
/usr/sbin/openvasmd –listen=0.0.0.0 –port=9390

Debian 8.x 上防火牆

1. 搜尋 iptables 相關套件
# apt-cache search iptables | grep ^iptables
iptables – administration tools for packet filtering and NAT
iptables-converter – convert iptables-commands from a file to iptables-save format
iptables-converter-doc – sphinx documentation for iptables-converter
iptables-dev – transitional dummy package
iptables-nftables-compat – iptables compat tools for nftables
iptables-optimizer – sort iptables rules by packet counters
iptables-optimizer-doc – sphinx html documentation for iptables-optimizer
iptables-persistent – boot-time loader for netfilter rules, iptables plugin

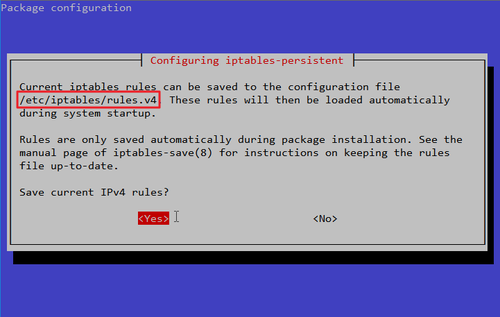
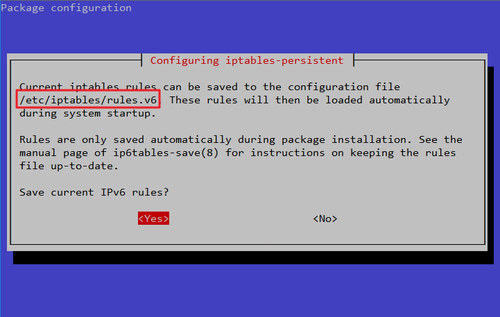
2. 安裝 iptables-persistent 套件
# apt-get install iptables-persistent
   ipv4 防火牆 /etc/iptables/rules.v4
   ipv6 防火牆 /etc/iptables/rules.v6


[@more@]3. 建立自行的防火牆規則
# iptables -L -n
Chain INPUT (policy DROP)
target     prot opt source               destination
f2b-sshd   tcp  —  0.0.0.0/0            0.0.0.0/0            multiport dports 22
ACCEPT     all  —  0.0.0.0/0            0.0.0.0/0
DROP       all  —  0.0.0.0/0            0.0.0.0/0            state INVALID
DROP       tcp  —  0.0.0.0/0            0.0.0.0/0            tcp flags:!0x17/0x02 state NEW
DROP       tcp  —  0.0.0.0/0            0.0.0.0/0            tcp flags:0x3F/0x00
DROP       tcp  —  0.0.0.0/0            0.0.0.0/0            tcp flags:0x03/0x03
DROP       tcp  —  0.0.0.0/0            0.0.0.0/0            tcp flags:0x06/0x06
DROP       tcp  —  0.0.0.0/0            0.0.0.0/0            tcp flags:0x05/0x05
DROP       tcp  —  0.0.0.0/0            0.0.0.0/0            tcp flags:0x11/0x01
DROP       tcp  —  0.0.0.0/0            0.0.0.0/0            tcp flags:0x30/0x20
DROP       tcp  —  0.0.0.0/0            0.0.0.0/0            tcp flags:0x18/0x08
DROP       tcp  —  0.0.0.0/0            0.0.0.0/0            tcp flags:0x3F/0x29
DROP       tcp  —  0.0.0.0/0            0.0.0.0/0            tcp flags:0x3F/0x37
DROP       tcp  —  0.0.0.0/0            0.0.0.0/0            tcp flags:0x3F/0x3F
DROP       tcp  —  0.0.0.0/0            0.0.0.0/0            tcp flags:0x3F/0x01
ACCEPT     all  —  0.0.0.0/0            0.0.0.0/0            state RELATED,ESTABLISHED
ACCEPT     tcp  —  192.168.1.0/24      0.0.0.0/0            tcp dpt:22 flags:0x17/0x02 state NEW

Chain FORWARD (policy DROP)
target     prot opt source               destination

Chain OUTPUT (policy ACCEPT)
target     prot opt source               destination
ACCEPT     all  —  0.0.0.0/0            0.0.0.0/0
ACCEPT     all  —  0.0.0.0/0            0.0.0.0/0            state RELATED,ESTABLISHED

Chain f2b-sshd (1 references)
target     prot opt source               destination
RETURN     all  —  0.0.0.0/0            0.0.0.0/0

4. 將 ipv4/6 規則寫入 /etc/iptables/rules.v4/6
# /sbin/iptables-save > /etc/iptables/rules.v4
# /sbin/ip6tables-save > /etc/iptables/rules.v6

5. 在 /etc/rc.local 中設定,開機時載入
# sed -i ‘/^exit 0/i/sbin/iptables-restore < /etc/iptables/rules.v4’ /etc/rc.local
# sed -i ‘/^exit 0/i/sbin/ip6tables-restore < /etc/iptables/rules.v6’ /etc/rc.local

Debian / Ubuntu 安裝 Let’s Encrypt 到 Apache

參考網站:
Debian / Ubuntu 安裝 Let’s Encrypt 到 Apache – Linux 技術手札

1. 安裝 Apache Web Server
# apt-get install apache2

2. 啟用 SSL 模組並重新啟動 Apache Web Server
# a2enmod ssl
Considering dependency setenvif for ssl:
Module setenvif already enabled
Considering dependency mime for ssl:
Module mime already enabled
Considering dependency socache_shmcb for ssl:
Enabling module socache_shmcb.
Enabling module ssl.
See /usr/share/doc/apache2/README.Debian.gz on how to configure SSL and create self-signed certificates.
To activate the new configuration, you need to run:
  service apache2 restart

# a2ensite default-ssl.conf
Enabling site default-ssl.
To activate the new configuration, you need to run:
  service apache2 reload

# /etc/init.d/apache2 restart
or
# systemctl restart apache2.service[@more@]3. 安裝 git 套件
# apt-get install git

4. 下載 Let’s Encrypt 的目錄
# cd /usr/local
# git clone https://github.com/letsencrypt/letsencrypt
Cloning into ‘letsencrypt’…
remote: Counting objects: 43808, done.
remote: Compressing objects: 100% (76/76), done.
remote: Total 43808 (delta 40), reused 0 (delta 0), pack-reused 43732
Receiving objects: 100% (43808/43808), 12.74 MiB | 2.16 MiB/s, done.
Resolving deltas: 100% (31283/31283), done.
Checking connectivity… done.

5. 產生憑證
# ./letsencrypt-auto –apache -d test.ilc.edu.tw -d www.test.ilc.edu.tw

Enter email address (used for urgent renewal and security notices) (Enter ‘c’ to
cancel):

——————————————————————————-
Please read the Terms of Service at
https://letsencrypt.org/documents/LE-SA-v1.1.1-August-1-2016.pdf. You must agree
in order to register with the ACME server at
https://acme-v01.api.letsencrypt.org/directory
——————————————————————————-
(A)gree/(C)ancel: A

——————————————————————————-
Would you be willing to share your email address with the Electronic Frontier
Foundation, a founding partner of the Let’s Encrypt project and the non-profit
organization that develops Certbot? We’d like to send you email about EFF and
our work to encrypt the web, protect its users and defend digital rights.
——————————————————————————-
(Y)es/(N)o: Y
Obtaining a new certificate
Performing the following challenges:
tls-sni-01 challenge for test.ilc.edu.tw
tls-sni-01 challenge for www.test.ilc.edu.tw
Waiting for verification…
Cleaning up challenges
Failed authorization procedure. nxi.tces.ilc.edu.tw (tls-sni-01): urn:acme:error:connection :: The server could not connect to the client to verify the domain :: Failed to connect to 192.168.1.1:443 for TLS-SNI-01 challenge

IMPORTANT NOTES:
 – If you lose your account credentials, you can recover through
   e-mails sent to t850008@gmail.com.
 – The following errors were reported by the server:

   Domain: www.test.ilc.edu.tw
   Type:   connection
   Detail: Failed to connect to 192.168.1.1:443 for TLS-SNI-01
   challenge

   To fix these errors, please make sure that your domain name was
   entered correctly and the DNS A record(s) for that domain
   contain(s) the right IP address. Additionally, please check that
   your computer has a publicly routable IP address and that no
   firewalls are preventing the server from communicating with the
   client. If you’re using the webroot plugin, you should also verify
   that you are serving files from the webroot path you provided.
 – Your account credentials have been saved in your Certbot
   configuration directory at /etc/letsencrypt. You should make a
   secure backup of this folder now. This configuration directory will
   also contain certificates and private keys obtained by Certbot so
   making regular backups of this folder is ideal.

判別 Linux 系統是不是在虛擬機器

方式很多種
以下針對 VMware 所架設的虛擬機器
1. 使用 lshw 指令
# yum install lshw
# lshw | grep -m 1 product
    product: VMware Virtual Platform

2. 使用 lspci 指令
# yum install pciutils
# lspci | grep -m 1 System
00:07.7 System peripheral: VMware Virtual Machine Communication Interface (rev 10)

3. 使用 dmidecode 指令
# yum install dmidecode
# dmidecode | grep -m 1 Product
        Product Name: VMware Virtual Platform[@more@]4. 使用 virt-what 指令
# yum install virt-what
# apt-get install virt-what
在 VMware
# virt-what
vmware
在 Proxmox
# virt-what
lxc
在 VirtualBox
# virt-what
virtualbox

ss 網路管理工具

ss 的功能和 netstat 相近。
主要參數有:

說明
-a顯示所有的 socket !
-n以數字來取代介面名稱與 port 號!
-t顯示使用 TCP 的 socket !
-u顯示使用 UDP 的 socket !
-l只顯示監聽中的 socket !
-p顯示 socket 執行序的 ID 號碼!

[@more@]# ss -antulp
Netid State      Recv-Q Send-Q                                                          Local Address:Port                                                                         Peer Address:Port
udp   UNCONN     0      0                                                                           *:161                                                                                     *:*                   users:((“snmpd”,pid=52,fd=6))
tcp   LISTEN     0      128                                                                 127.0.0.1:199                                                                                     *:*                   users:((“snmpd”,pid=52,fd=7))
tcp   LISTEN     0      128                                                                         *:22                                                                                      *:*                   users:((“sshd”,pid=72,fd=3))
tcp   LISTEN     0      128                                                                        :::22                                                                                     :::*                   users:((“sshd”,pid=72,fd=4))

# netstat -antulp
Active Internet connections (servers and established)
Proto Recv-Q Send-Q Local Address           Foreign Address         State       PID/Program name
tcp        0      0 127.0.0.1:199           0.0.0.0:*               LISTEN      52/snmpd
tcp        0      0 0.0.0.0:22              0.0.0.0:*               LISTEN      72/sshd
tcp6       0      0 :::22                   :::*                    LISTEN      72/sshd
udp        0      0 0.0.0.0:161             0.0.0.0:*                           52/snmpd

還是比較習慣使用 netstat

ip 網路管理工具

ip 指令和 ifconfig 的功能有些類似,但命令可以更加簡短

1. 列出所有網路介面 IP
# ip addr show
1: lo: <LOOPBACK,UP,LOWER_UP> mtu 65536 qdisc noqueue state UNKNOWN qlen 1
    link/loopback 00:00:00:00:00:00 brd 00:00:00:00:00:00
    inet 127.0.0.1/8 scope host lo
       valid_lft forever preferred_lft forever
    inet6 ::1/128 scope host
       valid_lft forever preferred_lft forever
112: eth0@if113: <BROADCAST,MULTICAST,UP,LOWER_UP> mtu 1500 qdisc noqueue state UP qlen 1000
    link/ether 9e:5b:bb:11:35:a7 brd ff:ff:ff:ff:ff:ff link-netnsid 0
    inet 192.168.1.17/24 brd 192.168.1.255 scope global eth0
       valid_lft forever preferred_lft forever[@more@]2. 單獨列出某一網路介面
# ip addr show eth0
# ip a s eth0
112: eth0@if113: <BROADCAST,MULTICAST,UP,LOWER_UP> mtu 1500 qdisc noqueue state UP qlen 1000
    link/ether 9e:5b:bc:14:35:a7 brd ff:ff:ff:ff:ff:ff link-netnsid 0
    inet 192.168.1.17/24 brd 192.168.1.255 scope global eth0

3. 列出網路路由
# ip route
# ip r
default via 192.168.1.254 dev eth0
192.168.1.0/24 dev eth0  proto kernel  scope link  src 192.168.1.17

取出 IP
# ip a s eth0 | grep ‘inet ‘ | awk ‘{print $2}’ | awk -F’/’ ‘{print $1}’
192.168.1.17
# ip r | grep src | awk ‘{print $9}’
192.168.1.17

取出 mac address
# ip a s eth0 | grep ‘link/ether’ | awk ‘{print $2}’
9e:5b:bb:11:35:a7

使用 diff / patch 來修正檔案

diff 可以產生二個檔案之間的差異對照,然後利用 patch 來進行修正。

1.產生二個檔案間差異
-a 將所有檔案都視為文字檔
-u 輸出預設三行的相同文字行
-r 遞迴比較所有的子目錄
-N 將缺少的檔案視為空檔案
# diff -Naur server.conf.2017-02-20 server.conf > /root/server.diff

2. 將差異檔和待修正的檔案放在一起
# cp /etc/openvpn/server.conf.2017-02-20 /root/server.conf

3. 利用 patch 進行修正
# cd /root
# patch -i server.diff

4. 比較二者間是否有差異
# diff /root/server.conf /etc/openvpn/server.conf

如果執行完後沒有任何訊息,代表二個檔案完全相同

解決執行 locale 出現的錯誤訊息

原本的 OB2D-XFCE-Server-2017 訊息是顯示中文的,但因個人使用習慣,所以移除了 X-Window,使用 SSH Client 遠端登入後,顯示訊息是中文的,就有些不太習慣。
# cp /etc/default/locale /etc/default/locale.$(date +%F)
# sed -i ‘s/zh_TW/en_US/’ /etc/default/locale
# sed -i ‘s/zh/en/’ /etc/default/locale

# locale-gen en_US.UTF-8
Generating locales (this might take a while)…
  zh_TW.UTF-8… done
Generation complete.

但執行 locale 會出現警告提示的訊息
# locale
locale: Cannot set LC_CTYPE to default locale: No such file or directory
locale: Cannot set LC_MESSAGES to default locale: No such file or directory
locale: Cannot set LC_ALL to default locale: No such file or directory
LANG=en_US.UTF-8
LANGUAGE=
LC_CTYPE=”en_US.UTF-8″
LC_NUMERIC=”en_US.UTF-8″
LC_TIME=”en_US.UTF-8″
LC_COLLATE=”en_US.UTF-8″
LC_MONETARY=”en_US.UTF-8″
LC_MESSAGES=”en_US.UTF-8″
LC_PAPER=”en_US.UTF-8″
LC_NAME=”en_US.UTF-8″
LC_ADDRESS=”en_US.UTF-8″
LC_TELEPHONE=”en_US.UTF-8″
LC_MEASUREMENT=”en_US.UTF-8″
LC_IDENTIFICATION=”en_US.UTF-8″
LC_ALL=[@more@]解決方式:
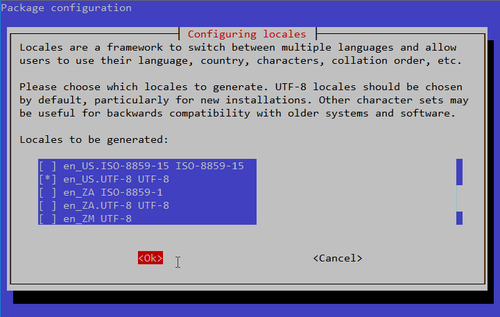
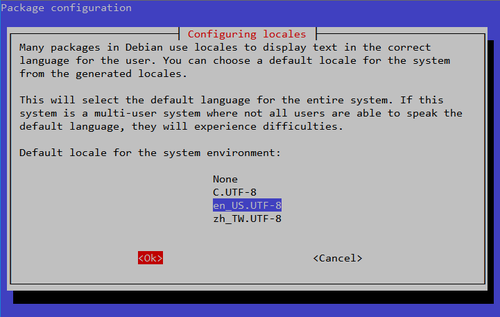
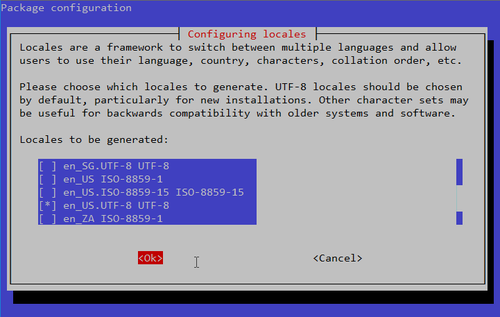
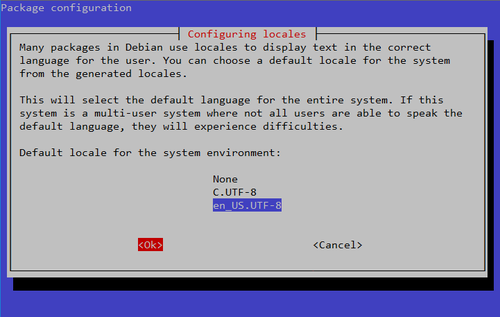
# dpkg-reconfigure locale

這樣就正常了!
# locale
LANG=en_US.UTF-8
LANGUAGE=en_US:en
LC_CTYPE=”en_US.UTF-8″
LC_NUMERIC=”en_US.UTF-8″
LC_TIME=”en_US.UTF-8″
LC_COLLATE=”en_US.UTF-8″
LC_MONETARY=”en_US.UTF-8″
LC_MESSAGES=”en_US.UTF-8″
LC_PAPER=”en_US.UTF-8″
LC_NAME=”en_US.UTF-8″
LC_ADDRESS=”en_US.UTF-8″
LC_TELEPHONE=”en_US.UTF-8″
LC_MEASUREMENT=”en_US.UTF-8″
LC_IDENTIFICATION=”en_US.UTF-8″
LC_ALL=

列出 CentOS / Debian / Ubuntu 開機時服務啟動的設定狀態

在 RedHat / CentOS Linux 中可以使用 chkconfig / systemctl 來查看開機時服務啟動的設定狀態
CentOS 6.x
# /sbin/chkconfig –list
crond           0:off   1:off   2:on    3:on    4:on    5:on    6:off
fail2ban        0:off   1:off   2:off   3:off   4:on    5:on    6:off
htcacheclean    0:off   1:off   2:off   3:off   4:off   5:off   6:off
httpd           0:off   1:off   2:off   3:on    4:off   5:off   6:off
ipset           0:off   1:off   2:on    3:on    4:on    5:on    6:off
iptables        0:off   1:off   2:on    3:on    4:on    5:on    6:off
mysqld          0:off   1:off   2:off   3:on    4:off   5:off   6:off
netconsole      0:off   1:off   2:off   3:off   4:off   5:off   6:off
netfs           0:off   1:off   2:off   3:on    4:on    5:on    6:off
network         0:off   1:off   2:on    3:on    4:on    5:on    6:off
ntpdate         0:off   1:off   2:off   3:off   4:off   5:off   6:off
rdisc           0:off   1:off   2:off   3:off   4:off   5:off   6:off
restorecond     0:off   1:off   2:off   3:off   4:off   5:off   6:off
rsyslog         0:off   1:off   2:on    3:on    4:on    5:on    6:off
snmpd           0:off   1:off   2:off   3:on    4:off   5:off   6:off
snmptrapd       0:off   1:off   2:off   3:off   4:off   5:off   6:off
sshd            0:off   1:off   2:on    3:on    4:on    5:on    6:off
udev-post       0:off   1:on    2:off   3:off   4:off   5:off   6:off[@more@]
# /sbin/chkconfig –list snmpd
snmpd           0:off   1:off   2:off   3:on    4:off   5:off   6:off

# /sbin/chkconfig –list | grep 3:on
crond           0:off   1:off   2:on    3:on    4:on    5:on    6:off
httpd           0:off   1:off   2:off   3:on    4:off   5:off   6:off
ipset           0:off   1:off   2:on    3:on    4:on    5:on    6:off
iptables        0:off   1:off   2:on    3:on    4:on    5:on    6:off
mysqld          0:off   1:off   2:off   3:on    4:off   5:off   6:off
netfs           0:off   1:off   2:off   3:on    4:on    5:on    6:off
network         0:off   1:off   2:on    3:on    4:on    5:on    6:off
rsyslog         0:off   1:off   2:on    3:on    4:on    5:on    6:off
snmpd           0:off   1:off   2:off   3:on    4:off   5:off   6:off
sshd            0:off   1:off   2:on    3:on    4:on    5:on    6:off

CentOS 7.x
# /usr/bin/systemctl list-unit-files | grep enabled
autovt@.service                        enabled
barnyard2.service                      enabled
crond.service                          enabled
getty@.service                         enabled
httpd.service                          enabled
iptables.service                       enabled
mariadb.service                        enabled
rsyslog.service                        enabled
snmpd.service                          enabled
sshd.service                           enabled
systemd-readahead-collect.service      enabled
systemd-readahead-drop.service         enabled
systemd-readahead-replay.service       enabled
default.target                         enabled
graphical.target                       enabled
remote-fs.target                       enabled
runlevel5.target                       enabled

在 Debian / Ubuntu
# apt-get install sysv-rc-conf

# /usr/sbin/sysv-rc-conf –list
atd          0:off      1:off   2:on    3:on    4:on    5:on    6:off
bootlogs     1:on       2:on    3:on    4:on    5:on
cron         2:on       3:on    4:on    5:on
dbus         2:on       3:on    4:on    5:on
halt         0:off
killprocs    1:on
kmod         S:on
motd         1:on       2:on    3:on    4:on    5:on
networking   0:off      6:off   S:on
postfix      0:off      1:off   2:on    3:on    4:on    5:on    6:off
procps       S:on
rc.local     2:on       3:on    4:on    5:on
reboot       6:off
rmnologin    2:on       3:on    4:on    5:on
rpcbind      0:off      1:off   6:off   S:on
rsync        2:on       3:on    4:on    5:on
rsyslog      0:off      1:off   2:on    3:on    4:on    5:on    6:off
sendsigs     0:off      6:off
single       1:on
snmpd        0:off      1:off   2:on    3:on    4:on    5:on    6:off
ssh          2:on       3:on    4:on    5:on
umountfs     0:off      6:off
umountroot   0:off      6:off
urandom      0:off      6:off   S:on
x11-common   S:on

# /usr/sbin/sysv-rc-conf –list snmpd
snmpd        0:off      1:off   2:on    3:on    4:on    5:on    6:off

# /usr/sbin/update-rc.d snmpd remove
# /usr/sbin/sysv-rc-conf –list snmpd
snmpd

# /usr/sbin/update-rc.d snmpd defaults
# /usr/sbin/sysv-rc-conf –list snmpd
snmpd        0:off      1:off   2:on    3:on    4:on    5:on    6:off

Proxmox – Debian 8 LXC 初始環境設定

1. 將更新的 Server 都指向國家高速網路中心
$ sudo cp /etc/apt/sources.list /etc/apt/sources.list.$(date +%F)
$ sudo sed -i ‘s/ftp.debian.org/free.nchc.org.tw/g’ /etc/apt/sources.list

清除所有的
$ sudo apt-get clean all
更新套件庫
$ sudo apt-get update

2. 進行套件更新
$ sudo apt-get upgrade

[@more@]3. 補足缺少的套件
$ sudo apt-get install vim zip unzip mailutils ntpdate rsync sysv-rc-conf

4. 讓終端機程式可以輸入及顯示中文
$ sudo dpkg-reconfigure locales


$ cat /etc/default/locale
LANG=en_US.UTF-8
LANGUAGE=en_US.UTF-8

$ /usr/bin/locale
LANG=en_US.UTF-8
LANGUAGE=
LC_CTYPE=”en_US.UTF-8″
LC_NUMERIC=”en_US.UTF-8″
LC_TIME=”en_US.UTF-8″
LC_COLLATE=”en_US.UTF-8″
LC_MONETARY=”en_US.UTF-8″
LC_MESSAGES=”en_US.UTF-8″
LC_PAPER=”en_US.UTF-8″
LC_NAME=”en_US.UTF-8″
LC_ADDRESS=”en_US.UTF-8″
LC_TELEPHONE=”en_US.UTF-8″
LC_MEASUREMENT=”en_US.UTF-8″
LC_IDENTIFICATION=”en_US.UTF-8″
LC_ALL=

5. 時區及預設編輯器設定
$ sudo tail -2 /etc/profile
export TZ=”Asia/Taipei”
export EDITOR=”/usr/bin/vim”

# /usr/bin/tzselect
Please identify a location so that time zone rules can be set correctly.
Please select a continent, ocean, “coord”, or “TZ”.
 1) Africa
 2) Americas
 3) Antarctica
 4) Arctic Ocean
 5) Asia
 6) Atlantic Ocean
 7) Australia
 8) Europe
 9) Indian Ocean
10) Pacific Ocean
11) coord – I want to use geographical coordinates.
12) TZ – I want to specify the time zone using the Posix TZ format.
#? 5
Please select a country whose clocks agree with yours.
 1) Afghanistan           18) Israel                35) Palestine
 2) Armenia               19) Japan                 36) Philippines
 3) Azerbaijan            20) Jordan                37) Qatar
 4) Bahrain               21) Kazakhstan            38) Russia
 5) Bangladesh            22) Korea (North)         39) Saudi Arabia
 6) Bhutan                23) Korea (South)         40) Singapore
 7) Brunei                24) Kuwait                41) Sri Lanka
 8) Cambodia              25) Kyrgyzstan            42) Syria
 9) China                 26) Laos                  43) Taiwan
10) Cyprus                27) Lebanon               44) Tajikistan
11) East Timor            28) Macau                 45) Thailand
12) Georgia               29) Malaysia              46) Turkmenistan
13) Hong Kong             30) Mongolia              47) United Arab Emirates
14) India                 31) Myanmar (Burma)       48) Uzbekistan
15) Indonesia             32) Nepal                 49) Vietnam
16) Iran                  33) Oman                  50) Yemen
17) Iraq                  34) Pakistan
#? 43

The following information has been given:

        Taiwan

Therefore TZ=’Asia/Taipei’ will be used.
Local time is now:      Tue Feb 28 22:47:26 CST 2017.
Universal Time is now:  Tue Feb 28 14:47:26 UTC 2017.
Is the above information OK?
1) Yes
2) No
#? 1

You can make this change permanent for yourself by appending the line
        TZ=’Asia/Taipei’; export TZ
to the file ‘.profile’ in your home directory; then log out and log in again.

Here is that TZ value again, this time on standard output so that you
can use the /usr/bin/tzselect command in shell scripts:
Asia/Taipei

6. 安裝 snmpd
$ sudo apt-get install snmpd snmp
$ sudo mv /etc/snmp/snmpd.conf /etc/snmp/snmpd.conf.$(date +%F)

$ sudo echo ‘rocommunity public’ > /etc/snmp/snmpd.conf
$ sudo  chmod 600 /etc/snmp/snmpd.conf
$ sudo update-rc.d snmpd defaults
$ sudo /etc/init.d/snmpd restart