Cubie Truck 上的 LED

本篇文章參考:
Cubieboard 开箱和入门 | Name5566
tutorials:common:begining_on_lubuntu [Cubieboard Docs]

# ls -l /sys/class/leds
lrwxrwxrwx 1 root root 0 10月  9 08:07 blue:ph21:led1 -> ../../devices/platform/leds-sunxi/leds/blue:ph21:led1
lrwxrwxrwx 1 root root 0 10月  9 08:07 green:ph07:led4 -> ../../devices/platform/leds-sunxi/leds/green:ph07:led4
lrwxrwxrwx 1 root root 0 10月  9 08:07 orange:ph20:led2 -> ../../devices/platform/leds-sunxi/leds/orange:ph20:led2
lrwxrwxrwx 1 root root 0 10月  9 08:07 white:ph11:led3 -> ../../devices/platform/leds-sunxi/leds/white:ph11:led3

由上面的檔案,可以知道:
lde1 藍色 接腳 – ph21
led2 綠色 接腳 – ph07
led3 橘色 接腳 – ph20
led4 白色 接腳 – ph11[@more@] 關閉 led
# ls /sys/class/leds/*/brightness | xargs -i -n1 echo “echo 0 > {}” | sh

讓設定開機時生效 
/etc/rc.local 最後一行 exit 0 之前加入 ls /sys/class/leds/*/brightness | xargs -i -n1 echo “echo 0 > {}” | sh
# sed -i ‘/^exit 0/ils /sys/class/leds/*/brightness | xargs -i -n1 echo “echo 0 > {}” | sh’ /etc/rc.local

Cubie Truck 測試 – Lubuntu 篇 使用無線網路連線

因為 Cubie Truck 內建有無線網路,所以測試使用無線網路來進行連線
參考網頁:
tutorials:common:lubuntu_wifi_configuration [Cubieboard Docs]

切換身份為 root
$ su –

安裝相關設定套件
# apt-get install wireless-tools wpasupplicant

載入無線網路模組
# modprobe bcmdhd

讓開機能立即啟用
# echo bcmdhd >> /etc/modules

查看模組的使用
# lsmod | grep bcmdhd
bcmdhd                505137  0[@more@]

啟動無線網路卡 wlan0
# ifconfig wlan0 up

掃描可以使用的無線網路
# iwlist wlan0 scan
wlan0     Scan completed :
          Cell 01 – Address: A0:F3:C1:34:C4:26
                     ESSID:”CHTN_T07AW”
                    Mode:Managed
                    Frequency:2.437 GHz (Channel 6)
                    Quality:1/5  Signal level:-81 dBm  Noise level:-92 dBm
                    Encryption key:off
                    Bit Rates:1 Mb/s; 2 Mb/s; 5.5 Mb/s; 11 Mb/s; 18 Mb/s
                              24 Mb/s; 36 Mb/s; 54 Mb/s; 6 Mb/s; 9 Mb/s
                              12 Mb/s; 48 Mb/s

進行連線
# iwconfig wlan0 essid “CHTN_T07AW”

產生編碼後的 key
# wpa_passphrase “CHTN_T07AW” 123456789 | grep -v ‘#psk’ | grep psk | awk -F’=’ ‘{print $2}’
7b1a762a689f76c82d9403c9a4cce22bbc6d6eb9fd0c900ca78e146626b57c11

修改網路組態,加入無線網路部分設定
# vim /etc/network/interfaces
auto lo eth0
iface lo inet loopback
iface eth0 inet dhcp
auto wlan0
iface wlan0 inet dhcp
        wpa-ssid “CHTN_T07AW”
        wpa-psk 7b1a762a689f76c82d9403c9a4cce22bbc6d6eb9fd0c900ca78e146626b57c11

重新啟動網路
# /etc/init.d/networking restart

先關閉 eth0 方便進行測試
# ifconfig eth0 down

查看 wlan0 無線網路卡網路組態
# ifconfig wlan0
wlan0     Link encap:Ethernet  HWaddr 98:3b:16:1e:67:d8
          inet addr:10.0.1.5  Bcast:10.0.1.255  Mask:255.255.255.0
          inet6 addr: fe80::9a3b:16ff:fe1e:67d8/64 Scope:Link
          UP BROADCAST RUNNING MULTICAST  MTU:1500  Metric:1
          RX packets:117 errors:0 dropped:0 overruns:0 frame:0
          TX packets:131 errors:0 dropped:0 overruns:0 carrier:0
          collisions:0 txqueuelen:1000
          RX bytes:22069 (22.0 KB)  TX bytes:16739 (16.7 KB)

測試是否能正連線
# ping -c 4 140.111.66.1
PING 140.111.66.1 (140.111.66.1) 56(84) bytes of data.
64 bytes from 140.111.66.1: icmp_req=1 ttl=53 time=14.0 ms
64 bytes from 140.111.66.1: icmp_req=2 ttl=53 time=13.5 ms
64 bytes from 140.111.66.1: icmp_req=3 ttl=53 time=14.1 ms
64 bytes from 140.111.66.1: icmp_req=4 ttl=53 time=13.3 ms

— 140.111.66.1 ping statistics —
4 packets transmitted, 4 received, 0% packet loss, time 3005ms

解決執行 ufw 出現的警告訊息

自己在設定 Linux 防火牆規則時,都是習慣使用 iptables 指令,把規則寫在 Script 檔,設定成開機時執行,比較不習慣使用第三方的套件來建立,因為後續要修改時會比較麻煩。
不過在 Cubie Truck 的 Ubuntu Server 似乎預設就有安裝 ufw(Uncomplicated Firewall),利用 ufw 來建立防火牆規則。
但在執行 ufw 時會出現一些警告訊息
# ufw status verbose
WARN: /lib is group writable!
WARN: /etc is group writable!
WARN: /etc/default is group writable!
WARN: /usr is group writable!
Status: inactive

看起來似乎是警告這些目錄的權限是群組可以寫入的[@more@]檢查一些這些目錄的權限,預設權限是 775
# ls -ld /lib /etc /etc/default /usr
drwxrwxr-x 96 root root 4096 Oct 18 10:53 /etc
drwxrwxr-x  2 root root 4096 Oct 16 23:18 /etc/default
drwxrwxr-x 21 root root 4096 Oct 16 23:18 /lib
drwxrwxr-x 10 root root 4096 Sep  6 17:54 /usr

把這些目錄的權限改成 751
# chmod 751 /lib /etc /etc/default /usr
# ls -ld /lib /etc /etc/default /usr
drwxr-x–x 96 root root 4096 Oct 18 10:53 /etc
drwxr-x–x  2 root root 4096 Oct 16 23:18 /etc/default
drwxr-x–x 21 root root 4096 Oct 16 23:18 /lib
drwxr-x–x 10 root root 4096 Sep  6 17:54 /usr

再次執行 ufw 時,就不會出現警告訊息了!
# ufw status verbose
Status: inactive

Debian / Ubuntu update-rc.d 用法 另一章

在這之前曾經試用 update.rc.d 來啟動或關閉服務,但很詭異的是有些服務,我明明沒有啟動,但有啟動,究竟是什麼原因呢?
這是在 Cubie Truck Ubuntu Server 14.04 中碰到的狀況。
如 Samba 服務
# netstat -antulp | egrep ‘:137|:138|:139|:445’
tcp        0      0 0.0.0.0:139             0.0.0.0:*               LISTEN      1597/smbd
tcp        0      0 0.0.0.0:445             0.0.0.0:*               LISTEN      1597/smbd
tcp6       0      0 :::139                  :::*                    LISTEN      1597/smbd
tcp6       0      0 :::445                  :::*                    LISTEN      1597/smbd
udp        0      0 192.168.1.255:137       0.0.0.0:*                           1587/nmbd
udp        0      0 192.168.1.105:137       0.0.0.0:*                           1587/nmbd
udp        0      0 0.0.0.0:137             0.0.0.0:*                           1587/nmbd
udp        0      0 192.168.1.255:138       0.0.0.0:*                           1587/nmbd
udp        0      0 192.168.1.105:138       0.0.0.0:*                           1587/nmbd
udp        0      0 0.0.0.0:138             0.0.0.0:*                           1587/nmbd
[@more@]使用 sysv-rc-conf –list 來列出服務的啟用狀態
# sysv-rc-conf –list
apache2      0:off      1:off   2:on    3:on    4:on    5:on    6:off
apparmor     S:on
atd
console-setu
cron
dbus
dns-clean    1:on       2:on    3:on    4:on    5:on
exim4        0:off      1:off   2:on    3:on    4:on    5:on    6:off
firstrun
friendly-rec
halt         0:on
irqbalance
killprocs    1:on
kmod
memcached    0:off      1:off   2:on    3:on    4:on    5:on    6:off
minidlna     0:off      1:off   2:on    3:on    4:on    5:on    6:off
mysql
networking
nmbd
ntp          1:off      2:on    3:on    4:on    5:on
ondemand     2:on       3:on    4:on    5:on
pppd-dns     1:on       2:on    3:on    4:on    5:on
pptpd        1:off      2:on    3:on    4:on    5:on
procps
rc.local     2:on       3:on    4:on    5:on
reboot       6:on
resolvconf
rsync        0:off      1:off   2:on    3:on    4:on    5:on    6:off
rsyslog
samba        2:off      3:off   4:off   5:off
samba-ad-dc  2:off      3:off   4:off   5:off
sendsigs     0:on       6:on
single       1:on
smbd
ssh
sudo
udev
umountfs     0:on       6:on
umountroot   0:on       6:on
urandom      0:on       6:on    S:on
vsftpd

目前的執行層級
# /sbin/runlevel
N 2

列出執行層級 2 啟動的服務,裡面根本沒有與 Samba 相關的服務
# sysv-rc-conf –list | grep 2:on
apache2      0:off      1:off   2:on    3:on    4:on    5:on    6:off
dns-clean    1:on       2:on    3:on    4:on    5:on
exim4        0:off      1:off   2:on    3:on    4:on    5:on    6:off
memcached    0:off      1:off   2:on    3:on    4:on    5:on    6:off
minidlna     0:off      1:off   2:on    3:on    4:on    5:on    6:off
ntp          1:off      2:on    3:on    4:on    5:on
ondemand     2:on       3:on    4:on    5:on
pppd-dns     1:on       2:on    3:on    4:on    5:on
pptpd        1:off      2:on    3:on    4:on    5:on
rc.local     2:on       3:on    4:on    5:on
rsync        0:off      1:off   2:on    3:on    4:on    5:on    6:off

列出 smbd / nmbd 服務,奇特的是沒有任何狀態
# sysv-rc-conf –list smbd
smbd
# sysv-rc-conf –list nmbd
nmbd

執行 sysv-rc-conf –level 2345 在 level 2345 層級關閉 smbd/nmbd 服務
# sysv-rc-conf –level 2345 smbd off
# sysv-rc-conf –level 2345 nmbd off

列出 smbd / nmbd 服務,終於有執行層級的狀態了!
# sysv-rc-conf –list smbd
smbd         2:off      3:off   4:off   5:off
# sysv-rc-conf –list nmbd
nmbd         2:off      3:off   4:off   5:off

重新啟動電腦
# reboot

重新開機後,發現還是會啟動 Samba Server

後來,我發現在 sys-rc-conf –list 看不到狀態的,似乎都會啟動
# sysv-rc-conf –list | egrep -v ‘on|off’
atd
dbus
firstrun
friendly-rec
irqbalance
kmod
mysql
networking
nmbd
procps
rsyslog
samba
samba-ad-dc
smbd
ssh
sudo
udev
vsftpd

真是不知道這是什麼狀態了,只能先在 /etc/rc.local 中把這些不想啟動的服務給停了,或是直接移除,眼不見為淨!
但是我天真了,開機後這些服務依然還是執行中!

後來又與 Banana Pi 的 Bananian 做比對,我說服我自己,這應該是特例,但我也馬上把這一個 Ubuntu 的 Image 也清除了!
# lsb_release -a
No LSB modules are available.
Distributor ID: Debian
Description:    Debian GNU/Linux 7.6 (wheezy)
Release:        7.6
Codename:       wheezy

# sysv-rc-conf –list
apache2      0:off      1:off   2:on    3:on    4:on    5:on    6:off
bootlogs     1:on       2:on    3:on    4:on    5:on
console-setu S:on
cpufrequtils 2:on       3:on    4:on    5:on
cron         2:on       3:on    4:on    5:on
exim4        0:off      1:off   2:on    3:on    4:on    5:on    6:off
fail2ban     0:off      1:off   2:on    3:on    4:on    5:on    6:off
halt         0:off
haveged      0:off      1:off   2:on    3:on    4:on    5:on    6:off
kbd          S:on
keyboard-set S:on
killprocs    1:on
kmod         S:on
loadcpufreq  2:on       3:on    4:on    5:on
motd         1:on       2:on    3:on    4:on    5:on
mysql        0:off      1:off   2:on    3:on    4:on    5:on    6:off
networking   0:off      6:off   S:on
noip2        0:off      1:off   2:on    3:on    4:on    5:on    6:off
ntp          2:on       3:on    4:on    5:on
openvpn      0:off      1:off   2:on    3:on    4:on    5:on    6:off
pppd-dns     S:on
procps       S:on
rc.local     2:on       3:on    4:on    5:on
reboot       6:off
rmnologin    2:on       3:on    4:on    5:on
rsync        2:on       3:on    4:on    5:on
rsyslog      0:off      1:off   2:on    3:on    4:on    5:on    6:off
screen-clean S:on
sendsigs     0:off      6:off
single       1:on
ssh          2:on       3:on    4:on    5:on
udev         S:on
udev-mtab    S:on
umountfs     0:off      6:off
umountroot   0:off      6:off
urandom      0:off      6:off   S:on
vsftpd       1:off      2:on    3:on    4:on    5:on

Cubie Truck Ubuntu Server
# lsb_release -a
No LSB modules are available.
Distributor ID: Linaro
Description:    Linaro 14.04
Release:        14.04
Codename:       trusty

# sysv-rc-conf –list
apache2      0:off      1:off   2:on    3:on    4:on    5:on    6:off
apparmor     S:on
atd
console-setu
cron
dbus
dns-clean    1:on       2:on    3:on    4:on    5:on
exim4        0:off      1:off   2:on    3:on    4:on    5:on    6:off
firstrun
friendly-rec
halt         0:on
irqbalance
killprocs    1:on
kmod
memcached    0:off      1:off   2:on    3:on    4:on    5:on    6:off
minidlna     0:off      1:off   2:on    3:on    4:on    5:on    6:off
mysql
networking
nmbd
ntp          1:off      2:on    3:on    4:on    5:on
ondemand     2:on       3:on    4:on    5:on
pppd-dns     1:on       2:on    3:on    4:on    5:on
pptpd        1:off      2:on    3:on    4:on    5:on
procps
rc.local     2:on       3:on    4:on    5:on
reboot       6:on
resolvconf
rsync        0:off      1:off   2:on    3:on    4:on    5:on    6:off
rsyslog
samba
samba-ad-dc
sendsigs     0:on       6:on
single       1:on
smbd
snmbd        2:off      3:off   4:off   5:off
ssh
sudo
udev
umountfs     0:on       6:on
umountroot   0:on       6:on
urandom      0:on       6:on    S:on
vsftpd

Cubie Truck 測試 – Lubuntu 篇 – 擴展 root 分割區

Cubie Truck  Lubuntu Desktop 硬碟分割
$ sudo fdisk -l

Disk /dev/nand: 15.9 GB, 15938355200 bytes
255 heads, 63 sectors/track, 1937 cylinders, total 31129600 sectors
Units = sectors of 1 * 512 = 512 bytes
Sector size (logical/physical): 512 bytes / 512 bytes
I/O size (minimum/optimal): 512 bytes / 512 bytes
Disk identifier: 0x00000000

Disk /dev/nand doesn’t contain a valid partition table

Disk /dev/nanda: 67 MB, 67108864 bytes
255 heads, 63 sectors/track, 8 cylinders, total 131072 sectors
Units = sectors of 1 * 512 = 512 bytes
Sector size (logical/physical): 512 bytes / 512 bytes
I/O size (minimum/optimal): 512 bytes / 512 bytes
Disk identifier: 0x00000000

     Device Boot      Start         End      Blocks   Id  System

Disk /dev/nandb: 2147 MB, 2147483648 bytes
255 heads, 63 sectors/track, 261 cylinders, total 4194304 sectors
Units = sectors of 1 * 512 = 512 bytes
Sector size (logical/physical): 512 bytes / 512 bytes
I/O size (minimum/optimal): 512 bytes / 512 bytes
Disk identifier: 0x00000000

Disk /dev/nandb doesn’t contain a valid partition table

Disk /dev/nandc: 13.7 GB, 13706985472 bytes
255 heads, 63 sectors/track, 1666 cylinders, total 26771456 sectors
Units = sectors of 1 * 512 = 512 bytes
Sector size (logical/physical): 512 bytes / 512 bytes
I/O size (minimum/optimal): 512 bytes / 512 bytes
Disk identifier: 0xffffffff

Disk /dev/nandc doesn’t contain a valid partition table[@more@]/dev/nanda 是系統開機分割區
/dev/nandb 是 /root 分割區
/dev/nandc 是還沒使用的區域

參考網頁:
Cubietruck-Resize NAND | www.maruscha.org
cubieboard nand 重新分区扩容 – 我喜欢智能化 – 博客频道 – CSDN.NET

查看 Nand 硬碟分割表資訊
$ sudo nand-part -f a20 /dev/nand
check partition table copy 0: mbr: version 0x00000200, magic softw411
OK
check partition table copy 1: mbr: version 0x00000200, magic softw411
OK
check partition table copy 2: mbr: version 0x00000200, magic softw411
OK
check partition table copy 3: mbr: version 0x00000200, magic softw411
OK
mbr: version 0x00000200, magic softw411
3 partitions
partition  1: class =         DISK, name =   bootloader, partition start =    32768, partition size =   131072 user_type=0
partition  2: class =         DISK, name =       rootfs, partition start =   163840, partition size =  4194304 user_type=0
partition  3: class =         DISK, name =        UDISK, partition start =  4358144, partition size = 26574848 user_type=0

綠色是分割區的名字,粉紅色是分割區的起始位置,橘色是分割區的大小
以 root 分割為例
它的大小是 size =4194304  ; 4194304/1024/2=2048 = 2G
UDISK 是還未用到的區域,也就是 root 分割區要擴展的區域
如果要把全部的空間用完,root 分割區的大小 = 4194304 + 26574848 = 30769152

進行設定
$ sudo nand-part -f a20 /dev/nand 32768 ‘boot 131072’ ‘rootfs 30769152’  
check partition table copy 0: mbr: version 0x00000200, magic softw411
OK
check partition table copy 1: mbr: version 0x00000200, magic softw411
OK
check partition table copy 2: mbr: version 0x00000200, magic softw411
OK
check partition table copy 3: mbr: version 0x00000200, magic softw411
OK
mbr: version 0x00000200, magic softw411
3 partitions
partition  1: class =         DISK, name =   bootloader, partition start =    32768, partition size =   131072 user_type=0
partition  2: class =         DISK, name =       rootfs, partition start =   163840, partition size =  4194304 user_type=0
partition  3: class =         DISK, name =        UDISK, partition start =  4358144, partition size = 26574848 user_type=0
check partition table copy 0: mbr: version 0x00000200, magic softw411
check partition table copy 1: mbr: version 0x00000200, magic softw411
check partition table copy 2: mbr: version 0x00000200, magic softw411
check partition table copy 3: mbr: version 0x00000200, magic softw411

ready to write new partition tables:
mbr: version 0x00000200, magic softw411
2 partitions
partition  1: class =         DISK, name =         boot, partition start =    32768, partition size =   131072 user_type=0
partition  2: class =         DISK, name =       rootfs, partition start =   163840, partition size = 30769152 user_type=0

write new partition tables? (Y/N)
y
Failed rereading partition table: Device or resource busy

verifying new partition tables:
check partition table copy 0: mbr: version 0x00000200, magic softw411
OK
check partition table copy 1: mbr: version 0x00000200, magic softw411
OK
check partition table copy 2: mbr: version 0x00000200, magic softw411
OK
check partition table copy 3: mbr: version 0x00000200, magic softw411
OK
mbr: version 0x00000200, magic softw411
2 partitions
partition  1: class =         DISK, name =         boot, partition start =    32768, partition size =   131072 user_type=0
partition  2: class =         DISK, name =       rootfs, partition start =   163840, partition size = 30769152 user_type=0
rereading partition table… returned -1

重新啟動電腦
$ sudo reboot

重新設定 /dev/nandb 分割區大小
$ sudo resize2fs /dev/nandb
resize2fs 1.42.5 (29-Jul-2012)
Filesystem at /dev/nandb is mounted on /; on-line resizing required
old_desc_blocks = 1, new_desc_blocks = 1
The filesystem on /dev/nandb is now 3870720 blocks long.

原本 /root 分割區的大小
$ df -h
Filesystem      Size  Used Avail Use% Mounted on
/dev/root       2.0G 1020M  894M  54% /
devtmpfs        889M  4.0K  889M   1% /dev
tmpfs            20M  224K   20M   2% /tmp
none            197M  220K  197M   1% /run
none            5.0M     0  5.0M   0% /run/lock
none            985M  132K  985M   1% /run/shm
none            100M   12K  100M   1% /run/user

擴展 /root 分割區後的大小
$ df -h
Filesystem      Size  Used Avail Use% Mounted on
/dev/root        15G 1021M   13G   8% /
devtmpfs        889M  4.0K  889M   1% /dev
tmpfs            20M  4.0K   20M   1% /tmp
none            197M  212K  197M   1% /run
none            5.0M     0  5.0M   0% /run/lock
none            985M     0  985M   0% /run/shm
none            100M   12K  100M   1% /run/user

Cubie Truck 測試 – 解決無法 ssh 連線的問題

亂玩了一下子,Lubuntu 系統被玩掛了,所以又重新使用 PhoenixSuit 燒錄系統到 Nand Flash。
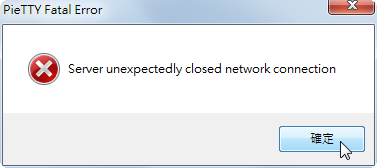
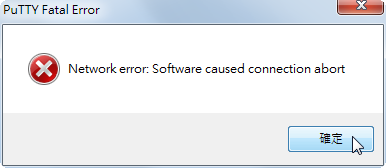
系統開機後,發現竟然無法 ssh 連線
Pietty 錯誤訊息

Putty 錯誤訊息
[@more@]ssh 連線出現的錯誤訊息
# ssh linaro@192.168.1.110
Read from socket failed: Connection reset by peer

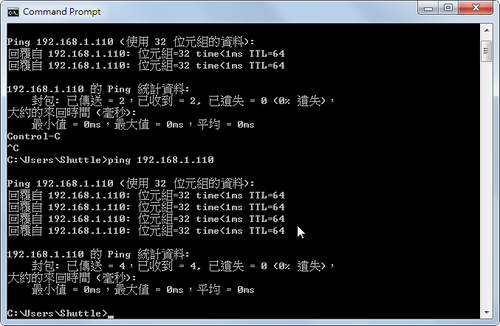
但系統 Ping 的到

ssh 服務有開放
# netstat -ant | grep :22 | grep LISTEN
tcp        0      0 0.0.0.0:22              0.0.0.0:*               LISTEN
tcp6       0      0 :::22                   :::*                    LISTEN

iptables 防火牆也沒有阻擋
# iptables -L -n
Chain INPUT (policy ACCEPT)
target     prot opt source               destination

Chain FORWARD (policy ACCEPT)
target     prot opt source               destination

Chain OUTPUT (policy ACCEPT)
target     prot opt source               destination

後來檢查 ssh server 的設定檔目錄
# cd /etc/ssh
# ls -latr
total 156
-rw-r–r–  1 root root   1669 Sep  6  2012 ssh_config
-rw-r–r–  1 root root 136156 Sep  6  2012 moduli
-rw-r–r–  1 root root      0 Oct  8 13:40 sshd_config
-rw-r–r–  1 root root      0 Oct  8 13:40 ssh_host_rsa_key.pub
-rw——-  1 root root      0 Oct  8 13:40 ssh_host_rsa_key
-rw-r–r–  1 root root      0 Oct  8 13:40 ssh_host_dsa_key.pub
-rw——-  1 root root      0 Oct  8 13:40 ssh_host_dsa_key
-rw-r–r–  1 root root      0 Oct  8 13:40 ssh_host_ecdsa_key.pub
-rw——-  1 root root      0 Oct  8 13:40 ssh_host_ecdsa_key
-rw——-  1 root root    980 Oct  8 13:42 ssh_host_key
drwxr-xr-x  2 root root   4096 Oct  8 13:42 .
-rw-r–r–  1 root root    645 Oct  8 13:42 ssh_host_key.pub
drwxrwxr-x 97 root root   4096 Oct  8 13:51 ..

發現 ssh_host_* key 的檔案大小都是 0

建立 ssh_host_key
# ssh-keygen -t rsa -f /etc/ssh/ssh_host_rsa_key
Generating public/private rsa key pair.
/etc/ssh/ssh_host_rsa_key already exists.
Overwrite (y/n)? y
Enter passphrase (empty for no passphrase):
Enter same passphrase again:
Your identification has been saved in /etc/ssh/ssh_host_rsa_key.
Your public key has been saved in /etc/ssh/ssh_host_rsa_key.pub.
The key fingerprint is:
8c:0a:32:2a:1b:02:6f:70:a1:2e:44:50:ee:35:f3:de root@cubietruck
The key’s randomart image is:
+–[ RSA 2048]—-+
|…              |
|..               |
| .o +            |
|.o o + o         |
|*.+   o S        |
|=* . o .         |
|*.o . . E        |
|++               |
|.                |
+—————–+
# ssh-keygen -t dsa -f /etc/ssh/ssh_host_dsa_key
Generating public/private dsa key pair.
/etc/ssh/ssh_host_dsa_key already exists.
Overwrite (y/n)? y
Enter passphrase (empty for no passphrase):
Enter same passphrase again:
Your identification has been saved in /etc/ssh/ssh_host_dsa_key.
Your public key has been saved in /etc/ssh/ssh_host_dsa_key.pub.
The key fingerprint is:
2f:36:fc:7c:5b:d4:d9:33:f4:2a:e6:fb:9b:5f:8c:81 root@cubietruck
The key’s randomart image is:
+–[ DSA 1024]—-+
|                 |
|                 |
|               . |
|             …+|
|        S   E o++|
|       . .   . =o|
|        = . o + o|
|       . = o.o ..|
|          o.+++o.|
+—————–+

建立完成後,就可以正常連線了!
# ssh linaro@192.168.1.110
The authenticity of host ‘192.168.1.110 (192.168.1.110)’ can’t be established.
RSA key fingerprint is 8c:0a:32:2a:1b:02:6f:70:a1:2e:44:50:ee:35:f3:de.
Are you sure you want to continue connecting (yes/no)? yes

Cubie Truck 測試 – 從 SATA 硬碟上的 root 分割區來開機

參考網頁:
tutorials:ct1:installation:moving_rootfs_from_nandflash_to_hard_drive [Cubieboard Docs]

查看一下 SATA 硬碟的硬碟分割表資訊
# fdisk -l /dev/sda

格式化硬碟為 ext4 格式
# mkfs.ext4 /dev/sda1

使用 dd 指令,將 /dev/nandb 複製到 /dev/sda1
# dd if=/dev/nandb of=/dev/sda1 bs=1M
2048+0 records in
2048+0 records out
2147483648 bytes (2.1 GB) copied, 205.5 s, 10.5 MB/s

掛載 /dev/nanda 開機分割區
# mount /dev/nanda /mnt

修改開機參數,從 SATA 硬碟上的 root 分割區來開機
# sed -i ‘s|nand_root=/dev/nandb|nand_root=/dev/sda1|’ /mnt/uEnv.txt

 取消掛載
# umount /mnt

重新啟動電腦
# reboot

Cubie Truck 測試 – Lubuntu 外接 SATA 硬碟

外接 SATA 硬碟的方式
[@more@]

安裝 ntfs-3g 程式
$ sudo apt-get install ntfs-3g

查看一下 SATA 硬碟掛載資訊
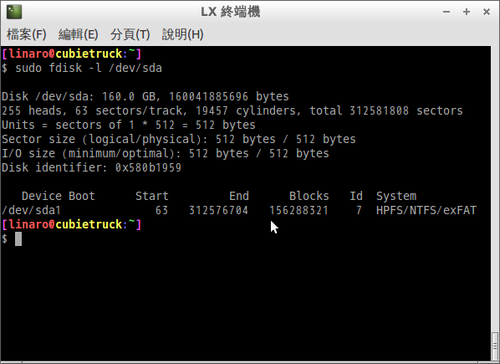
$  sudo fdisk -l /dev/sda 

建立掛載的目錄及掛載
$ sudo mkdir /mnt/sda1
$ sudo mount -t ntfs /dev/sda1 /mnt/sda1

因為一般使用者似乎不能正常讀寫,所以我切換到 root 身份
$ su –
# cd /mnt/sda1
# mkdir 新增資料夾

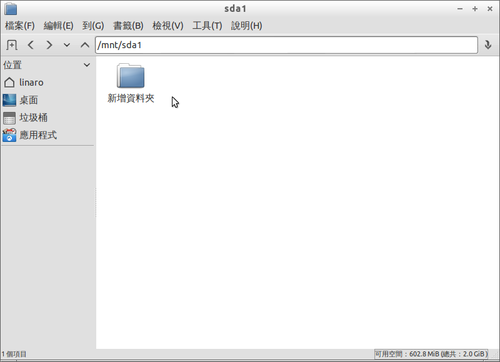
檔案管理程式可以看到建立的資料夾

刪除資料夾
# rm -rf 新增資料夾

在檔案管理程式中,可以看到資料夾已經刪除了!

Cubie Truck 測試 – Lubuntu Desktop 中文化及設定

Cubie Truck Lubuntu Desktop 中文化的步驟和 Banana Pi 的步驟都是一樣的。
介面是英文的
[@more@]
安裝文泉驛中文字形
$ sudo apt-get install ttf-wqy-microhei ttf-wqy-zenhei xfonts-wqy

設定中文環境
$ sudo locale-gen zh_TW.UTF-8
$ sudo update-locale LANG=zh_TW.UTF-8
$ sudo update-locale LANGUAGE=zh_TW.UTF-8
$ cp /etc/default/locale $HOME/.pam_environment

修正時區
$ date
Tue Oct  7 14:29:31 UTC 2014
執行時區設定
$ sudo dpkg-reconfigure tzdata
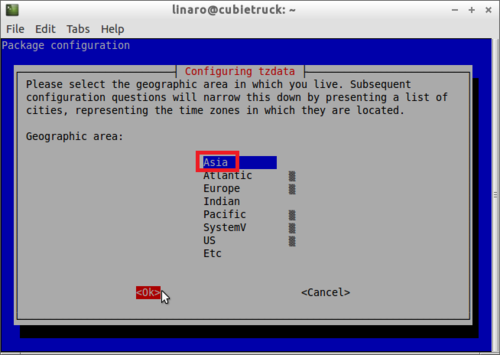
選擇 Asia

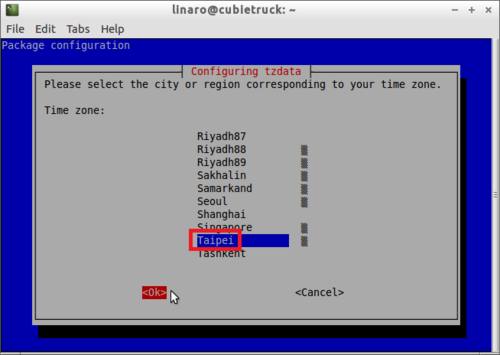
選擇 Taipei

$ date
Tue Oct  7 22:31:25 CST 2014

安裝中文輸入法架構 gcin
$ sudo apt-get install gcin

gcin 的一些設定
$ cd /etc/X11/xinit/xinput.d/
$ ls -l
lrwxrwxrwx 1 root root  32 Oct  7 22:32 all_ALL -> /etc/alternatives/xinput-all_ALL
-rw-r–r– 1 root root 185 Apr  7  2012 gcin
lrwxrwxrwx 1 root root  30 Oct  7 22:32 ja_JP -> /etc/alternatives/xinput-ja_JP
lrwxrwxrwx 1 root root  30 Oct  7 22:32 zh_CN -> /etc/alternatives/xinput-zh_CN
lrwxrwxrwx 1 root root  30 Oct  7 22:32 zh_TW -> /etc/alternatives/xinput-zh_TW

$ cat /etc/alternatives/xinput-zh_TW
XIM=gcin
XIM_PROGRAM=/usr/bin/gcin
XIM_ARGS=
GTK_IM_MODULE=gcin
if [ -e /usr/lib/qt4/plugins/inputmethods/im-gcin.so ]; then
    QT_IM_MODULE=gcin
else
    QT_IM_MODULE=xim
fi
DEPENDS=

安裝 Firefox 及 Chromium 中文語系
$ sudo apt-get install firefox firefox-locale-zh-hant chromium-browser-l10n

重新啟動系統後,就中文了!

個人感覺,Cubie Truck  Lubuntu Desktop 中文顯示部分看起來很舒服,是我用過這幾個板子中(Raspberry Pi / Banana Pi),預設不用調整看起來就覺得很不錯的,只是它的系統版本實在是有些舊 Ubuntu 12.10。

另外還有一個問題是,Cubie Truck 不像 Banana Pi 一樣,系統關機之後,電源似乎不會自動關掉,板子上還是會閃著燈。