Linux 下 7z 的使用方式

CentOS 7.x 安裝
# yum install epel-release
# yum update
# yum install p7zip

Arch Linux 安裝
# pacman -S p7zip

Ubuntu / Debian
# apt-get install p7zip-full 

# apt-get install p7zip[@more@]CentOS 可用指令 7za
Arch Linux / Debian / Ubuntu 可用指令 7z / 7za

常用參數
壓縮
# 7z a 壓縮檔名.7z 要壓縮的檔案或目錄1 要壓縮的檔案或目錄2

解壓縮
# 7z x 壓縮檔名.7z

# 7z e 壓縮檔名.7z

xe 差別,如果建立壓縮檔時有包含目錄,則 x 會依照原本壓縮時的樣子來還原,e 會建立原來的空目錄名稱,並把檔案解開在目錄名稱的外面
原則上會建議使用 x

列出壓縮檔的內容
# 7z l 壓縮檔名.7z

解壓縮時指定目錄
# 7z x 壓縮檔名.7z -o目錄位置
# 7z x 123.7z -o/tmp

更多的參數
# 7z –help

<Commands>
  a : Add files to archive
  b : Benchmark
  d : Delete files from archive
  e : Extract files from archive (without using directory names)
  h : Calculate hash values for files
  i : Show information about supported formats
  l : List contents of archive
  rn : Rename files in archive
  t : Test integrity of archive
  u : Update files to archive
  x : eXtract files with full paths

sed 備忘

參考網頁:
[轉貼] SED單行腳本快速參考 @ 胖虎的祕密基地 :: 痞客邦 PIXNET ::
sed 工具
阿旺的 Linux 開竅手冊
sed, a stream editor Examples
Sed – An Introduction and Tutorial

1. 刪除空白行
# sed -i ‘/^$/d’ testfile
# sed -i ‘/./!d’ testfile

2. 刪除第一行空行後的所有內容
# sed -i ‘/^$/q’ testfile

3. 刪除第一行空行之前的所有內容
# sed -i ‘1,/^$/d’ testfile[@more@]4. 刪除含 pattern 的行
# sed -i ‘/pattern/d’ testfile

# cat /tmp/testfile
1
2
3
4
5
# sed -i ‘/2/’,’/4/d’ /tmp/testfile
# cat /tmp/testfile
1
5

5. 刪除文件中開頭的10行
# sed -i ‘1,10d’ testfile

6. 刪除文件中的最後一行
# sed -i ‘$d’ testfile

7. 顯示 8~12 行
# sed -n ‘8,12p’ testfile

8. 只顯示符合 pattern 的行
# sed -n ‘/pattern/p’ testfile
# sed ‘/pattern/!d’ testfile
# grep pattern testfile

9. 不顯示符合 pattern 的行
# sed -n ‘/pattern/!p’ testfile
# sed ‘/pattern/d’ testfile
# grep -v pattern testfile

10. 一次全部更換多個符合的 pattern
# sed -i ‘s/mysql/red/g;s/php/black/g’ testfile

11. 在每一行前面插入 5 個空白
# sed -i ‘s/^/ /’ testfile

12. 更換指定行(n)符合的字串
# sed -i ‘ns/php/red/’ testfile

13. 在指定行之前插入
# sed -i ‘2i 1234567890’ testfile

14. 在指定行之後插入
# sed -i ‘2a 1234567890’ testfile

15. 在最後一行插入
# sed -i ‘$a 1234567890’ testfile

16. 字串取代
# sed -i ‘s/^(anonymous_enable=).*$/1”NO/’ /etc/vsftpd/vsftpd.conf
# sed -i ‘s/^(SELINUX=).*$/1”disabled/’ /etc/selinux/config

17. 字串取代
# sed -i ‘/foo/ s//bar/g’ testfile

18. 字串取代 指定行範圍
# sed -i ‘34,38 s/ACCEPT/DROP/’ /etc/ufw/before.rules

19. 取出 IP
# ifconfig eth0
inet addr:192.168.1.12 Bcast:192.168.1.255 Mask:255.255.255.0
# ifconfig eth0 | grep ‘inet ‘ | sed ‘s/^.*inet addr://g’ | sed ‘s/ *Bcast.*$//g’
192.168.1.12

20. 多個指令
# sed -i ‘s/123/234/; s/四忠/四義/’ list

21. 將編輯命令放在檔案之中
# cat sedscr
s/123/234/
s/四忠/四義/
# sed -i -f sedscr list

22. 刪除找到 %post 後的所有行數
# sed -i ‘/%post/ ,$d’ /tmp/anaconda-ks.cfg

23. 找到字串的後面插入一行
#PIDFILE 後面插入一行
# sed -i ‘/#PIDFILE/ a PIDFILE=/var/chroot/bind9/var/run/named/named.pid’ /etc/init.d/bind9

24. 多重取代
# sed -i -e ‘s/123/234/’ -e ‘s/四忠/四義/’ list

25. 刪除最後幾個字元
# sed -i ‘s/…$//’ testfile

26. 在每一行後面插入一行空白行
# sed -i G testfile

27. 在最後一個欄位插入字串
# sed -i ‘s/$/@smail.ilc.edu.tw/’ class3

crontab 工作排程的寫法

普通的用法
分 時 日 月 星期幾 命令
如:
# 每天早上 03:30 備份資料到 NAS
30 3 * * * /usr/local/bin/backuptonas > /dev/null 2>&1
# 每 5 分鐘檢查一次 Squid Proxy Server 的狀態
*/5 * * * * /usr/local/bin/check_squid > /dev/null 2>&1

另外一些比較特別的用法,參考:實用 crontab 寫法 | Linux 技術手札
@reboot: 在每次開機時執行。
@yearly: 等同 0 0 1 1 * 寫法,即每年一月一日零時零分。
@annually: 與 @yearly 相同。
@monthly: 在每月一號零時零分執行。
@weekly: 在星期天零時零分執行。 Run once a week, “0 0 * * 0″.
@daily: 每天零時零分。
@midnight: 與 @daily 相同。
@hourly: 每小時零分執行。

解決 Arch Linux 更新時出現的錯誤訊息

在 Arch Linux 更新套件時出現下面的錯誤訊息
# pacman -Syu
:: Synchronizing package databases…
 core is up to date
 extra is up to date
 community is up to date
 alarm is up to date
 aur is up to date
:: Starting full system upgrade…
error: duplicated database entry ‘pacman-mirrorlist’[@more@]解決方式:
1. 檢查 /var/lib/pacman/local 目錄下是否有重複
# ls /var/lib/pacman/local | grep pacman-mirrorlist
pacman-mirrorlist-20151217-1
pacman-mirrorlist-20151228-1

2. 移除掉舊的重複
# rm -rf  /var/lib/pacman/local/pacman-mirrorlist-20151217-1

更換 Arch Linux 套件庫更新來源

最近做 Arch Linux 套件庫更新時,出現下面的錯誤訊息
# pacman -Syy
:: Synchronizing package databases…
error: failed retrieving file ‘core.db’ from tw.mirror.archlinuxarm.org : Connection timed out after 10000 milliseconds
error: failed to update core (download library error)
error: failed retrieving file ‘extra.db’ from tw.mirror.archlinuxarm.org : Connection timed out after 10000 milliseconds
error: failed to update extra (download library error)
error: failed retrieving file ‘community.db’ from tw.mirror.archlinuxarm.org : Connection timed out after 10000 milliseconds
error: failed to update community (download library error)
error: failed retrieving file ‘alarm.db’ from tw.mirror.archlinuxarm.org : Connection timed out after 10000 milliseconds
error: failed to update alarm (download library error)
error: failed retrieving file ‘aur.db’ from tw.mirror.archlinuxarm.org : Connection timed out after 10000 milliseconds
error: failed to update aur (download library error)
error: failed to synchronize any databases
error: failed to init transaction (download library error)[@more@]使用 lftp 連線測試
# lftp tw.mirror.archlinuxarm.org
lftp tw.mirror.archlinuxarm.org:~> ls
`ls’ at 0 [Connecting…]

直接改套件庫來源
# sed -i ‘s/^Server/#Server/’ /etc/pacman.d/mirrorlist
# sed -i ‘7s/# Server/Server/g’ /etc/pacman.d/mirrorlist

可以正常更新了!
# pacman -Syy
:: Synchronizing package databases…
 core                                                                            208.2 KiB   130K/s 00:02 [##############################################################] 100%
 extra                                                                             2.4 MiB   122K/s 00:20 [##############################################################] 100%
 community                                                                         3.1 MiB  88.8K/s 00:36 [##############################################################] 100%
 alarm                                                                           103.9 KiB  65.4K/s 00:02 [##############################################################] 100%
 aur                                                                              32.0 KiB  99.9K/s 00:00 [##############################################################] 100%

備份 Server 資料到 NAS – Arch Linux Server 篇

NAS Server:192.168.1.5
Arch Linux Server:192.168.1.12

@ Arch Linux Server
1. 安裝 autofs 套件
# pacman -S autofs

2. 修改設定檔 /etc/autofs/auto.master
# vim /etc/autofs/auto.master
在最後一行加入
/mnt/nasnfs     /etc/autofs/auto.nfs

3. 新增 /etc/autofs/auto.nfs 設定檔
# vim /etc/autofs/auto.nfs
nds  -rw,soft,intr,rsize=8192,wsize=8192,nfsvers=4 192.168.1.5:/volume1/homes/t850008/Server/nds
[@more@]
4. 設定開機時啟動 autofs 服務
# systemctl enable autofs
Created symlink from /etc/systemd/system/multi-user.target.wants/autofs.service to /usr/lib/systemd/system/autofs.service.

5. 啟動 autofs 服務
# systemctl start autofs

6. 安裝 rpcbind nfs-utils 套件
# pacman -S rpcbind nfs-utils

7. 開機時啟動 rpcbind 服務
# systemctl enable rpcbind
Created symlink from /etc/systemd/system/sockets.target.wants/rpcbind.socket to /usr/lib/systemd/system/rpcbind.socket.

8. 啟動 rpcbind 服務
# systemctl start rpcbind

9. 開啟防火牆讓 Arch Linux Server 可以連線到 NAS 的 NFS Server,預設情況是有限制對外連線
# iptables -P OUTPUT DROP
# iptables -A OUTPUT -o eth0 -p tcp -d 192.168.1.5 -m multiport –dport 111,892,2049 –syn -m state –state NEW -j ACCEPT
# iptables -A OUTPUT -m state –state ESTABLISHED,RELATED -j ACCEPT

10. 切換到 /mnt/nasnfs/nds 目錄,如果可以正常切換到該目錄,代表上面的設定成功
# cd /mnt/nasnfs/nds

11. 將要備份的設定檔及資料寫入到 Script,並放入工作排程
例:
# cat /usr/local/bin/backuptonas
!/bin/bash
# 備份帳號密檔
cp /etc/passwd /mnt/nasnfs/nds/set/passwd_`date +%F`
cp /etc/shadow /mnt/nasnfs/nds/set/shadow_`date +%F`
cp /etc/group /mnt/nasnfs/nds/set/group_`date +%F`
cp /etc/gshadow /mnt/nasnfs/nds/set/gshadow_`date +%F`
# mirror 網頁資料
# /mnt/nasnfs/nds/html 目錄要先建好
/usr/bin/mirrordir /var/www/html /mnt/nasnfs/nds/html

12. 更改檔案屬性
# chmod +x /usr/local/bin/backuptonas

13. 加入工作排程,每天早上 3 時備份
# echo “0 3 * * * /usr/local/bin/backuptonas” >> /var/spool/cron/root

在 Linux 中使用 screen 指令工具

screen 指令工具是一個非常方便的工具程式,有時工作到一半時,因為有事情要離開或是下班,但因為目前套件的安裝或編譯還未完成,如果中斷了,可能要重新再來一次,或是可能還會造成一些嚴重的後果,這時候如果可以把工作放在背景視窗,繼續工作,然後有空的話,再接續回來。
screen 指令工具就有這樣的功能,利用分離(Detach)功能,可以將視窗內的程序放入背景,即使登出主機切斷連線,只要該主機一直維持運作,分離的視窗就會持續地保留在背景。

安裝方式:
CentOS Linux
# yum install screen

Debian/Ubuntu Linux
$ sudo apt-get install screen

Arch Linux
# pacman -S screen

Gentoo Linux
# emerge screen[@more@]Screen 的功能非常強大,這裡只針對 分離(Detach) 來做說明
1. 登入主機後執行 screen 指令,執行之後畫面不會有任何變化
# screen

2. 退出的方式
# exit

3. 畫面會出現 [screen is terminating],表示已經退出 screen

4. 使用分離(Detach) 功能,執行 screen 後

執行要放入背景的工作,並按 CTRL+A 之後,再按 D
# /usr/bin/emerge -u world

工作會放到背景,畫面上會出現 [detached]

5. 執行 screen -ls 列出放在背景的視窗
# screen -ls
There is a screen on:
        31862.pts-0.share       (Detached)
1 Socket in /root/.screen.

6. 取出
# screen -r
# screen -r 31862.pts-0.share
因為目前只有一個工作,所以只要直接使用 -r 即可,如果有很多個,就要加上編號

7. 就取回原來的工作了!

Linux – 找出佔用磁碟空間最大的目錄/檔案

在 Linux 中 du / find  的功能非常強大,尤其是搭配 sort / head 指令後,可以快速尋找出所需的目錄/檔案及佔用磁碟空間最大的目錄/檔案。
找出 /home 目錄中佔用磁碟空間最大的目錄
# du -hsx /home/* | sort -hr | head
15G     /home/share
13G     /home/s0990
12G     /home/www
6.3G    /home/t850008
6.2G    /home/s0970
5.6G    /home/s0980
4.4G    /home/s0960
3.8G    /home/s0100
3.8G    /home/homework
1.5G    /home/s0950

找出佔用磁碟空間最大的學生前三名
# du -hsx /home/s0990/* /home/s0980/* | sort -hr | head -n 3
340M    /home/s0980/s0980055
281M    /home/s0990/s0990145
281M    /home/s0990/s0990136[@more@]找出前 10 大的檔案
# find /home -type f -printf ‘%s %pn’ | sort -nr | head
4670320640 /home/www/course_3-6.iso
2519356635 /home/share/PhotoCap/PCMaterial_V5_MultiFrame.exe
1785901819 /home/share/PhotoCap/PCMaterial_V6_MultiFrame.exe
1593472746 /home/53.tar.bz2
1552238558 /home/share/38/38.html.tar.bz2
1513110984 /home/www/all_g3_big5.zip
1513110912 /home/www/all_g3.zip
1507640047 /home/drbl.tar.bz2
1258466165 /home/share/PhotoCap/PCMaterial_V5_Frame.exe
1131084431 /home/share/PhotoCap/PCMaterial_V6_Frame.exe

找出前 10 大的 exe 檔案
# find /home -type f -iname ‘*.exe’ -printf ‘%s %pn’ | sort -hr | head
2519356635 /home/share/PhotoCap/PCMaterial_V5_MultiFrame.exe
1785901819 /home/share/PhotoCap/PCMaterial_V6_MultiFrame.exe
1258466165 /home/share/PhotoCap/PCMaterial_V5_Frame.exe
1131084431 /home/share/PhotoCap/PCMaterial_V6_Frame.exe
663175919 /home/share/PhotoCap/PCMaterial_V100.exe
459156905 /home/share/PhotoCap/PCMaterial_V4_Frame.exe
439657482 /home/share/PhotoCap/PCMaterial_V4_MultiFrame1.exe
431579494 /home/share/PhotoCap/PCMaterial_V300.exe
408804542 /home/share/PhotoCap/PCMaterial_V200.exe
401967094 /home/share/PhotoCap/PCMaterial_V4_MultiFrame2.exe

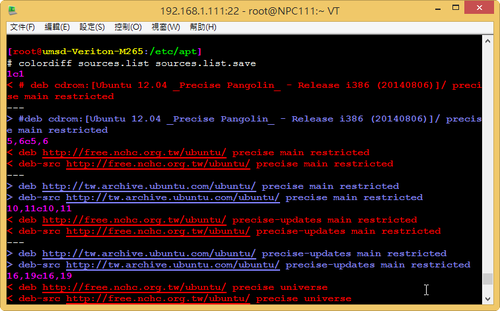
colordiff 讓 diff 比對檔案時加上顏色區別

diff 是一個用來比對檔案的指令
# diff sources.list sources.list.save

結果有些難以閱讀[@more@]使用 colordiff
# colordiff sources.list sources.list.save

用顏色來區別,看起來就會好一些

安裝方式:
CentOS 6.x/7.x
# yum install colordiff –enablerepo=epel

Debian / Ubuntu
$ sudo apt-get install colordiff

Arch Linux
# pacman -S colordiff

Gentoo Linux
# emerge colordiff

Arch Linux 套件資訊

本篇文章參考:簡約概念只預裝必要套件 Arch Linux桌面環境設置 – 技術專欄 – 網管人NetAdmin

使用 -Qo 來查詢檔案所屬的套件
# pacman -Qo /etc/vimrc
/etc/vimrc is owned by vim-runtime 7.4.663-2

這些查詢的資訊來取自 /var/lib/pacman 目錄裡,目錄下有二個子目錄
子目錄 sync – 記錄了套件的資料庫
# ls -l /var/lib/pacman/sync
-rw-r–r– 1 root root   97070 Apr  7 09:37 alarm.db
-rw-r–r– 1 root root   64989 Apr  6 05:00 aur.db
-rw-r–r– 1 root root 2774851 Apr  9 22:54 community.db
-rw-r–r– 1 root root  222315 Apr  8 13:46 core.db
-rw-r–r– 1 root root 2384203 Apr 10 01:25 extra.db[@more@]套件資料庫(Reoisutory) 主要有三個
core.db – 核心套件資料庫,包含了啟動程式、檔案系統管理工具、重要的系統程式等等。
extra.db – 附加套件資料庫,包含了在核心套件資料庫之外相關常用的應用程式,如圖形介面 X-Window 等等。
community.db – 社群資料庫,包含了 Arch 使用者套件資料庫(Arch User Repository)挑選來的軟體。

可以使用 pacman -Sy 來進行套件庫的更新

子目錄 local – 記載套件的資訊,是由各套件名稱版本號碼名字組成的目錄
# ls -ld local/vim-*
drwxr-xr-x 2 root root 4096 Mar 29 23:51 local/vim-7.4.663-2
drwxr-xr-x 2 root root 4096 Mar 29 23:51 local/vim-runtime-7.4.663-2
以 vim 為例
# ls -l local/vim-7.4.663-2/
-rw-r–r– 1 root root  500 Mar 29 23:51 desc
-rw-r–r– 1 root root 3768 Mar 29 23:51 files
-rw-r–r– 1 root root 4525 Mar 29 00:37 mtree

desc 套件的資訊
files 套件安裝到系統的檔案
install 安裝前後所需執行的 shell 程式
mtree 是用 gzip 壓縮過的檔案,包含安裝檔案的驗證資料