試用 Banana Pi R1 – Ubuntu minimal 16.04 上安裝 OpenVPN

參考網站:
How To Set Up an OpenVPN Server on Ubuntu 16.04 | DigitalOcean

1. 安裝 OpenVPN
# apt-get install openvpn easy-rsa

2. 建立 Certificate Authority
# mkdir -p /etc/openvpn/easy-rsa/keys
# cp -r /usr/share/easy-rsa /etc/openvpn
# cd /etc/openvpn/easy-rsa
請情況修改 /etc/openvpn/easy-rsa/vars 中的變數
# vim /etc/openvpn/easy-rsa/vars
export KEY_COUNTRY=”TW

export KEY_PROVINCE=”Taiwan
export KEY_CITY=”Yilan
export KEY_ORG=”School
export KEY_EMAIL=”me@myhost.mydomain”
export KEY_OU=”MyOrganizationalUnit”

# X509 Subject Field
export KEY_NAME=”EasyRSA”[@more@]
# source ./vars
NOTE: If you run ./clean-all, I will be doing a rm -rf on /etc/openvpn/easy-rsa/keys
# ./clean-all
# ./build-ca

3. 產生 Server 憑證、金鑰及加密檔案
#  ./build-key-server server
Certificate is to be certified until Dec 21 10:24:53 2026 GMT (3650 days)
Sign the certificate? [y/n]:y

1 out of 1 certificate requests certified, commit? [y/n]y
Write out database with 1 new entries
Data Base Updated

時間會稍微比較久一些
# ./build-dh
# openvpn –genkey –secret keys/ta.key

4. 產生 Client Certificate 和 Key Pair
# source ./vars
NOTE: If you run ./clean-all, I will be doing a rm -rf on /etc/openvpn/easy-rsa/keys
# ./build-key client
Please enter the following ‘extra’ attributes
to be sent with your certificate request
A challenge password []:
An optional company name []:
Using configuration from /etc/openvpn/easy-rsa/openssl-1.0.0.cnf
Check that the request matches the signature
Signature ok

Certificate is to be certified until Dec 21 12:15:42 2026 GMT (3650 days)
Sign the certificate? [y/n]:y

1 out of 1 certificate requests certified, commit? [y/n]y
Write out database with 1 new entries
Data Base Updated

如果要建立需要密碼
# source ./vars
NOTE: If you run ./clean-all, I will be doing a rm -rf on /etc/openvpn/easy-rsa/keys
# ./build-pass client

5. 複製憑證金鑰到 /etc/openvpn/keys 目錄
# cd /etc/openvpn/easy-rsa/keys 
# mkdir /etc/openvpn/keys
# cp ca.crt ca.key server.crt server.key ta.key dh2048.pem /etc/openvpn/keys

6. 設定 OpenVPN
修改 /etc/openvpn/server.conf 設定檔
# gunzip -c /usr/share/doc/openvpn/examples/sample-config-files/server.conf.gz | tee /etc/openvpn/server.conf
# cp /etc/openvpn/server.conf /etc/openvpn/server.conf.$(date +%F)

修改設定
# sed -i ‘s/;tls-auth/tls-auth/’ /etc/openvpn/server.conf
# sed -i ‘/tls-auth/ akey-direction 0’ /etc/openvpn/server.conf
# sed -i ‘s/;cipher AES/cipher AES/’ /etc/openvpn/server.conf
# sed -i ‘/^cipher/ aauth SHA256’ /etc/openvpn/server.conf
OpenVPN 執行使用者及群組
# sed -i ‘s/^;user/user/’ /etc/openvpn/server.conf
# sed -i ‘s/^;group/group/’ /etc/openvpn/server.conf
VPN Client 的 Default Gatewa y以 VPN Gateway 為主
# sed -i ‘s/^;push “redirect/push “redirect/’ /etc/openvpn/server.conf
DNS  設定
# sed -i ‘s/^;push “dhcp-option DNS 208.67.222.222″/push “dhcp-option DNS 168.95.1.1″/’ /etc/openvpn/server.conf
# sed -i ‘s/^;push “dhcp-option DNS 208.67.220.220″/push “dhcp-option DNS 8.8.8.8″/’ /etc/openvpn/server.conf
將預設的 UDP 改為 TCP
# sed -i ‘s/^;proto tcp/proto tcp/’ /etc/openvpn/server.conf
# sed -i ‘s/^proto udp/;proto udp/’ /etc/openvpn/server.conf
更改 crt / key 的檔案位置
# sed -i ‘s|ca ca.crt|ca /etc/openvpn/keys/ca.crt|’ /etc/openvpn/server.conf
# sed -i ‘s|cert server.crt|cert /etc/openvpn/keys/server.crt|’ /etc/openvpn/server.conf
# sed -i ‘s|key server.key|key /etc/openvpn/keys/server.key|’ /etc/openvpn/server.conf
# sed -i ‘s|dh dh2048.pem|dh /etc/openvpn/keys/dh2048.pem|’ /etc/openvpn/server.conf
# sed -i ‘s|tls-auth ta.key 0|tls-auth /etc/openvpn/keys/ta.key 0|’ /etc/openvpn/server.conf
使用憑證認證時,允許所有的 Client 使用相同的 KEY 登入
# sed -i ‘s/^;duplicate-cn/duplicate-cn/’ /etc/openvpn/server.conf
允許 Client 間互接連接
# sed -i ‘s/^;client-to-client/client-to-client/’ /etc/openvpn/server.conf
更改 log 檔位置
# sed -i ‘s|status openvpn-status.log|status /var/log/openvpn/openvpn-status.log|’  /etc/openvpn/server.conf
# sed -i ‘s|;log         openvpn.log|log         /var/log/openvpn/openvpn.log|’ /etc/openvpn/server.conf
# sed -i ‘s|;log-append  openvpn.log|log-append  /var/log/openvpn/openvpn.log|’ /etc/openvpn/server.conf
此網段走 VPN Gateway
# sed -i ‘/^;push “route 192.168.10/ ipush “route 10.8.0.0 255.255.255.0″‘ /etc/openvpn/server.conf

For sed
# cat script-file
s/;tls-auth/tls-auth/
/tls-auth/ akey-direction 0
s/;cipher AES/cipher AES/
/^cipher/ aauth SHA256
s/^;user/user/
s/^;group/group/
s/^;push “redirect/push “redirect/
s/^;push “dhcp-option DNS 208.67.222.222″/push “dhcp-option DNS 168.95.1.1″/
s/^;push “dhcp-option DNS 208.67.220.220″/push “dhcp-option DNS 8.8.8.8″/
s/^;proto tcp/proto tcp/
s/^proto udp/;proto udp/
s|ca ca.crt|ca /etc/openvpn/keys/ca.crt|
s|cert server.crt|cert /etc/openvpn/keys/server.crt|
s|key server.key|key /etc/openvpn/keys/server.key|
s|dh dh2048.pem|dh /etc/openvpn/keys/dh2048.pem|
s|tls-auth ta.key 0|tls-auth /etc/openvpn/keys/ta.key 0|
s/^;duplicate-cn/duplicate-cn/
s/^;client-to-client/client-to-client/
s|status openvpn-status.log|status /var/log/openvpn/openvpn-status.log|
s|;log         openvpn.log|log         /var/log/openvpn/openvpn.log|
s|;log-append  openvpn.log|log-append  /var/log/openvpn/openvpn.log|
/^;push “route 192.168.10/ ipush “route 10.8.0.0 255.255.255.0”

# sed -i -f script-file /etc/openvpn/server.conf

建立存放 Log 的目錄
# mkdir /var/log/openvpn

7.設定網路 Forward
# sed -i ‘s/#net.ipv4.ip_forward=1/net.ipv4.ip_forward=1/’ /etc/sysctl.conf
# sysctl -p

8. 防火牆設定 iptables
# iptables -t nat -A POSTROUTING -s 10.8.0.0/24 -o eth0 -j MASQUERADE
# iptables -A FORWARD -i tun0 -j ACCEPT 
# iptables -A FORWARD -o tun0 -j ACCEPT

9. 設定開機時啟動 OpenVPN 服務
# systemctl enable openvpn@server.service
Created symlink from /etc/systemd/system/multi-user.target.wants/openvpn@server.service to /lib/systemd/system/openvpn@.service.

10. 啟動並檢查是否有正常啟動
# systemctl start openvpn@server.service
# systemctl status openvpn@server.service | head -3
● openvpn@server.service – OpenVPN connection to server
   Loaded: loaded (/lib/systemd/system/openvpn@.service; enabled; vendor preset: enabled)
   Active: active (running) since 五 2016-12-23 21:35:43 CST; 15h ago

# netstat -antpl | grep :1194
tcp        0      0 0.0.0.0:1194            0.0.0.0:*               LISTEN      3146/openvpn

試用 Banana Pi M3 – DietPi 取消每次登入時都會自動執行 dietpi-software

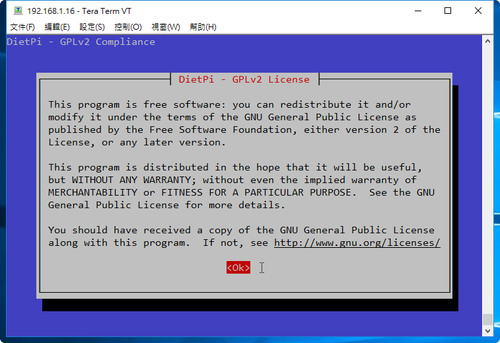
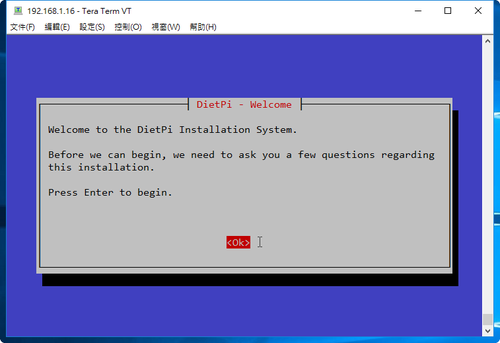
DietPi 在每次 root 登入時都會自動執行設定的畫面

實在有些煩人……[@more@]解決方式:
# sed -i ‘s|/DietPi|#/DietPi|’ /root/.bashrc

後來發現,只要有執行 dietpi-*,又會把下面這一行加回去 /root/.bashrc
/DietPi/dietpi/login

所以就乾脆在 /etc/rc.local 加入去除的這一行
# tail -2 /etc/rc.local
sed -i ‘s|^/DietPi|#/DietPi|’ /root/.bashrc
exit 0

試用 Banana Pi M3 – DietPi 簡單調整

1. 更改預設的 Locale 預設是 en_GB.UTF-8
# locale
LANG=en_GB.UTF-8
LANGUAGE=
LC_CTYPE=”en_GB.UTF-8″
LC_NUMERIC=”en_GB.UTF-8″
LC_TIME=”en_GB.UTF-8″
LC_COLLATE=”en_GB.UTF-8″
LC_MONETARY=”en_GB.UTF-8″
LC_MESSAGES=”en_GB.UTF-8″
LC_PAPER=”en_GB.UTF-8″
LC_NAME=”en_GB.UTF-8″
LC_ADDRESS=”en_GB.UTF-8″
LC_TELEPHONE=”en_GB.UTF-8″
LC_MEASUREMENT=”en_GB.UTF-8″
LC_IDENTIFICATION=”en_GB.UTF-8″
LC_ALL=

# cat /etc/default/locale
#  File generated by update-locale
LC_MESSAGES=POSIX
LANG=en_GB.UTF-8
LANGUAGE=en_GB.UTF-8[@more@]執行 dpkg-reconfigure locales 進行設定
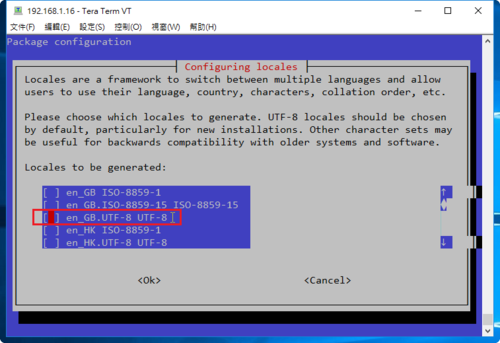
# dpkg-reconfigure locales
Generating locales (this might take a while)…
  en_US.UTF-8… done
Generation complete.

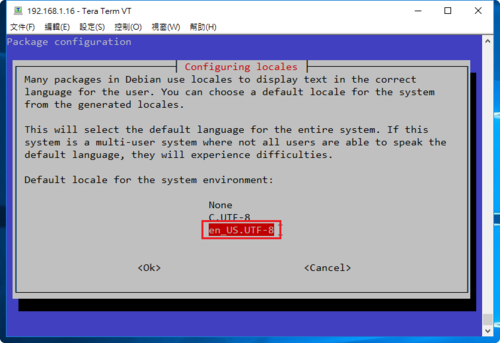
取消選擇 en_GB.UTF-8

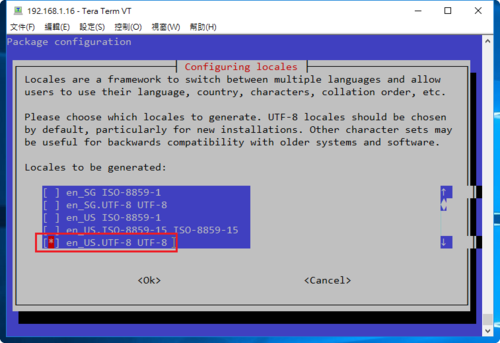
加選 en_US.UTF-8

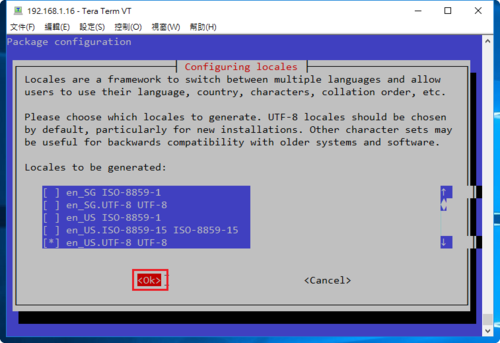
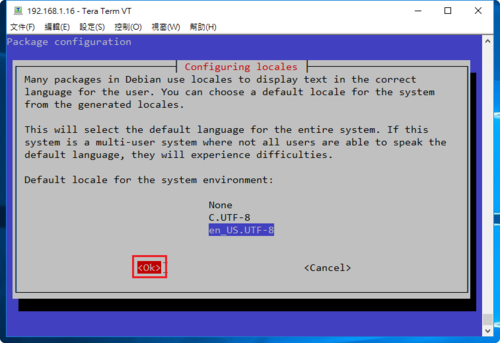
選擇 OK 繼續

選擇 en_US.UTF-8 為預設的 Locales

選擇 OK 完成設定

後記:
後來發現改用 en_US.UTF-8 後,有些設定畫面就會不太正常,所以後來又改回 en_GB.UTF-8

2. 補安裝一些個人覺得缺少的套件
# apt-get install openssh-client cifs-utils screen dnsutils mlocate

試用 Banana Pi M3 – DietPi


官網下載:DietPi
DietPi 官方網站:http://dietpi.com/

預設登入的帳號及密碼:root / dietpi

剛看到 DietPi 這個名字時,感到有些陌生,不知道是什麼東西,在網路上搜尋了一下,發現它是一套針對單板電腦(Single-Board Computer)所優化的 Debian Linux,其實和 Banana Pi 或是 Raspberry Pi 上使用的 Raspbian Linux 類似,只不過它提供更多或更方便的工具。[@more@]登入後畫面

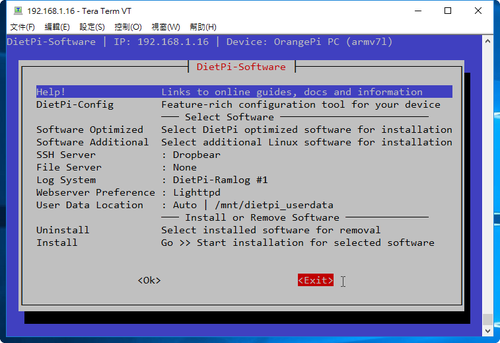
退出功能表畫面,要再重新執行,可以執行 dietpi-software 即可!

Raspberry Pi • View topic – Raspbian Jessie Lite now available 可以找到 DietPi 和 Raspbian Lite 的比較

從這張表之中,我們可以發現:
1. DietPi 在 SSH Server 是採用 Dropbear,也可以選擇原來的 OpenSSH
2. DietPi 可以自動擴展 /root 分割區
3. DietPi 使用 dietpi-software 管理套件,也可以用原來的 apt-get
4. DietPi 設定系統、網路、CPU 調校,可以使用 dietpi-config
5. 其它….

可以參考的資料:
簡單入門
更多應用

試用 Banana Pi M3 – Ubuntu 16.04 LXDE

一個版本是由洪博士所製作的版本,簡單的試用了一下。
桌面環境

[@more@]影音

系統工具

網際網路

美工繪圖

辦公

附屬應用程式

偏好設定

我個人修改的部分:
1. 刪除 fcitx 輸入法,因為行列輸入法有些問題
$ sudo apt-get remove –purge $(dapkg -l | grep fcitx | awk ‘{print $2}’)
2. 改用 gcin
$ sudo apt-get install gcin
3. 加裝以下套件
$ sudo apt-get install vim gpicview mtpaint
4. 備份系統時使用
$ sudo apt-get install cifs-utils sshfs curlftpfs

這一個版本的優點:
1. 執行速度快
2. 系統乾淨、整潔,需要什麼自己安裝

缺點:
1. 比較不適合不熟悉 Linux 的人

試用 Banana Pi M3 – Ubuntu minimal 16.04 讓終端機介面可以輸入及顯示中文

預設的設定無法輸入及顯示中文
原本的設定
# cat /etc/default/locale
#  File generated by update-locale
LANG=”C”
LC_ALL=”C”

# locale
LANG=C
LANGUAGE=
LC_CTYPE=”C”
LC_NUMERIC=”C”
LC_TIME=”C”
LC_COLLATE=”C”
LC_MONETARY=”C”
LC_MESSAGES=”C”
LC_PAPER=”C”
LC_NAME=”C”
LC_ADDRESS=”C”
LC_TELEPHONE=”C”
LC_MEASUREMENT=”C”
LC_IDENTIFICATION=”C”
LC_ALL=C
[@more@]
# cp /etc/default/locale /etc/default/locale.$(date +%F)
# locale-gen en_US.UTF-8
# update-locale LANG=en_US.UTF-8
# update-locale LANGUAGE=en_US.UTF-8

# cat /etc/default/locale
#  File generated by update-locale
LANG=en_US.UTF-8
LANGUAGE=en_US.UTF-8

# locale
LANG=en_US.UTF-8
LANGUAGE=en_US.UTF-8
LC_CTYPE=”en_US.UTF-8″
LC_NUMERIC=”en_US.UTF-8″
LC_TIME=”en_US.UTF-8″
LC_COLLATE=”en_US.UTF-8″
LC_MONETARY=”en_US.UTF-8″
LC_MESSAGES=”en_US.UTF-8″
LC_PAPER=”en_US.UTF-8″
LC_NAME=”en_US.UTF-8″
LC_ADDRESS=”en_US.UTF-8″
LC_TELEPHONE=”en_US.UTF-8″
LC_MEASUREMENT=”en_US.UTF-8″
LC_IDENTIFICATION=”en_US.UTF-8″
LC_ALL=

重新啟動讓設定生效!

試用 Banana Pi M3 – Ubuntu minimal 16.04


官網下載位置:請按 這裡
預設登入的帳號及密碼:pi or root / bananapi[@more@]1. 更改 pi & root 的密碼
$ sudo passwd root
# passwd pi

2. 先更新套件庫來源
# apt-get update

3. 安裝 OpenSSH 相關套件
# apt-get install openssh-server

4. 補安裝個人覺得缺少的套件
# apt-get install colordiff dnsutils iptables lftp nano screen unzip vim xz-utils zip mlocate ntpdate rsync

5. 系統更新
# apt-get upgrade

6. 時區設定
目前的設定
# date
Thu Dec 22 02:47:44 UTC 2016
更改方式
# export TZ=’Asia/Taipei’
加入到 /etc/profile 讓開機時生效
# echo “export TZ=’Asia/Taipei'” >> /etc/profile 
更改之後
# date
Thu Dec 22 10:52:55 CST 2016

試用 Banana Pi M3 – CentOS Linux 安裝 LAMP Server

1. 更新套件庫
# yum update

2. 安裝 LAMP 套件
# yum install httpd mariadb-server php php-gd php-mbstring php-mysql php-pdo php-pear php-soap php-xml php-xmlrpc

3. 設定開機時啟動
# systemctl enable httpd
Created symlink from /etc/systemd/system/multi-user.target.wants/httpd.service to /usr/lib/systemd/system/httpd.service.
# systemcrl enable mariadb
Created symlink from /etc/systemd/system/multi-user.target.wants/mariadb.service to /usr/lib/systemd/system/mariadb.service.[@more@]4. 防火牆設定
# /usr/bin/firewall-cmd –permanent –zone=public –add-service=http
# /usr/bin/firewall-cmd –reload

5. 啟動 Apache / MariaDB
# systemctl start httpd
# systemctl start mariadb

6. 瀏覽網頁 http://Server’IP

試用 Banana Pi M3 – CentOS Linux

燒錄了三次的 Image 才成功,有些辛苦。
預設登入的帳號及密碼:root / bananapi
登入後 root 目錄下有 README 檔案,是關於擴展 /root 分割區及無線網路相關的設定
# cat /root/README
== CentOS 7 userland ==

If you want to automatically resize your / partition, just type the following (as root user):
touch /.rootfs-repartition
systemctl reboot

For wifi on the rpi3, just proceed with those steps :

curl –location https://github.com/RPi-Distro/firmware-nonfree/raw/54bab3d6a6d43239c71d26464e6e10e5067ffea7/brcm80211/brcm/brcmfmac43430-sdio.bin > /usr/lib/firmware/brcm/brcmfmac43430-sdio.bin

curl –location https://github.com/RPi-Distro/firmware-nonfree/raw/54bab3d6a6d43239c71d26464e6e10e5067ffea7/brcm80211/brcm/brcmfmac43430-sdio.txt > /usr/lib/firmware/brcm/brcmfmac43430-sdio.txt

systemctl reboot

[@more@]修改套件庫來源
備份原檔
# cp /etc/yum.repos.d/CentOS-Base.repo /etc/yum.repos.d/CentOS-Base.repo.$(date +%F)

修改 CentOS-Base.repo
# sed -i ‘s|^baseurl=http://mirror.centos.org/altarch|baseurl=ftp://140.111.74.109/Linux/CentOS/altarch|’ /etc/yum.repos.d/CentOS-Base.repo

清除舊有及更新
# yum clean all;yum update

更新前
# cat /etc/redhat-release
Derived from Red Hat Enterprise Linux 7.2 (Source)

更新後
# cat /etc/redhat-release
CentOS Linux release 7.3.1611 (Core)

系統有些精簡,有些個人習慣使用的工具都沒有,底下特別補上
# yum install which unzip zip bind-utils vim nano mlocate screen lftp wget