ArchLinux 安裝 ownCloud 7.x

參考網頁:
ownCloud – ArchWiki
How To Install and Setup ownCloud on Arch Linux | DigitalOcean
EFSTATHIOS IOSIFIDIS: Install ownCloud on Raspberry Pi (Arch Linux) using Lighttpd
EFSTATHIOS IOSIFIDIS: Install ownCloud 7 on Raspberry Pi (Arch Linux) using Lighttpd
Arch Linux / OwnCloud with nginx | Ryad’s Blog

安裝 PHP 和 Nginx
# pacman -S nginx php php-fpm php-gd php-mcrypt php-intl[@more@]
修改 /etc/php/php.ini 設定檔
# sed -i ‘s/;extension=zip.so/extension=zip.so/’ /etc/php/php.ini
# sed -i ‘s/;extension=gd.so/extension=gd.so/’ /etc/php/php.ini
# sed -i ‘s/;extension=iconv.so/extension=iconv.so/’ /etc/php/php.ini
# sed -i ‘s/;extension=openssl.so/extension=openssl.so/’ /etc/php/php.ini
# sed -i ‘s/;extension=xmlrpc.so/extension=xmlrpc.so/’ /etc/php/php.ini
# sed -i ‘s/;extension=bz2.so/extension=bz2.so/’ /etc/php/php.ini
# sed -i ‘s/;extension=curl.so/extension=curl.so/’ /etc/php/php.ini
# sed -i ‘s/;extension=intl.so/extension=intl.so/’ /etc/php/php.ini
# sed -i ‘s/;extension=mcrypt.so/extension=mcrypt.so/’ /etc/php/php.ini
# sed -i ‘s/;extension=mysql.so/extension=mysql.so/’ /etc/php/php.ini
# sed -i ‘s/;extension=pdo_mysql.so/extension=pdo_mysql.so/’ /etc/php/php.ini
# sed -i ‘s/;extension=mysqli.so/extension=mysqli.so/’ /etc/php/php.ini
# sed -i ‘s/;zend_extension=opcache.so/zend_extension=opcache.so/’ /etc/php/php.ini

如果要將 ownCloud 檔案存放在速度比較快的目錄 /mnt/sda1/ownCloud
# vim /etc/php/php.ini
open_basedir = /srv/http/:/home/:/tmp/:/usr/share/pear/:/usr/share/webapps/:/mnt/sda1/ownCloud

建立 ownCloud 資料庫及使用者和密碼
# /usr/bin/mysql -u root -p
> CREATE DATABASE cloud;
> CREATE USER cloud@localhost;
> SET PASSWORD FOR cloud@localhost= PASSWORD(“password_for_cloud”);
> GRANT ALL PRIVILEGES ON cloud.* TO cloud@localhost IDENTIFIED BY ‘password_for_cloud’;
> FLUSH PRIVILEGES;
> exit

下載 ownCloud
# wget https://download.owncloud.org/community/owncloud-7.0.2.tar.bz2
解壓縮
# tar xvjf owncloud-7.0.2.tar.bz2
建立目錄
# mkdir /srv/http/owncloud/data
改變目錄擁有者
# chown -R http:http /srv/http/owncloud/data

啟動及開機時啟動 php-fpm 及 nginx 服務
# systemctl enable php-fpm
# systemctl start php-fpm
# systemctl enable nginx
# systemctl start nginx

ArchLinux 安裝 ownCloud 7.x

關於 ownCloud 可以參考:頭城國小資訊組 | 在 CentOS 6.x 上安裝 ownCloud
參考網頁:
ownCloud – ArchWiki
How To Install and Setup ownCloud on Arch Linux | DigitalOcean
EFSTATHIOS IOSIFIDIS: Install ownCloud on Raspberry Pi (Arch Linux) using Lighttpd
EFSTATHIOS IOSIFIDIS: Install ownCloud 7 on Raspberry Pi (Arch Linux) using Lighttpd

查詢套件庫中有無 ownCloud 套件
# pacman -Ss owncloud
community/owncloud 7.0.2-1
    A cloud server to store your files centrally on a hardware controlled by you
安裝 ownCloud 套件
# pacman -S owncloud
Optional dependencies for owncloud
    php-apache: to use the Apache web server
    php-sqlite: to use the SQLite database backend
    php-pgsql: to use the PostgreSQL database backend
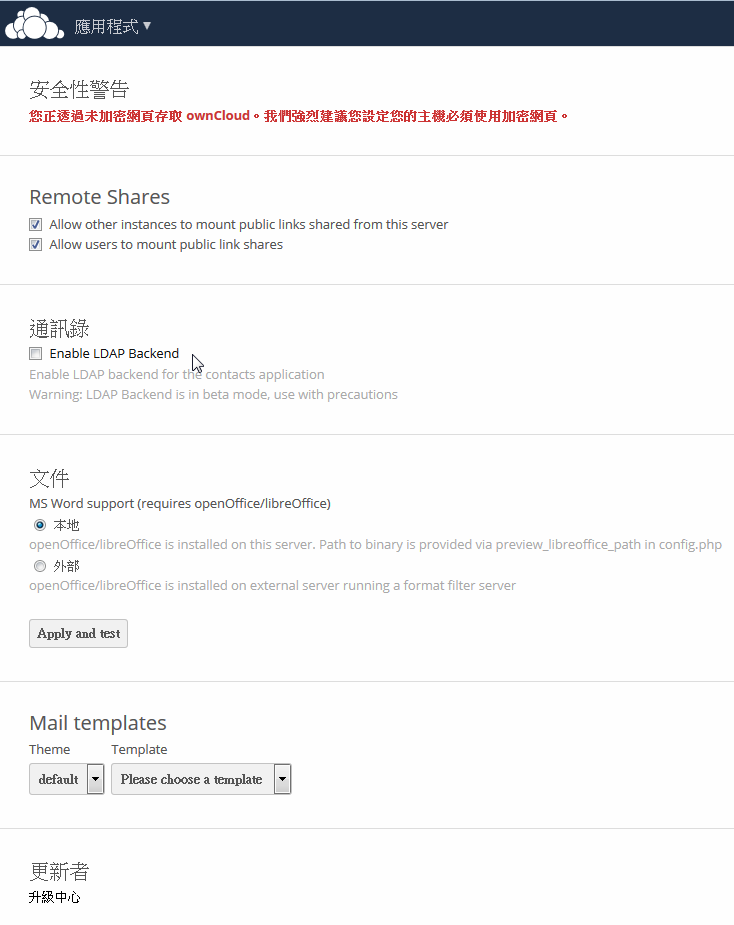
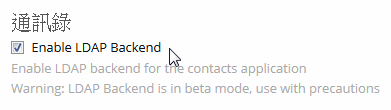
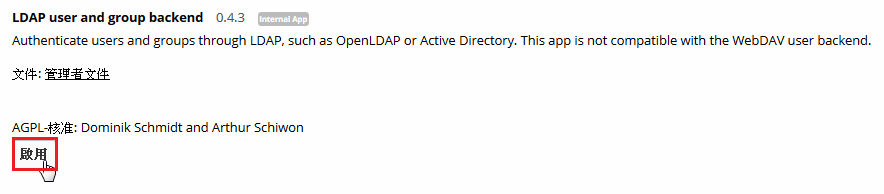
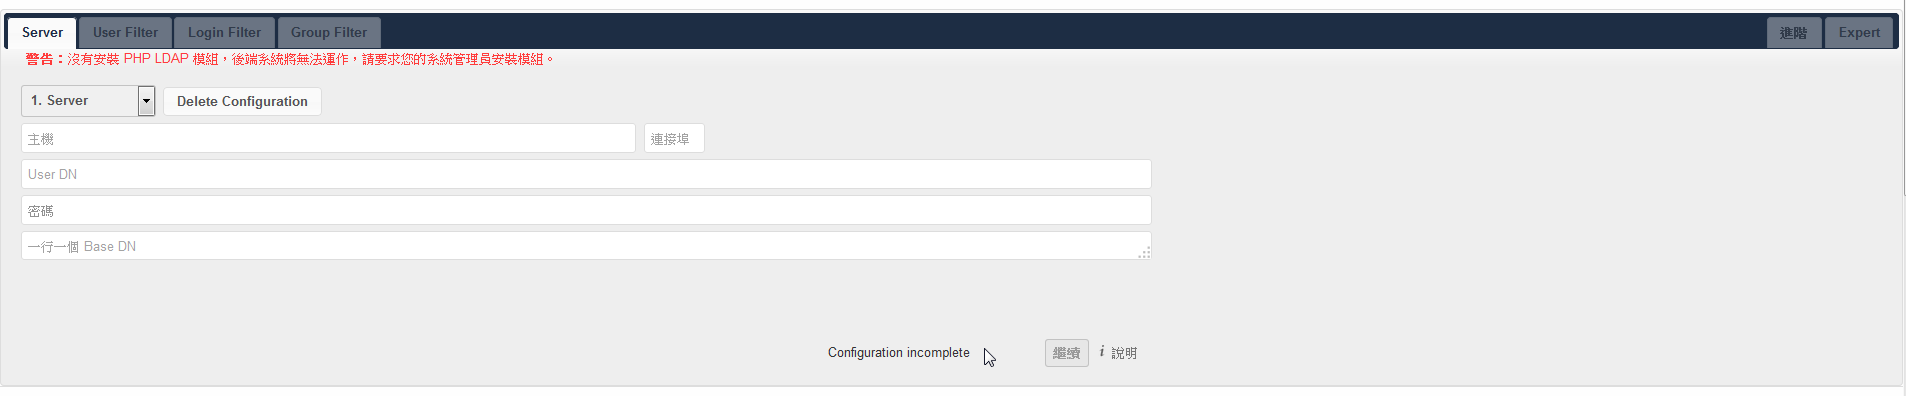
    php-ldap: LDAP authentication
    php-intl [installed]
    php-apcu
    php-xcache
    mariadb: to use the MySQL database backend [installed]
    smbclient: to mount SAMBA shares [installed]
    php-mcrypt [installed]
    ffmpeg: file preview
    libreoffice-common: file preview[@more@]
安裝 php-ldap / php-apcu / php-xcache 套件
# pacman -S php-ldap php-apcu php-xcache

安裝 uwsgi-plugin-php 套件
# pacman -S uwsgi-plugin-php

修改 /etc/php/php.ini 設定檔
# sed -i ‘s/;extension=zip.so/extension=zip.so/’ /etc/php/php.ini
# sed -i ‘s/;extension=gd.so/extension=gd.so/’ /etc/php/php.ini
# sed -i ‘s/;extension=iconv.so/extension=iconv.so/’ /etc/php/php.ini
# sed -i ‘s/;extension=openssl.so/extension=openssl.so/’ /etc/php/php.ini
# sed -i ‘s/;extension=xmlrpc.so/extension=xmlrpc.so/’ /etc/php/php.ini
# sed -i ‘s/;extension=bz2.so/extension=bz2.so/’ /etc/php/php.ini
# sed -i ‘s/;extension=curl.so/extension=curl.so/’ /etc/php/php.ini
# sed -i ‘s/;extension=intl.so/extension=intl.so/’ /etc/php/php.ini
# sed -i ‘s/;extension=mcrypt.so/extension=mcrypt.so/’ /etc/php/php.ini

修改 nginx 設定檔
# vim /etc/nginx/ngix.conf
#this is to avoid Request Entity Too Large error
        client_max_body_size 1000M;
        # deny access to some special files
        location ~ ^/(data|config|.ht|db_structure.xml|README) {
              deny all;
        }
        # pass all .php or .php/path urls to uWSGI
        location ~ ^(.+.php)(.*)$ {
              include uwsgi_params;
              uwsgi_modifier1 14;
              uwsgi_pass 127.0.0.1:3001;
        }
        # everything else goes to the filesystem,
        # but / will be mapped to index.php and run through uwsgi
        location /owncloud {
              root /usr/share/webapps;
              index index.php;
              rewrite ^/.well-known/carddav /remote.php/carddav/ redirect;
              rewrite ^/.well-known/caldav /remote.php/caldav/ redirect;
        }

重新啟動 Nginx Web Server
# systemctl restart nginx

安裝 uwsgi
# pacman -S uwsgi

建立設定檔
# vim /etc/uwsgi/owncloud.ini

[uwsgi]
master = true
socket = 127.0.0.1:3001

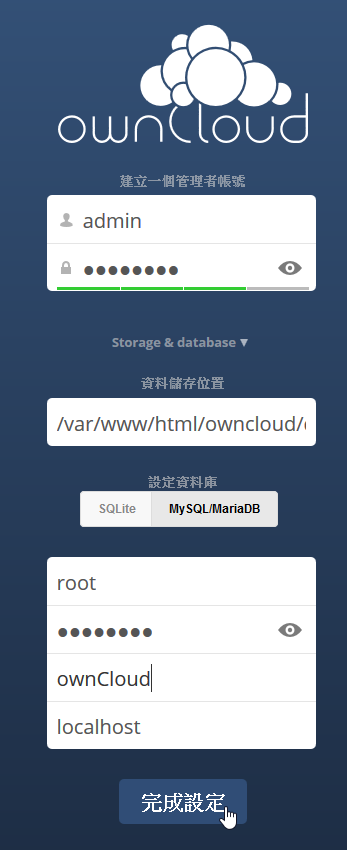
# Change this to where you want ownlcoud data to be stored (maybe /home/owncloud)
owncloud_data_dir = /usr/share/webapps/owncloud/data/
chdir             = %(owncloud_data_dir)

plugins = php
php-docroot     = /usr/share/webapps/owncloud
php-index       = index.php

# only allow these php files, I don't want to inadvertently run something else
php-allowed-ext = /index.php
php-allowed-ext = /public.php
php-allowed-ext = /remote.php
php-allowed-ext = /cron.php
php-allowed-ext = /status.php
php-allowed-ext = /settings/apps.php
php-allowed-ext = /core/ajax/update.php
php-allowed-ext = /core/ajax/share.php
php-allowed-ext = /core/ajax/requesttoken.php
php-allowed-ext = /core/ajax/translations.php
php-allowed-ext = /search/ajax/search.php
php-allowed-ext = /search/templates/part.results.php
php-allowed-ext = /settings/admin.php
php-allowed-ext = /settings/users.php
php-allowed-ext = /settings/personal.php
php-allowed-ext = /settings/help.php
php-allowed-ext = /settings/ajax/getlog.php
php-allowed-ext = /settings/ajax/setlanguage.php
php-allowed-ext = /settings/ajax/setquota.php
php-allowed-ext = /settings/ajax/userlist.php
php-allowed-ext = /settings/ajax/createuser.php
php-allowed-ext = /settings/ajax/removeuser.php
php-allowed-ext = /settings/ajax/enableapp.php
php-allowed-ext = /core/ajax/appconfig.php
php-allowed-ext = /settings/ajax/setloglevel.php
php-allowed-ext = /ocs/v1.php
# set php configuration for this instance of php, no need to edit global php.ini
php-set = date.timezone=Etc/UTC
php-set = open_basedir=%(owncloud_data_dir):/tmp/:/usr/share/pear/:/usr/share/webapps/owncloud:/etc/webapps/owncloud
php-set = session.save_path=/tmp
php-set = post_max_size=1000M
php-set = upload_max_filesize=1000M

# load all extensions only in this instance of php, no need to edit global php.ini
php-set = extension=bz2.so
php-set = extension=curl.so
php-set = extension=intl.so
php-set = extension=openssl.so
php-set = extension=pdo_sqlite.so
php-set = extension=exif.so
php-set = extension=gd.so
php-set = extension=imagick.so
php-set = extension=gmp.so
php-set = extension=iconv.so
php-set = extension=mcrypt.so
php-set = extension=sockets.so
php-set = extension=sqlite3.so
php-set = extension=xmlrpc.so
php-set = extension=xsl.so
php-set = extension=zip.so

processes = 10
cheaper = 2
cron = -3 -1 -1 -1 -1 /usr/bin/php -f /usr/share/webapps/owncloud/cron.php 1>/dev/null

建立目錄
# mkdir /usr/share/webapps/owncloud/data

# uwsgi_php –ini /etc/uwsgi/owncloud.ini
[uwsgi] implicit plugin requested php
[uWSGI] getting INI configuration from /etc/uwsgi/owncloud.ini
*** Starting uWSGI 2.0.7 (32bit) on [Wed Nov  5 09:22:02 2014] ***
compiled with version: 4.8.2 20131219 (prerelease) on 02 October 2014 06:16:59
os: Linux-3.4.90 #2 SMP PREEMPT Wed Aug 27 10:31:52 CST 2014
nodename: lemaker
machine: armv7l
clock source: unix
pcre jit disabled
detected number of CPU cores: 2
current working directory: /root
detected binary path: /sbin/uwsgi
uWSGI running as root, you can use –uid/–gid/–chroot options
*** WARNING: you are running uWSGI as root !!! (use the –uid flag) ***
chdir(): No such file or directory [core/uwsgi.c line 2537]

ownCloud 7.x 使用 OpenLDAP 認證

新版本的 ownCloud 似乎預設不會啟動 LDAP 相關模組,所以安裝完成之後,一直在 管理  畫面中找不到與 LDAP 相關的選項
[@more@]即使啟用 通訊錄的 LDAP 也沒有用

後來試了很久,終於在 應用程式 中找到了!
選擇 左方的 檔案應用程式

選擇 LDAP user and group backend

選擇 啟用

這時候在 管理 畫面,就可以找到與 LDAP 相關的選項了!

 LDAP  的設定方式,可以參考之前寫的 ownCloud 使用 LDAP Server 做認證

CentOS 6.x/7.x 上安裝 ownCloud 7.x

最近在 CentOS 6.x / 7.x 安裝 ownCloud 時,都會出現下面的畫面
[@more@]經過反覆的測試,發現應該是 SElinux 造成的問題
只要暫且把 SELinux 關閉
# setenforce 0

系統就可以正常安裝

可以在 owncloud 目錄下的 README.SELinux 中提到
NOTE: IF YOU INSTALLED FROM THE OFFICIAL OWNCLOUD RPM, YOU DO NOT NEED TO
      FOLLOW THE INSTRUCTIONS BELOW! THEY HAVE ALREADY BEEN DONE FOR YOU!

If you are running Fedora 16 with SELinux enabled, you need to relabel the
ownCloud installation directory to allow the webserver to store files there.

To do that, execute the following commands as user root AFTER you installed
ownCloud:

# semanage fcontext -a -t httpd_sys_rw_content_t ‘/var/www/html/owncloud/data’
# restorecon ‘/var/www/html/owncloud/data’
# semanage fcontext -a -t httpd_sys_rw_content_t ‘/var/www/html/owncloud/config’
# restorecon ‘/var/www/html/owncloud/config’

To remove the ownCloud directory label execute the following commands as
user root AFTER you uninstalled ownCloud:

# semanage fcontext -d -t httpd_sys_rw_content_t ‘/var/www/html/owncloud/data’
# restorecon ‘/var/www/html/owncloud/data’
# semanage fcontext -d -t httpd_sys_rw_content_t ‘/var/www/html/owncloud/config’
# restorecon ‘/var/www/html/owncloud/config’

Note: all of the above applies only to the default policies. If you modified
      them, please give the webserver write-access to the directories
      /var/www/html/owncloud/data and /var/www/html/owncloud/config

Note: for non-Fedora / Redhat systems running SELinux the policy might be
      called differently.

Enjoy you own Cloud!

只要是用 rpm 來安裝的,就可以不用做設定,但即使做了設定也沒有用

解決方式:
1. 關閉 SELinux,這是我最不建議的
# sed -i ‘s/SELINUX=enforcing/SELINUX=disabled/’ /etc/selinux/config

重新開機
# reboot

2. 設定目錄擁有者及 SELinux
# chown -R apache:apache /var/www/html/owncloud/data
# chown -R apache:apache /var/www/html/owncloud/config
# chcon -R -t httpd_sys_rw_content_t /var/www/html/owncloud/config
# chcon -R -t httpd_sys_rw_content_t /var/www/html/owncloud/data
# chcon -R -t httpd_sys_rw_content_t /var/www/html/owncloud/apps

在 CentOS 7.x 安裝 ownCloud 7

ownCloud 7 Release,新增的功能可以參考官方網站製作的 New in ownCloud 7
ownCloud 官方網站:http://owncloud.org/
[@more@]新增 EPEL 套件庫
# wget http://dl.fedoraproject.org/pub/epel/7/x86_64/e/epel-release-7-2.noarch.rpm
# rpm –import http://dl.fedoraproject.org/pub/epel/RPM-GPG-KEY-EPEL-7
# rpm -ivh epel-release-7-2.noarch.rpm
# sed -i ‘s/enabled=1/enabled=0/g’ /etc/yum.repos.d/epel.repo

加入 ownCloud 套件庫
# cd /etc/yum.repos.d/
# wget http://download.opensuse.org/repositories/isv:ownCloud:community/CentOS_CentOS-7/isv:ownCloud:community.repo
# rpm –import http://download.opensuse.org/repositories/isv:/ownCloud:/community/CentOS_CentOS-7/repodata/repomd.xml.key
# yum install owncloud –enablerepo=epel


更改目錄權限,否則會出現下圖的錯誤訊息
# chown -R apache:apache /var/www/html/owncloud/config


開啟支援 .htaccess 的功能
修改 Apache Web Server 設定檔,加入下面的設定內容
# vim /etc/httpd/conf/httpd.conf
<Directory “/var/www/html/owncloud”>
    AllowOverride All
</Directory>
重新啟動 Apache Web Server
# systemctl restart httpd

安裝畫面

安裝完成

ownCloud 使用 LDAP Server 做認證

ownCloud 架設完成後,在建立使用者的部分,除了可以一筆一筆新增外,也可以搭配 LDAP Server 做使用者的認證。
1. 首先以管理者身分登入,選擇 管理
[@more@]2. 輸入 LDAP Server 相關資訊

3. 輸入 User Filter 相關資訊

4. 輸入 Login Filter 相關資訊

5. 輸入 Group Filter 相關資訊

6. 切換到 Advanced 頁面,並輸入 連線設定 相關資訊

7. 選擇 目錄設定

8. 輸入 目錄設定 相關資訊,最後按 儲存

9. 按 測試此設定,檢查設定是否正常

10. 可以正常連線

11. 開啟瀏覽器,輸入 LDAP Server 中的帳號及密碼

12. 可以正常登入,畫面右上角會出現使用者班級座號及姓名

如果關於 LDAP 設定上有問題的話,可以參考官方網站上的 說明

ownClient Linux Client 端使用

這裡以 Ubuntu 13.10 x64 版本為例
首先先連線到 ownCloud Client 端網頁:http://owncloud.org/sync-clients/

選擇 Ubuntu
[@more@]底下是安裝步驟
1. 下載 gpg key
# wget http://download.opensuse.org/repositories/isv:ownCloud:desktop/xUbuntu_13.10/Release.key
2. 匯入 gpg key
# sudo apt-key add – < Release.key
3. 加入安裝來源
# sudo sh -c “echo ‘deb http://download.opensuse.org/repositories/isv:/ownCloud:/desktop/xUbuntu_13.10/ /’ >> /etc/apt/sources.list.d/owncloud-client.list”
4. 更新套件庫來源
# sudo apt-get update
安裝 owncloud-client
# sudo apt-get install owncloud-client

安裝完成的 ownCloud Client

設定 伺服器位址

輸入 使用者帳號及密碼

本地端同步的目錄

設定完成

同步的目錄,在家目錄下的 ownCloud

同步的檔案及目錄

ownCloud Mac Client 使用

首先先到 ownCloud Client 端網頁下載:http://owncloud.org/sync-clients/

下載下來是一個 dmg 檔,按二下即可掛載

安裝時,只要把程式拉到 Applications 即可
[@more@]在 應用程式,就可以找到 ownClient 端式

按二下即可開啟,選擇 打開

輸入 伺服器位址,並按 下一個

輸入 使用者帳號及密碼,並按 下一個

同步的目錄,並按 Connect

完成

原本的檔案

在網頁上傳 Firefox-full-latest.exe

在資料夾中也可以找到 Firefox-full-latest.exe

Bandzip – 支援 unicode 的壓縮軟體

Bandzip 是一套免費的壓縮軟體,它主要特別的地方是支援 unicode 的檔名,所以之前在 ownCloud 還沒做 zip 檔打包修正時,下載下來的檔案中,如果有中文的目錄或是檔名都會出現亂碼。

但 Bandzip 則沒有這樣的問題

[@more@]Bandzip 官方網站:http://www.bandisoft.com/bandizip/
目前最新的版本是 3.10
將下載下來的檔案,按二下開始安裝

選擇要關聯的副檔名,然後按 確定

如果要解從 Linux / Mac 平台壓縮的壓縮檔,就要更改 代碼頁

支援的編碼,選擇 Linux(UTF-8)

就可以正常解壓縮了!

更多關於 Bandzip 的介紹:
輕巧免費的壓縮軟體 – Bandzip:::iThome Download-你要的軟體在這裡:::
Bandizip : 輕巧、快速、免費的壓縮軟體

解決 ownCloud 用 zip 檔打包下載時,中文檔名會出現亂碼

使用 ownCloud 上傳及下載中文檔名的檔案,都沒有問題,但如果要用 zip 檔打包下載時,中文檔案或目錄,都會出現亂碼。
中文目錄沒有問題

中文檔名也沒有問題

[@more@]但使用 zip 檔打包下載整個目錄時,會出現亂碼

使用 7zip 解壓縮時,中文目錄出現亂碼

中文檔名也會出現亂碼

在網路搜尋了一下,找到了解決的方法:工作雜記: Owncloud中文目錄包裹下載

切換目錄
# cd /var/www/html/owncloud/lib/private
備份原檔
# cp files.php files.php.`date +%F`

修改 files.php
紅色 的部分是修改的部分
# vim files.php
 foreach ($files as $file) {
                                $file = $dir . ‘/’ . $file;
                                if (OCFilesFilesystem::is_file($file)) {
                                        $tmpFile = OCFilesFilesystem::toTmpFile($file);
                                        self::$tmpFiles[] = $tmpFile;
                                        $u8filename=iconv(“UTF-8”, “Big-5”, basename($file));   //for utf-8
//                                      $zip->addFile($tmpFile, basename($file));
                                        $zip->addFile($tmpFile,$u8filename);
                                } elseif (OCFilesFilesystem::is_dir($file)) {
                                        self::zipAddDir($file, $zip);
                                }
                        }

        public static function zipAddDir($dir, $zip, $internalDir=”) {
                $dirname=basename($dir);
                $dirname=iconv(“UTF-8”, “Big-5”, $dirname); // for utf-8
                $zip->addEmptyDir($internalDir.$dirname);
                $internalDir.=$dirname.=’/’;
                $files=OC_Files::getDirectoryContent($dir);
                foreach($files as $file) {
                        $filename=$file[‘name’];
                        $file=$dir.’/’.$filename;
                        if(OCFilesFilesystem::is_file($file)) {
                                $tmpFile=OCFilesFilesystem::toTmpFile($file);
                                OC_Files::$tmpFiles[]=$tmpFile;
                                $filename=iconv(“UTF-8”, “Big-5”, $filename); // for utf-8
                                $zip->addFile($tmpFile, $internalDir.$filename);
                        }elseif(OCFilesFilesystem::is_dir($file)) {
                                self::zipAddDir($file, $zip, $internalDir);
                        }
                }
        }

中文目錄正常顯示

中文檔名正常顯示