SSH Tunnel

內部 IP:192.168.131.219 Server A
外部 IP:140.111.74.17      Server B
外部 IP:1.161.49.150        Server C

1. 在 Server A 上執行
# ssh -NfR 2222:localhost:22 root@140.111.74.17
# ssh -BfR 2222:192.168.131.219 root@140.111.74.17
-N Do not execute a remote command.
-f Requests ssh to go to background just before command execution.
-R [bind_address:]port:host:hostport

2. 在 Server B 上執行
# netstat -antp | grep 2222
tcp        0      0 127.0.0.1:2222          0.0.0.0:*               LISTEN      519/sshd: root
tcp6       0      0 ::1:2222                :::*                    LISTEN      519/sshd: root
# ss -antp | grep 2222
LISTEN     0      128    127.0.0.1:2222                     *:*                   users:((“sshd”,pid=519,fd=9))
LISTEN     0      128        ::1:2222                    :::*                   users:((“sshd”,pid=519,fd=8))

3. 在 Server C 上想要連線到 Server A,先連線到 Server B
# ssh root@140.111.74.17
# ssh -p 2222 root@127.0.0.1

SSH Server – 使用 pssh 一次同時操控多台 Server

參考網頁:
CentOS 7 : SSH Server : Use Parallel SSH : Server World

如果有多台 Server 要查看或進行設定,可以考慮使用 pssh。
使用限制:
這幾台 Server 的密碼要一樣,或是先好 頭城國小資訊組 | 免密碼登入 SSH Server 的設定。

1. 安裝 pssh
# yum install pssh –enablerepo=epel

2. 查看 192.168.1.9 / 192.168.1.10 的開機時間
-H 要操作的主機
-i 要執行的命令
# pssh -H “192.168.1.9 192.168.1.10” -i “uptime”
[1] 11:19:10 [FAILURE] 192.168.1.10 Exited with error code 255
Stderr: pssh error: SSH requested a password. Please create SSH keys or use
the -A option to provide a password.
Permission denied (publickey,password).
[2] 11:19:20 [FAILURE] 192.168.1.9 Exited with error code 255
Stderr: pssh error: SSH requested a password. Please create SSH keys or use
the -A option to provide a password.
Permission denied (publickey,password).

上面提示需要輸入密碼,可以使用 -A 參數[@more@]3. 加上 -A 參數
# pssh -A -H “192.168.1.9 192.168.1.10” -i “uptime”
Warning: do not enter your password if anyone else has superuser
privileges or access to your account.
Password:
[1] 11:24:20 [SUCCESS] 192.168.1.9
11:24:20 up 13 days, 16:43, 2 users, load average: 0.57, 0.48, 0.47
[2] 11:24:20 [SUCCESS] 192.168.1.10
11:24:20 up 4 days, 20:20, 0 users, load average: 0.02, 0.06, 0.07

4. 如果二台密碼不相同,就要使用 ssh key 的方式來處理
# pssh -A -H “192.168.1.99 192.168.1.8” -i “uptime”
Warning: do not enter your password if anyone else has superuser
privileges or access to your account.
Password:
[1] 11:26:18 [SUCCESS] 192.168.1.99
11:26:18 up 13 days, 16:45, 2 users, load average: 0.29, 0.39, 0.44
[2] 11:26:20 [FAILURE] 192.168.1.8 Exited with error code 255
Stderr: Permission denied (publickey,gssapi-keyex,gssapi-with-mic,password).

5. 將要連線的 Server 清單放在檔案之中
# cat pssh_hosts.txt
root@192.168.1.9
root@192.168.1.10
# pssh -A -h pssh_hosts.txt -i “uptime”
Warning: do not enter your password if anyone else has superuser
privileges or access to your account.
Password:
[1] 11:24:20 [SUCCESS] 192.168.1.9
11:24:20 up 13 days, 16:43, 2 users, load average: 0.57, 0.48, 0.47
[2] 11:24:20 [SUCCESS] 192.168.1.10
11:24:20 up 4 days, 20:20, 0 users, load average: 0.02, 0.06, 0.07

6. 更多的參數
# pssh –help
Usage: pssh [OPTIONS] command […]

Options:
–version show program’s version number and exit
–help show this help message and exit
-h HOST_FILE, –hosts=HOST_FILE
hosts file (each line “[user@]host[:port]”)
-H HOST_STRING, –host=HOST_STRING
additional host entries (“[user@]host[:port]”)
-l USER, –user=USER username (OPTIONAL)
-p PAR, –par=PAR max number of parallel threads (OPTIONAL)
-o OUTDIR, –outdir=OUTDIR
output directory for stdout files (OPTIONAL)
-e ERRDIR, –errdir=ERRDIR
output directory for stderr files (OPTIONAL)
-t TIMEOUT, –timeout=TIMEOUT
timeout (secs) (0 = no timeout) per host (OPTIONAL)
-O OPTION, –option=OPTION
SSH option (OPTIONAL)
-v, –verbose turn on warning and diagnostic messages (OPTIONAL)
-A, –askpass Ask for a password (OPTIONAL)
-x ARGS, –extra-args=ARGS
Extra command-line arguments, with processing for
spaces, quotes, and backslashes
-X ARG, –extra-arg=ARG
Extra command-line argument
-i, –inline inline aggregated output and error for each server
–inline-stdout inline standard output for each server
-I, –send-input read from standard input and send as input to ssh
-P, –print print output as we get it

Example: pssh -h hosts.txt -l irb2 -o /tmp/foo uptime

SSH Server – 使用 sshpass 免輸入密碼登入

參考網站:
CentOS 7 : SSH Server : Use SSHPass : Server World

1. 安裝 sshpass 套件
# yum install sshpass –enablerepo=epel

2. 使用命令列來輸入密碼,登入成功之後執行 free 指令查看記憶體使用狀況
# sshpass -p 123456 ssh 192.168.1.101 free
             total       used       free     shared    buffers     cached
Mem:      16122192   15946676     175516     252788     914424   12375072
-/+ buffers/cache:    2657180   13465012
Swap:      7340028      30684    7309344
[@more@]3. 使用密碼檔
# echo ‘123456’ > sshpass.txt
# chmod 600 sshpass.txt
# sshpass -f sshpass.txt ssh 192.168.1.101 free

4. 使用環境變數
# export SSHPASS=123456
# sshpass -e ssh 192.168.1.101 free

5. 更多參數
# sshpass -help
Usage: sshpass [-f|-d|-p|-e] [-hV] command parameters
   -f filename   Take password to use from file
   -d number     Use number as file descriptor for getting password
   -p password   Provide password as argument (security unwise)
   -e            Password is passed as env-var “SSHPASS”
   With no parameters – password will be taken from stdin

   -P prompt     Which string should sshpass search for to detect a password prompt
   -v            Be verbose about what you’re doing
   -h            Show help (this screen)
   -V            Print version information
At most one of -f, -d, -p or -e should be used

SSH Server – SFTP only + Chroot

參考網站:
CentOS 7 : SSH Server : SFTP only + Chroot : Server World

以前的作法都是不開放一般使用者使用 ssh,讓使用者使用 ftp 來傳輸檔案,不過 FTP Server 算是比較不安全的通訊協定而且還要安裝建置 FTP Server,所以改用 SFTP,因為帳號密碼及傳輸資料都有經過加密,會比較安全。
以前的作法:
# useradd test -d /home/test -m -s /bin/nologin
改用 SFTP 的作法:
1. 建立 sftp 群組
# groupadd sftp_users
2. 新增使用者
# useradd test -G sftp_users -d /home/test -m
如果使用者已經建立完成
# usermod -G sftp_users test
3. 設定帳號密碼
# passwd test
Changing password for user test.
New password:
Retype new password:
passwd: all authentication tokens updated successfully.
[@more@]4. 修改 SSH Server 設定
# cp /etc/ssh/sshd_config /etc/ssh/sshd_config.$(date +%F)
# vim /etc/ssh/sshd_config
#Subsystem      sftp    /usr/libexec/openssh/sftp-server
Subsystem       sftp    internal-sftp

Match Group sftp_users
        X11Forwarding no
        AllowTcpForwarding no
        ChrootDirectory /home
        ForceCommand internal-sftp

5. 重新啟動 SSH Server
# systemctl restart sshd.service

6. 進行測試
# ssh test@192.168.1.17
test@192.168.1.17’s password:
Could not chdir to home directory /home/test: No such file or directory
This service allows sftp connections only.
Connection to 192.168.1.17 closed.

# sftp test@192.168.1.17
Connecting to 192.168.1.17…
test@192.168.1.17’s password:
sftp> ls -l
drwx–x–x    2 1000     1001         4096 Mar 11 02:05 test
sftp> bye

一般使用者可以使用 FileZilla 或是 WinSCP

免密碼登入 SSH Server

有一些 Linux 已經預設不能以 root 身份登入,或是不允許 root 以輸入密碼登入。
# grep RootLogin /etc/ssh/sshd_config
PermitRootLogin prohibit-password

PermitRootLogin without-password

如果還是習慣使用 root 身份登入,可以修改成
PermitRootLogin yes

重新啟動 SSH Server
# /etc/init.d/sshd restart
# systemctl restart sshd.service

或直接改用 SSH Key 的方式,來達成免密碼直接登入[@more@]Server A:192.168.1.10
Server B:192.168.1.101

1. 在 Server A 上執行
# ssh-keygen -t rsa

2. 產生的 key,id_rsa 私鑰 / id_rsa.pub 公鑰
# ls -l ~/.ssh/
-rw——- 1 root root 1675 Mar  9 19:17 id_rsa
-rw-r–r– 1 root root  390 Mar  9 19:17 id_rsa.pub
-rw-r–r– 1 root root 1330 Mar  9 14:41 known_hosts

3. 將公鑰複製到 Server B
# scp ~/.ssh/id_rsa.pub root@192.168.1.101:/root

4. 登入到 Server B,並將從 Server A 複製過來的 id_rsa 公鑰 附加入到 ~/.ssh/authorized_keys
# ssh root@192.168.1.101
# cat id_rsa >> ~/.ssh/authorized_keys
# rm -rf id_rsa

5. 更改權限
# chmod 700 ~/.ssh
# chmod 600 ~/.ssh/authorized_keys

6. 測試從 Server A 以 ssh 連線 Server B 是不是不用輸入密碼

以 Tera Term 進行 SSH 連線

1. 執行桌面上的 Tera Term 圖示

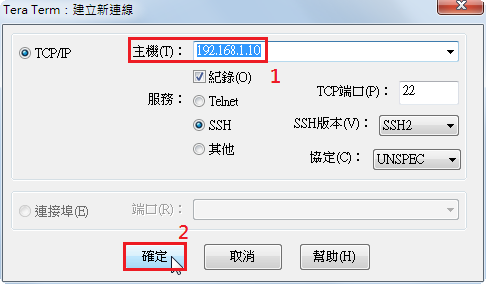
2.  出現 建立新連線 的視窗,輸入連線主機,然後按 確定
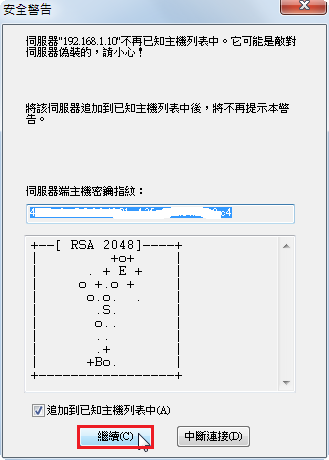
[@more@]3.  金鑰加入本機,請按 繼續

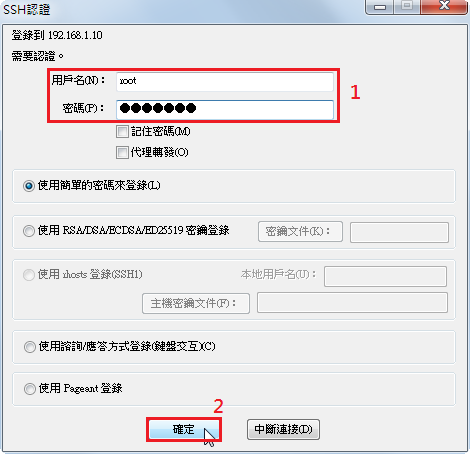
4.  輸入要登入的使用者帳號及密碼,並按 確定

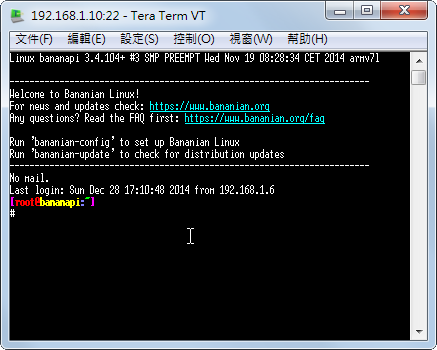
5. 登入成功

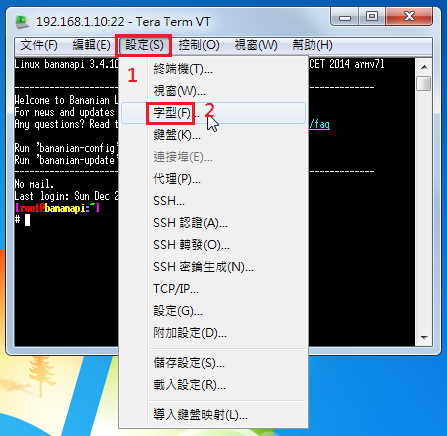
6. 不過顯示的字有些小,選擇 設定字型

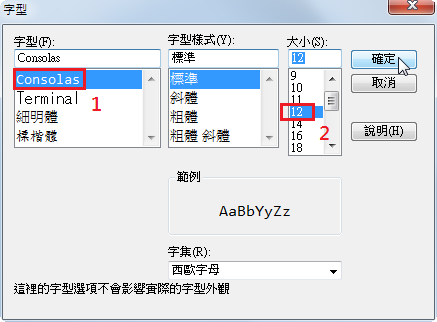
7.  字型 Consolas,大小 12

8. 字型就比較大一些了!

更多的操作可以參考:Cooper Maa: Tera Term 簡介

Tera Term 一套開放原始碼的 SSH Client

本來一直都是使用 Pietty / Putty 來做為 SSH Client,因為它的程式很小,又不用安裝,尤其是 Pietty 與中文的相容性非不錯。但最近再與 Banana Pi 做 ssh 連線時,常常會出現下圖的錯誤訊息,造成無法連線,有些困擾,所以想找一套 SSH Client 程式來使用。
[@more@]
Tera Term 是一套開放原始碼的 SSH Client,看起來應該是日本人所開發的。
Tera Term 官方網站:http://ttssh2.sourceforge.jp/
Tera Term 下載網頁:http://en.sourceforge.jp/projects/ttssh2/releases/

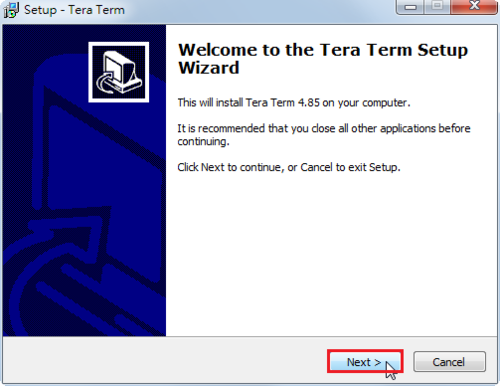
1. 執行下載下來的 Tera Term 應用程式

2. 選擇 Next 繼續

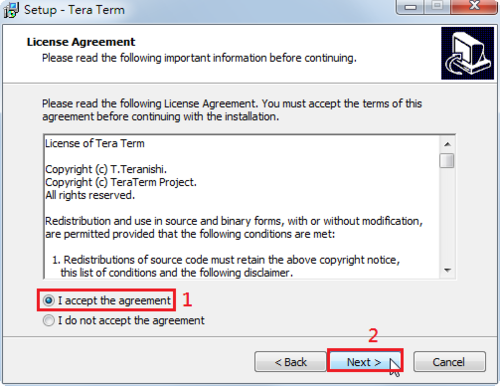
3.  選擇 I accept the agreement,並選擇 Next 繼續

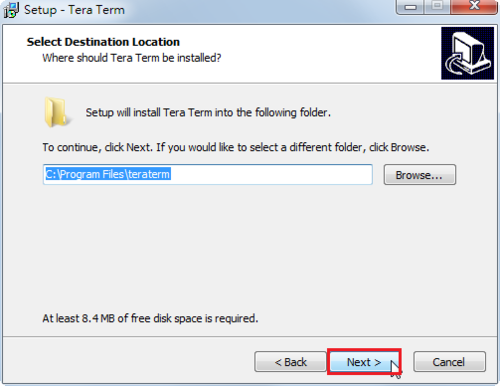
4. 程式安裝路徑,選擇 Next 繼續

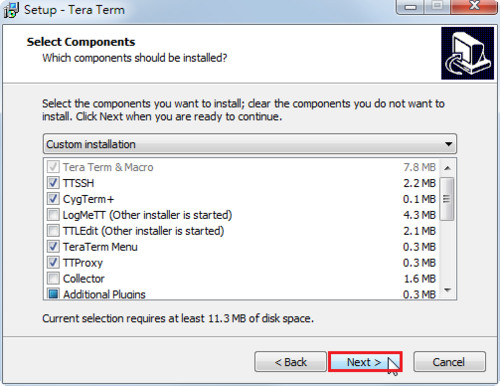
5.  選擇要安裝的程式,選擇 Next 繼續

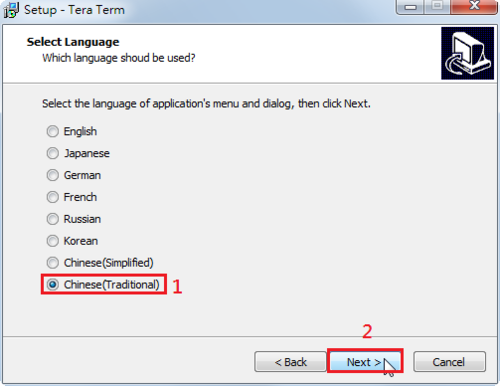
6.  選擇 Chinese(Tradition)正體中文,選擇 Next 繼續

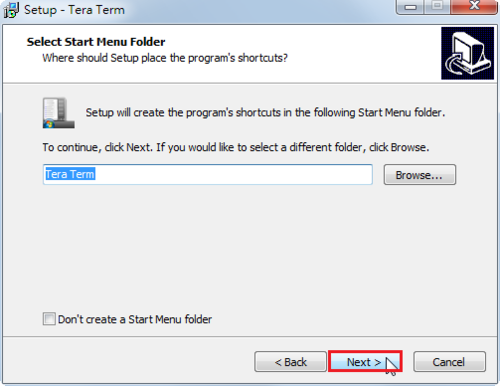
7. 選擇 Next 繼續

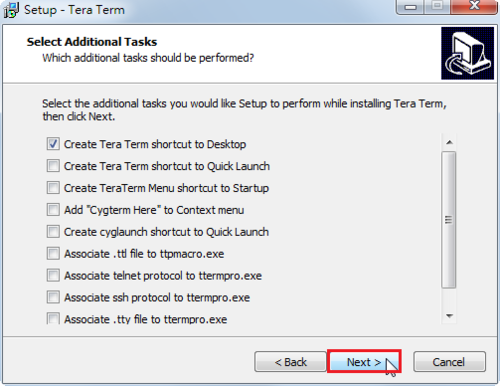
8.  程式安裝選項,選擇 Next 繼續

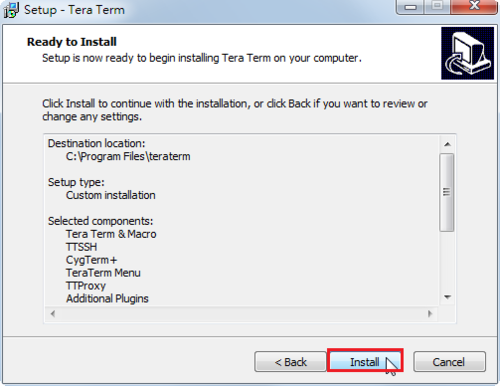
9. 選擇 Install 開始安裝

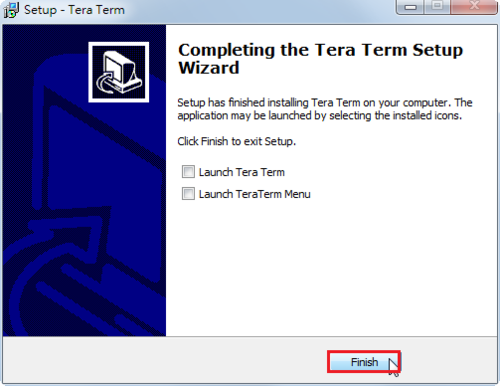
10. 選擇 Finish 完成安裝

11. 桌面上會出現 Tera Term 圖示

以 Xshell 進行 SSH 連線

1. 執行桌面上的 Xshell 5 圖示

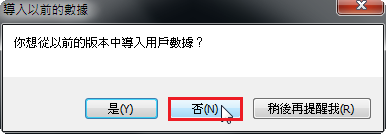
2.   如果有使用過之前的版本,可以選擇匯入之前的記錄
[@more@]
3.  Xshell 執行畫面
3.

4.  選擇 工作階段的 新增

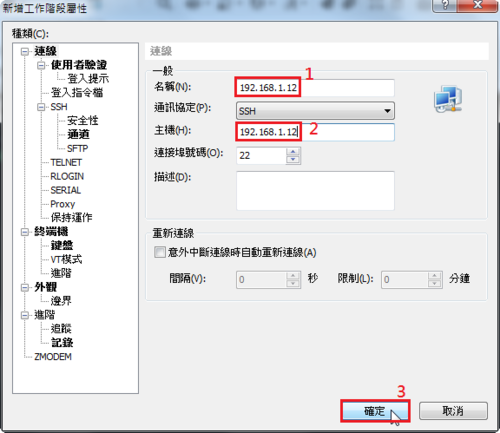
5.  輸入要連線的主機資訊,並按 確定

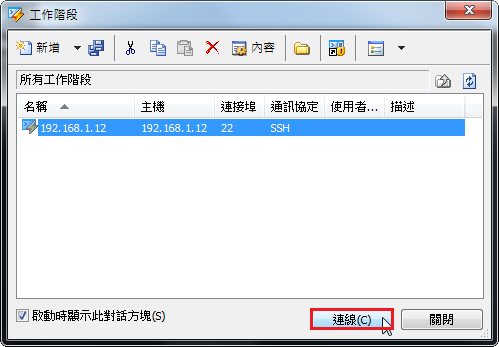
6. 選好要連線的主機,並按 連線

7. 選擇 接受及存檔(S) 金鑰

8.  輸入帳號,並按 確定

9.  輸入密碼,並按 確定

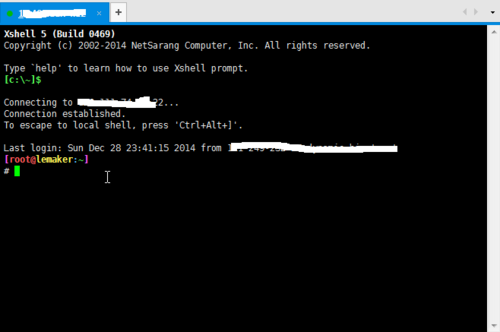
10.  已經登入成功!

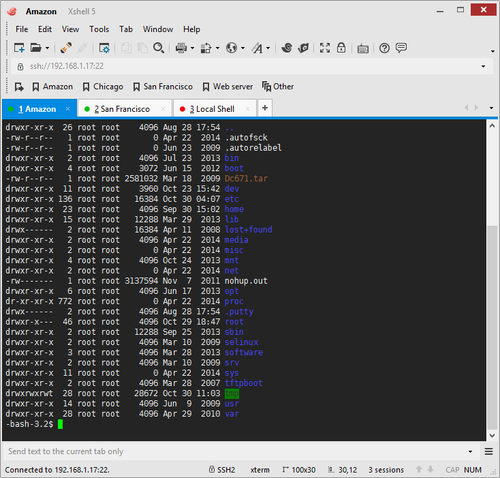
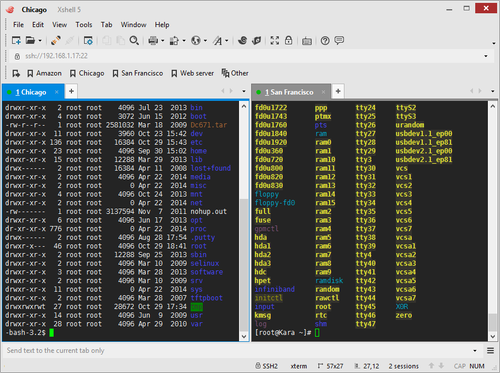
比較特別的是,Xshell 是以類似標籤的方式,來區隔每一個連線,連線數量大時,會比較不佔工作列空間,切換也比較方便!
更多的 Xshell 特色,請參考:http://www.netsarang.com/products/xsh_screenshot.html
下圖取自官網

Xshell 可以在家裡及學校免費使用的 SSH Client

Xshell 是由 NetSarang 公司所開發的軟體,可以支援 SSH, SFTP, TELNET, RLOGIN and SERIAL 等連線,功能非常強大,個人在家裡及學校可以免費使用。

NetSarang Xshell 官方網站:
http://www.netsarang.com/products/xsh_overview.html
NetSarang Xshell 下載網頁:
http://www.netsarang.com/download/down_xsh.html

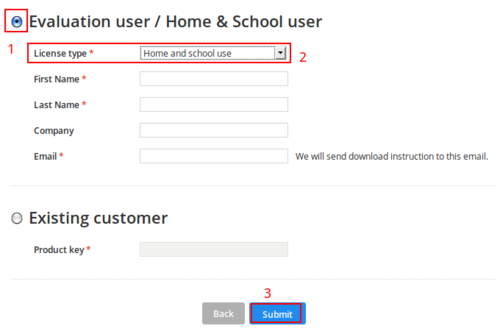
要下載之前,請先到下載網頁填入一些個人資料,網站會寄一封軟體下載點的 mail,提供下載。

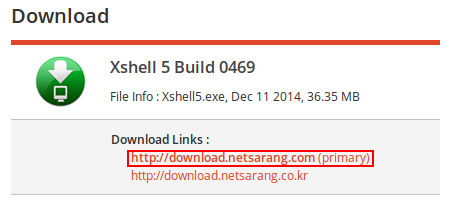
[@more@]1. 按 mail 中的下載連結來下載 Xshell

2. 在下載下來的程式按二下,開始安裝

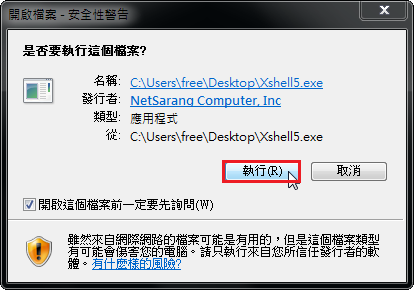
3.  選擇 執行

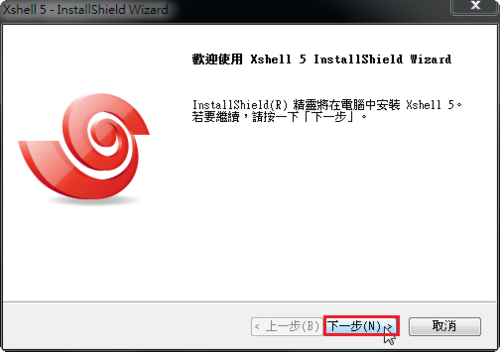
4.  安裝畫面

5.  選擇 下一步

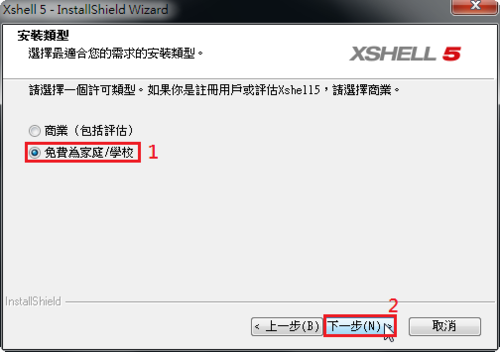
6. 選擇 免費為家庭/學校選擇 下一步

7. 選擇 我接受授權合約的條款(A),然後選擇 下一步

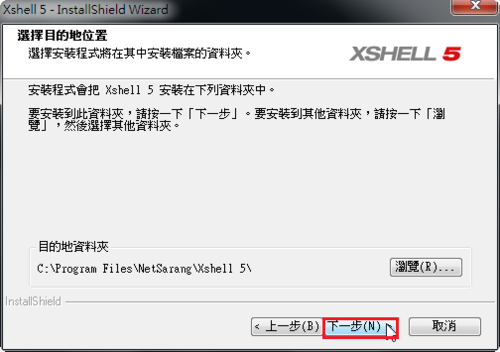
8. 軟體安裝位置,選擇 下一步

9. 選擇 下一步

10. 選擇 安裝

11.  安裝過程

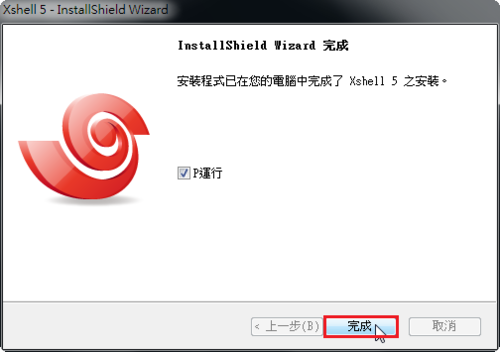
12. 選擇 完成

13. 桌面上會出現一個 Xshell 5 的圖示