Debian / Ubuntu 安裝 Let’s Encrypt 到 Apache

參考網站:
Debian / Ubuntu 安裝 Let’s Encrypt 到 Apache – Linux 技術手札

1. 安裝 Apache Web Server
# apt-get install apache2

2. 啟用 SSL 模組並重新啟動 Apache Web Server
# a2enmod ssl
Considering dependency setenvif for ssl:
Module setenvif already enabled
Considering dependency mime for ssl:
Module mime already enabled
Considering dependency socache_shmcb for ssl:
Enabling module socache_shmcb.
Enabling module ssl.
See /usr/share/doc/apache2/README.Debian.gz on how to configure SSL and create self-signed certificates.
To activate the new configuration, you need to run:
  service apache2 restart

# a2ensite default-ssl.conf
Enabling site default-ssl.
To activate the new configuration, you need to run:
  service apache2 reload

# /etc/init.d/apache2 restart
or
# systemctl restart apache2.service[@more@]3. 安裝 git 套件
# apt-get install git

4. 下載 Let’s Encrypt 的目錄
# cd /usr/local
# git clone https://github.com/letsencrypt/letsencrypt
Cloning into ‘letsencrypt’…
remote: Counting objects: 43808, done.
remote: Compressing objects: 100% (76/76), done.
remote: Total 43808 (delta 40), reused 0 (delta 0), pack-reused 43732
Receiving objects: 100% (43808/43808), 12.74 MiB | 2.16 MiB/s, done.
Resolving deltas: 100% (31283/31283), done.
Checking connectivity… done.

5. 產生憑證
# ./letsencrypt-auto –apache -d test.ilc.edu.tw -d www.test.ilc.edu.tw

Enter email address (used for urgent renewal and security notices) (Enter ‘c’ to
cancel):

——————————————————————————-
Please read the Terms of Service at
https://letsencrypt.org/documents/LE-SA-v1.1.1-August-1-2016.pdf. You must agree
in order to register with the ACME server at
https://acme-v01.api.letsencrypt.org/directory
——————————————————————————-
(A)gree/(C)ancel: A

——————————————————————————-
Would you be willing to share your email address with the Electronic Frontier
Foundation, a founding partner of the Let’s Encrypt project and the non-profit
organization that develops Certbot? We’d like to send you email about EFF and
our work to encrypt the web, protect its users and defend digital rights.
——————————————————————————-
(Y)es/(N)o: Y
Obtaining a new certificate
Performing the following challenges:
tls-sni-01 challenge for test.ilc.edu.tw
tls-sni-01 challenge for www.test.ilc.edu.tw
Waiting for verification…
Cleaning up challenges
Failed authorization procedure. nxi.tces.ilc.edu.tw (tls-sni-01): urn:acme:error:connection :: The server could not connect to the client to verify the domain :: Failed to connect to 192.168.1.1:443 for TLS-SNI-01 challenge

IMPORTANT NOTES:
 – If you lose your account credentials, you can recover through
   e-mails sent to t850008@gmail.com.
 – The following errors were reported by the server:

   Domain: www.test.ilc.edu.tw
   Type:   connection
   Detail: Failed to connect to 192.168.1.1:443 for TLS-SNI-01
   challenge

   To fix these errors, please make sure that your domain name was
   entered correctly and the DNS A record(s) for that domain
   contain(s) the right IP address. Additionally, please check that
   your computer has a publicly routable IP address and that no
   firewalls are preventing the server from communicating with the
   client. If you’re using the webroot plugin, you should also verify
   that you are serving files from the webroot path you provided.
 – Your account credentials have been saved in your Certbot
   configuration directory at /etc/letsencrypt. You should make a
   secure backup of this folder now. This configuration directory will
   also contain certificates and private keys obtained by Certbot so
   making regular backups of this folder is ideal.

開啟 Nginx Web Server 的使用者目錄網頁

1. 新增使用者 testuser
# useradd testuser -d /home/testuser

2. 建立網頁目錄及測試網頁
# mkdir /home/testuser/www
# echo “<h2> Testuser’ Nginx UserDir Test Page</h2>” > /home/testuser/www/test.html

3. 更改目錄及檔案擁有者及群組
# chown -R testuser:testuser /home/testuser
# chmod 711 /home/testuser[@more@]
4. 加入設定
# vim /etc/nginx/conf.d/default.conf
     location ~ ^/~(.+?)(/.*)?$ {
         alias /home/$1/www$2;
         index  index.php index.html index.htm;
         autoindex on;
     }

5. 重新啟動 Nginx Web Server
# systemctl restart nginx.service

6. 觀看成果 http://Server’IP/~testuser/test.html

Nignx 加入網頁密碼保護

參考網頁:
Linux . 無限: 在 CentOS7/RHEL7上,使用 Nginx 設定基本 Web 帳號密碼

1. 安裝 httpd-tools 套件
# yum install httpd-tools

2. 建立目錄及測試檔
# mkdir /usr/share/nginx/html/admin
# echo “<h2>This is a secure file</h2>” > /usr/share/nginx/html/admin/test.html

3. 建立密碼檔
# /bin/htpasswd -c /usr/share/nginx/html/admin/.htpasswd test
New password:
Re-type new password:
Adding password for user test[@more@]
4. 俢改 /etc/nginx/conf.d/default.conf 設定檔
# vim /etc/nginx/conf.d/default.conf
    location ~ ^/admin/.* {
        root /usr/share/nginx/html;
        index index.php index.html index.htm;
        location ~ .php$ {
           try_files $uri = 404;
           fastcgi_pass   127.0.0.1:9000;
           fastcgi_index  index.php;
           fastcgi_param  SCRIPT_FILENAME  $document_root$fastcgi_script_name;
           include        fastcgi_params;
        }
        auth_basic “Administrator Login”;
        auth_basic_user_file /usr/share/nginx/html/admin/.htpasswd;
    }

    location ~ ^/admin/.* {
        root /usr/share/nginx/html;
        index index.php index.html index.htm;
            auth_basic            “
Administrator Login“;
            auth_basic_user_file  “/
usr/share/nginx/html/admin/.htpasswd“;
        }

5. 重新啟動 Nginx Web Server
# systemctl restart nginx.service

6. 觀看成果 http://Server’IP/admin/test.html

Nginx 加入Memcached 模組

參考網站:
Linux . 無限: 在 CentOS7/RHEL7 上安裝 Memcached 套件
Linux . 無限: 在 CentOS7/RHEL7 上架設 Nginx Web Server(一)

1. 安裝 memcache 相關套件 
# yum install memcached php-pecl-memcache

2. 查看 /etc/sysconfig/memcached 設定檔
# cat /etc/sysconfig/memcached
# 連線 Port
PORT=”11211″
# 執行身份
USER=”memcached”
# 最多連線
MAXCONN=”1024″
# 使用 Cache 容量
CACHESIZE=”64″

3. 啟動 memcached 服務
# systemctl enable memcached.service
Created symlink from /etc/systemd/system/multi-user.target.wants/memcached.service to /usr/lib/systemd/system/memcached.service.
# systemctl start memcached.service[@more@]
4. 檢查服務是否有正常啟動
# systemctl status memcached.service
● memcached.service – Memcached
   Loaded: loaded (/usr/lib/systemd/system/memcached.service; enabled; vendor preset: disabled)
   Active: active (running) since Sat 2017-03-11 15:02:39 CST; 10s ago
 Main PID: 1107 (memcached)
   CGroup: /system.slice/memcached.service
           mq1107 /usr/bin/memcached -u memcached -p 11211 -m 64 -c 1024

Mar 11 15:02:39 mis systemd[1]: Started Memcached.
Mar 11 15:02:39 mis systemd[1]: Starting Memcached…

# ss -tnl | grep 11211
LISTEN     0      128          *:11211                    *:*
LISTEN     0      128         :::11211                   :::*

5. 重新啟動 Web Server
for Apache Web Server
# systemctl restart httpd.service

for Nginx Web Server
# vim /etc/nginx/conf.d/default.conf
    location ^~ /cache/ {
        set            $memcached_key $request_uri;
        memcached_pass 127.0.0.1:11211;
    }
# systemctl restart nginx.service
# systemctl restart php-fpm

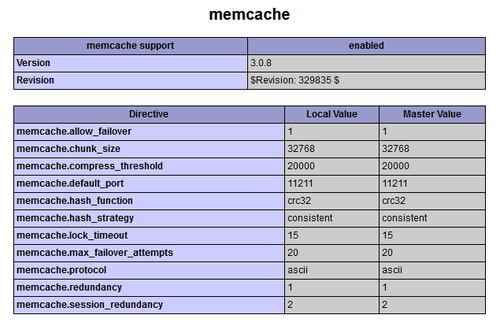
觀看成果 http://Server’IP/info.php

改成 Socket 的使用方式
# cat /etc/sysconfig/memcached
PORT=”11211″
USER=”memcached”
MAXCONN=”1024″
CACHESIZE=”64″
OPTIONS=”-s /tmp/memcached.sock -a 666″

# vim /etc/php.d/memcache.ini
;  Use memcache as a session handler
session.save_handler=memcache
;  Defines a comma separated of server urls to use for session storage
session.save_path=”/tmp/memcached.sock”

# vim /etc/nginx/conf.d/default.conf
    location ^~ /cache/ {
        set            $memcached_key $request_uri;
        memcached_pass unix:/tmp/memcached.sock;
    }

# systemctl restart memcached.service
# systemctl restart nginx.service
# systemctl restart php-fpm

# ls -l /tmp/memcached.sock
srw-rw-rw- 1 memcached memcached 0 Mar 11 16:00 /tmp/memcached.sock

Nginx 加入 php 模組

參考網頁:
Linux . 無限: 在 CentOS7/RHEL7 上架設 Nginx Web Server(一)
CentOS 7 : Nginx : PHP-FPM : Server World
[CentOS 7] 整合 Nginx、MariaDB、PHP 7 組成 LEMP Server | IT 技術家

1. 安裝 php-fpm 套件
# yum install php-fpm php-mbstring php-pear

2. 修改 /etc/php-fpm.d/www.conf 設定檔,改變執行者及群組
# vim /etc/php-fpm.d/www.conf
user = apache
group = apache

3. 啟動php-fpm 服務
# systemctl enable php-fpm.service
Created symlink from /etc/systemd/system/multi-user.target.wants/php-fpm.service to /usr/lib/systemd/system/php-fpm.service.
# systemctl start php-fpm.service[@more@]
4. 修改 /etc/nginx/conf.d/default.conf 設定檔
# cp /etc/nginx/conf.d/default.conf /etc/nginx/conf.d/default.conf.$(date +%F)
# vim /etc/nginx/conf.d/default.conf
server {
    listen       80;
    server_name  localhost;

    charset utf-8;
    access_log  /var/log/nginx/access.log  main;
    error_log /var/log/nginx/error.log warn;

    location / {
        root   /usr/share/nginx/html;
        index  index.php index.html index.htm;
    }

    error_page  404              /404.html;

    location ~ .php$ {
        root           /usr/share/nginx/html;
        fastcgi_pass   127.0.0.1:9000;
        fastcgi_index  index.php;
        fastcgi_param  SCRIPT_FILENAME $document_root$fastcgi_script_name;
        include        fastcgi_params;
    }
    location ~ /.ht {
        deny  all;
    }
}

5. 修改 /etc/php.ini
# sed -i ‘s/;cgi.fix_pathinfo=1/cgi.fix_pathinfo=0/’ /etc/php.ini

6. 重新啟動 Nginx Web Server
# systemctl restart nginx.service
# systemctl status nginx.service

7. 編輯 php 測試檔
# echo “<?php phpinfo(); ?>” > /usr/share/nginx/html/info.php

8. SELinux 設定
# chcon -R -t httpd_sys_rw_content_t /usr/share/nginx/html

9. 開啟瀏覽器 http://Server’IP/info.php


修改 /etc/php-fpm.d/www.conf 設定檔,改變執行者及群組
# vim /etc/php-fpm.d/www.conf
user = nginx
group = nginx
listen = /var/run/php-fpm.sock
listen.owner = nginx
listen.group = nginx
listen.mode = 0666

# vim /etc/nginx/conf.d/default.conf
    location ~ .php$ {
        root           /usr/share/nginx/html;
        fastcgi_pass   unix:/var/run/php-fpm.sock;
        fastcgi_index  index.php;
        fastcgi_param  SCRIPT_FILENAME $document_root$fastcgi_script_name;
        include        fastcgi_params;
    }

在 CentOS 7.x 下安裝 Nignx Web Server

使用 nginx 套件庫安裝
1. 建立 nginx 套件庫
# vim /etc/yum.repos.d/nginx.repo
[nginx]
name=nginx repo
baseurl=http://nginx.org/packages/centos/$releasever/$basearch/
gpgcheck=0
enabled=1

2. 套件庫更新
# yum update

3. 安裝 Nginx Web Server
# yum install nginx

4. 安裝的版本
# /sbin/nginx -V
nginx version: nginx/1.10.3[@more@]或使用 epel 套件庫安裝
1. 安裝 Nginx Web Server
# yum install nginx –enablerepo=epel

2. 安裝的版本
# /sbin/nginx -V
nginx version: nginx/1.10.2

二者差別
1. 用 nginx 套件庫安裝的版本比較新 1.10.3 > 1.10.2
2. 用 epel 套件庫安裝的套件數比較多 25 > 3

設定開機時啟動
# systemctl enable nginx.service
Created symlink from /etc/systemd/system/multi-user.target.wants/nginx.service to /usr/lib/systemd/system/nginx.service.
# systemctl start nginx.service

防火牆上設定
# firewall-cmd –add-service=http –permanent
# firewall-cmd –add-service=https –permanent
# firewall-cmd –reload

# iptables -A INPUT -p tcp –syn -m state –state NEW –dport 80 -j ACCEPT
# iptables -A INPUT -p tcp –syn -m state –state NEW –dport 443 -j ACCEPT

觀看成果 http://Server’IP
Nginx 套件庫

EPEL 套件庫

Apache Web Server 2.4 使用密碼來限制瀏覽來源

1. 建立使用者及密碼
# /usr/bin/htpasswd -c /var/www/test/.htpasswd admin
New password:
Re-type new password:
Adding password for user admin

第二個使用者就不用加上 -c
# /usr/bin/htpasswd /var/www/test/.htpasswd abc[@more@]
2. 建立設定檔 /etc/httpd/conf.d/test.conf
# vim /etc/httpd/conf.d/test.conf
Alias /base /var/www/test
<Directory /var/www/test/>
Order Deny,Allow
#Deny from all
#Allow from 192.168.1.0/24
Require all denied
Require ip 192.168.1.0/24

AuthType Basic
AuthName “Restricted Files”
AllowOverride AuthConfig
# (Following line optional)
AuthBasicProvider file
AuthUserFile “/var/www/test/.htpasswd”
Require valid-user
</Directory>

3. 重新啟動 Apache Web Server
# systemctl restart httpd
# systemctl status httpd

4. 測試一下 http://Server’IP/test

Apache Web Server 2.4 限制瀏覽來源 IP

建立設定檔
# vim /etc/httpd/conf.d/base.conf
Alias /base /var/www/base
<Directory /var/www/base/>
Order Deny,Allow
# 2.2
#Deny from all
#Allow from 192.168.1.0/24
# 2.4
Require all denied
Require ip 192.168.1.0/24
</Directory>

重新啟動 Web Server
# systemctl restart httpd

檢查是否有正常啟動
# system status httpd

LEMP server on CentOS 7.x with FastCGI

參考網頁:LEMP server on CentOS 7 with FastCGI

安裝 epel-release 套件
# yum install epel-release

安裝 Mariadb SQL Server
# yum install mariadb-server mariadb

啟動 Mariadb SQL Server
# systemctl enable mariadb
# systemctl start mariadb

第一次使用時的設定
# /usr/bin/mysql_secure_installation[@more@]安裝 Nginx Web Server
# yum install nginx

修改設定檔 /etc/nginx/nginx.conf
# vim /etc/nginx/nginx.conf
server 區段中加入
   server {
        listen       80 default_server;
        (略)

        error_page 500 502 503 504 /50x.html;
            location = /50x.html {
        }

        location ~ .php$ {
            root           /usr/share/nginx/html;
            fastcgi_pass   127.0.0.1:9000;
            fastcgi_index  index.php;
            fastcgi_param  SCRIPT_FILENAME  $document_root$fastcgi_script_name;
            include        fastcgi_params;
        }
    }

啟動 Nginx Web Server
# systemctl enable nginx
# systemctl start nginx

開啟防火牆設定
# firewall-cmd –permanent –zone=public –add-service=http
# firewall-cmd –permanent –zone=public –add-service=https

安裝 PHP with FastCGI 套件
# yum install php-cli php spawn-fcgi

新增 /usr/bin/php-fastcgi 設定檔
# vim /usr/bin/php-fastcgi
#!/bin/sh
if [ `grep -c “nginx” /etc/passwd` = “1” ]; then
    FASTCGI_USER=nginx
elif [ `grep -c “www-data” /etc/passwd` = “1” ]; then
    FASTCGI_USER=www-data
elif [ `grep -c “http” /etc/passwd` = “1” ]; then
    FASTCGI_USER=http
else
# Set the FASTCGI_USER variable below to the user that
# you want to run the php-fastcgi processes as

FASTCGI_USER=
fi

/usr/bin/spawn-fcgi -a 127.0.0.1 -p 9000 -C 6 -u $FASTCGI_USER -f /usr/bin/php-cgi

更新檔案權限
# chmod +x /usr/bin/php-fastcgi

新增 /etc/systemd/system/php-fastcgi.service 設定檔
# vim /etc/systemd/system/php-fastcgi.service
[Unit]
Description= php-fastcgi systemd service script

[Service]
Type=forking
ExecStart=/usr/bin/php-fastcgi start

[Install]
WantedBy=multi-user.target

啟動相關服務
# systemctl daemon-reload
# systemctl enable php-fastcgi.service
# systemctl start php-fastcgi.service

隱藏 Nginx Web Server 版本

Nginx Web Server 在找不到預設首頁時,會出現如下的圖

畫面上會出現使用的 Web Server 種類及版本[@more@]隱藏方式:CentOS 7.x
1. 先備份原設定檔
# cp /etc/nginx/nginx.conf /etc/nginx/nginx.conf.$(date +%F)

2. 在 nginx.conf  設定檔中加入 server_tokens off; 設定
# /bin/sed -i ‘/root         /usr/share/nginx/html;/a        server_tokens off;’ /etc/nginx/nginx.conf

3. 重新啟動 Nginx Web Server
# systemctl restart nginx

4. 就不會再出現版本號碼了,但還是會出現 Web Server 種類,想到的解決方式可能是把 404 網頁換掉