啟動 SELinux 後的錯誤解決工具

參考網站:鳥哥的 Linux 私房菜 — 程序管理與 SELinux 初探
使用 audit2why 工具
auditd 會將 SELinux 發生的錯誤資訊寫入 /var/log/audit/audit.log

CentOS 7.x
# systemctl list-unit-files | grep audit
auditd.service                              enabled
CentOS 6.x
# chkconfig –list | grep audit
auditd          0:off   1:off   2:on    3:on    4:on    5:on    6:off
[@more@]
# /usr/bin/audit2why < /var/log/audit/audit.log
        Was caused by:
        The boolean httpd_unified was set incorrectly.
        Description:
        Allow httpd to unified

        Allow access by executing:
        # setsebool -P httpd_unified 1

解決方式:
# setsebool -P httpd_unified 1

CentOS 6.x/7.x 上安裝 ownCloud 7.x

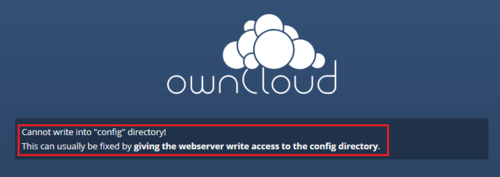
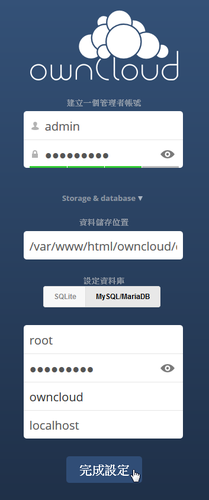
最近在 CentOS 6.x / 7.x 安裝 ownCloud 時,都會出現下面的畫面
[@more@]經過反覆的測試,發現應該是 SElinux 造成的問題
只要暫且把 SELinux 關閉
# setenforce 0

系統就可以正常安裝

可以在 owncloud 目錄下的 README.SELinux 中提到
NOTE: IF YOU INSTALLED FROM THE OFFICIAL OWNCLOUD RPM, YOU DO NOT NEED TO
      FOLLOW THE INSTRUCTIONS BELOW! THEY HAVE ALREADY BEEN DONE FOR YOU!

If you are running Fedora 16 with SELinux enabled, you need to relabel the
ownCloud installation directory to allow the webserver to store files there.

To do that, execute the following commands as user root AFTER you installed
ownCloud:

# semanage fcontext -a -t httpd_sys_rw_content_t ‘/var/www/html/owncloud/data’
# restorecon ‘/var/www/html/owncloud/data’
# semanage fcontext -a -t httpd_sys_rw_content_t ‘/var/www/html/owncloud/config’
# restorecon ‘/var/www/html/owncloud/config’

To remove the ownCloud directory label execute the following commands as
user root AFTER you uninstalled ownCloud:

# semanage fcontext -d -t httpd_sys_rw_content_t ‘/var/www/html/owncloud/data’
# restorecon ‘/var/www/html/owncloud/data’
# semanage fcontext -d -t httpd_sys_rw_content_t ‘/var/www/html/owncloud/config’
# restorecon ‘/var/www/html/owncloud/config’

Note: all of the above applies only to the default policies. If you modified
      them, please give the webserver write-access to the directories
      /var/www/html/owncloud/data and /var/www/html/owncloud/config

Note: for non-Fedora / Redhat systems running SELinux the policy might be
      called differently.

Enjoy you own Cloud!

只要是用 rpm 來安裝的,就可以不用做設定,但即使做了設定也沒有用

解決方式:
1. 關閉 SELinux,這是我最不建議的
# sed -i ‘s/SELINUX=enforcing/SELINUX=disabled/’ /etc/selinux/config

重新開機
# reboot

2. 設定目錄擁有者及 SELinux
# chown -R apache:apache /var/www/html/owncloud/data
# chown -R apache:apache /var/www/html/owncloud/config
# chcon -R -t httpd_sys_rw_content_t /var/www/html/owncloud/config
# chcon -R -t httpd_sys_rw_content_t /var/www/html/owncloud/data
# chcon -R -t httpd_sys_rw_content_t /var/www/html/owncloud/apps

SELinux 備忘

SELinux 設定檔
# cat /etc/selinux/config

# This file controls the state of SELinux on the system.
# SELINUX= can take one of these three values:
#     enforcing – SELinux security policy is enforced.
#     permissive – SELinux prints warnings instead of enforcing.
#     disabled – No SELinux policy is loaded.
SELINUX=enforcing
# SELINUXTYPE= can take one of these two values:
#     targeted – Targeted processes are protected,
#     mls – Multi Level Security protection.
SELINUXTYPE=targeted

顯示目前 SELinux 狀態
# sestatus
SELinux status:                 enabled
SELinuxfs mount:                /selinux
Current mode:                   enforcing
Mode from config file:          enforcing
Policy version:                 24
Policy from config file:        targeted

# sestatus
SELinux status:                 disabled
[@more@]
改變 SELinux 模式
# getenforce
Enforcing
# setenforce 0
# getenforce
Permissive
# setenforce 1
# getenforce
Enforcing
# setenforce –help
usage:  setenforce [ Enforcing | Permissive | 1 | 0 ]

Display SELinux Contexts
# ls -Z /root/anaconda-ks.cfg
-rw——-. root root system_u:object_r:admin_home_t:s0 /root/anaconda-ks.cfg
# ls -dZ /var/www/html
drwxr-xr-x. root root system_u:object_r:httpd_sys_content_t:s0 /var/www/html/

Set SELinux Contexts
# touch index-1.html
# touch /var/www/html/index.html
# mv index-1.html /var/www/html/
# ls -Z /var/www/html/*.html
-rw-r–r–. root root unconfined_u:object_r:admin_home_t:s0 /var/www/html/index-1.html
-rw-r–r–. root root unconfined_u:object_r:httpd_sys_content_t:s0 /var/www/html/index.html
# chcon -t httpd_sys_content_t /var/www/html/index-1.html
# ls -Z /var/www/html/*.html
-rw-r–r–. root root unconfined_u:object_r:httpd_sys_content_t:s0 /var/www/html/index-1.html
-rw-r–r–. root root unconfined_u:object_r:httpd_sys_content_t:s0 /var/www/html/index.html

# touch index-2.html
# mv index-2.html /var/www/html
# ls -Z /var/www/html/*.html
-rw-r–r–. root root unconfined_u:object_r:httpd_sys_content_t:s0 /var/www/html/index-1.html
-rw-r–r–. root root unconfined_u:object_r:admin_home_t:s0 /var/www/html/index-2.html
-rw-r–r–. root root unconfined_u:object_r:httpd_sys_content_t:s0 /var/www/html/index.html
# restorecon -v /var/www/html/index-2.html
restorecon reset /var/www/html/index-2.html context unconfined_u:object_r:admin_home_t:s0->unconfined_u:object_r:httpd_sys_content_t:s0
# ls -Z /var/www/html/*.html
-rw-r–r–. root root unconfined_u:object_r:httpd_sys_content_t:s0 /var/www/html/index-1.html
-rw-r–r–. root root unconfined_u:object_r:httpd_sys_content_t:s0 /var/www/html/index-2.html
-rw-r–r–. root root unconfined_u:object_r:httpd_sys_content_t:s0 /var/www/html/index.html

Get SELinux booleans
# getsebool -a | head -10
abrt_anon_write –> off
abrt_handle_event –> off
allow_console_login –> on
allow_cvs_read_shadow –> off
allow_daemons_dump_core –> on
allow_daemons_use_tcp_wrapper –> off
allow_daemons_use_tty –> on
allow_domain_fd_use –> on
allow_execheap –> off
allow_execmem –> on

# getsebool -a | grep ftp
allow_ftpd_anon_write –> off
allow_ftpd_full_access –> off
allow_ftpd_use_cifs –> off
allow_ftpd_use_nfs –> off
ftp_home_dir –> off
ftpd_connect_db –> off
ftpd_use_fusefs –> off
ftpd_use_passive_mode –> off
httpd_enable_ftp_server –> off
tftp_anon_write –> off
tftp_use_cifs –> off
tftp_use_nfs –> off

# getsebool ftp_home_dir
ftp_home_dir –> off

Set SELinux booleans
# setsebool ftp_home_dir 1
# getsebool ftp_home_dir
ftp_home_dir –> on
# setsebool ftp_home_dir 0
# getsebool ftp_home_dir
ftp_home_dir –> off

讓設定永遠生效
# setsebool -P ftp_home_dir 1

# yum install policycoreutils-python

取得相關資訊
# semanage boolean -l | grep ftp_home_dir
ftp_home_dir                   (開啟   ,   開啟)  Allow ftp to read and write files in the user home directories

解決 FTP 時 550 Failed to change directory. 的問題

在建立 PXE Server 時,有透過 FTP 的方式來網路安裝 Linux,是使用 ln -s(Symbolic Link) 的方式來連結。
# ln -s /var/www/html/CentOS /var/ftp/CentOS

但建立完之後,使用 ftp 連線時,卻發現無法切換到 CentOS 目錄,出現 550 Failed to change directory 的錯誤訊息
# lftp 192.168.1.6
lftp 192.168.1.6:~> ls
lrwxrwxrwx    1 0        0              20 Jan 08 09:31 CentOS -> /var/www/html/CentOS
drwxr-xr-x    2 0        0            4096 Jan 08 09:29 Linux
drwxr-xr-x    2 0        0            4096 Jan 06 19:16 pub
lftp 192.168.1.6:/> cd CentOS/
cd: Access failed: 550 Failed to change directory. (/CentOS)
lftp 192.168.1.6:/> bye
[@more@]本來以為是 SELinux 的問題,幾乎把所有有關 ftp 的選項都打開了,也是沒有辦法
# getsebool -a | grep ftp
allow_ftpd_anon_write –> off
allow_ftpd_full_access –> on
allow_ftpd_use_cifs –> off
allow_ftpd_use_nfs –> off
ftp_home_dir –> on
ftpd_connect_db –> off
ftpd_use_fusefs –> off
ftpd_use_passive_mode –> on
httpd_enable_ftp_server –> off
tftp_anon_write –> off
tftp_use_cifs –> off
tftp_use_nfs –> off

後來乾脆來 SELinux 整個關掉,也是不行

後來在網路上找了很久,終於找到這一篇文章 網路一族: vsftp 出現 550 failed to change directory
文章中提到的第 2 點,可能是 Soft Link 的問題,因為 chroot 不能使用 Link 的功能

根據這一個提示,在網路上搜尋 Soft Link 550,在 FileZilla Forums • View topic – Symbolic links cause error 550 because path is too deep  找到了解決的方式

刪除原來的 Link
# rm -rf /var/ftp/CentOS
建立要連結的目錄
# mkdir /var/ftp/CentOS
使用 mount –bind 的方式來建立連結
 # mount –bind /var/www/html/CentOS /var/ftp/CentOS

這樣子就可以正常切換到 /var/ftp/CentOS 目錄了!

autofs 無法自動掛載目錄

學校 Server 之間的備份都是利用 NFS 搭配 autofs 服務,再使用 cron 及備份的 Script 來做備份,重新安裝 Server後,發現 autofs 無法自動掛載 NFS 目錄,所以備份無法成功。
後來發現應該也是 SELinux 所造成的問題
# ls -lZ /etc/auto.*
-rw-r–r–. root root unconfined_u:object_r:admin_home_t:s0 /etc/auto.bs
-rw-r–r–. root root system_u:object_r:etc_t:s0       /etc/auto.master
-rw-r–r–. root root system_u:object_r:etc_t:s0       /etc/auto.misc
-rwxr-xr-x. root root system_u:object_r:etc_t:s0       /etc/auto.net*
-rwxr-xr-x. root root system_u:object_r:etc_t:s0       /etc/auto.smb*

auto.bs 是我從備份的設定檔複製過去的,所以權限不同[@more@]解決方式:
1. 關閉 SELinux,感覺 SELinux 有點像是 Windows 上的 使用者帳戶控制(UAC),強調會比較安全,但卻造成使用者操作上的不便。不過在這裡並不關閉 SELinux,而是改用第二種方法。
2. 更改權限
# chcon -u system_u -t etc_t /etc/auto.bs

再檢查一下權限
# ls -lZ /etc/auto.*
-rw-r–r–. root root system_u:object_r:etc_t:s0       /etc/auto.bs
-rw-r–r–. root root system_u:object_r:etc_t:s0       /etc/auto.master
-rw-r–r–. root root system_u:object_r:etc_t:s0       /etc/auto.misc
-rwxr-xr-x. root root system_u:object_r:etc_t:s0       /etc/auto.net*
-rwxr-xr-x. root root system_u:object_r:etc_t:s0       /etc/auto.smb*

重新啟動 autofs 服務
# /etc/init.d/autofs restart
正在停止 automount:                                       [  確定  ]
正在啟動 automount:                                       [  確定  ]

這時候就正常了!

後記:
關於 SELinux 所造成的困擾,最簡單的解決方式,就是不要直接從別的目錄複製舊的設定檔來想要直接覆蓋,而是先編輯新的設定檔,再把舊資料讀入,就會沒有問題了!
以 Apache Web Server 為例
# cp /etc/httpd/conf/httpd.conf /etc/httpd/conf/httpd.conf.$(date +%F)
# vim /etc/httpd/conf/httpd.conf
:r /root/bak/httpd.conf

# chcon -u system_u -t httpd_config_t /etc/httpd/httpd.conf*

squid Proxy Server & SELinux

重新安裝了之前硬碟故障的 Proxy Server,系統安裝完後,複製之前備份的設定檔後,重新啟動 Proxy Server 後,發現無法啟動 Proxy Server
# service squid start
正在啟動 squid:                                           [失敗]
2013/12/27 13:59:21| Processing Configuration File: /etc/squid/squid.conf (depth 0)
FATAL: Unable to open configuration file: /etc/squid/squid.conf: (13) Permission denied
Squid Cache (Version 3.1.10): Terminated abnormally.
CPU Usage: 0.009 seconds = 0.005 user + 0.004 sys
Maximum Resident Size: 22736 KB
Page faults with physical i/o: 0[@more@]檢查 /etc/squid/squid.conf 的檔案權限
# ls -l /etc/squid/squid.conf*
-rw-r—–. 1 root root 4399 2013-11-19 00:48 /etc/squid/squid.conf
-rw-r—–. 1 root squid 2510 2013-10-01 21:44 /etc/squid/squid.conf.bak

所屬群組似不同
# chown root:squid /etc/squid/squid.conf
# ls -l /etc/squid/squid.conf*
-rw-r—–. 1 root squid 4399 2013-11-19 00:48 /etc/squid/squid.conf
-rw-r—–. 1 root squid 2510 2013-10-01 21:44 /etc/squid/squid.conf.bak

但還是無法啟動
# service squid start
正在啟動 squid:                                           [失敗]
2013/12/27 13:59:21| Processing Configuration File: /etc/squid/squid.conf (depth 0)
FATAL: Unable to open configuration file: /etc/squid/squid.conf: (13) Permission denied
Squid Cache (Version 3.1.10): Terminated abnormally.
CPU Usage: 0.009 seconds = 0.005 user + 0.004 sys
Maximum Resident Size: 22736 KB
Page faults with physical i/o: 0

後來發現可能是 SELinux 的問題,權限不對
ls -lZ /etc/squid/squid.conf*
-rw-r—–. root squid unconfined_u:object_r:admin_home_t:s0 /etc/squid/squid.conf
-rw-r—–. root squid system_u:object_r:squid_cache_t:s0 /etc/squid/squid.conf.bak

更改成正確的屬性
# chcon -R -u system_u -t squid_conf_t /etc/squid/squid.conf

再次檢查屬性
# ls -lZ /etc/squid/squid.conf*
-rw-r—–. root squid system_u:object_r:squid_conf_t:s0 /etc/squid/squid.conf
-rw-r—–. root squid system_u:object_r:squid_conf_t:s0 /etc/squid/squid.conf.bak

原本 Squid Proxy Server Cache 目錄權限
ls -lZ /cache1/* | head
/cache1/00:
drwxr-x—. squid squid system_u:object_r:default_t:s0   00/
drwxr-x—. squid squid system_u:object_r:default_t:s0   01/
drwxr-x—. squid squid system_u:object_r:default_t:s0   02/
drwxr-x—. squid squid system_u:object_r:default_t:s0   03/
drwxr-x—. squid squid system_u:object_r:default_t:s0   04/
drwxr-x—. squid squid system_u:object_r:default_t:s0   05/
drwxr-x—. squid squid system_u:object_r:default_t:s0   06/
drwxr-x—. squid squid system_u:object_r:default_t:s0   07/
drwxr-x—. squid squid system_u:object_r:default_t:s0   08/

更改成正確的屬性
# chcon -R -u system_u -t squid_cache_t /cache1

再次檢查屬性
ls -lZ /cache1/* | head
/cache1/00:
drwxr-x—. squid squid system_u:object_r:squid_cache_t:s0 00/
drwxr-x—. squid squid system_u:object_r:squid_cache_t:s0 01/
drwxr-x—. squid squid system_u:object_r:squid_cache_t:s0 02/
drwxr-x—. squid squid system_u:object_r:squid_cache_t:s0 03/
drwxr-x—. squid squid system_u:object_r:squid_cache_t:s0 04/
drwxr-x—. squid squid system_u:object_r:squid_cache_t:s0 05/
drwxr-x—. squid squid system_u:object_r:squid_cache_t:s0 06/
drwxr-x—. squid squid system_u:object_r:squid_cache_t:s0 07/
drwxr-x—. squid squid system_u:object_r:squid_cache_t:s0 08/

就可以正常啟動 Proxy Server 了!
# service squid start
正在啟動 squid:.                                          [  確定  ]


連線 FTP Server 出現 500 OOPS: cannot change directory:/root

新架設完成的 vsfTPd FTP Server 連線時,出現 500 OOPS: cannot change directory:/root 的錯誤訊息,看起來應該是 SELinux 的問題,解決的方式有二個。
一個是關閉 SELinux
# vim /etc/selinux/config

SELINUX=enforcing
改成
SELINUX=disabled

重新開機即可,不過並不建議這種方式。
[@more@]第二種方式,開啟 SELinux 的設定中有關於 ftp 的部分權限
# sestatus -b | grep ftp
allow_ftpd_anon_write                       off
allow_ftpd_full_access                      off
allow_ftpd_use_cifs                         off
allow_ftpd_use_nfs                          off
ftp_home_dir                                off
ftpd_connect_db                             off
ftpd_use_fusefs                             off
ftpd_use_passive_mode                       off
httpd_enable_ftp_server                     off
tftp_anon_write                             off
tftp_use_cifs                               off
tftp_use_nfs                                off

# setsebool -P ftp_home_dir  on

重新啟動 FTP Server 即可,如果還是不行,請再開啟下面的選項

# setsebool -P allow_ftpd_full_access  on

semanage 指令找不到

semanage 是一個在 Linux 中設定 SELinux 權限的工具,但預設似乎不會安裝,所以要用的時候找不到。

找不到這一個程式
# which semanage
/usr/bin/which: no semanage in (/usr/lib64/qt-3.3/bin:/usr/local/sbin:/usr/local/bin:/sbin:/bin:/usr/sbin:/usr/bin:/root/bin)

系統中沒有安裝
# rpm -qa | grep semanage
libsemanage-2.0.43-4.2.el6.x86_64

yum search 也找不到
# yum search semanage
Loaded plugins: fastestmirror, security
Loading mirror speeds from cached hostfile
Warning: No matches found for: semanage
No Matches found
[@more@]查詢哪一個套件有提供這一個程式
# yum provides /usr/sbin/semanage
Loaded plugins: downloadonly, fastestmirror
Loading mirror speeds from cached hostfile
 * base: ftp.twaren.net
 * extras: ftp.twaren.net
 * updates: ftp.twaren.net
policycoreutils-python-2.0.83-19.30.el6.x86_64 : SELinux policy core python utilities
Repo        : base
Matched from:
Filename    : /usr/sbin/semanage

終於找到了,是 policycoreutils-python 這一個套件
進行安裝
# yum install policycoreutils-python

Security-Enhanced Linux & Samba

好久沒碰 SELinux(Security-Enhanced Linux)  了,加上以前為了麻煩,大部分都是直接關掉,最近重新安裝了幾台伺服器,在學校授權光碟伺服器上,吃了 SELinux 很大的苦頭。
安裝好系統之後,首先是做 Samba Server 的設定,接著在防火牆上也進行連線來源的管制設定,但在連線時,卻都是可以看的到,但無法存取,重覆檢查 Samba 和防火牆上的設定,也都沒有問題,百思不得其解。
[@more@]後來想到,是不是 SELinux 的問題,執行下面的指令,果然就可以正常存取了!
# setsebool -P samba_enable_home_dirs=1