建立 Cache-only DNS

安裝在 Proxy Server 上,給 Proxy Server 使用,為了加快 DNS 查詢的速度,把查詢過的 DNS 記錄快取起來。
參考網站:
CentOS Cache-only DNS伺服器安裝設定[1]:::iThome Download-你要的軟體在這裡:::

1. 安裝套件
# yum install bind bind-chroot bind-utils

2. 修改設定檔  /etc/named.conf
# cp /etc/named.conf /etc/named.conf.$(date +%F)
# egrep -v ‘^$|//’ /etc/named.conf
options {
#       listen-on port 53 { 127.0.0.1; };
#       listen-on-v6 port 53 { ::1; };
        directory       “/var/named”;
        dump-file       “/var/named/data/cache_dump.db”;
        statistics-file “/var/named/data/named_stats.txt”;
        memstatistics-file “/var/named/data/named_mem_stats.txt”;
        allow-query     { localhost; };
        /*
         – If you are building an AUTHORITATIVE DNS server, do NOT enable recursion.
         – If you are building a RECURSIVE (caching) DNS server, you need to enable
           recursion.
         – If your recursive DNS server has a public IP address, you MUST enable access
           control to limit queries to your legitimate users. Failing to do so will
           cause your server to become part of large scale DNS amplification
           attacks. Implementing BCP38 within your network would greatly
           reduce such attack surface
        */
        recursion yes;
        dnssec-enable yes;
        dnssec-validation yes;
        /* Path to ISC DLV key */
        bindkeys-file “/etc/named.iscdlv.key”;
        forward only;
        forwarders {
                168.95.1.1;

                8.8.8.8;
                };
        managed-keys-directory “/var/named/dynamic”;
        pid-file “/run/named/named.pid”;
        session-keyfile “/run/named/session.key”;
};
logging {
        channel default_debug {
                file “data/named.run”;
                severity dynamic;
        };
};
zone “.” IN {
        type hint;
        file “named.ca”;
};
include “/etc/named.rfc1912.zones”;
include “/etc/named.root.key”;[@more@]3. 設定開機時啟動
# systemctl enable named.service
Created symlink from /etc/systemd/system/multi-user.target.wants/named.service to /usr/lib/systemd/system/named.service.
# systemctl start named.service

4. 修改 /etc/resolv.conf
# echo “nameserver 127.0.0.1” > /etc/resolv.conf

5. 進行 DNS 查詢
# host www.ilc.edu.tw 127.0.0.1
Using domain server:
Name: 127.0.0.1
Address: 127.0.0.1#53
Aliases:

www.ilc.edu.tw has address 140.111.66.96
www.ilc.edu.tw has IPv6 address 2001:288:a201::66:96

再一次查詢的速度會比前一次本查詢過的,快一些!

安裝 lightsquid

LightSquid 是一個可以分析 Squid Proxy Server 瀏覽記錄的程式,可以讓管理者更加了解 Proxy Server 的使用狀況。
LightSquid 官方網站:http://lightsquid.sourceforge.net/
1. 下載 LightSquid
 # wget –no-check-certificate https://downloads.sourceforge.net/project/lightsquid/lightsquid/1.8/lightsquid-1.8.tgz -P /var/www

2. 解壓縮
# tar xvzf /var/www/lightsquid-1.8.tgz

3. 搬移目錄
# mv /var/www/lightsquid-1.8 /var/www/lightsquid[@more@]
4. 更改設定檔 /var/www/lightsquid/lightsquid.cfg
# sed -i ‘s@/var/www/html@/var/www@’  /var/www/lightsquid/lightsquid.cfg

5. 檢查設定
# cd /var/www/lightsquid
# ./check-setup.pl
LightSquid Config Checker, (c) 2005-9 Sergey Erokhin GNU GPL

no: CGI.PM found, please install
no: GD.PM found, please install or set $graphreport=0 to disable

# yum install perl-CGI perl-GD

# ./check-setup.pl
LightSquid Config Checker, (c) 2005-9 Sergey Erokhin GNU GPL

LogPath   : /var/log/squid
reportpath: /var/www/lightsquid/report
Lang      : /var/www/lightsquid/lang/zh_tw
Template  : /var/www/lightsquid/tpl/base
Ip2Name   : /var/www/lightsquid/ip2name/ip2name.simple

all check passed, now try access to cgi part in browser

6. 處理 SELinux 權限
# chcon -R system_u:object_r:httpd_sys_script_exec_t:s0 /var/www/lightsquid

7. 建立 /etc/httpd/conf.d/lightsquid.conf
# vim /etc/httpd/conf.d/lightsquid.conf
Alias /lightsquid /var/www/lightsquid
ScriptAlias /lightsquid/ /var/www/lifgtsquid/
<Directory /var/www/lightsquid/>
DirectoryIndex index.cgi
Options ExecCGI
AddHandler cgi-script .cgi
</Directory>

8. 處理 SELinux 權限
# chcon -R system_u:object_r:httpd_config_t:s0 /etc/httpd/conf.d

9. 重新啟動 Web Server
# systemctl restart httpd.service

10. 加入工作排程
# crontab -e
0 1 * * * /usr/sbin/squid -k rotate > /dev/null 2>&1
30 1 * * * /var/www/lightsquid/lightparser.pl access.log.0 > /dev/null 2>&1

Squid Proxy Server SSL

參考網站:
SQUID Transparent Proxy (HTTP+HTTPs)
設定SQUID 成為 HTTP/HTTPS 代理伺服器及啟動 ICAP client功能
Jedi Linuxer: 利用 Squid 代理伺服器(Proxy)分析 HTTPS 連線內容
Configure Squid as HTTP and HTTPS Transparent Proxy
Configure squid-3.3 in transparent mode on CentOS 7 with SSL bum – Notes Wiki

CentOS 7.x x64
NAT Client:192.168.1.0/24
NAT Server:192.168.1.254
1. 安裝 perl-Crypt-OpenSSL-X509 套件
# yum install perl-Crypt-OpenSSL-X509 –enablerepo=epel

2. 初始化 Squid SSL DB
# /usr/lib64/squid/ssl_crtd -c -s /var/lib/ssl_db
Initialization SSL db…
Done[@more@]
3. 改變擁有者及群組
# chown -R squid.squid /var/lib/ssl_db

4. 如果有開啟 SELinux
# chcon -R -u system_u -t squid_conf_t /var/lib/ssl_db

5. 修改 /etc/squid/squid.conf
    僅列出特別修改的地方
# vim /etc/squid/squid.conf
http_port 3130
http_port 3128 intercept
http_port 3129 intercept ssl-bump generate-host-certificates=on dynamic_cert_mem_cache_size=4MB cert=/etc/squid/ssl_cert/myca.pem key=/etc/squid/ssl_cert/myca.pem

#always_direct allow all
ssl_bump server-first all
#sslproxy_cert_error deny all
#sslproxy_flags DONT_VERIFY_PEER

sslcrtd_program /usr/lib64/squid/ssl_crtd -s /var/lib/ssl_db -M 4MB
sslcrtd_children 8 startup=1 idle=1

coredump_dir /var/spool/squid
shutdown_lifetime 1 second

6. 使用 OpenSSL 來建立 Squid 憑證
# cp /etc/pki/tls/openssl.cnf /etc/pki/tls/openssl.cnf.$(date +%F)
# vim /etc/pki/tls/openssl.cnf
default_days    = 1365                  # how long to certify for

[ req_distinguished_name ]
countryName                     = Country Name (2 letter code)
countryName_default             = TW
countryName_min                 = 2
countryName_max                 = 2

stateOrProvinceName             = State or Province Name (full name)
stateOrProvinceName_default     = Yilan

localityName                    = Locality Name (eg, city)
localityName_default            = TouCheng

0.organizationName              = Organization Name (eg, company)
0.organizationName_default      = Elementary School

# we can do this but it is not needed normally 🙂
#1.organizationName             = Second Organization Name (eg, company)
#1.organizationName_default     = World Wide Web Pty Ltd

organizationalUnitName          = Organizational Unit Name (eg, section)
organizationalUnitName_default  = Proxy Server

commonName                      = Common Name (eg, your name or your server’s hostname)
commonName_default              = proxy.test.ilc.edu.tw
commonName_max                  = 64

emailAddress                    = test@gmail.com
emailAddress_max                = 64

7. 建立目錄
# mkdir /etc/squid/ssl_cert

8. 改變目錄擁有者及群組
# chown -R squid.squid /etc/squid/ssl_cert

9. 切換目錄
# cd /etc/squid/ssl_cert

10. 建立 Server Key,按 Enter 鍵即可
# openssl req -new -newkey rsa:1024 -days 1365 -nodes -x509 -keyout myca.pem -out myca.pem
Generating a 1024 bit RSA private key
………………………………………..++++++
………++++++
writing new private key to ‘myca.pem’
—–
You are about to be asked to enter information that will be incorporated
into your certificate request.
What you are about to enter is what is called a Distinguished Name or a DN.
There are quite a few fields but you can leave some blank
For some fields there will be a default value,
If you enter ‘.’, the field will be left blank.
—–
Country Name (2 letter code) [TW]:
State or Province Name (full name) [Yilan]:
Locality Name (eg, city) [TouCheng]:
Organization Name (eg, company) [Elementary School]:
Organizational Unit Name (eg, section) [Proxy Server]:
Common Name (eg, your name or your server’s hostname) [proxy.test.ilc.edu.tw]:
test@gmail.com []:

11. 建立 Windows Client Key
# openssl x509 -in myca.pem -outform DER -out myca.der

12. 修改防火牆設定
# iptables -t nat -A PREROUTING -p tcp -s 192.168.1.0/24 –dport 80 -j DNAT –to 192.168.1.254:3128
# iptables -t nat -A PREROUTING -p tcp -s 192.168.1.0/24 –dport 443 -j DNAT –to 192.168.1.254:3129

Proxy Server 磁碟空間已滿

最近在看學校 Server 的 Log 檔時,發現 Proxy Server 使用的 Cache 空間已經快要滿了!
/dev/sda2        20G   19G  451M  98% /cache1
/dev/sdb1        20G   19G  451M  98% /cache2
/dev/sda3        20G   19G  451M  98% /cache3
/dev/sdb2        20G   19G  450M  98% /cache4

 /dev/sda2 => 98% Used. Warning. Disk Filling up.
 /dev/sdb1 => 98% Used. Warning. Disk Filling up.
 /dev/sda3 => 98% Used. Warning. Disk Filling up.
 /dev/sdb2 => 98% Used. Warning. Disk Filling up.
[@more@]檢查一下設定檔,發現設定檔裡面並沒有設定磁碟空間使用的上限,所以加入了下面的設定,並且把 Proxy Server 重新啟動
cache_swap_low 90
cache_swap_high 95

這二行的意思是,當磁碟使用量達 95% 時,比較舊的快取資料將會被刪除,當刪除到剩下磁碟使用量達 90% 時,就停止持續刪除的動作。

但發現總空間使用容量還是一樣,並沒有減少,所以就決定把所有的 Cache 目錄下的檔案全部刪除,重新建立目錄
停止 Proxy Server
# service squid stop
刪除目錄
# rm -rf /cache{1..4}/*
重新建立 Proxy Server 目錄
# /usr/sbin/squid -z
啟動 Proxy Server
# service squid start

重新啟動 Proxy Server 後,Cache 空間的使用量就有變小了!
# df -h | grep /cache
/dev/sda2        20G  172M   19G   1% /cache1
/dev/sdb1        20G  172M   19G   1% /cache2
/dev/sda3        20G  172M   19G   1% /cache3
/dev/sdb2        20G  172M   19G   1% /cache4

squid Proxy Server 使用 LDAP Server 做認證

1. 修改設定檔
# vim /etc/squid/squid.conf
在 acl 區段加入下面這二行,192.168.154.167 為 LDAP Server’ IP
acl squid_user proxy_auth REQUIRED
auth_param basic program /usr/lib64/squid/squid_ldap_auth -b “dc=ldap,dc=tces.ilc.edu.tw” -h 192.168.154.167 -f “uid=%s”

2. 在 /etc/squid/squid.conf 中的 http_access deny all 前面加入下面這一行
http_access allow squid_user

3. 重新啟動 Squid Proxy Server
# server squid restart
[@more@]

檢驗是否有成功
# grep -v t850008 /var/log/squid/access.log | tail -5
1389089280.327     32 192.168.220.14 TCP_CLIENT_REFRESH_MISS/200 2722 GET http://safebrowsing-cache.google.com/safebrowsing/rd/ChNnb29nLW1hbHdhcmUtc2hhdmFyEAEYtdwHILrcByoFOe4BAAMyBTXuAQAP t850008 DIRECT/2404:6800:4008:c02::64 application/vnd.google.safebrowsing-chunk
1389089280.368     12 192.168.220.14 TCP_CLIENT_REFRESH_MISS/200 4471 GET http://safebrowsing-cache.google.com/safebrowsing/rd/ChNnb29nLW1hbHdhcmUtc2hhdmFyEAAYhZIIIJiSCCoGDwkCAP8DMgYFCQIA_wM t850008 DIRECT/2404:6800:4008:c02::64 application/vnd.google.safebrowsing-chunk
1389089280.414     12 192.168.220.14 TCP_CLIENT_REFRESH_MISS/200 4977 GET http://safebrowsing-cache.google.com/safebrowsing/rd/ChFnb29nLXBoaXNoLXNoYXZhchABGOe5CSDsuQkyBedcAgA_ t850008 DIRECT/2404:6800:4008:c02::64 application/vnd.google.safebrowsing-chunk
1389089280.460     12 111.249.220.14 TCP_CLIENT_REFRESH_MISS/200 2445 GET http://safebrowsing-cache.google.com/safebrowsing/rd/ChFnb29nLXBoaXNoLXNoYXZhchABGO25CSCAugkqB-5cAgD__wcyBe1cAgAB t850008 DIRECT/2404:6800:4008:c02::64 application/vnd.google.safebrowsing-chunk
1389089280.494     12 192.168.220.14 TCP_CLIENT_REFRESH_MISS/200 4918 GET http://safebrowsing-cache.google.com/safebrowsing/rd/ChFnb29nLXBoaXNoLXNoYXZhchAAGMPyEiDM8hIqBUa5BAB_MgVDuQQABw t850008 DIRECT/2404:6800:4008:c02::64 application/vnd.google.safebrowsing-chunk

squid Proxy Server 使用帳號密碼做認證

最近因應某些需求,除了可以用 VPN 來解決外,也思考用 squid Proxy Server 解決的可能方式。
1. 修改設定檔
# vim /etc/squid/squid.conf
在 acl 區段加入下面這二行
acl squid_user proxy_auth REQUIRED
auth_param basic program /usr/lib64/squid/ncsa_auth /etc/squid/passwd

2. 在 /etc/squid/squid.conf 中的 http_access deny all 前面加入下面這一行
http_access allow squid_user
[@more@]
3. 建立所須的密碼檔
這裡建立二個使用者 teacher01 和 student01
# /usr/bin/htpasswd -b -c /etc/squid/passwd teacher01 123456
Adding password for user teacher01
# /usr/bin/htpasswd -b  /etc/squid/passwd student01 234567
Adding password for user student01

檢查帳號是否有設定成功
# more /etc/squid/passwd
teacher01:Z6gIorvSGN/UI
student01:jbqLqf5mmJQKE

4. 重新啟動 squid Proxy Server
# service squid restart

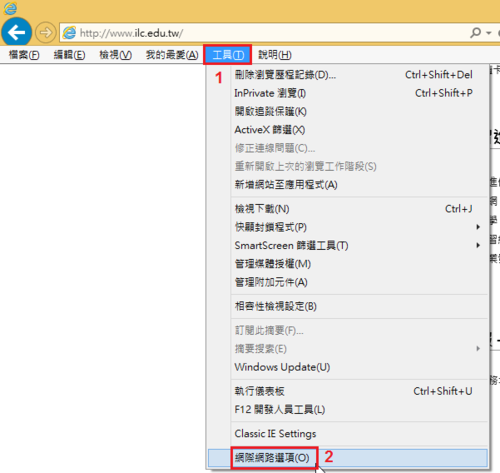
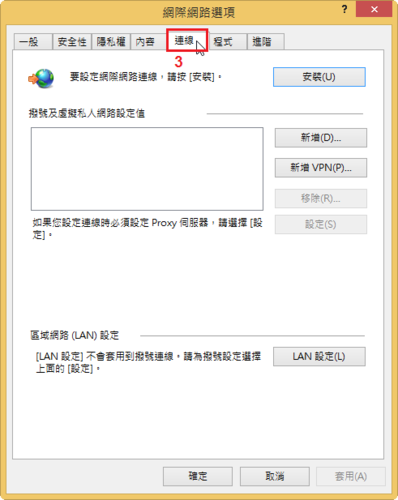
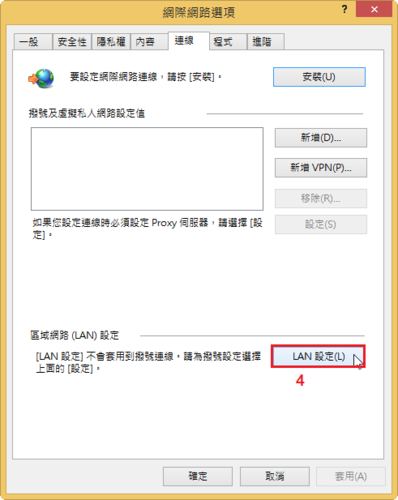
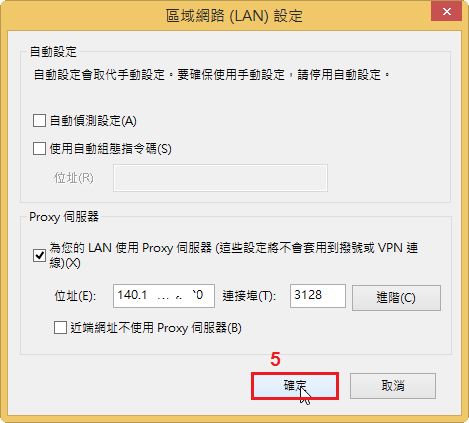
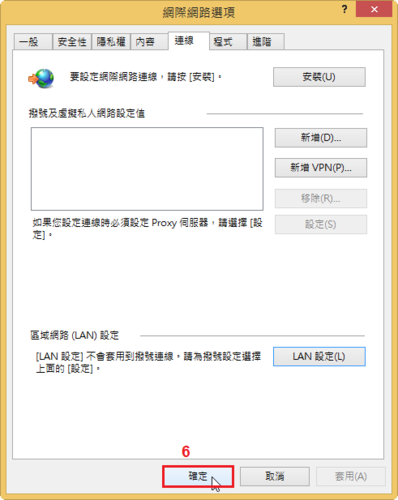
5. 開啟瀏覽器,做 Proxy Server 的設定,以 IE 為例

選擇 工具 / 網際網路選項

選擇 連線

選擇 LAN 設定

輸入 Proxy Server 的 IP 和使用的 Port,然後按 確定

最後再按 確定

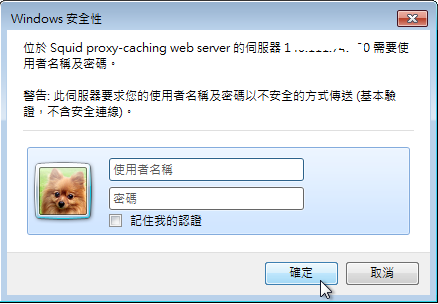
設定完成之後,要連線時,會出現要求輸入帳號及密碼的畫面

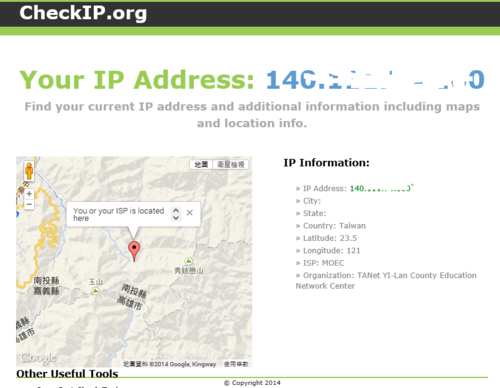
連線 IP 已改成 Proxy Server IP

員工業務網也沒有問題

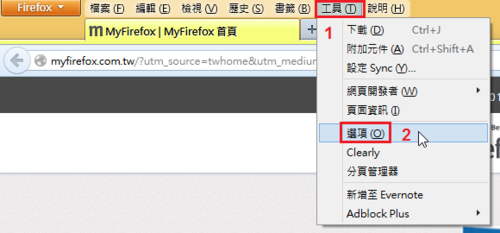
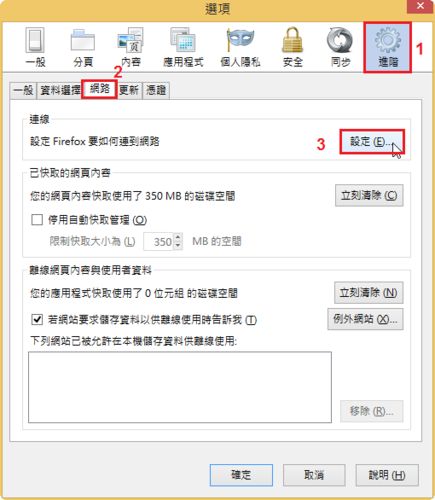
如果 Firefox 要採用和 IE 一樣的設定

選擇 工具 / 選項

選擇 進階 / 網路 / 設定

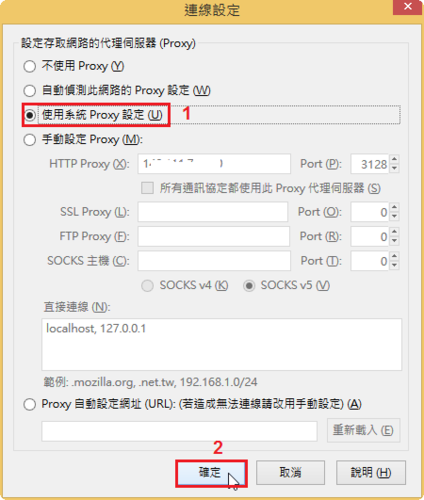
選擇 使用系統 Proxy 設定,然後按 確定

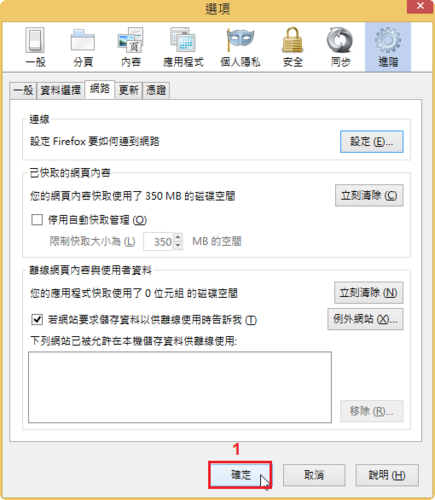
最後按 確定

squid Proxy Server & SELinux

重新安裝了之前硬碟故障的 Proxy Server,系統安裝完後,複製之前備份的設定檔後,重新啟動 Proxy Server 後,發現無法啟動 Proxy Server
# service squid start
正在啟動 squid:                                           [失敗]
2013/12/27 13:59:21| Processing Configuration File: /etc/squid/squid.conf (depth 0)
FATAL: Unable to open configuration file: /etc/squid/squid.conf: (13) Permission denied
Squid Cache (Version 3.1.10): Terminated abnormally.
CPU Usage: 0.009 seconds = 0.005 user + 0.004 sys
Maximum Resident Size: 22736 KB
Page faults with physical i/o: 0[@more@]檢查 /etc/squid/squid.conf 的檔案權限
# ls -l /etc/squid/squid.conf*
-rw-r—–. 1 root root 4399 2013-11-19 00:48 /etc/squid/squid.conf
-rw-r—–. 1 root squid 2510 2013-10-01 21:44 /etc/squid/squid.conf.bak

所屬群組似不同
# chown root:squid /etc/squid/squid.conf
# ls -l /etc/squid/squid.conf*
-rw-r—–. 1 root squid 4399 2013-11-19 00:48 /etc/squid/squid.conf
-rw-r—–. 1 root squid 2510 2013-10-01 21:44 /etc/squid/squid.conf.bak

但還是無法啟動
# service squid start
正在啟動 squid:                                           [失敗]
2013/12/27 13:59:21| Processing Configuration File: /etc/squid/squid.conf (depth 0)
FATAL: Unable to open configuration file: /etc/squid/squid.conf: (13) Permission denied
Squid Cache (Version 3.1.10): Terminated abnormally.
CPU Usage: 0.009 seconds = 0.005 user + 0.004 sys
Maximum Resident Size: 22736 KB
Page faults with physical i/o: 0

後來發現可能是 SELinux 的問題,權限不對
ls -lZ /etc/squid/squid.conf*
-rw-r—–. root squid unconfined_u:object_r:admin_home_t:s0 /etc/squid/squid.conf
-rw-r—–. root squid system_u:object_r:squid_cache_t:s0 /etc/squid/squid.conf.bak

更改成正確的屬性
# chcon -R -u system_u -t squid_conf_t /etc/squid/squid.conf

再次檢查屬性
# ls -lZ /etc/squid/squid.conf*
-rw-r—–. root squid system_u:object_r:squid_conf_t:s0 /etc/squid/squid.conf
-rw-r—–. root squid system_u:object_r:squid_conf_t:s0 /etc/squid/squid.conf.bak

原本 Squid Proxy Server Cache 目錄權限
ls -lZ /cache1/* | head
/cache1/00:
drwxr-x—. squid squid system_u:object_r:default_t:s0   00/
drwxr-x—. squid squid system_u:object_r:default_t:s0   01/
drwxr-x—. squid squid system_u:object_r:default_t:s0   02/
drwxr-x—. squid squid system_u:object_r:default_t:s0   03/
drwxr-x—. squid squid system_u:object_r:default_t:s0   04/
drwxr-x—. squid squid system_u:object_r:default_t:s0   05/
drwxr-x—. squid squid system_u:object_r:default_t:s0   06/
drwxr-x—. squid squid system_u:object_r:default_t:s0   07/
drwxr-x—. squid squid system_u:object_r:default_t:s0   08/

更改成正確的屬性
# chcon -R -u system_u -t squid_cache_t /cache1

再次檢查屬性
ls -lZ /cache1/* | head
/cache1/00:
drwxr-x—. squid squid system_u:object_r:squid_cache_t:s0 00/
drwxr-x—. squid squid system_u:object_r:squid_cache_t:s0 01/
drwxr-x—. squid squid system_u:object_r:squid_cache_t:s0 02/
drwxr-x—. squid squid system_u:object_r:squid_cache_t:s0 03/
drwxr-x—. squid squid system_u:object_r:squid_cache_t:s0 04/
drwxr-x—. squid squid system_u:object_r:squid_cache_t:s0 05/
drwxr-x—. squid squid system_u:object_r:squid_cache_t:s0 06/
drwxr-x—. squid squid system_u:object_r:squid_cache_t:s0 07/
drwxr-x—. squid squid system_u:object_r:squid_cache_t:s0 08/

就可以正常啟動 Proxy Server 了!
# service squid start
正在啟動 squid:.                                          [  確定  ]


啟動 squid Proxy Server 出現的錯誤訊息

最近重新安裝一台 Server,安裝好 squid Proxy Server,按照之前的設定方式做了設定,啟動時卻一直出現錯誤。
# service squid start
正在啟動 squid:……………….. [失敗]

檢視 /var/log/message 中的訊息,發現如下的錯誤訊息
Sep 30 11:05:39 free squid[16500]: Squid Parent: child process 16516 started
Sep 30 11:05:39 free (squid): commonUfsDirOpenSwapLog: Failed to open swap log.
Sep 30 11:05:39 free squid[16500]: Squid Parent: child process 16516 exited with status 1
Sep 30 11:05:42 free squid[16500]: Squid Parent: child process 16522 started
Sep 30 11:05:43 free (squid): commonUfsDirOpenSwapLog: Failed to open swap log.
Sep 30 11:05:43 free squid[16500]: Squid Parent: child process 16522 exited with status 1
Sep 30 11:05:46 free squid[16500]: Squid Parent: child process 16529 started
Sep 30 11:05:46 free (squid): commonUfsDirOpenSwapLog: Failed to open swap log.
Sep 30 11:05:46 free squid[16500]: Squid Parent: child process 16529 exited with status 1
Sep 30 11:05:46 free squid[16500]: Exiting due to repeated, frequent failures

[@more@]解決的方式如下:
# vim /etc/squid/squid.conf
加入下面一行
 cache_swap_log /var/log/squid/swap.log squid

重新啟動 squid Proxy Server
 # service squid start
正在啟動 squid:.                                          [  確定  ]