解決 Nagios chkeck_snmp 會出現 No OIDs specified 的警告訊息

使用 Nagios 來偵測無線 AP 時會出現 No OIDs specified 的警告訊息

[@more@]解決方式:
1. 修改 commands.cfg
# vim /etc/nagios/object/commands.cfg

# vim /usr/local/nagios/etc/objects/commands.cfg

# ‘check_snmp’ command definition
define command{
        command_name    check_snmp
        command_line    $USER1$/check_snmp -H $HOSTADDRESS$ $ARG1$
        }
修改成
# ‘check_snmp’ command definition
define command{
        command_name    check_snmp
        command_line    $USER1$/check_snmp -H $HOSTADDRESS$ -C $ARG1$ -o $ARG2$
        }

2. 重新啟動 Nagios Server
# systemctl restart nagios.service

check_snmp 指令用法
# /usr/local/nagios/libexec/check_snmp
check_snmp: Could not parse arguments
Usage:
check_snmp -H <ip_address> -o <OID> [-w warn_range] [-c crit_range]
[-C community] [-s string] [-r regex] [-R regexi] [-t timeout] [-e retries]
[-l label] [-u units] [-p port-number] [-d delimiter] [-D output-delimiter]
[-m miblist] [-P snmp version] [-N context] [-L seclevel] [-U secname]
[-a authproto] [-A authpasswd] [-x privproto] [-X privpasswd]

在 Ubuntu 16.04 上安裝 Nagios 4.x

因為 Ubuntu 16.04 套件庫中的 Nagios 是 3.x 版,所以要改用手動的方式進行安裝
# apt-cache search nagios | grep ^nagios
nagios-images – Collection of images and icons for the nagios system
nagios-nrpe-plugin – Nagios Remote Plugin Executor Plugin
nagios-nrpe-server – Nagios Remote Plugin Executor Server
nagios-plugins – transitional dummy package (nagios-plugins to monitoring-plugins)
nagios-plugins-basic – transitional dummy package
nagios-plugins-standard – transitional dummy package
nagios3 – host/service/network monitoring and management system
nagios3-cgi – cgi files for nagios3
nagios3-common – support files for nagios3
nagios3-core – host/service/network monitoring and management system core files
nagios3-dbg – debugging symbols and debug stuff for nagios3
nagios3-doc – documentation for nagios3
nagios-check-xmppng – monitoring plugin to check XMPP servers
nagios-plugin-check-multi – run nagios checks as a group
nagios-plugins-common – transitional dummy package
nagios-plugins-contrib – Plugins for nagios compatible monitoring systems
nagios-plugins-extra – transitional dummy package
nagios-plugins-rabbitmq – Set of Nagios checks useful for monitoring a RabbitMQ server
nagios-snmp-plugins – SNMP Plugins for nagios
nagios2mantis – Automatically create Mantis issues on Nagios events

參考網頁:
How to Install Nagios on Ubuntu 16.04
How To Install Nagios Core 4.1.1 In Ubuntu 15.10/16.04 | Unixmen
Install Nagios core 4.1.1 on Ubuntu 16.04 (Xenial Xerus) Server | Ubuntu Geek
How To Install Nagios on Ubuntu 16.04 – idroot[@more@]請先安裝好 Apache / MySQL / PHP
1. 安裝編譯及必要套件
# apt-get install build-essential libgd-dev apache2-utils unzip 

2. 建立使用者及群組資料
# useradd -m nagios
# groupadd nagcmd
# usermod -a -G nagcmd nagios
# usermod -a -G nagcmd www-data

3. 到 Nagios 官方網站下載所須程式
Nagios Core 下載網站:https://www.nagios.org/downloads/nagios-core/
Nagios Plugin 下載網頁:https://www.nagios.org/downloads/nagios-plugins/
下載時的最新版本 Nagios Core 4.3.1 / Nagios Plugin 2.1.4


# wget https://assets.nagios.com/downloads/nagioscore/releases/nagios-4.3.1.tar.gz
# wget https://nagios-plugins.org/download/nagios-plugins-2.1.4.tar.gz

4. 解壓縮
# tar xvzf nagios-4.3.1.tar.gz

5. 切換目錄
# cd nagios-4.3.1

6. 開始編譯
# ./configure –with-command-group=nagcmd
 General Options:
 ————————-
        Nagios executable:  nagios
        Nagios user/group:  nagios,nagios
       Command user/group:  nagios,nagcmd
             Event Broker:  yes
        Install ${prefix}:  /usr/local/nagios
    Install ${includedir}:  /usr/local/nagios/include/nagios
                Lock file:  ${prefix}/var/nagios.lock
   Check result directory:  ${prefix}/var/spool/checkresults
           Init directory:  /etc/init.d
  Apache conf.d directory:  /etc/apache2/sites-available
             Mail program:  /bin/mail
                  Host OS:  linux-gnu
          IOBroker Method:  epoll

 Web Interface Options:
 ————————
                 HTML URL:  http://localhost/nagios/
                  CGI URL:  http://localhost/nagios/cgi-bin/
 Traceroute (used by WAP):

Review the options above for accuracy.  If they look okay,
type ‘make all’ to compile the main program and CGIs.

7. 進行安裝
# make all
# make install
You can continue with installing Nagios as follows (type ‘make’
without any arguments for a list of all possible options):

  make install-init
     – This installs the init script in /etc/init.d

  make install-commandmode
     – This installs and configures permissions on the
       directory for holding the external command file

  make install-config
     – This installs sample config files in /usr/local/nagios/etc

# make install-init
/usr/bin/install -c -m 755 -d -o root -g root /etc/init.d
/usr/bin/install -c -m 755 -o root -g root daemon-init /etc/init.d/nagios

*** Init script installed ***

# make install-commandmode
/usr/bin/install -c -m 775 -o nagios -g nagcmd -d /usr/local/nagios/var/rw
chmod g+s /usr/local/nagios/var/rw

*** External command directory configured ***

# make install-config
/usr/bin/install -c -m 775 -o nagios -g nagios -d /usr/local/nagios/etc
/usr/bin/install -c -m 775 -o nagios -g nagios -d /usr/local/nagios/etc/objects
/usr/bin/install -c -b -m 664 -o nagios -g nagios sample-config/nagios.cfg /usr/local/nagios/etc/nagios.cfg
/usr/bin/install -c -b -m 664 -o nagios -g nagios sample-config/cgi.cfg /usr/local/nagios/etc/cgi.cfg
/usr/bin/install -c -b -m 660 -o nagios -g nagios sample-config/resource.cfg /usr/local/nagios/etc/resource.cfg
/usr/bin/install -c -b -m 664 -o nagios -g nagios sample-config/template-object/templates.cfg /usr/local/nagios/etc/objects/templates.cfg
/usr/bin/install -c -b -m 664 -o nagios -g nagios sample-config/template-object/commands.cfg /usr/local/nagios/etc/objects/commands.cfg
/usr/bin/install -c -b -m 664 -o nagios -g nagios sample-config/template-object/contacts.cfg /usr/local/nagios/etc/objects/contacts.cfg
/usr/bin/install -c -b -m 664 -o nagios -g nagios sample-config/template-object/timeperiods.cfg /usr/local/nagios/etc/objects/timeperiods.cfg
/usr/bin/install -c -b -m 664 -o nagios -g nagios sample-config/template-object/localhost.cfg /usr/local/nagios/etc/objects/localhost.cfg
/usr/bin/install -c -b -m 664 -o nagios -g nagios sample-config/template-object/windows.cfg /usr/local/nagios/etc/objects/windows.cfg
/usr/bin/install -c -b -m 664 -o nagios -g nagios sample-config/template-object/printer.cfg /usr/local/nagios/etc/objects/printer.cfg
/usr/bin/install -c -b -m 664 -o nagios -g nagios sample-config/template-object/switch.cfg /usr/local/nagios/etc/objects/switch.cfg

*** Config files installed ***

Remember, these are *SAMPLE* config files.  You’ll need to read
the documentation for more information on how to actually define
services, hosts, etc. to fit your particular needs.

8. 安裝 Nagios Web interface:
# make install-webconf
/usr/bin/install -c -m 644 sample-config/httpd.conf /etc/apache2/sites-available/nagios.conf
if [ 1 -eq 1 ]; then
        ln -s /etc/apache2/sites-available/nagios.conf /etc/apache2/sites-enabled/nagios.conf;
fi

*** Nagios/Apache conf file installed ***

9. 建立密碼
# /usr/bin/htpasswd -c /usr/local/nagios/etc/htpasswd.users nagiosadmin
New password:
Re-type new password:
Adding password for user nagiosadmin

10. 安裝  Nagios plugins:
切換目錄
# cd ..
解壓縮
# tar xvzf nagios-plugins-2.1.4.tar.gz
切換目錄
# cd nagios-plugins-2.1.4
進行編譯
# ./configure –with-nagios-user=nagios –with-nagios-group=nagios

安裝
# make
# make install

11. 修改收件者
# sed -i ‘s/nagios@localhost/xxxxx@gmail.com/’ /usr/local/nagios/etc/objects/contacts.cfg

12. 開啟 rewrite / cgi 功能
# a2enmod rewrite
Enabling module rewrite.
To activate the new configuration, you need to run:
  service apache2 restart

# a2enmod cgi
AH00558: apache2: Could not reliably determine the server’s fully qualified domain name, using 127.0.1.1. Set the ‘ServerName’ directive globally to suppress this message
Enabling module cgi.
To activate the new configuration, you need to run:
  service apache2 restart

13. 重新啟動 Apache Web Server
# systemctl restart apache2.service

14. 檢查 Nagios 設定檔
# /usr/local/nagios/bin/nagios -v /usr/local/nagios/etc/nagios.cfg

Nagios Core 4.3.1
Copyright (c) 2009-present Nagios Core Development Team and Community Contributors
Copyright (c) 1999-2009 Ethan Galstad
Last Modified: 02-23-2017
License: GPL

Website: https://www.nagios.org
Reading configuration data…
   Read main config file okay…
   Read object config files okay…

Running pre-flight check on configuration data…

Checking objects…
        Checked 8 services.
        Checked 1 hosts.
        Checked 1 host groups.
        Checked 0 service groups.
        Checked 1 contacts.
        Checked 1 contact groups.
        Checked 24 commands.
        Checked 5 time periods.
        Checked 0 host escalations.
        Checked 0 service escalations.
Checking for circular paths…
        Checked 1 hosts
        Checked 0 service dependencies
        Checked 0 host dependencies
        Checked 5 timeperiods
Checking global event handlers…
Checking obsessive compulsive processor commands…
Checking misc settings…

Total Warnings: 0
Total Errors:   0

Things look okay – No serious problems were detected during the pre-flight check

15. 啟動 Nagios Server
# /etc/init.d/nagios start
[….] Starting nagios (via systemctl): nagios.serviceFailed to start nagios.service: Unit nagios.service not found.
 failed!

如果出現錯誤訊息,進行下面修改
備份原檔
# mv /etc/init.d/nagios /etc/init.d/nagios.$(date +%F)
複製 /etc/init.d/skeleton 成為 /etc/init.d/nagios
# cp /etc/init.d/skeleton /etc/init.d/nagios
# vim /etc/init.d/nagios
把以下二行刪除
DESC=”Description of the service”
DAEMON=/usr/sbin/daemonexecutablename
改成
DESC=”Nagios”
NAME=nagios
DAEMON=/usr/local/nagios/bin/$NAME
DAEMON_ARGS=”-d /usr/local/nagios/etc/nagios.cfg”
PIDFILE=/usr/local/nagios/var/$NAME.lock

更改檔案執行權限
# chmod +x /etc/init.d/nagios


# mv /etc/init.d/nagios /etc/init.d/nagios.$(date +%F)
# vim /etc/systemd/system/nagios.service
[Unit]
Description=Nagios
BindTo=network.target

[Install]
WantedBy=multi-user.target

[Service]
User=nagios
Group=nagios
Type=simple
ExecStart=/usr/local/nagios/bin/nagios /usr/local/nagios/etc/nagios.cfg

# systemctl enable /etc/systemd/system/nagios.service
Created symlink from /etc/systemd/system/multi-user.target.wants/nagios.service to /etc/systemd/system/nagios.service.

# systemctl start nagios.service

16. 啟動 Nagios Server
# /etc/init.d/nagios start
 * Starting Nagios nagios                                                [ OK ]

17. 建立用來存其它偵測主機的目錄
# mkdir /usr/local/nagios/etc/conf.d
# sed -i ‘/#cfg_dir=/usr/local/nagios/etc/routers/acfg_dir=/usr/local/nagios/etc/conf.d’ /usr/local/nagios/etc/nagios.cfg

在 CentOS 7.x 上安裝 Nagios 4.x – Nginx

參考網頁:
Linux . 無限: 在 CentOS7/RHEL7上,為 Nginx 加上 Perl CGI 模組

1. 安裝所需套件
# yum install nagios nagios-plugins-all

2. 設定開機時啟動服務
# systemctl disable httpd.service
# systemctl enable nagios.service
Created symlink from /etc/systemd/system/multi-user.target.wants/nagios.service to /usr/lib/systemd/system/nagios.service.
# systemctl stop httpd.service
# systemctl start nagios.service

3. 設定登入帳號及密碼
# /usr/bin/htpasswd -c /etc/nagios/passwd nagiosadmin
New password:
Re-type new password:
Adding password for user nagiosadmin[@more@]
4. 檢查設定是否正確
# /usr/sbin/nagios -v /etc/nagios/nagios.cfg
Nagios Core 4.2.4
Copyright (c) 2009-present Nagios Core Development Team and Community Contributors
Copyright (c) 1999-2009 Ethan Galstad
Last Modified: 12-07-2016
License: GPL

Website: https://www.nagios.org
Reading configuration data…
   Read main config file okay…
   Read object config files okay…

Running pre-flight check on configuration data…

Checking objects…
        Checked 8 services.
        Checked 1 hosts.
        Checked 1 host groups.
        Checked 0 service groups.
        Checked 1 contacts.
        Checked 1 contact groups.
        Checked 24 commands.
        Checked 5 time periods.
        Checked 0 host escalations.
        Checked 0 service escalations.
Checking for circular paths…
        Checked 1 hosts
        Checked 0 service dependencies
        Checked 0 host dependencies
        Checked 5 timeperiods
Checking global event handlers…
Checking obsessive compulsive processor commands…
Checking misc settings…

Total Warnings: 0
Total Errors:   0

Things look okay – No serious problems were detected during the pre-flight check

5. 下載套件庫設定檔
# wget https://copr.fedorainfracloud.org/coprs/jorti/fcgiwrap/repo/epel-7/jorti-fcgiwrap-epel-7.repo -P /etc/yum.repos.d -P /etc/yum.repos.d

6. 更新套件庫
# yum update

7. 安裝相關套件
# yum install fcgiwrap spawn-fcgi

8. 修改 /etc/sysconfig/spawn-fcgi 設定檔
# vim /etc/sysconfig/spawn-fcgi
FCGI_SOCKET=/var/run/fcgiwrap.socket
FCGI_PROGRAM=/usr/sbin/fcgiwrap
FCGI_USER=nginx
FCGI_GROUP=nginx
FCGI_EXTRA_OPTIONS=”-M 0700″
OPTIONS=”-u $FCGI_USER -g $FCGI_GROUP -s $FCGI_SOCKET -S $FCGI_EXTRA_OPTIONS -F 1 -P /var/run/spawn-fcgi.pid — $FCGI_PROGRAM”

9. 啟動 spawn-cfgi 服務
# systemctl enable spawn-fcgi
spawn-fcgi.service is not a native service, redirecting to /sbin/chkconfig.
Executing /sbin/chkconfig spawn-fcgi on
# systemctl start spawn-fcgi

10. 開啟瀏覽器 http://Server’IP/nagios
輸入設定的帳號及密碼

11. 登入後畫面


改變 Nagios 登入的預設帳號

Nagios 預設登入帳號是 nagiosadmin,如果想要進行更改
1. 修改 /etc/nagios/cgi.cfg,帳號改成 admin
# cp /etc/nagios/cgi.cfg /etc/nagios/cgi.cfg.$(date +%F)
# sed -i ‘s/nagiosadmin/admin/’ /etc/nagios/cgi.cfg[@more@]
2. 刪除原有的帳號資料
# /usr/bin/htpasswd -D /etc/nagios/passwd nagiosadmin
Deleting password for user nagiosadmin

3. 建立 admin 密碼
# /usr/bin/htpasswd -c /etc/nagios/passwd admin
New password:
Re-type new password:
Adding password for user admin

4. 檢查設定檔是否正確
# /usr/sbin/nagios -v /etc/nagios/nagios.cfg

Nagios Core 4.2.4
Copyright (c) 2009-present Nagios Core Development Team and Community Contributors
Copyright (c) 1999-2009 Ethan Galstad
Last Modified: 12-07-2016
License: GPL

Website: https://www.nagios.org
Reading configuration data…
   Read main config file okay…
   Read object config files okay…

Running pre-flight check on configuration data…

Checking objects…
        Checked 8 services.
        Checked 1 hosts.
        Checked 1 host groups.
        Checked 0 service groups.
        Checked 1 contacts.
        Checked 1 contact groups.
        Checked 24 commands.
        Checked 5 time periods.
        Checked 0 host escalations.
        Checked 0 service escalations.
Checking for circular paths…
        Checked 1 hosts
        Checked 0 service dependencies
        Checked 0 host dependencies
        Checked 5 timeperiods
Checking global event handlers…
Checking obsessive compulsive processor commands…
Checking misc settings…

Total Warnings: 0
Total Errors:   0

Things look okay – No serious problems were detected during the pre-flight check

CentOS 7.x 限定 Nagios 瀏覽來源

除了使用 htpasswd 設定密碼也保護 nagios 使用安全外,也可以使用 ip 來限制來源


1. 註解 Require all
# sed -i ‘s/Require all/#Require all/’ /etc/httpd/conf.d/nagios.conf[@more@]
2. 在後面插入二行
# sed -i -e ‘/#Require all/atRequire all deniedntRequire ip 192.168.1.0/24’ /etc/httpd/conf.d/nagios.conf

3. 查看設定
# cat /etc/httpd/conf.d/nagios.conf
ScriptAlias /nagios/cgi-bin/ “/usr/lib64/nagios/cgi-bin/”

<Directory “/usr/lib64/nagios/cgi-bin/”>
#  SSLRequireSSL
   Options ExecCGI
   AllowOverride None
   <IfVersion >= 2.3>
      <RequireAll>
         #Require all granted
        Require all denied
        Require ip 192.168.1.0/24
#        Require host 127.0.0.1

         AuthName “Nagios Access”
         AuthType Basic
         AuthUserFile /etc/nagios/passwd
         Require valid-user
      </RequireAll>
   </IfVersion>
</Directory>

Alias /nagios “/usr/share/nagios/html”

<Directory “/usr/share/nagios/html”>
#  SSLRequireSSL
   Options None
   AllowOverride None
   <IfVersion >= 2.3>
      <RequireAll>
         #Require all granted
        Require all denied
        Require ip 192.168.1.0/24
#        Require host 127.0.0.1

         AuthName “Nagios Access”
         AuthType Basic
         AuthUserFile /etc/nagios/passwd
         Require valid-user
      </RequireAll>
   </IfVersion>
</Directory>

4. 重新啟動 Web Server
# systemctl restart httpd.service

在 CentOS 7.x 上安裝 Nagios 4.x – Apache

參考網頁:
Install And Configure Nagios 4 On CentOS 7 | Unixmen
CentOS 7 : Nagios : Install : Server World
Configuring and Installing Nagios Core 4 on CentOS 6 – nuxref
Nagios Core 4.x Setup for CentOS 7.x – nuxref
Configuring and Installing NRPE and NSCA into Nagios Core 4 on CentOS 6 – nuxref
Control Protocol: Nagios issues, duh.

1. 安裝所需套件
# yum install nagios nagios-plugins-all php http

2. 設定開機時啟動服務
# systemctl enable httpd.service
# systemctl enable nagios.service
Created symlink from /etc/systemd/system/multi-user.target.wants/nagios.service to /usr/lib/systemd/system/nagios.service.
# systemctl start httpd.service
# systemctl start nagios.service[@more@]
3. 設定登入帳號及密碼
# /usr/bin/htpasswd -c /etc/nagios/passwd nagiosadmin
New password:
Re-type new password:
Adding password for user nagiosadmin

4. 檢查設定是否正確
# /usr/sbin/nagios -v /etc/nagios/nagios.cfg
Nagios Core 4.2.4
Copyright (c) 2009-present Nagios Core Development Team and Community Contributors
Copyright (c) 1999-2009 Ethan Galstad
Last Modified: 12-07-2016
License: GPL

Website: https://www.nagios.org
Reading configuration data…
   Read main config file okay…
   Read object config files okay…

Running pre-flight check on configuration data…

Checking objects…
        Checked 8 services.
        Checked 1 hosts.
        Checked 1 host groups.
        Checked 0 service groups.
        Checked 1 contacts.
        Checked 1 contact groups.
        Checked 24 commands.
        Checked 5 time periods.
        Checked 0 host escalations.
        Checked 0 service escalations.
Checking for circular paths…
        Checked 1 hosts
        Checked 0 service dependencies
        Checked 0 host dependencies
        Checked 5 timeperiods
Checking global event handlers…
Checking obsessive compulsive processor commands…
Checking misc settings…

Total Warnings: 0
Total Errors:   0

Things look okay – No serious problems were detected during the pre-flight check

5. 開啟瀏覽器 http://Server’IP/nagios
輸入設定的帳號及密碼

6. 登入後畫面

解決 Nagios 3 偵測 HTTP Server 時出現的 WARNING 訊息

使用 Nagios 3 偵測 HTTP Server 時,有時候會出現如下圖的警告訊息
HTTP WARNING: HTTP/1.1 403 Forbidden – 366 bytes in 0.005 second response time

出現這種問題的原因,可能是系統有提供 HTTP Server,但在網站中並有預設的首頁,就是在根目錄中沒有預設的網頁。
解決的方式,利用這個訊息在網路上搜尋了一下,提到的解決方式都是在個別的 Server 的根目錄中,建立 index.html 的檔案,不過我覺得,這種方法只適用在台數不多的 Server 情況下,如果台數很多,要一台一台的修改,也是也累人的一件事。[@more@]我的想法是最好能在 Nagios 3 Server 上直接解決,不用動到其它的 Server

解決方式:
OS:Debian 8.2
1. 新增一個 check_http_n 的檢查命令,與原先的 check_http 做分隔
# vim /etc/nagios3/commands.cfg
在檔案的最後面加上
# ‘check_http_n’ command definition
define command{
        command_name    check_http_n
        command_line    $USER1$/check_http -e HTTP/1.1 -I $HOSTADDRESS$ $ARG1$
        }

2. 重新修改 /etc/nagios3/conf.d 目錄下的各個 Server 檢查檔,把原本的 check_http 改成 check_http_n
# sed -i ‘s/check_http/check_http_n/’ /etc/nagios3/conf.d/*.cfg

3. 重新啟動 Nagios 3 Server
# systemctl restart nagios3

4. 之後就不會再出現警告的訊息了!

解決 Nagios 出現 “Is This Service Flapping” 的提示訊息

在 Debian / Ubuntu Linux 使用 Nagios 來偵測 SNMP 時出現了一個特別的狀況
偵測項目 SNMP 上出現一個汽泡提示和向上的黑色三角形

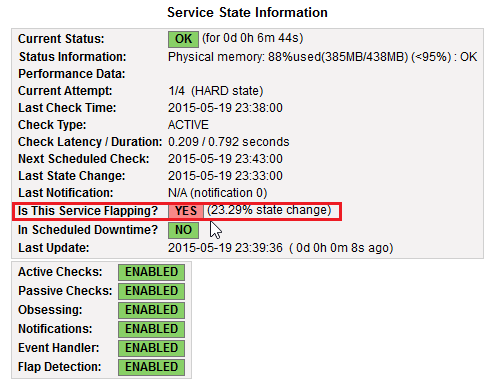
點選 SNMP 項目會出現 “Is This Service Flapping” 的提示訊息
[@more@]在網路上搜尋了一下,找到了這一篇:
nagios报警延迟的解决–flapping state – abnerfrmh的专栏 – 博客频道 – CSDN.NET

解決方式:
1. 修改 /etc/nagios3/nagios.cfg
$ sudo sed -i ‘s/enable_flap_detection=1/enable_flap_detection=0/’ /etc/nagios3/nagios.cfg

2. 重新啟動 Nagios 3
$ sudo /etc/init.d/nagios3 restart
 * Restarting nagios3 monitoring daemon nagios3
                                                                                     [ OK ]

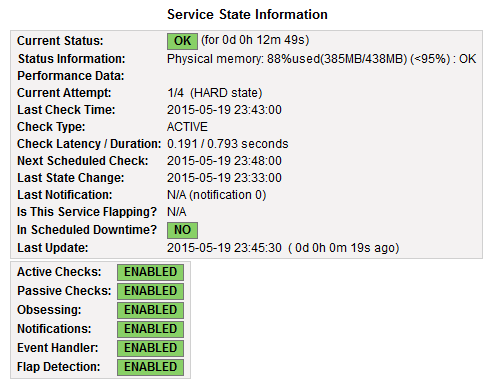
就不會再出現 “Is This Service Flapping” 的提示訊息

會出現這個提示訊息,猜想應該是偵測使用 SNMP 去檢測實體記憶體的使用量,變動性比較大。

解決 Nagios 出現 CRITICAL – Could not interpret output from ping command 的錯誤訊息

在 Ubuntu Server 上建置 Nagios 3 和 Cacti 來監測學校 Server 的一些狀態。
不過在 Nagios 3 上卻出現下圖的錯誤訊息
[@more@]可是明明就是本機,竟出現這種訊息,依 “CRITICAL – Could not interpret output from ping command” 訊息,在 Google 搜尋了一下,找到了這一篇:
Could not interpret output from ping command – View topic • Nagios Support Forum

解決方式:
1. 更改 ping 的執行權限
原本
# ls -l /bin/ping
-rwxr-xr-x 1 root root 34820 Mar 15  2014 /bin/ping

更改成
# chmod u+s /bin/ping
更改後
# ls -l /bin/ping
-rwsr-xr-x 1 root root 34820 Mar 15  2014 /bin/ping

2. 重新啟動 Nagios 3
# /etc/init.d/nagios3 restart
 * Restarting nagios3 monitoring daemon nagios3
                                                                                        [ OK ]

3. 系統就正常了!