解決測試 Samba Server 設定檔時出現的提示訊息

在使用 testparm 測試 Samba Server 設定檔時會出現如下的提示訊息
# testparm
Load smb config files from /etc/samba/smb.conf
rlimit_max: increasing rlimit_max (1024) to minimum Windows limit (16384)
Processing section “[homes]”
Loaded services file OK.
Server role: ROLE_STANDALONE

Press enter to see a dump of your service definitions[@more@]解決方式:
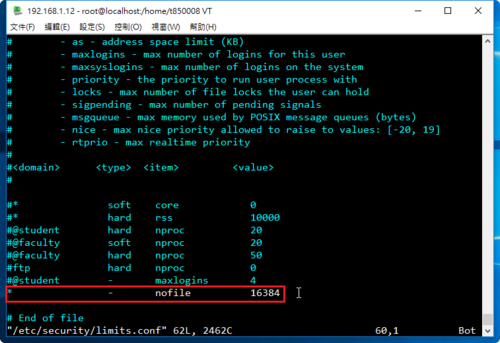
修改 /etc/security/limits.conf 設定檔
# vim /etc/security/limits.conf
加入下面一行
*                –       nofile          16384

重新啟動電腦後,就不會再出現了!
# testparm
Load smb config files from /etc/samba/smb.conf
Processing section “[homes]”
Loaded services file OK.
Server role: ROLE_STANDALONE

Press enter to see a dump of your service definitions

在 CentOS 7.x 上使用 Samba Server

1. 安裝 Samba Server
# yum install samba

2. 修改設定檔 /etc/samba/smb.conf
# cat /etc/samba/smb.conf | grep -E -v ‘^#|^;’
[global]
        workgroup = HOME
        server string = Samba Server Version %v

        # log files split per-machine:
        log file = /var/log/samba/log.%m
        # maximum size of 50KB per log file, then rotate:
        max log size = 50

        security = user
        passdb backend = tdbsam

[homes]
        comment = Home Directories
        browseable = no
        writable = yes
        valid users = %S
        veto files=/.*

[@more@]3. 測試設定檔
# testparm
Load smb config files from /etc/samba/smb.conf
rlimit_max: increasing rlimit_max (1024) to minimum Windows limit (16384)
Processing section “[homes]”
Loaded services file OK.
Server role: ROLE_STANDALONE

Press enter to see a dump of your service definitions

# Global parameters
[global]
        workgroup = HOME
        server string = Samba Server Version %v
        security = USER
        log file = /var/log/samba/log.%m
        max log size = 50
        idmap config * : backend = tdb

[homes]
        comment = Home Directories
        valid users = %S
        read only = No
        veto files = /.*
        browseable = No

4. 建立使用者 Samba 密碼
# /usr/bin/pdbedit -a t850008
new password:
retype new password:
Unix username:        t850008
NT username:
Account Flags:        [U          ]
User SID:             S-1-5-21-1562595748-815096285-1647261660-1000
Primary Group SID:    S-1-5-21-1562595748-815096285-1647261660-513
Full Name:
Home Directory:       \localhostt850008
HomeDir Drive:
Logon Script:
Profile Path:         \localhostt850008profile
Domain:               LOCALHOST
Account desc:
Workstations:
Munged dial:
Logon time:           0
Logoff time:          Wed, 06 Feb 2036 23:06:39 CST
Kickoff time:         Wed, 06 Feb 2036 23:06:39 CST
Password last set:    Wed, 29 Jun 2016 09:06:19 CST
Password can change:  Wed, 29 Jun 2016 09:06:19 CST
Password must change: never
Last bad password   : 0
Bad password count  : 0
Logon hours         : FFFFFFFFFFFFFFFFFFFFFFFFFFFFFFFFFFFFFFFFFF
5. SELinux 在 Samba Server 上設定
# setsebool -P samba_enable_home_dirs on
如果有另外分享的目錄
# semanage fcontext -a -t samba_share_t ‘/sharedpath(/.*)?’
# restorecon -RFvv /sharedpath

6. 設定開機時啟動 Samba Server
# systemctl enable smb
Created symlink from /etc/systemd/system/multi-user.target.wants/smb.service to /usr/lib/systemd/system/smb.service.
# systemctl enable nmb
Created symlink from /etc/systemd/system/multi-user.target.wants/nmb.service to /usr/lib/systemd/system/nmb.service.

7. 啟動 Samba Server
# systemctl start smb
# systemctl start nmb

8. 檢查是否有正常啟動
# netstat -an | grep -E ‘:137|:138|:139|:445’
tcp        0      0 0.0.0.0:139             0.0.0.0:*               LISTEN
tcp        0      0 0.0.0.0:445             0.0.0.0:*               LISTEN
tcp6       0      0 :::139                  :::*                    LISTEN
tcp6       0      0 :::445                  :::*                    LISTEN
udp        0      0 0.0.0.0:137             0.0.0.0:*
udp        0      0 0.0.0.0:138             0.0.0.0:*

在 CentOS 6.x 上使用 Samba 4

1. 搜尋 Samba 套件
# yum search samba | grep ^samba
samba-client.x86_64 : Samba client programs
samba-common.i686 : Files used by both Samba servers and clients
samba-common.x86_64 : Files used by both Samba servers and clients
samba-doc.x86_64 : Documentation for the Samba suite
samba-glusterfs.x86_64 : Samba VFS module for GlusterFS
samba-swat.x86_64 : The Samba SMB server Web configuration program
samba-winbind.x86_64 : Samba winbind
samba-winbind-clients.i686 : Samba winbind clients
samba-winbind-clients.x86_64 : Samba winbind clients
samba-winbind-krb5-locator.x86_64 : Samba winbind krb5 locator
samba4-client.x86_64 : Samba client programs
samba4-common.x86_64 : Files used by both Samba servers and clients
samba4-devel.x86_64 : Developer tools for Samba libraries
samba4-libs.x86_64 : Samba libraries
samba4-python.x86_64 : Samba Python libraries
samba4-test.x86_64 : Testing tools for Samba servers and clients
samba4-winbind.x86_64 : Samba winbind
samba4-winbind-clients.x86_64 : Samba winbind clients
samba4-winbind-krb5-locator.x86_64 : Samba winbind krb5 locator
samba.x86_64 : Server and Client software to interoperate with Windows machines
samba-domainjoin-gui.x86_64 : Domainjoin GUI
samba-winbind-devel.i686 : Developer tools for the winbind library
samba-winbind-devel.x86_64 : Developer tools for the winbind library
samba4.x86_64 : Server and Client software to interoperate with Windows machines
samba4-dc.x86_64 : AD Domain Controller placeholder package.
samba4-dc-libs.x86_64 : AD Domain Controller libraries placeholder package.
samba4-pidl.x86_64 : Perl IDL compiler

2. 安裝 Samba 4
# yum install -y samba4[@more@]3. 修改 /etc/samba/smb.conf 設定檔
# cat /etc/samba/smb.conf | grep -E -v ‘^#|^;’
[global]
        workgroup = HOME
        server string = Samba Server Version %v
        # log files split per-machine:
        log file = /var/log/samba/log.%m
        # maximum size of 50KB per log file, then rotate:
        max log size = 50

        security = user
        passdb backend = tdbsam

[homes]
        comment = Home Directories
        browseable = no
        writable = yes
        valid users = %S
        create mode = 0664
        directory mode = 0775
        veto files=/.*/

4. 測試設定檔
# testparm
Load smb config files from /etc/samba/smb.conf
rlimit_max: increasing rlimit_max (1024) to minimum Windows limit (16384)
Processing section “[homes]”
Loaded services file OK.
Server role: ROLE_STANDALONE

Press enter to see a dump of your service definitions

# Global parameters
[global]
        workgroup = HOME
        server string = Samba Server Version %v
        security = USER
        log file = /var/log/samba/log.%m
        max log size = 50
        idmap config * : backend = tdb

[homes]
        comment = Home Directories
        valid users = %S
        read only = No
        create mask = 0664
        directory mask = 0775
        veto files = /.*/
        browseable = No

5. 建立使用者 Samba 密碼
# /usr/bin/pdbedit -a t850008
new password:
retype new password:
Unix username:        t850008
NT username:
Account Flags:        [U          ]
User SID:             S-1-5-21-1562595748-815096285-1647261660-1000
Primary Group SID:    S-1-5-21-1562595748-815096285-1647261660-513
Full Name:
Home Directory:       \localhostt850008
HomeDir Drive:
Logon Script:
Profile Path:         \localhostt850008profile
Domain:               LOCALHOST
Account desc:
Workstations:
Munged dial:
Logon time:           0
Logoff time:          Wed, 06 Feb 2036 23:06:39 CST
Kickoff time:         Wed, 06 Feb 2036 23:06:39 CST
Password last set:    Wed, 29 Jun 2016 09:06:19 CST
Password can change:  Wed, 29 Jun 2016 09:06:19 CST
Password must change: never
Last bad password   : 0
Bad password count  : 0
Logon hours         : FFFFFFFFFFFFFFFFFFFFFFFFFFFFFFFFFFFFFFFFFF

6. SELinux 在 Samba Server 上的設定
# setsebool -P samba_enable_home_dirs on
# chcon -R -t samba_share_t /home/homework
# chcon -R -t samba_share_t /home/share

7. 啟動 Samba Server
# /etc/init.d/smb start
# /etc/init.d/nmb start

8. 檢查 Samba Server 是否有正常啟動
# netstat -an | grep -E ‘:137|:138|:139|:445’
tcp        0      0 0.0.0.0:445                 0.0.0.0:*                   LISTEN
tcp        0      0 0.0.0.0:139                 0.0.0.0:*                   LISTEN
tcp        0      0 :::445                      :::*                        LISTEN
tcp        0      0 :::139                      :::*                        LISTEN
udp        0      0 0.0.0.0:137                 0.0.0.0:*
udp        0      0 0.0.0.0:138                 0.0.0.0:*

9. 設定開機時啟動 Samba Server
# chkconfig –level 3 smb on
# chkconfig –level 3 nmb on

10. 防火牆上的設定
防火牆設定 設定內部網路 IP 192.168.1.0/24
# iptables -A INPUT -s 192.168.1.0/24 -m state –state NEW -m udp -p udp –dport 137 -j ACCEPT
# iptables -A INPUT -s 192.168.1.0/24 -m state –state NEW -m udp -p udp –dport 138 -j ACCEPT
# iptables -A INPUT -s 192.168.1.0/24 -m state –state NEW -m tcp -p tcp –dport 139 -j ACCEPT
# iptables -A INPUT -s 192.168.1.0/24 -m state –state NEW -m tcp -p tcp –dport 445 -j ACCEPT
# iptables -A INPUT -s 192.168.1.0/24 -m state –state NEW -m udp -p udp –dport 445 -j ACCEPT

在 Debian Linux 安裝 Samba Server

1. 搜尋 Samba Server 套件
# apt-cache search samba | grep ^samba
samba – SMB/CIFS file, print, and login server for Unix
samba-common – common files used by both the Samba server and client
samba-common-bin – Samba common files used by both the server and the client
samba-dbg – Samba debugging symbols
samba-dev – tools for extending Samba
samba-doc – Samba documentation
samba-dsdb-modules – Samba Directory Services Database
samba-libs – Samba core libraries
samba-testsuite – test suite from Samba
samba-vfs-modules – Samba Virtual FileSystem plugins

2. 進行安裝
# apt-get install samba[@more@]3. 進行設定
# vim /etc/samba/smb.conf
# Global parameters
[global]
        workgroup = HOME
        server role = standalone server
        security = USER
        map to guest = Bad User
        obey pam restrictions = Yes
        pam password change = Yes
        passwd program = /usr/bin/passwd %u
        passwd chat = *Entersnews*spassword:* %nn *Retypesnews*spassword:* %nn *passwordsupdatedssuccessfully* .
        unix password sync = Yes
        syslog = 0
        log file = /var/log/samba/log.%m
        max log size = 1000
        dns proxy = No
        usershare allow guests = Yes
        panic action = /usr/share/samba/panic-action %d
        idmap config * : backend = tdb

[homes]
        comment = Home Directories
        valid users = %S
        read only = No
        create mask = 0700
        directory mask = 0700
        veto files = /.*/
        browseable = No

[printers]
        comment = All Printers
        path = /var/spool/samba
        create mask = 0700
        printable = Yes
        print ok = Yes
        browseable = No

[print$]
        comment = Printer Drivers
        path = /var/lib/samba/printers

4. 測試設定檔
# testparm
Load smb config files from /etc/samba/smb.conf
Processing section “[homes]”
Processing section “[printers]”
Processing section “[print$]”
Loaded services file OK.
Server role: ROLE_STANDALONE

5. 啟動 Samba Server
# /etc/init.d/samba start
[ ok ] Starting nmbd (via systemctl): nmbd.service.
[ ok ] Starting smbd (via systemctl): smbd.service.
[ ok ] Starting samba-ad-dc (via systemctl): samba-ad-dc.service.

6. 檢查 Samba Server 是否有正常啟動
# netstat -an | grep -E ‘:137|:138|:139|:445’
tcp        0      0 0.0.0.0:445             0.0.0.0:*               LISTEN
tcp        0      0 0.0.0.0:139             0.0.0.0:*               LISTEN
tcp6       0      0 :::445                  :::*                    LISTEN
tcp6       0      0 :::139                  :::*                    LISTEN
udp        0      0 0.0.0.0:137             0.0.0.0:*
udp        0      0 0.0.0.0:138             0.0.0.0:*

在 FreeBSD 安裝 Samba4

參考文章:Samba 4.1 on FreeBSD 10.1 · GitHub
1. 搜尋可用的套件
# pkg search samba | grep ^samba
samba-nsupdate-9.8.6_1         nsupdate utility with GSS-TSIG support
samba-virusfilter-0.1.3_1      On-access anti-virus filter for Samba
samba36-3.6.25_3               Free SMB and CIFS client and server for Unix
samba36-libsmbclient-3.6.25_2  Shared lib from the samba package
samba36-nmblookup-3.6.25       NetBIOS Name lookup tool
samba36-smbclient-3.6.25       Samba “ftp-like” client
samba41-4.1.22_2               Free SMB/CIFS and AD/DC server and client for Unix
samba42-4.2.11                 Free SMB/CIFS and AD/DC server and client for Unix
samba43-4.3.8                  Free SMB/CIFS and AD/DC server and client for Unix

2. 直接安裝最新的版本
# pkg install samba43

************************************************************
Message from trousers-tddl-0.3.10_7:
To run tcsd automatically, add the following line to /etc/rc.conf

tcsd_enable=”YES”

You might want to edit /usr/local/etc/tcsd.conf to reflect your setup.

To use TPM, add your_account to ‘_tss’ group like following:

# pw groupadd _tss -m your_account
Message from cyrus-sasl-2.1.26_12:
You can use sasldb2 for authentication, to add users use:

        saslpasswd2 -c username

===============================================================================
Message from samba43-4.3.8:
===============================================================================

How to start: http://wiki.samba.org/index.php/Samba4/HOWTO

* Your configuration is: /usr/local/etc/smb4.conf

* All the relevant databases are under: /var/db/samba4

* All the logs are under: /var/log/samba4

* Provisioning script is: /usr/local/bin/samba-tool

For additional documentation check: http://wiki.samba.org/index.php/Samba4

Bug reports should go to the: https://bugzilla.samba.org/

===============================================================================[@more@]3. 建立 /usr/local/etc/smb4.conf
    設定檔是從 NAS4Free 取得,再稍做修改
# vim /usr/local/etc/smb4.conf
[global]
encrypt passwords = yes
netbios name = freebsd
workgroup = HOME
server string = FreeBSD Server
security = user
dns proxy = no
strict locking = no
read raw = yes
write raw = yes
oplocks = yes
max xmit = 65535
deadtime = 15
getwd cache = yes
unix charset = UTF-8
time server = yes
max log size = 100
logging = syslog
loglevel = 1
load printers = no
printing = bsd
printcap cache time = 0
printcap name = /dev/null
disable spoolss = yes
dos charset = CP950
smb passwd file = /var/etc/private/smbpasswd
private dir = /var/etc/private
passdb backend = tdbsam
idmap config * : backend = tdb
idmap config * : range = 10000-39999
aio read size = 1024
aio write size = 1024

[t850008]
comment = t850008
path = /home/t850008
writeable = yes
printable = no
hide dot files = yes
guest ok = no
inherit permissions = yes
inherit acls = yes

4. 測試設定檔是否正確
# /usr/local/bin/testparm
Load smb config files from /usr/local/etc/smb4.conf
Processing section “[t850008]”
Loaded services file OK.
Server role: ROLE_STANDALONE

Press enter to see a dump of your service definitions

# Global parameters
[global]
        dos charset = CP950
        workgroup = HOME
        server string = FreeBSD Server
        security = USER
        smb passwd file = /var/etc/private/smbpasswd
        private dir = /var/etc/private
        logging = syslog
        max log size = 100
        max xmit = 65535
        time server = Yes
        deadtime = 15
        load printers = No
        printcap cache time = 0
        printcap name = /dev/null
        disable spoolss = Yes
        dns proxy = No
        idmap config * : range = 10000-39999
        idmap config * : backend = tdb
        aio read size = 1024
        aio write size = 1024
        strict locking = No

[t850008]
        comment = t850008
        path = /home/t850008
        read only = No
        inherit permissions = Yes
        inherit acls = Yes

5. 修改 /etc/rc.conf 啟動設定檔
# vim /etc/rc.conf
加入下面這一行設定
samba_server_enable=”YES”

# echo ‘samba_server_enable=”YES”‘ >> /etc/rc.conf

6. 啟動 Samba Server
# /usr/local/etc/rc.d/samba_server start
Performing sanity check on Samba configuration: OK
Starting nmbd.
Starting smbd

7. 檢查 Samba Server 是否有正常啟動
# netstat -an | grep -E ‘137|138|139|445’
tcp4       0      0 *.139                  *.*                    LISTEN
tcp4       0      0 *.445                  *.*                    LISTEN
tcp6       0      0 *.139                  *.*                    LISTEN
tcp6       0      0 *.445                  *.*                    LISTEN
udp4       0      0 *.138                  *.*
udp4       0      0 *.137                  *.*

8. 設定使用者密碼
# /usr/local/bin/pdbedit -a t850008
new password:
retype new password:
Unix username:        t850008
NT username:
Account Flags:        [U          ]
User SID:             S-1-5-21-1407030253-4189778233-248147614-1000
Primary Group SID:    S-1-5-21-1407030253-4189778233-248147614-513
Full Name:            User &
Home Directory:       freebsdt850008
HomeDir Drive:
Logon Script:
Profile Path:         freebsdt850008profile
Domain:               FREEBSD
Account desc:
Workstations:
Munged dial:
Logon time:           0
Logoff time:          日, 00  1月 1900 00:00:00 CST
Kickoff time:         日, 00  1月 1900 00:00:00 CST
Password last set:    日, 26  6月 2016 09:59:39 CST
Password can change:  日, 26  6月 2016 09:59:39 CST
Password must change: never
Last bad password   : 0
Bad password count  : 0
Logon hours         : FFFFFFFFFFFFFFFFFFFFFFFFFFFFFFFFFFFFFFFFFF

解決 Samba Server 的錯誤訊息

參考網頁:解決 smbd 錯誤訊息 Unable to connect to CUPS server localhost:631 – Connection refused | Mr. 沙先生
在看系統 log 檔時,發現 Samba Server 出現如下的錯誤訊息
Aug 31 12:42:54 localhost smbd[30235]:   Unable to connect to CUPS server localhost:631 – 連線被拒絕
Aug 31 12:42:54  localhost smbd[30226]: [2015/08/31 12:42:54.544213,  0] printing/print_cups.c:528(cups_async_callback)
Aug 31 12:42:54  localhost smbd[30226]:   failed to retrieve printer list: NT_STATUS_UNSUCCESSFUL

可能的原因是,Samba Server 安裝預設會啟用 Printer Server,但這一台 Samba Server 只負責檔案儲存及分享使用,並沒有擔任 Printer Server 的工作,所以要把 Samba Server 設定檔中關於 Printer Server 的設定關閉。[@more@]1. 修改 /etc/samba/smb.conf
# vim /etc/samba/smb.conf
原本
;       load printers = yes
;       printing = cups
改成
        load printers = no
        printing = bsd

2. 重新啟動 Samba Server
# service smb restart

CentOS 6.x Samba 備份

1. 進行備份學生帳號及密碼
# tar cvjfp /Backup/Stu_account.tar.bz2 /etc/passwd /etc/shadow /etc/group /etc/gshadow
2. 學生檔案備份
# tar cvjfp /Backup/Stu.tar.bz2 /etc/samba/smb.conf /home/s0990 /home/s0100 /var/lib/samba/private
3. 資料還原
# tar xvjfp /Backup/Stu.tar.bz2 -C /[@more@]4. 處理 Samba 與 SELinux 之間的安全性設定
# getsebool -a | grep samba
bacula_use_samba –> off
samba_create_home_dirs –> off
samba_domain_controller –> off
samba_enable_home_dirs –> on
samba_export_all_ro –> off
samba_export_all_rw –> off
samba_load_libgfapi –> off
samba_portmapper –> off
samba_run_unconfined –> off
samba_share_fusefs –> off
samba_share_nfs –> off
sanlock_use_samba –> off
use_samba_home_dirs –> off
virt_use_samba –> off
# setsebool -P samba_enable_home_dirs on
# chcon -R -t samba_share_t /home/s0990
# chcon -R -t samba_share_t /home/s0100

5. 防火牆設定
# iptables -A INPUT -s 192.168.1.0/24 -m state –state NEW -m udp -p udp –dport 137 -j ACCEPT
# iptables -A INPUT -s 192.168.1.0/24 -m state –state NEW -m udp -p udp –dport 138 -j ACCEPT
# iptables -A INPUT -s 192.168.1.0/24 -m state –state NEW -m tcp -p tcp –dport 139 -j ACCEPT
# iptables -A INPUT -s 192.168.1.0/24 -m state –state NEW -m tcp -p tcp –dport 445 -j ACCEPT
# iptables -A INPUT -s 192.168.1.0/24 -m state –state NEW -m udp -p udp –dport 445 -j ACCEPT

Cubie Truck 測試 – 安裝 Samba Server

安裝方式:
$ sudo apt-get install samba tdb-tools

修改設定檔 /etc/samba/smb.conf
$ grep -E -v ‘^$|^#|^;’ /etc/samba/smb.conf
[@more@]
建立使用者的 Samba 帳號及密碼
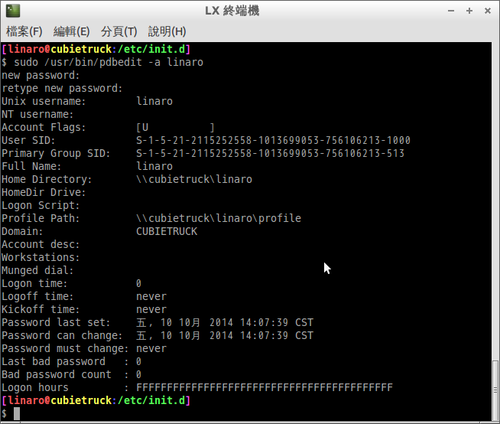
$ sudo /usr/bin/pdbedit -a linaro

啟動 Samba Server
$ sudo /etc/init.d/nmbd start
$ sudo /etc/init.d/smbd start

在 Windows 7 上測試
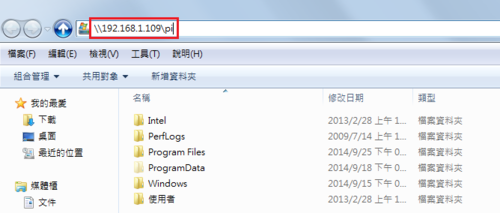
在檔案總管上方列輸入 IPUsername

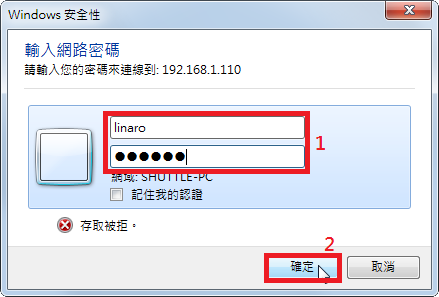
輸入帳號及密碼

應該可以瀏覽使用者的家目錄

Banana Pi 測試 – Bananian 篇 安裝 Samba Server

利用 Samba Server 來當做網路上的芳鄰,可以分享資料。
# apt-get install samba

修改 Samba Server 設定檔
# vim /etc/samba/smb.conf
[global]
workgroup = HOME
security = user
[homes]
   comment = Home Directories
   browseable = no
   read only = no
[@more@]
重新啟動 Samba Server
# /etc/init.d/samba restart
[ ok ] Stopping Samba daemons: nmbd smbd.
[ ok ] Starting Samba daemons: nmbd smbd.

建立測試使用者
# useradd -d /home/pi -m -s /bin/false pi

設定 Samba 使用者的密碼
# pdbedit -a pi
new password:
retype new password:
Unix username:        pi
NT username:
Account Flags:        [U          ]
User SID:             S-1-5-21-4012369507-4131397429-245333283-1000
Primary Group SID:    S-1-5-21-4012369507-4131397429-245333283-513
Full Name:
Home Directory:       lamobopi
HomeDir Drive:
Logon Script:
Profile Path:         lamobopiprofile
Domain:               LAMOBO
Account desc:
Workstations:
Munged dial:
Logon time:           0
Logoff time:          never
Kickoff time:         never
Password last set:    Sun, 28 Sep 2014 15:17:57 CST
Password can change:  Sun, 28 Sep 2014 15:17:57 CST
Password must change: never
Last bad password   : 0
Bad password count  : 0
Logon hours         : FFFFFFFFFFFFFFFFFFFFFFFFFFFFFFFFFFFFFFFFFF

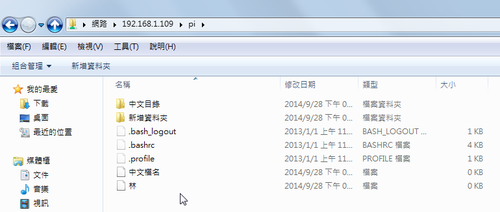
在 Windows 開啟檔案總管來測試

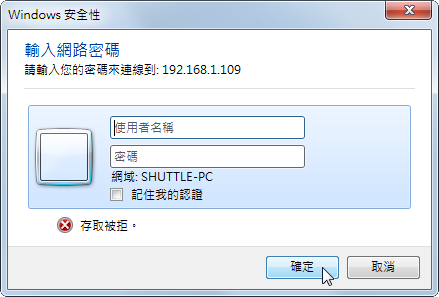
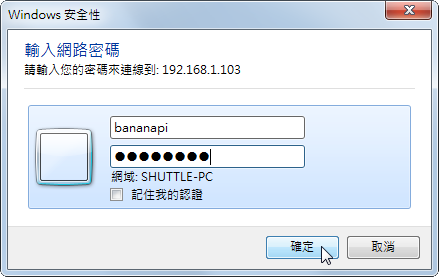
輸入使用者帳號及密碼後

中文檔名及目錄均沒有問題

Banana Pi 測試 – ArchLinux 安裝 Samba Server

安裝 Samba Server
# pacman -S samba

修改設定檔
# cp /etc/samba/smb.conf.default /etc/samba/smb.conf
# egrep -v ‘^$|^#|^;’ /etc/samba/smb.conf
[global]
   workgroup = HOME
   server string = Samba Server
   printcap name = /etc/printcap
   load printers = yes
   log file = /var/log/samba/%m.log
   max log size = 50
   security = user
   dns proxy = no
[homes]
   comment = Home Directories
   browseable = no
   writable = yes
[printers]
   comment = All Printers
   path = /var/spool/samba
   browseable = no
   guest ok = no
   writable = no
   printable = yes
[@more@]設定使用者 Samba 密碼
# /usr/bin/pdbedit -a bananapi

測試設定檔是否正確
# /usr/bin/testparm

啟動 Samba Server
# system start smbd
# systemctl start nmbd

設定開機時啟動 Samba Server
# systemctl enable smbd
Created symlink from /etc/systemd/system/multi-user.target.wants/smbd.service to /lib/systemd/system/smbd.service.
# systemctl enable nmbd
Created symlink from /etc/systemd/system/multi-user.target.wants/nmbd.service to /lib/systemd/system/nmbd.service.

檢查是否有正常啟動
# netstat -antulp | egrep  ‘:445|:139|:137|:138’
tcp        0      0 0.0.0.0:445             0.0.0.0:*               LISTEN      15106/smbd
tcp        0      0 0.0.0.0:139             0.0.0.0:*               LISTEN      15106/smbd
tcp        0      0 192.168.1.103:445       192.168.1.6:2283        ESTABLISHED 15138/smbd
tcp6       0      0 :::445                  :::*                    LISTEN      15106/smbd
tcp6       0      0 :::139                  :::*                    LISTEN      15106/smbd
udp        0      0 192.168.1.255:137       0.0.0.0:*                           15112/nmbd
udp        0      0 192.168.1.103:137       0.0.0.0:*                           15112/nmbd
udp        0      0 0.0.0.0:137             0.0.0.0:*                           15112/nmbd
udp        0      0 192.168.1.255:138       0.0.0.0:*                           15112/nmbd
udp        0      0 192.168.1.103:138       0.0.0.0:*                           15112/nmbd
udp        0      0 0.0.0.0:138             0.0.0.0:*                           15112/nmbd

在 Windows 7 下測試
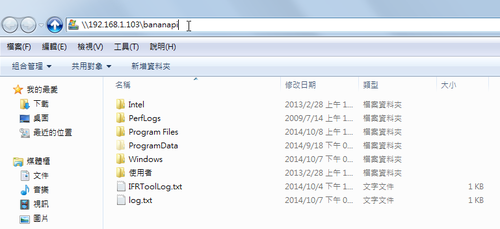
在檔案總管下輸入 SambaServer’IPusername

輸入使用者帳號及密碼

可以正常讀寫

其它分享的目錄