解決安裝 Cacti 1.0.x 版時出現的一些 SQL Server 提示訊息

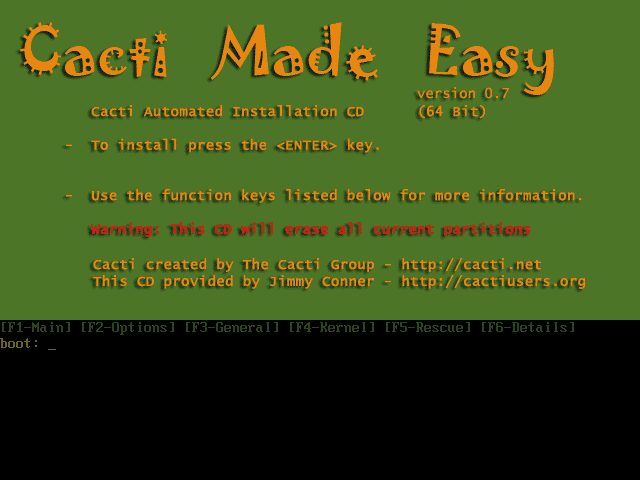
在 CentOS 7.x 上安裝 Cacti 1.0.x 版時, 會出現一堆紅色的提示訊息

雖然按 Next 還是可以跳過,但還是花了一些時間,把它們通通都去除了![@more@]解決方式:
1. 安裝 MariaDB SQL 10.x 版,可以參考 頭城國小資訊組 | 安裝 MariaDB SQL Sever 10.x
2. 備份原設定檔
# cp /etc/my.cnf.d/client.cnf /etc/my.cnf.d/client.cnf.$(date +%F)
# cp /etc/my.cnf.d/server.cnf /etc/my.cnf.d/server.cnf.$(date +%F)
# cp /etc/my.cnf.d/mysql-clients.cnf cp /etc/my.cnf.d/mysql-clients.cnf.$(date +%F)

3. 參考了以下的網頁:
Optimize my.cnf with MariaDB | cPanel Forums
How to improve InnoDB performance by 55%

其實也不懂,反正只是把上面提示的值加大而已!

# sed -i ‘/[client]/adefault-character-set=utf8mb4’ /etc/my.cnf.d/client.cnf

# sed -i ‘/[mysqld]/acollation-server=utf8mb4_unicode_ci’ /etc/my.cnf.d/server.cnf
# sed -i ‘/[mysqld]/acharacter-set-server=utf8mb4’ /etc/my.cnf.d/server.cnf
# sed -i ‘/[mysqld]/amax_heap_table_size=128M’ /etc/my.cnf.d/server.cnf
# sed -i ‘/[mysqld]/amax_allowed_packet=32M’ /etc/my.cnf.d/server.cnf
# sed -i ‘/[mysqld]/atmp_table_size=128M’ /etc/my.cnf.d/server.cnf
# sed -i ‘/[mysqld]/ajoin_buffer_size=128M’ /etc/my.cnf.d/server.cnf
# sed -i ‘/[mysqld]/ainnodb_buffer_pool_size = 512M’ /etc/my.cnf.d/server.cnf

# sed -i ‘/innodb_lock_wait_timeout/askip-innodb_doublewrite’ /etc/my.cnf.d/mysql-clients.cnf
# sed -i ‘/innodb_lock_wait_timeout/ainnodb_read_io_threads=64’ /etc/my.cnf.d/mysql-clients.cnf
# sed -i ‘/innodb_lock_wait_timeout/ainnodb_write_io_threads=32’ /etc/my.cnf.d/mysql-clients.cnf
# sed -i ‘/innodb_lock_wait_timeout/ainnodb_additional_mem_pool_size=96M’ /etc/my.cnf.d/mysql-clients.cnf
# sed -i ‘/innodb_lock_wait_timeout/asinnodb_flush_log_at_timeout=5’ /etc/my.cnf.d/mysql-clients.cnf

4. 重新啟動 MariaDB SQL Server
# systemctl restart mariadb
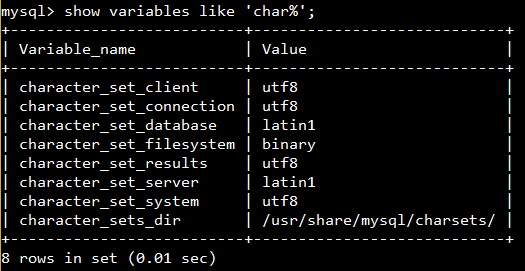
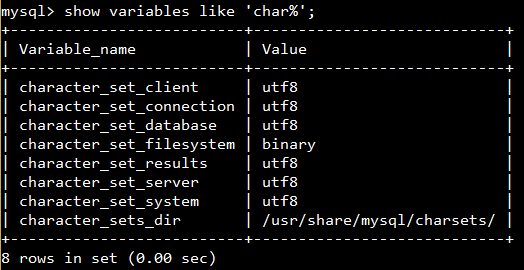
5. 檢查成果

解決 Cacti 出現 RRDTool version does not match configured version 的訊息

在 Cacti 管理畫面 Console / System Utilities / Technical Support 畫面中,出現的警告訊息:
ERROR: Installed RRDTool version does not match configured version.
Please visit the Configuration Settings and select the correct RRDTool Utility Version.

檢查系統安裝的 RRD Tool 版本,是 1.5.5-4
# dpkg -l | grep rrd
ii  librrd4:amd64                      1.5.5-4                            amd64        time-series data storage and display system (runtime library)
ii  rrdtool                            1.5.5-4                            amd64        time-series data storage and display system (programs)

可是在 Console / Settings / General 頁面中,RRDTool Utility Version 只有 1.0~1.4 版可以選擇

[@more@]解決方式:
參考 Cacti + RRDtool 錯誤訊息 @mini box 迷你盒子 – nidBox親子盒子

# cp /usr/share/cacti/site/utilities.php /usr/share/cacti/site/utilities.php.$(date +%F)
# vim /usr/share/cacti/site/utilities.php

if (preg_match(“/^RRDtool 1.4/”, $out_array[0])) {
    $rrdtool_version = “rrd-1.4.x”;
}else if (preg_match(“/^RRDtool 1.3./”, $out_array[0])) {
    $rrdtool_version = “rrd-1.3.x”;
}else if (preg_match(“/^RRDtool 1.2./”, $out_array[0])) {
    $rrdtool_version = “rrd-1.2.x”;
}else if (preg_match(“/^RRDtool 1.0./”, $out_array[0])) {
    $rrdtool_version = “rrd-1.0.x”;
}

 修改成

 if (preg_match(“/^RRDtool 1.6/”, $out_array[0])) {
     $rrdtool_version = “rrd-1.6.x”;
  } elseif (preg_match(“/^RRDtool 1.5/”, $out_array[0])) {
       $rrdtool_version = “rrd-1.5.x”;
  } elseif (preg_match(“/^RRDtool 1.4/”, $out_array[0])) {
       $rrdtool_version = “rrd-1.4.x”;
  }else if (preg_match(“/^RRDtool 1.3./”, $out_array[0])) {
       $rrdtool_version = “rrd-1.3.x”;
  }else if (preg_match(“/^RRDtool 1.2./”, $out_array[0])) {
      $rrdtool_version = “rrd-1.2.x”;
  }else if (preg_match(“/^RRDtool 1.0./”, $out_array[0])) {
      $rrdtool_version = “rrd-1.0.x”;
  }

 
# cp /usr/share/cacti/site/include/global_arrays.php /usr/share/cacti/site/include/global_arrays.php.$(date +%F)
# vim /usr/share/cacti/site/include/global_arrays.php

$rrdtool_versions = array(
        “rrd-1.0.x” => “RRDTool 1.0.x”,
        “rrd-1.2.x” => “RRDTool 1.2.x”,
        “rrd-1.3.x” => “RRDTool 1.3.x”,
        “rrd-1.4.x” => “RRDTool 1.4.x”);

修改成

$rrdtool_versions = array(
        “rrd-1.0.x” => “RRDTool 1.0.x”,
        “rrd-1.2.x” => “RRDTool 1.2.x”,
        “rrd-1.3.x” => “RRDTool 1.3.x”,
        “rrd-1.4.x” => “RRDTool 1.4.x”,
        “rrd-1.5.x” => “RRDTool 1.5.x”,
        “rrd-1.6.x” => “RRDTool 1.6.x”);


解決在 Ubuntu 16.04 上 Cacti monitor 模組一片空白

在 Ubuntu 16.04 上安裝 Cacti monitor 模組後,一片空白,檢查 Apache Log 發現有下面的錯誤訊息
# grep error /var/log/apache2/error.log
PHP Fatal error:  Uncaught Error: Call to undefined function split() in /usr/share/cacti/site/plugins/monitor/monitor.php:34nStack trace:n#0 {main}n  thrown in /usr/share/cacti/site/plugins/monitor/monitor.php on line 33

[@more@]在網路上搜尋了一下,找到
Cacti • View topic – Blank page plugin monitor
How to make Cacti’s Plugin Monitor works on PHP 7

這二篇,似乎是新版本的 PHP 7.x 不支援 split 函數,要改用 explode 函數。

1. 先備份原檔
# mv /usr/share/cacti/site/plugins/monitor/monitor.php /usr/share/cacti/site/plugins/monitor/monitor.php.$(date +%F)

2. 下載修改完成的檔案
# wget https://2blog.ilc.edu.tw/wp-content/uploads/sites/985/25793/25793-3792019.zip -P /usr/share/cacti/site/plugins/monitor

3. 解壓縮
# unzip /usr/share/cacti/site/plugins/monitor/25793-3792019.zip

4. 修改 /usr/share/cacti/site/plugins/monitor/monitor.php 中的設定
# vim /usr/share/cacti/site/plugins/monitor/monitor.php
改成您的設定,共有二行
$link = mysqli_connect(“localhost”, “帳號”, “密碼”, “資料庫名稱”);

5. 重新瀏覽就可以看到畫面了!

Cacti 使用 OpenLDAP 認證

選擇 Console / Setting / Authentication

原本是使用 Builtin Authentication

[@more@]改成 LDAP Authentication

LDAP Server IP
Distinguished Name (DN)

Search Base
Search Filter
Search Distingished Name (DN)
Search Password

登入畫面

如果無法登入,請執行 User Management,檢查帳號是否有 enable

把使用者  enable

cacti 安裝 plugin – monitor – CentOS

參考網頁:
Cacti 0.8.8b 安裝及設定Monitor & thold Plugin:::iThome Download-你要的軟體在這裡:::

1.0.x 版無法安裝,顯示 Plugin Not Compatible

Cacti monitor 下載網站:
http://docs.cacti.net/plugin:monitor#monitor
1. 下載 monitor plugin
# wget http://docs.cacti.net/_media/plugin:monitor-v1.3-1.tgz
2. 更改檔案名稱
# mv plugin:monitor-v1.3-1.tgz plugin_monitor-v1.3-1.tgz
3. 解壓縮
# tar xvzf plugin_monitor-v1.3-1.tgz -C /usr/share/cacti/plugins[@more@]
4. 登入 Cacti 後,選擇 Plugin Management

5. 選擇 Install Plugin

6. 選擇 Enable Plugin

7. 上方會出現 monitor 頁面

8. 選擇 Settings

9. 選擇 Misc 頁面

10. 進行設定

11. 觀看成果!

在 CentOS 7.x 下安裝 Cacti

1. 安裝 epel 套件庫
# yum install epel-release
# yum update

2. 安裝 LAMP
# yum install httpd mariadb-server php php-mysql php-pear php-gd php-mbstring net-snmp net-snmp-utils rrdtool

3. 安裝 cacti
# yum install cacti[@more@]
4. 啟動相關服務並開機時啟動
# systemctl enable httpd.service
# systemctl enable mariadb.service
# systemctl start httpd.service
# systemctl start mariadb.service

5. 設定 MariaDB SQL Server
# /usr/bin/mysql_secure_installation

6. 建立資料庫並設定管理帳號及密碼
# /usr/bin/mysql -u root -p
MariaDB [(none)]> create database cacti;
Query OK, 1 row affected (0.00 sec)

MariaDB [(none)]> grant all privileges on cacti.* to cacti@localhost identified by ‘password’;
Query OK, 0 rows affected (0.00 sec)

# For 1.0.x
MariaDB [(none)]> grant select on mysql.time_zone_name to cacti@localhost;
Query OK, 0 rows affected (0.00 sec)

MariaDB [(none)]> flush privileges;
Query OK, 0 rows affected (0.00 sec)

MariaDB [(none)]> exit

7. 匯入資料 版本會變動
# /usr/bin/mysql -u cacti -p cacti < /usr/share/doc/cacti-0.8.8h/cacti.sql
# /usr/bin/mysql -u cacti -p cacti < /usr/share/doc/cacti-1.0.4/cacti.sql

8. 修改 /etc/httpd/conf.d/cacti.conf 限制瀏覽的 IP 來源
# sed -i “/# httpd 2.4/attRequire ip 192.168.1.0/24” /etc/httpd/conf.d/cacti.conf
# cat /etc/httpd/conf.d/cacti.conf
Alias /cacti    /usr/share/cacti

<Directory /usr/share/cacti/>
        <IfModule mod_authz_core.c>
                # httpd 2.4
                Require ip 192.168.1.0/24
                Require host localhost
        </IfModule>
        <IfModule !mod_authz_core.c>
                # httpd 2.2
                Order deny,allow
                Deny from all
                Allow from localhost
        </IfModule>
</Directory>

9. 重新啟動 Web Server
# systemctl restart httpd.service

10. 修改 cacti 資料庫設定  /etc/cacti/db.php
# sed -i -e ‘s/database_username = “cactiuser”/database_username = “cacti”/’ -e ‘s/database_password = “cactiuser”/database_password = “password”/’ /etc/cacti/db.php
For 1.0.x
# sed -i -e “s/database_username = ‘cactiuser’/database_username = ‘cacti’/” -e “s/database_password = ‘cactiuser’/database_password = ‘password’/” /etc/cacti/db.php

11. 修改 cacti 工作排程設定 /etc/cron.d/cacti
# sed -i -e ‘s/^#//’ /etc/cron.d/cacti

12. 進行安裝設定 http://Server’IP/cacti

13.安裝過程 0.8.8 版本

預設帳號密碼:admin / admin

安裝完成!

1.0.x 版


解決 ERROR: Your Cacti database login account does not have access to the MySQL TimeZone database. Please provide the Cacti database account “select” access to the “time_zone_name” table in the “mysql” database, and populate MySQL’s TimeZone information before proceeding.

# /usr/bin/mysql_tzinfo_to_sql /usr/share/zoneinfo | /usr/bin/mysql -u root -p mysql
Enter password:

更改目錄擁有者及權限
# chown -R apache:apache /usr/share/cacti
# chmod -R 777 /usr/share/cacti/resource

進行安裝 http://Server’IP/cacti

有一些 Warn,先跳過

Next

程式路徑

目錄權限

安裝完成

預設帳號及密碼:admin / admin

重設密碼,密碼強度要求很高

Save 更改密碼

登入完成畫面

修正 Cacti Monitor Module 無法顯示正確的偵測失敗時間

安裝完 Cacti 的 Monitor Module 後發現無法顯示正確的偵測失敗時間

顯示的日期及時間都是 0000-00-00 00:00:00[@more@]底下文章參考:Cacti • View topic – [SOLVED] Monitor v1.3-1 plugin – last fail not working

OS:Debian 8

1. 先找到 functions.php
# locate functions.php
/usr/share/cacti/site/lib/functions.php

CentOS
/usr/share/cacti/lib/functions.php

2. 先備份原檔
# cp /usr/share/cacti/site/lib/functions.php /usr/share/cacti/site/lib/functions.php.$(date +%F)

3. 進行修改
# vim /usr/share/cacti/site/lib/functions.php

$hosts[$host_id][“status_fail_date”] = ‘0000-00-00 00:00:00’;
$hosts[$host_id][“status_rec_date”] = ‘0000-00-00 00:00:00’;
修改成
if ($hosts[$host_id][“status_fail_date”] == “”){
$hosts[$host_id][“status_fail_date”] = ‘0000-00-00 00:00:00’;}
if ($hosts[$host_id][“status_rec_date”] == “”){
$hosts[$host_id][“status_rec_date”] = ‘0000-00-00 00:00:00’;}

之後就可以正常顯示了!

讓 Cacti 能正常顯示中文

OS:Debian 8.0 jessie
cacti:0.8.8b
安裝完 cacti 之後發現無法呈現中文,輸入中文之後,都會變成 ??

在網路上搜尋了一下,找到下面的文章:
在 Cacti 中顯示中文 | .K.T.’s Blog
電腦中心 | 讓cacti的圖正常出現中文[@more@]底下是設定的步驟:
1. 修改 /usr/share/cacti/site/lib/functions.php
# vim /usr/share/cacti/site/lib/functions.php
在 <?php 下方加入下面一行
setlocale(LC_CTYPE,”zh_TW.UTF-8″);

2. 安裝中文字形
# apt-get install ttf-wqy-microhei ttf-wqy-zenhei fonts-arphic-bkai00mp fonts-arphic-bsmi00lp

3. 加入字型的支援
# /usr/bin/fc-cache -v -f

做了以上的設定還是不行

4. 檢查 MySQL Server 的編碼設定
# /usr/bin/mysql -u root -p
Enter password:
Welcome to the MySQL monitor.  Commands end with ; or g.
Your MySQL connection id is 124
Server version: 5.5.44-0+deb8u1 (Raspbian)

Copyright (c) 2000, 2015, Oracle and/or its affiliates. All rights reserved.

Oracle is a registered trademark of Oracle Corporation and/or its
affiliates. Other names may be trademarks of their respective
owners.

Type ‘help;’ or ‘h’ for help. Type ‘c’ to clear the current input statement.

mysql> show variables like ‘char%’;

如果發現有 latin1,代表資料庫編碼要做設定

5. 修改 MySQL Server 設定,加入以下的設定
# vim /etc/mysql/my.cnf
[client]
default-character-set=utf8

[mysqld]
character-set-server=utf8
collation-server=utf8_general_ci
init-connect=’SET NAMES utf8′

[mysql]
default-character-set=utf8

6. 重新啟動 MySQL Server
# systemctl restart mysql

7. 重新檢查 MySQL Server 資料庫編碼
# /usr/bin/mysql -u root -p
Enter password:
Welcome to the MySQL monitor.  Commands end with ; or g.
Your MySQL connection id is 124
Server version: 5.5.44-0+deb8u1 (Raspbian)

Copyright (c) 2000, 2015, Oracle and/or its affiliates. All rights reserved.

Oracle is a registered trademark of Oracle Corporation and/or its
affiliates. Other names may be trademarks of their respective
owners.

Type ‘help;’ or ‘h’ for help. Type ‘c’ to clear the current input statement.

mysql> show variables like ‘char%’;

8. 匯出原 cacti 資料庫
# /usr/bin/mysqldump -u root -p cacti > /root/cacti.sql –default-character-set=latin1

9. 將匯出檔案的 latin1 全部改成 utf8
# sed -i ‘s/latin1/utf8/’ /root/cacti.sql

10. 重新匯入
# /usr/bin/mysql -u root -p /root/cacti < cacti.sql –default-character-set=utf8

終於可以正常顯示中文了!

CactiEZ 0.7 和 CactiEZ 10.1 的比較

CactiEZ 0.7 和 CactiEZ 10.1 二套都是用來幫助使用者能快速安裝及使用 Cacti 的工具,二套都有試著安裝一下,稍微比較一下二者之間的差異。

CactiEZ 0.7 官方網站:http://cactiez.cactiusers.org/


CactiEZ 10.1 官方網站:http://www.cactiez.com (目前連不上)[@more@]比較如下:
1. CactiEZ 0.7 和 CactiEZ 10.1 都是 base on CentOS
    CactiEZ 0.7 是 CentOS 6.3

    CactiEZ 10.1 是 CentOS 6.0

2. CactiEZ 0.7 提供手動及自動安裝,而 CactiEZ 10.1 則只提供自動安裝
CactiEZ 0.7 有提供手動安裝,可以讓使用自行設定網路組態、硬碟分割、root 管理密碼等等,提供有經驗的管理者更多的彈性,CactiEZ 0.7 和 CactiEZ 10.1 的自動安裝,在網路設定上不太相同,CactiEZ 0.7 是使用 DHCP 取得 IP,而 CactiEZ 10.1 是指定一個 192.168.0.64 的 IP。

3. CactiEZ 0.7 中的 cacti 安裝方式是利用 rpm 的方式來安裝,CactiEZ 10.1 則是利用 .tgz 的檔案在安裝過程中解壓縮安裝。
使用 rpm 的好處是比較方便使用者安裝新的版本或移除舊的版本,但要受限套件庫的維護者更新版本的速度,使用 .tgz 的版本則是純粹手工處理。

4. CactiEZ 0.7 的 Cacti 介面是英文的,而 CactiEZ 10.1 的介面是簡體中文的

5. CactiEZ 0.7 預設安裝的 cacti 版本是 0.8.8a,而 CactiEZ 10.1 安裝的是 0.8.7g

6. CactiEZ 0.7 和 CactiEZ 10.1 自動安裝的管理者密碼
     root / CactiEZ
     MySQL Server 管理者預設沒有密碼

7. CactiEZ 0.7 安裝套件數 311 個,CactiEZ 10.1 安裝套件數 277 個

8. CactiEZ 0.7 似乎只有 x86_64 版本,而 CactiEZ 10.1 則有 x86 和 x86_64 版本

最後,這二片光碟都是研究自動安裝 Linux 一個很不錯的教材,從其中收穫很多。