在 Ubuntu Linux 上安裝 gcin 中文輸入法

本來都一直直接使用 Ubuntu 套件庫來安裝 gcin,後來無意中看到 Ubuntu 15.04/14.10/14.04/…/12.10/12.04 安裝最新的 gcin 中文輸入的完整步驟 這一篇。
稍微試了一下,可以安裝並使用,不過一時之間看不出二者之間有什麼差異。

加入 GPG 金鑰
$ sudo apt-key adv –keyserver keyserver.ubuntu.com –recv-keys 835AB0E3
如果沒加入,在做 apt-get update 更新套件庫時會出現錯誤訊息
W: GPG 錯誤: http://hyperrate.com eliu Release: 由於無法取得它們的公鑰,以下簽章無法進行驗證: NO_PUBKEY 5C577D59835AB0E3

加入 gcin 套件庫來源
$ sudo echo “deb http://hyperrate.com/debian eliu release” >> /etc/apt/sources.list

更新套件庫
$ sudo apt-get update

進行安裝
$ sudo apt-get install gcin

在 Ubuntu MATE 14.04.2 上使用 Scratch 2 來開啟 .sb2 檔

之前是利用 Ubuntu Tweak 來處理:
頭城國小資訊組 | 在 Ubuntu Linux 上使用 Scratch 2 來開啟 .sb2 檔

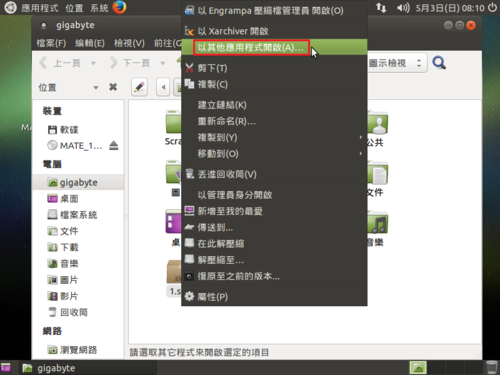
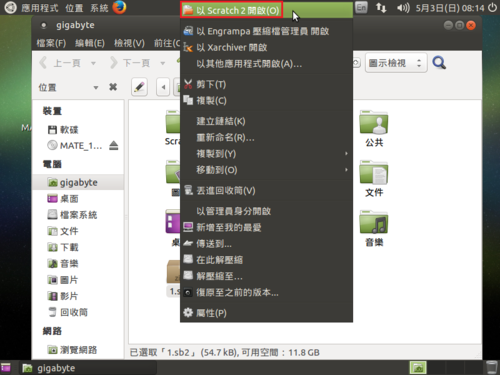
1. 在 .sb2 檔上按滑鼠右鍵,選擇 以其它應用程式開啟(A)…
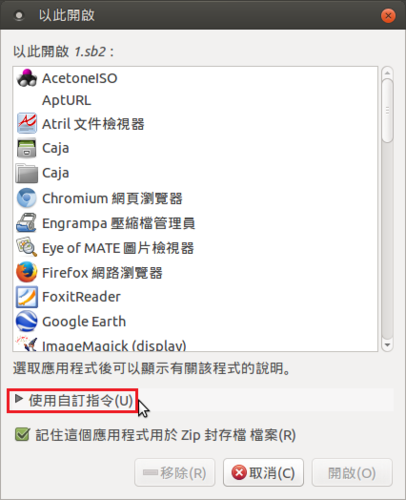
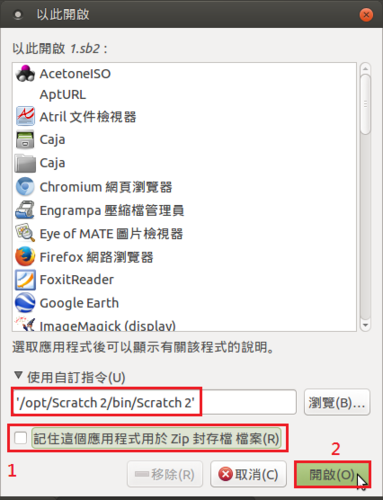
[@more@]2. 選擇 使用自訂指令(U)

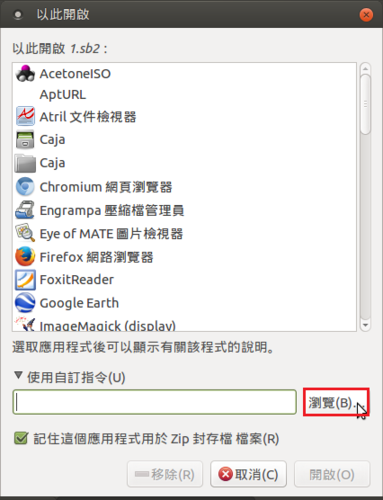
3. 選擇 瀏覽(B)…

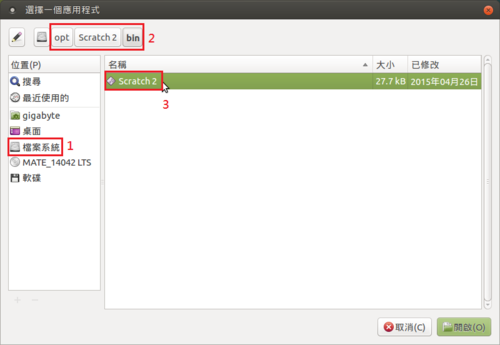
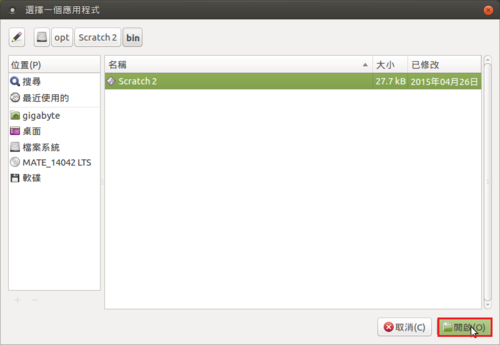
4. 選擇 Scratch 2 程式所在的路徑

5. 選擇 開啟(O)

6. 取消勾選 記住這個應用程式用於 Zip 封存檔 檔案(R),然後按 開啟(O)

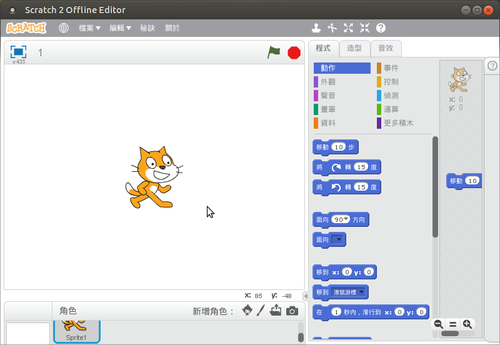
6. 以 Scratch 2 開啟

7. 以後在 .sb2 檔上按滑鼠右鍵,就會出現 以 Scratch 2 開啟(O)

Linux 軟體套件整理

把 ezgo 和 ntpcU 上的軟體套件稍做整理
辦公
  流程圖 – Dia   $ sudp apt-get install dia
  電子書 – Calibre   $ sudo apt-get install calibre
  PDF 瀏覽 – Okular   $ sudo apt-get install okular
  PDF 編輯 – PDF Shuffler   $ sudo apt-get install pdfshuffler
  PDF 手繪筆記 – Xournal   $ sudo apt-get install xournal
  QR Code 產生器 – QtQR  $ sudo apt-get install qtqr
  心智圖 – XMind   https://www.xmind.net/
  心智圖 – FreeMind   $ sudo apt-get install freemind

美工
  小畫家 – KolourPaint   $ sudo apt-get install kolourpaint4 kde-l10n-zhtw
  企鵝小畫家 – TuxPaint   $ sudo apt-get install tuxpaint
  筆刷繪圖 – Krita   $ sudo apt-get install krita
  筆刷繪圖 – My Paint   $ sudo apt-get install mypaint
  相片瀏覽 – Gwenview   $ sudo apt-get install gwenview
  相片管理 – digikam   $ sudo apt-get install digikam
  影像擷取 – Shutter   $ sudo apt-get install shutter
  多圖合併 – Fotowall   $ sudo apt-get install fotowall
  電路設計 – Fritzing   $ sudo apt-get install fritzing
  圖片管理 – gThumb   $ sudo apt-get install gthumb
  相片管理 – Shotwell   $ sudo apt-get install shotwell
  影像檢視 – eog   $ sudo apt-get install eog
  圖片檢視 – GpicView   $ sudo apt-get install gpicview
  panorama photo stitcher – GUI tools – hugin   $ sudo apt-get install hugin[@more@]
影音
  多媒體中心 – XBMC   $ sudo apt-get install xbmc
  影音播放 – VLC   $ sudo apt-get install vlc
  影片編輯 – OpenShot   $ sudo apt-get install openShot
  影片編輯 – Kdenlive   $ sudo apt-get install kdenlive
  桌面錄製 – Kazam   $ sudo apt-get install kazam
  視訊擷取 – Cheese   $ sudo apt-get install cheese
  影像擷取 – guvcview   $ sudo apt-get install guvcview
  投影片秀 – Imagination   $ sudo apt-get install imagination
  投影片秀 – ffDiaporama   $ sudo apt-get install ffDiaporama
  虛擬光碟 – Furius ISO Mount   $ sudo apt-get install furiusisomount
  音樂播放 – Amarok   $ sudo apt-get install amarok
  音樂播放 – Audacious   $ sudo apt-get install audacious
  樂譜編輯 – MuseScore   $ sudo apt-get install museScore
  音樂編輯 – Audacity   $ sudo apt-get install audacity
  媒體播放器 – Parole   $ sudo apt-get install parole

網路
  BBS 連線 – PCMan X BBS   $ sudo apt-get install pcmanx-gtk2
  檔案分享 – Meiga   http://meiga.igalia.com/
  網頁編輯 – Blue Griffon   http://bluegriffon.org/
 

遊戲
  打字遊戲 – Tux Typing   $ sudo apt-get install tuxtype
  數學遊戲 – TuxMath   $ sudo apt-get install tuxmath
  企鵝練習 – Pingus   $ sudo apt-get install pingus
  超級企鵝 – SuperTux   $ sudo apt-get install supertux  or $ sudo apt-get install supertux-stable   
  賽車遊戲 – Supertuxkart   $ sudo apt-get install supertuxkart

教育
  幼教 – GCompris   $ sudo apt-get install gcompris
  馬鈴薯小子 – Ktuberling   $ sudo apt-get install ktuberling
  天文 – Stellarium   $ sudo apt-get install stellarium
  天文 – Celestia   $ sudo apt-get install celestia

在 Linux 中使用 screen 指令工具

screen 指令工具是一個非常方便的工具程式,有時工作到一半時,因為有事情要離開或是下班,但因為目前套件的安裝或編譯還未完成,如果中斷了,可能要重新再來一次,或是可能還會造成一些嚴重的後果,這時候如果可以把工作放在背景視窗,繼續工作,然後有空的話,再接續回來。
screen 指令工具就有這樣的功能,利用分離(Detach)功能,可以將視窗內的程序放入背景,即使登出主機切斷連線,只要該主機一直維持運作,分離的視窗就會持續地保留在背景。

安裝方式:
CentOS Linux
# yum install screen

Debian/Ubuntu Linux
$ sudo apt-get install screen

Arch Linux
# pacman -S screen

Gentoo Linux
# emerge screen[@more@]Screen 的功能非常強大,這裡只針對 分離(Detach) 來做說明
1. 登入主機後執行 screen 指令,執行之後畫面不會有任何變化
# screen

2. 退出的方式
# exit

3. 畫面會出現 [screen is terminating],表示已經退出 screen

4. 使用分離(Detach) 功能,執行 screen 後

執行要放入背景的工作,並按 CTRL+A 之後,再按 D
# /usr/bin/emerge -u world

工作會放到背景,畫面上會出現 [detached]

5. 執行 screen -ls 列出放在背景的視窗
# screen -ls
There is a screen on:
        31862.pts-0.share       (Detached)
1 Socket in /root/.screen.

6. 取出
# screen -r
# screen -r 31862.pts-0.share
因為目前只有一個工作,所以只要直接使用 -r 即可,如果有很多個,就要加上編號

7. 就取回原來的工作了!

Linux – 找出佔用磁碟空間最大的目錄/檔案

在 Linux 中 du / find  的功能非常強大,尤其是搭配 sort / head 指令後,可以快速尋找出所需的目錄/檔案及佔用磁碟空間最大的目錄/檔案。
找出 /home 目錄中佔用磁碟空間最大的目錄
# du -hsx /home/* | sort -hr | head
15G     /home/share
13G     /home/s0990
12G     /home/www
6.3G    /home/t850008
6.2G    /home/s0970
5.6G    /home/s0980
4.4G    /home/s0960
3.8G    /home/s0100
3.8G    /home/homework
1.5G    /home/s0950

找出佔用磁碟空間最大的學生前三名
# du -hsx /home/s0990/* /home/s0980/* | sort -hr | head -n 3
340M    /home/s0980/s0980055
281M    /home/s0990/s0990145
281M    /home/s0990/s0990136[@more@]找出前 10 大的檔案
# find /home -type f -printf ‘%s %pn’ | sort -nr | head
4670320640 /home/www/course_3-6.iso
2519356635 /home/share/PhotoCap/PCMaterial_V5_MultiFrame.exe
1785901819 /home/share/PhotoCap/PCMaterial_V6_MultiFrame.exe
1593472746 /home/53.tar.bz2
1552238558 /home/share/38/38.html.tar.bz2
1513110984 /home/www/all_g3_big5.zip
1513110912 /home/www/all_g3.zip
1507640047 /home/drbl.tar.bz2
1258466165 /home/share/PhotoCap/PCMaterial_V5_Frame.exe
1131084431 /home/share/PhotoCap/PCMaterial_V6_Frame.exe

找出前 10 大的 exe 檔案
# find /home -type f -iname ‘*.exe’ -printf ‘%s %pn’ | sort -hr | head
2519356635 /home/share/PhotoCap/PCMaterial_V5_MultiFrame.exe
1785901819 /home/share/PhotoCap/PCMaterial_V6_MultiFrame.exe
1258466165 /home/share/PhotoCap/PCMaterial_V5_Frame.exe
1131084431 /home/share/PhotoCap/PCMaterial_V6_Frame.exe
663175919 /home/share/PhotoCap/PCMaterial_V100.exe
459156905 /home/share/PhotoCap/PCMaterial_V4_Frame.exe
439657482 /home/share/PhotoCap/PCMaterial_V4_MultiFrame1.exe
431579494 /home/share/PhotoCap/PCMaterial_V300.exe
408804542 /home/share/PhotoCap/PCMaterial_V200.exe
401967094 /home/share/PhotoCap/PCMaterial_V4_MultiFrame2.exe

解決 Nagios 出現 “Is This Service Flapping” 的提示訊息

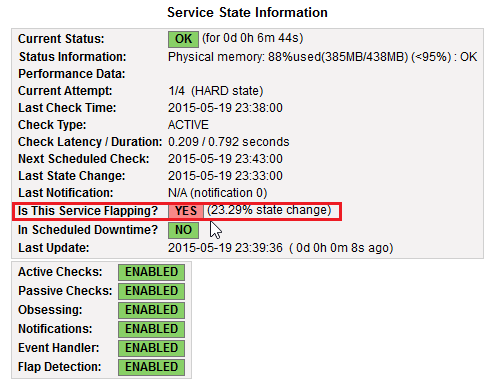
在 Debian / Ubuntu Linux 使用 Nagios 來偵測 SNMP 時出現了一個特別的狀況
偵測項目 SNMP 上出現一個汽泡提示和向上的黑色三角形

點選 SNMP 項目會出現 “Is This Service Flapping” 的提示訊息
[@more@]在網路上搜尋了一下,找到了這一篇:
nagios报警延迟的解决–flapping state – abnerfrmh的专栏 – 博客频道 – CSDN.NET

解決方式:
1. 修改 /etc/nagios3/nagios.cfg
$ sudo sed -i ‘s/enable_flap_detection=1/enable_flap_detection=0/’ /etc/nagios3/nagios.cfg

2. 重新啟動 Nagios 3
$ sudo /etc/init.d/nagios3 restart
 * Restarting nagios3 monitoring daemon nagios3
                                                                                     [ OK ]

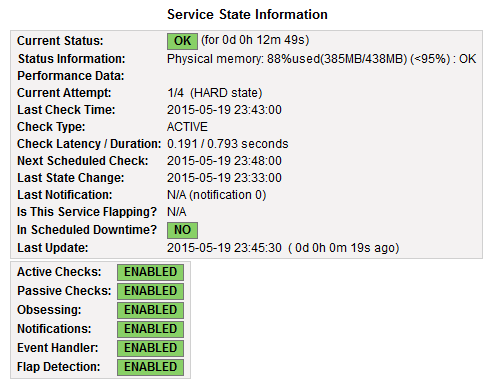
就不會再出現 “Is This Service Flapping” 的提示訊息

會出現這個提示訊息,猜想應該是偵測使用 SNMP 去檢測實體記憶體的使用量,變動性比較大。

解決 Nagios 出現 CRITICAL – Could not interpret output from ping command 的錯誤訊息

在 Ubuntu Server 上建置 Nagios 3 和 Cacti 來監測學校 Server 的一些狀態。
不過在 Nagios 3 上卻出現下圖的錯誤訊息
[@more@]可是明明就是本機,竟出現這種訊息,依 “CRITICAL – Could not interpret output from ping command” 訊息,在 Google 搜尋了一下,找到了這一篇:
Could not interpret output from ping command – View topic • Nagios Support Forum

解決方式:
1. 更改 ping 的執行權限
原本
# ls -l /bin/ping
-rwxr-xr-x 1 root root 34820 Mar 15  2014 /bin/ping

更改成
# chmod u+s /bin/ping
更改後
# ls -l /bin/ping
-rwsr-xr-x 1 root root 34820 Mar 15  2014 /bin/ping

2. 重新啟動 Nagios 3
# /etc/init.d/nagios3 restart
 * Restarting nagios3 monitoring daemon nagios3
                                                                                        [ OK ]

3. 系統就正常了!

在 Ubuntu MATE 14.04.2 上安裝 VMware Tools

1. 切換目錄
$ cd /media/gigabyte/VMware Tools/

2. 查看目錄內容
$ ls
manifest.txt     VMwareTools-9.6.1-1378637.tar.gz  vmware-tools-upgrader-64
run_upgrader.sh  vmware-tools-upgrader-32
[@more@]
3. 解壓縮 VMwareTools-9.6.1-1378637.tar.gz 到 /tmp 目錄
$ tar xvzf VMwareTools-9.6.1-1378637.tar.gz -C /tmp

4. 切換目錄
$ cd /tmp/vmware-tools-distrib

5. 進行安裝,一直按 Enter 鍵即可
$ sudo ./vmware-install.pl
Creating a new VMware Tools installer database using the tar4 format.

Installing VMware Tools.

In which directory do you want to install the binary files?
[/usr/bin]
What is the directory that contains the init directories (rc0.d/ to rc6.d/)?
[/etc]

What is the directory that contains the init scripts?
[/etc/init.d]

In which directory do you want to install the daemon files?
[/usr/sbin]

The configuration of VMware Tools 9.6.1 build-1378637 for Linux for this
running kernel completed successfully.

You must restart your X session before any mouse or graphics changes take
effect.

You can now run VMware Tools by invoking “/usr/bin/vmware-toolbox-cmd” from the
command line.

To enable advanced X features (e.g., guest resolution fit, drag and drop, and
file and text copy/paste), you will need to do one (or more) of the following:
1. Manually start /usr/bin/vmware-user
2. Log out and log back into your desktop session; and,
3. Restart your X session.

Enjoy,

–the VMware team

完成安裝,重新啟動電腦即可!

客製化 Ubuntu MATE 14.04.2

感謝 Franklin 的技術指導,完成自己最喜歡使用的 Ubuntu MATE 14.04.2 版本。
影音
[@more@]教育

系統工具

網際網路

美工繪圖

軟體開發

辦公

附屬應用程式

Chromium Adobe Flash Player

Firefox Adobe Flash Player

Firefox 安裝附加元件

Chromium 安裝擴充功能

Foxit Reader

XMind 6

LibreOffice 安裝標點符號工具列

安裝 Adobe AIR

Scratch 2 精簡剩下 English / 正體中文

可以固定正體中文顯示

Google Earth