試用 Banana Pi R1 – Ubuntu minimal 16.04 上安裝 OpenVPN

參考網站:
How To Set Up an OpenVPN Server on Ubuntu 16.04 | DigitalOcean

1. 安裝 OpenVPN
# apt-get install openvpn easy-rsa

2. 建立 Certificate Authority
# mkdir -p /etc/openvpn/easy-rsa/keys
# cp -r /usr/share/easy-rsa /etc/openvpn
# cd /etc/openvpn/easy-rsa
請情況修改 /etc/openvpn/easy-rsa/vars 中的變數
# vim /etc/openvpn/easy-rsa/vars
export KEY_COUNTRY=”TW

export KEY_PROVINCE=”Taiwan
export KEY_CITY=”Yilan
export KEY_ORG=”School
export KEY_EMAIL=”me@myhost.mydomain”
export KEY_OU=”MyOrganizationalUnit”

# X509 Subject Field
export KEY_NAME=”EasyRSA”[@more@]
# source ./vars
NOTE: If you run ./clean-all, I will be doing a rm -rf on /etc/openvpn/easy-rsa/keys
# ./clean-all
# ./build-ca

3. 產生 Server 憑證、金鑰及加密檔案
#  ./build-key-server server
Certificate is to be certified until Dec 21 10:24:53 2026 GMT (3650 days)
Sign the certificate? [y/n]:y

1 out of 1 certificate requests certified, commit? [y/n]y
Write out database with 1 new entries
Data Base Updated

時間會稍微比較久一些
# ./build-dh
# openvpn –genkey –secret keys/ta.key

4. 產生 Client Certificate 和 Key Pair
# source ./vars
NOTE: If you run ./clean-all, I will be doing a rm -rf on /etc/openvpn/easy-rsa/keys
# ./build-key client
Please enter the following ‘extra’ attributes
to be sent with your certificate request
A challenge password []:
An optional company name []:
Using configuration from /etc/openvpn/easy-rsa/openssl-1.0.0.cnf
Check that the request matches the signature
Signature ok

Certificate is to be certified until Dec 21 12:15:42 2026 GMT (3650 days)
Sign the certificate? [y/n]:y

1 out of 1 certificate requests certified, commit? [y/n]y
Write out database with 1 new entries
Data Base Updated

如果要建立需要密碼
# source ./vars
NOTE: If you run ./clean-all, I will be doing a rm -rf on /etc/openvpn/easy-rsa/keys
# ./build-pass client

5. 複製憑證金鑰到 /etc/openvpn/keys 目錄
# cd /etc/openvpn/easy-rsa/keys 
# mkdir /etc/openvpn/keys
# cp ca.crt ca.key server.crt server.key ta.key dh2048.pem /etc/openvpn/keys

6. 設定 OpenVPN
修改 /etc/openvpn/server.conf 設定檔
# gunzip -c /usr/share/doc/openvpn/examples/sample-config-files/server.conf.gz | tee /etc/openvpn/server.conf
# cp /etc/openvpn/server.conf /etc/openvpn/server.conf.$(date +%F)

修改設定
# sed -i ‘s/;tls-auth/tls-auth/’ /etc/openvpn/server.conf
# sed -i ‘/tls-auth/ akey-direction 0’ /etc/openvpn/server.conf
# sed -i ‘s/;cipher AES/cipher AES/’ /etc/openvpn/server.conf
# sed -i ‘/^cipher/ aauth SHA256’ /etc/openvpn/server.conf
OpenVPN 執行使用者及群組
# sed -i ‘s/^;user/user/’ /etc/openvpn/server.conf
# sed -i ‘s/^;group/group/’ /etc/openvpn/server.conf
VPN Client 的 Default Gatewa y以 VPN Gateway 為主
# sed -i ‘s/^;push “redirect/push “redirect/’ /etc/openvpn/server.conf
DNS  設定
# sed -i ‘s/^;push “dhcp-option DNS 208.67.222.222″/push “dhcp-option DNS 168.95.1.1″/’ /etc/openvpn/server.conf
# sed -i ‘s/^;push “dhcp-option DNS 208.67.220.220″/push “dhcp-option DNS 8.8.8.8″/’ /etc/openvpn/server.conf
將預設的 UDP 改為 TCP
# sed -i ‘s/^;proto tcp/proto tcp/’ /etc/openvpn/server.conf
# sed -i ‘s/^proto udp/;proto udp/’ /etc/openvpn/server.conf
更改 crt / key 的檔案位置
# sed -i ‘s|ca ca.crt|ca /etc/openvpn/keys/ca.crt|’ /etc/openvpn/server.conf
# sed -i ‘s|cert server.crt|cert /etc/openvpn/keys/server.crt|’ /etc/openvpn/server.conf
# sed -i ‘s|key server.key|key /etc/openvpn/keys/server.key|’ /etc/openvpn/server.conf
# sed -i ‘s|dh dh2048.pem|dh /etc/openvpn/keys/dh2048.pem|’ /etc/openvpn/server.conf
# sed -i ‘s|tls-auth ta.key 0|tls-auth /etc/openvpn/keys/ta.key 0|’ /etc/openvpn/server.conf
使用憑證認證時,允許所有的 Client 使用相同的 KEY 登入
# sed -i ‘s/^;duplicate-cn/duplicate-cn/’ /etc/openvpn/server.conf
允許 Client 間互接連接
# sed -i ‘s/^;client-to-client/client-to-client/’ /etc/openvpn/server.conf
更改 log 檔位置
# sed -i ‘s|status openvpn-status.log|status /var/log/openvpn/openvpn-status.log|’  /etc/openvpn/server.conf
# sed -i ‘s|;log         openvpn.log|log         /var/log/openvpn/openvpn.log|’ /etc/openvpn/server.conf
# sed -i ‘s|;log-append  openvpn.log|log-append  /var/log/openvpn/openvpn.log|’ /etc/openvpn/server.conf
此網段走 VPN Gateway
# sed -i ‘/^;push “route 192.168.10/ ipush “route 10.8.0.0 255.255.255.0″‘ /etc/openvpn/server.conf

For sed
# cat script-file
s/;tls-auth/tls-auth/
/tls-auth/ akey-direction 0
s/;cipher AES/cipher AES/
/^cipher/ aauth SHA256
s/^;user/user/
s/^;group/group/
s/^;push “redirect/push “redirect/
s/^;push “dhcp-option DNS 208.67.222.222″/push “dhcp-option DNS 168.95.1.1″/
s/^;push “dhcp-option DNS 208.67.220.220″/push “dhcp-option DNS 8.8.8.8″/
s/^;proto tcp/proto tcp/
s/^proto udp/;proto udp/
s|ca ca.crt|ca /etc/openvpn/keys/ca.crt|
s|cert server.crt|cert /etc/openvpn/keys/server.crt|
s|key server.key|key /etc/openvpn/keys/server.key|
s|dh dh2048.pem|dh /etc/openvpn/keys/dh2048.pem|
s|tls-auth ta.key 0|tls-auth /etc/openvpn/keys/ta.key 0|
s/^;duplicate-cn/duplicate-cn/
s/^;client-to-client/client-to-client/
s|status openvpn-status.log|status /var/log/openvpn/openvpn-status.log|
s|;log         openvpn.log|log         /var/log/openvpn/openvpn.log|
s|;log-append  openvpn.log|log-append  /var/log/openvpn/openvpn.log|
/^;push “route 192.168.10/ ipush “route 10.8.0.0 255.255.255.0”

# sed -i -f script-file /etc/openvpn/server.conf

建立存放 Log 的目錄
# mkdir /var/log/openvpn

7.設定網路 Forward
# sed -i ‘s/#net.ipv4.ip_forward=1/net.ipv4.ip_forward=1/’ /etc/sysctl.conf
# sysctl -p

8. 防火牆設定 iptables
# iptables -t nat -A POSTROUTING -s 10.8.0.0/24 -o eth0 -j MASQUERADE
# iptables -A FORWARD -i tun0 -j ACCEPT 
# iptables -A FORWARD -o tun0 -j ACCEPT

9. 設定開機時啟動 OpenVPN 服務
# systemctl enable openvpn@server.service
Created symlink from /etc/systemd/system/multi-user.target.wants/openvpn@server.service to /lib/systemd/system/openvpn@.service.

10. 啟動並檢查是否有正常啟動
# systemctl start openvpn@server.service
# systemctl status openvpn@server.service | head -3
● openvpn@server.service – OpenVPN connection to server
   Loaded: loaded (/lib/systemd/system/openvpn@.service; enabled; vendor preset: enabled)
   Active: active (running) since 五 2016-12-23 21:35:43 CST; 15h ago

# netstat -antpl | grep :1194
tcp        0      0 0.0.0.0:1194            0.0.0.0:*               LISTEN      3146/openvpn

試用 Banana Pi M3 – Ubuntu 16.04 LXDE

一個版本是由洪博士所製作的版本,簡單的試用了一下。
桌面環境

[@more@]影音

系統工具

網際網路

美工繪圖

辦公

附屬應用程式

偏好設定

我個人修改的部分:
1. 刪除 fcitx 輸入法,因為行列輸入法有些問題
$ sudo apt-get remove –purge $(dapkg -l | grep fcitx | awk ‘{print $2}’)
2. 改用 gcin
$ sudo apt-get install gcin
3. 加裝以下套件
$ sudo apt-get install vim gpicview mtpaint
4. 備份系統時使用
$ sudo apt-get install cifs-utils sshfs curlftpfs

這一個版本的優點:
1. 執行速度快
2. 系統乾淨、整潔,需要什麼自己安裝

缺點:
1. 比較不適合不熟悉 Linux 的人

試用 Banana Pi M3 – Ubuntu minimal 16.04 讓終端機介面可以輸入及顯示中文

預設的設定無法輸入及顯示中文
原本的設定
# cat /etc/default/locale
#  File generated by update-locale
LANG=”C”
LC_ALL=”C”

# locale
LANG=C
LANGUAGE=
LC_CTYPE=”C”
LC_NUMERIC=”C”
LC_TIME=”C”
LC_COLLATE=”C”
LC_MONETARY=”C”
LC_MESSAGES=”C”
LC_PAPER=”C”
LC_NAME=”C”
LC_ADDRESS=”C”
LC_TELEPHONE=”C”
LC_MEASUREMENT=”C”
LC_IDENTIFICATION=”C”
LC_ALL=C
[@more@]
# cp /etc/default/locale /etc/default/locale.$(date +%F)
# locale-gen en_US.UTF-8
# update-locale LANG=en_US.UTF-8
# update-locale LANGUAGE=en_US.UTF-8

# cat /etc/default/locale
#  File generated by update-locale
LANG=en_US.UTF-8
LANGUAGE=en_US.UTF-8

# locale
LANG=en_US.UTF-8
LANGUAGE=en_US.UTF-8
LC_CTYPE=”en_US.UTF-8″
LC_NUMERIC=”en_US.UTF-8″
LC_TIME=”en_US.UTF-8″
LC_COLLATE=”en_US.UTF-8″
LC_MONETARY=”en_US.UTF-8″
LC_MESSAGES=”en_US.UTF-8″
LC_PAPER=”en_US.UTF-8″
LC_NAME=”en_US.UTF-8″
LC_ADDRESS=”en_US.UTF-8″
LC_TELEPHONE=”en_US.UTF-8″
LC_MEASUREMENT=”en_US.UTF-8″
LC_IDENTIFICATION=”en_US.UTF-8″
LC_ALL=

重新啟動讓設定生效!

試用 Banana Pi M3 – Ubuntu minimal 16.04


官網下載位置:請按 這裡
預設登入的帳號及密碼:pi or root / bananapi[@more@]1. 更改 pi & root 的密碼
$ sudo passwd root
# passwd pi

2. 先更新套件庫來源
# apt-get update

3. 安裝 OpenSSH 相關套件
# apt-get install openssh-server

4. 補安裝個人覺得缺少的套件
# apt-get install colordiff dnsutils iptables lftp nano screen unzip vim xz-utils zip mlocate ntpdate rsync

5. 系統更新
# apt-get upgrade

6. 時區設定
目前的設定
# date
Thu Dec 22 02:47:44 UTC 2016
更改方式
# export TZ=’Asia/Taipei’
加入到 /etc/profile 讓開機時生效
# echo “export TZ=’Asia/Taipei'” >> /etc/profile 
更改之後
# date
Thu Dec 22 10:52:55 CST 2016

在 Ubuntu 16.04.1 Server 上建置 OpenConnect SSL VPN Server

參考網站:
折腾笔记:架设OpenConnect Server给iPhone提供更顺畅的网络生活 – 比特客栈的文艺复兴
Ubuntu ocserv搭建
使用ocserv搭建 Cisco Anyconnect 服務器 | 落格博客
Setup OpenConnect VPN Server for Cisco AnyConnect on Ubuntu 14.04 x64 – Vultr.com

1. 安裝 ocserv
# apt-get install ocserv

2. 安裝建立憑證時所需套件
# apt install gnutls-bin

3. 建立目錄及切換目錄
# mkdir certificates
# cd certificates[@more@]4. 建立 CA 金鑰
# certtool –generate-privkey –outfile ca-key.pem
Generating a 3072 bit RSA private key…

建立 ca.tmpl
# cat ca.tmpl
cn = “VPN CA”
organization = “Home”
serial = 1
expiration_days = 3650
ca
signing_key
cert_signing_key
crl_signing_key

# certtool –generate-self-signed –load-privkey ca-key.pem –template ca.tmpl –outfile ca-cert.pem

複製 ca-cert.pem 到 /etc/ocserv 目錄
# cp ca-cert.pem /etc/ocserv

5. 建立本機 Server 證書
# certtool –generate-privkey –outfile server-key.pem
Generating a 3072 bit RSA private key…

建立 server.tmpl
# cat server.tmpl
cn = “nas.test.com”
organization = “Home”
serial = 2
expiration_days = 3650
encryption_key
signing_key
tls_www_server

# certtool –generate-certificate –load-privkey server-key.pem –load-ca-certificate ca-cert.pem –load-ca-privkey ca-key.pem –template server.tmpl –outfile server-cert.pem

將 server-cert.pem 和 server-key.pem 複製到 /etc/ocserv
# cp server-cert.pem server-key.pem /etc/ocserv

6. 產生使用者端證書(連線時可以不用輸入帳號及密碼)
# cat gen-client-cert.sh
#!/bin/bash
USER=$1
CA_DIR=$2
SERIAL=`date +%s`
certtool –generate-privkey –outfile $USER-key.pem
cat << _EOF_ >user.tmpl
cn = “$USER”
unit = “users”
serial = “$SERIAL”
expiration_days = 3650
signing_key
tls_www_client
_EOF_
certtool –generate-certificate –load-privkey $USER-key.pem –load-ca-certificate $CA_DIR/ca-cert.pem –load-ca-privkey $CA_DIR/ca-key.pem –template user.tmpl –outfile $USER-cert.pem
openssl pkcs12 -export -inkey $USER-key.pem -in $USER-cert.pem -name “$USER VPN Client Cert” -certfile $CA_DIR/ca-cert.pem -out $USER.p12

更改檔案權限
# chmod 700 gen-client-cert.sh

建立目錄來存放使用者證書
# mkdir home
# 切換目錄
# cd home
# home 是使用者的名稱,.. 是指 ca 證書所在的目錄
# ../gen-client-cert.sh home ..
可以直接按 Enter 鍵跳過,就不用設定密碼
Signing certificate…
Enter Export Password:
Verifying – Enter Export Password:

產生之後可以將 home.p12 複製給使用者用戶端導入即可

7. 修改 /etc/ocserv/ocserv.conf 設定檔
# cp /etc/ocserv/ocserv.conf /etc/ocserv/ocserv.conf.$(date +%F)
取消 pam 認證
# sed -i ‘s|^auth = “pam|#auth = “pam|’ /etc/ocserv/ocserv.conf
採用 certificate 認證
# sed -i ‘s/#auth = “certificate”/auth = “certificate”/’ /etc/ocserv/ocserv.conf
設定同一個用戶最多的登入數
# sed -i ‘s/max-same-clients = 2/max-same-clients = 10/’ /etc/ocserv/ocserv.conf
設定憑證檔的位置
# sed -i ‘s|server-cert = /etc/ssl/certs/ssl-cert-snakeoil.pem|server-cert = /etc/ocserv/server-cert.pem|’ /etc/ocserv/ocserv.conf
# sed -i ‘s|server-key = /etc/ssl/private/ssl-cert-snakeoil.key|server-key = /etc/ocserv/server-key.pem|’ /etc/ocserv/ocserv.conf
# sed -i ‘s|ca-cert = /etc/ssl/certs/ssl-cert-snakeoil.pem|ca-cert = /etc/ocserv/ca-cert.pem|’ /etc/ocserv/ocserv.conf
從證書中提取用戶名的方式,這裡提取的是證書中的 CN 欄位作為用戶名
# sed -i ‘s/cert-user-oid = 0.9.2342.19200300.100.1.1/cert-user-oid = 2.5.4.3/’ /etc/ocserv/ocserv.conf
分配給 VPN 用戶端的 IP 網段
# sed -i ‘s/ipv4-network = 192.168.1.0/ipv4-network = 10.12.0.0/’ /etc/ocserv/ocserv.conf
設定 DNS
# sed -i ‘s/dns = 192.168.1.2/dns = 8.8.8.8/’ /etc/ocserv/ocserv.conf
註解 route,讓 Ocserv 伺服器成為 Gateway
# sed -i ‘s/^route = 10.10.10.0/# route = 10.10.10.0/’ /etc/ocserv/ocserv.conf
# sed -i ‘s/^route = 192.168.0.0/# route = 10.10.10.0/’ /etc/ocserv/ocserv.conf
優化 VPN 的網路性能
# sed -i ‘s/^(try-mtu-discovery = ).*$/1”true/’ /etc/ocserv/ocserv.conf

For sed
# cat sed-script
s|^auth = “pam|#auth = “pam|
s/#auth = “certificate”/auth = “certificate”/
s/max-same-clients = 2/max-same-clients = 10/
s|server-cert = /etc/ssl/certs/ssl-cert-snakeoil.pem|server-cert = /etc/ocserv/server-cert.pem|
s|server-key = /etc/ssl/private/ssl-cert-snakeoil.key|server-key = /etc/ocserv/server-key.pem|
s|ca-cert = /etc/ssl/certs/ssl-cert-snakeoil.pem|ca-cert = /etc/ocserv/ca-cert.pem|
s/cert-user-oid = 0.9.2342.19200300.100.1.1/cert-user-oid = 2.5.4.3/
s/ipv4-network = 192.168.1.0/ipv4-network = 10.12.0.0/
s/dns = 192.168.1.2/dns = 8.8.8.8/
s/^route = 10.10.10.0/# route = 10.10.10.0/
s/^route = 192.168.0.0/# route = 10.10.10.0/
s/^(try-mtu-discovery = ).*$/1true/

# sed -i -f sed-script /etc/ocserv/ocserv.conf

8. 設定網路 Forward
# sed -i ‘s/#net.ipv4.ip_forward=1/net.ipv4.ip_forward=1/’ /etc/sysctl.conf
# sysctl -p /etc/sysctl.conf

10. 設定防火牆規則
# iptables -t nat -A POSTROUTING -s 10.12.0.0/24 -o eth0 -j MASQUERADE
# iptables -A FORWARD -i vpns+ -j ACCEPT
# iptables -A FORWARD -o vpns+ -j ACCEPT

11. 儲存防火牆規則
# iptables-save > /etc/sysconfig/iptables

12. 設定開機時啟動
# systemctl enable ocserv
Synchronizing state of ocserv.service with SysV init with /lib/systemd/systemd-sysv-install…
Executing /lib/systemd/systemd-sysv-install enable ocserv

12. 啟動 OpenConnect Server
# systemctl start ocserv
# systemctl status ocserv

解決執行 apt-get update 出現的錯誤訊息

在 Ubuntu Mate 執行 apt-get update 出現下面的錯誤訊息

$ sudo apt-get update
Reading package lists… Done
E: Could not get lock /var/lib/apt/lists/lock – open (11: Resource temporarily unavailable)
E: Unable to lock directory /var/lib/apt/lists/

可能的原因是可能有另外一個 synaptic 套件管理程式或 apt-get  程式正在執行
如果有的話,請先關閉,再重新執行,如果沒有的話,可以把 /var/lib/apt/lists 目錄下的 lock 刪除

$ sudo rm -rf /var/lib/apt/lists/lock

sed 備忘

參考網頁:
[轉貼] SED單行腳本快速參考 @ 胖虎的祕密基地 :: 痞客邦 PIXNET ::
sed 工具
阿旺的 Linux 開竅手冊
sed, a stream editor Examples
Sed – An Introduction and Tutorial

1. 刪除空白行
# sed -i ‘/^$/d’ testfile
# sed -i ‘/./!d’ testfile

2. 刪除第一行空行後的所有內容
# sed -i ‘/^$/q’ testfile

3. 刪除第一行空行之前的所有內容
# sed -i ‘1,/^$/d’ testfile[@more@]4. 刪除含 pattern 的行
# sed -i ‘/pattern/d’ testfile

# cat /tmp/testfile
1
2
3
4
5
# sed -i ‘/2/’,’/4/d’ /tmp/testfile
# cat /tmp/testfile
1
5

5. 刪除文件中開頭的10行
# sed -i ‘1,10d’ testfile

6. 刪除文件中的最後一行
# sed -i ‘$d’ testfile

7. 顯示 8~12 行
# sed -n ‘8,12p’ testfile

8. 只顯示符合 pattern 的行
# sed -n ‘/pattern/p’ testfile
# sed ‘/pattern/!d’ testfile
# grep pattern testfile

9. 不顯示符合 pattern 的行
# sed -n ‘/pattern/!p’ testfile
# sed ‘/pattern/d’ testfile
# grep -v pattern testfile

10. 一次全部更換多個符合的 pattern
# sed -i ‘s/mysql/red/g;s/php/black/g’ testfile

11. 在每一行前面插入 5 個空白
# sed -i ‘s/^/ /’ testfile

12. 更換指定行(n)符合的字串
# sed -i ‘ns/php/red/’ testfile

13. 在指定行之前插入
# sed -i ‘2i 1234567890’ testfile

14. 在指定行之後插入
# sed -i ‘2a 1234567890’ testfile

15. 在最後一行插入
# sed -i ‘$a 1234567890’ testfile

16. 字串取代
# sed -i ‘s/^(anonymous_enable=).*$/1”NO/’ /etc/vsftpd/vsftpd.conf
# sed -i ‘s/^(SELINUX=).*$/1”disabled/’ /etc/selinux/config

17. 字串取代
# sed -i ‘/foo/ s//bar/g’ testfile

18. 字串取代 指定行範圍
# sed -i ‘34,38 s/ACCEPT/DROP/’ /etc/ufw/before.rules

19. 取出 IP
# ifconfig eth0
inet addr:192.168.1.12 Bcast:192.168.1.255 Mask:255.255.255.0
# ifconfig eth0 | grep ‘inet ‘ | sed ‘s/^.*inet addr://g’ | sed ‘s/ *Bcast.*$//g’
192.168.1.12

20. 多個指令
# sed -i ‘s/123/234/; s/四忠/四義/’ list

21. 將編輯命令放在檔案之中
# cat sedscr
s/123/234/
s/四忠/四義/
# sed -i -f sedscr list

22. 刪除找到 %post 後的所有行數
# sed -i ‘/%post/ ,$d’ /tmp/anaconda-ks.cfg

23. 找到字串的後面插入一行
#PIDFILE 後面插入一行
# sed -i ‘/#PIDFILE/ a PIDFILE=/var/chroot/bind9/var/run/named/named.pid’ /etc/init.d/bind9

24. 多重取代
# sed -i -e ‘s/123/234/’ -e ‘s/四忠/四義/’ list

25. 刪除最後幾個字元
# sed -i ‘s/…$//’ testfile

26. 在每一行後面插入一行空白行
# sed -i G testfile

27. 在最後一個欄位插入字串
# sed -i ‘s/$/@smail.ilc.edu.tw/’ class3

在 Ubuntu MATE 16.04.1 安裝 OxOffice R6C1

移除舊的 LibreOffice
$ sudo apt-get remove –purge `dpkg -l | grep libreoffice | awk ‘{print $2}’`
[@more@]下載 OxOffice R6C1
$ wget http://ncu.dl.sourceforge.net/project/ossii-oxoffice/Linux/x86_64/OxOffice_R6C1_Linux_x86-64_deb_20160804.tar.gz
$ wget http://ncu.dl.sourceforge.net/project/ossii-oxoffice/Linux/x86_64/OxOffice_R6C1_Linux_x86-64_deb_langpack_zh-TW_20160804.tar.gz

列出下載後的檔案
$ ls
OxOffice_R6C1_Linux_x86-64_deb_20160804.tar.gz
OxOffice_R6C1_Linux_x86-64_deb_langpack_zh-TW_20160804.tar.gz

解壓縮
$ tar xvzf OxOffice_R6C1_Linux_x86-64_deb_20160804.tar.gz
$ tar xvzf OxOffice_R6C1_Linux_x86-64_deb_langpack_zh-TW_20160804.tar.gz

進行安裝
$ sudo dpkg -i OxOffice_R6C1_Linux_x86-64_deb_20160804/DEBS/*.deb
$ sudo dpkg -i OxOffice_R6C1_Linux_x86-64_deb_langpack_zh-TW_20160804/DEBS/*.deb

安裝完成之後在功能表中的位置

啟動 OxOffice R6C1

OxOffice Writer

OxOffice Calc

OxOffice Impress

稍候會整合到自己習慣使用的 LiveCD 中。

Ubuntu Server 16.04.1 amd64 安裝

採用 16.04.1 版是因為它是 LTS 版本,支援期到 2021-04。
Server 版下載網站:http://releases.ubuntu.com/16.04/

1. 光碟開機畫面,選擇 Install Ubuntu Server

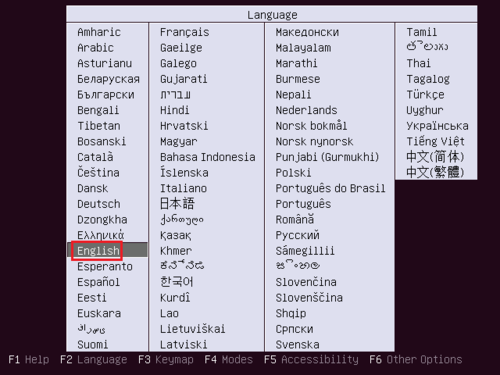
[@more@]2. 在之前可以按 F2 Language 選擇安裝時要用的語言

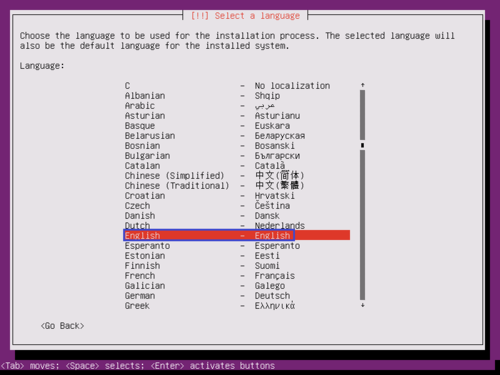
3. 選擇語言

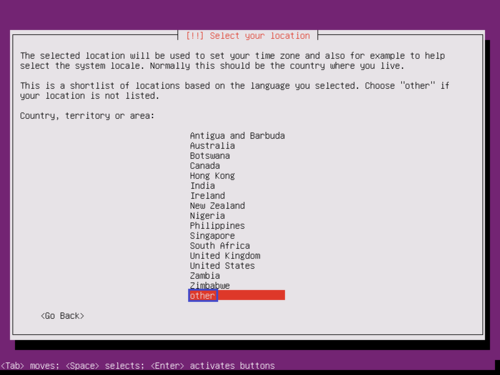
4. 選擇 Other

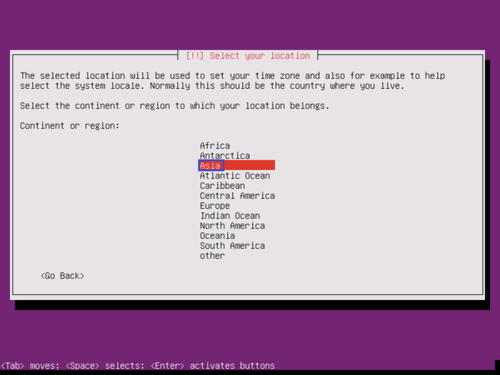
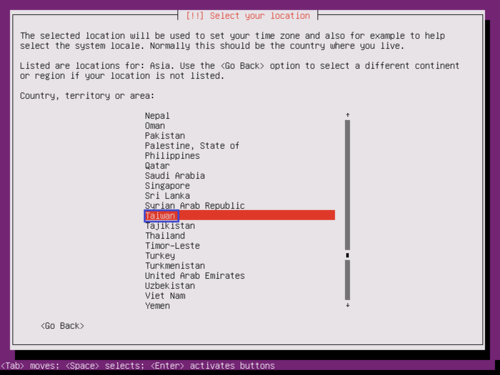
5. 選擇 Asia

6. 選擇 Taiwan

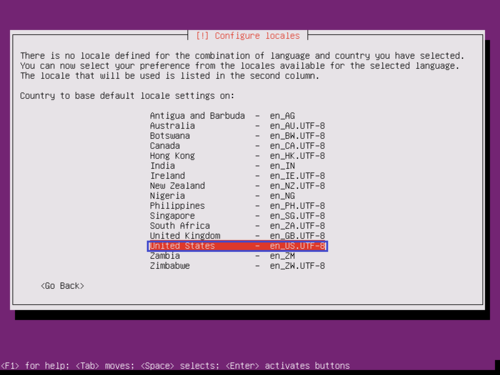
7. 選擇語系 Locale

8. 不偵測鍵盤

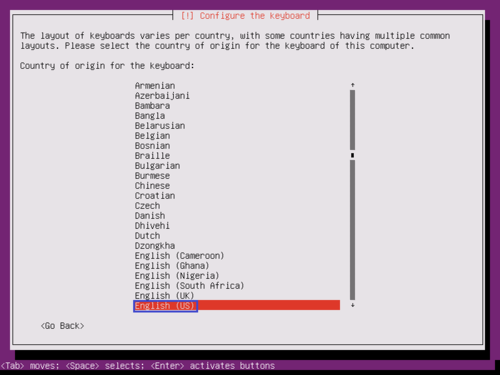
9. 鍵盤型式選擇

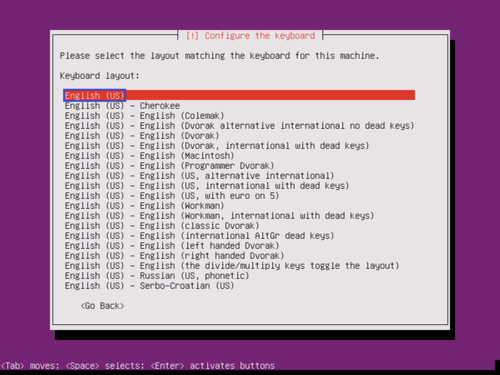
10. 設定鍵盤

11. 載入安裝元件

12. 設定主機名稱

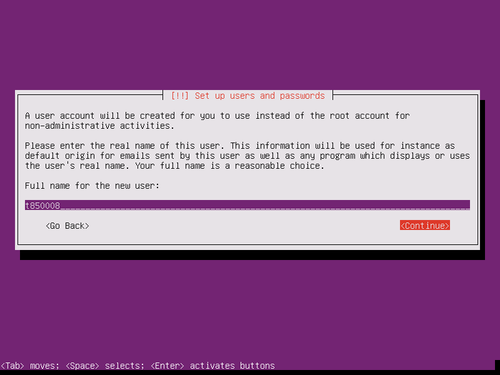
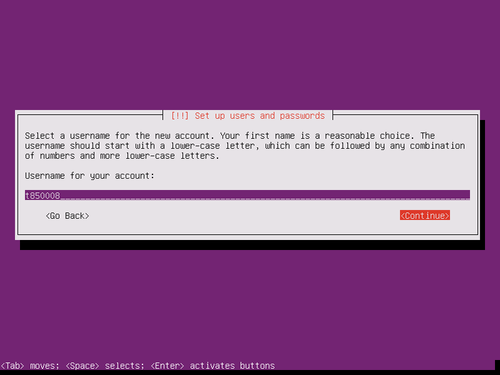
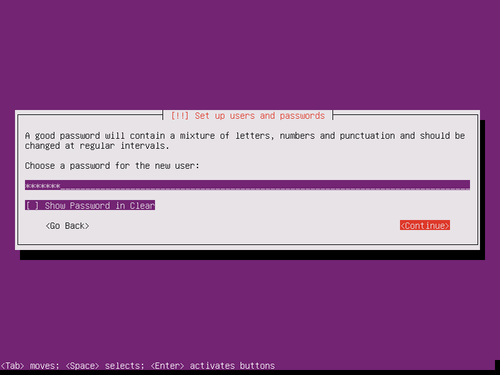
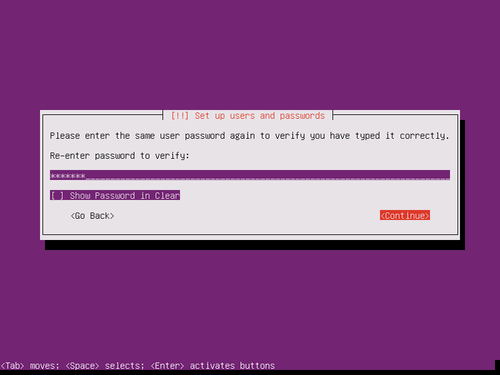
13. 建立 root 管理者之外的一般帳號

14. 設定時間

15. 時區設定 Asia/Taipei

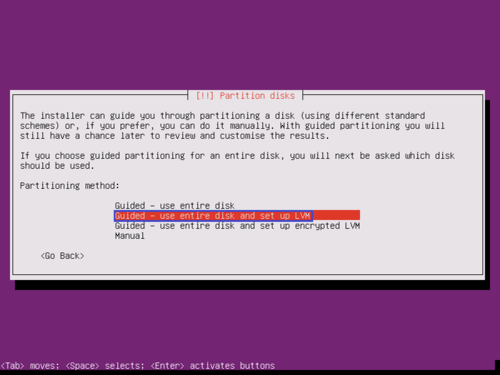
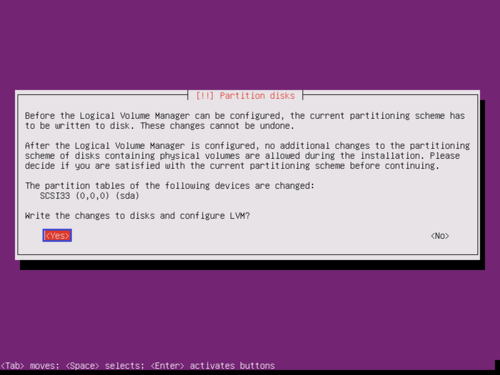
16. 硬碟分割

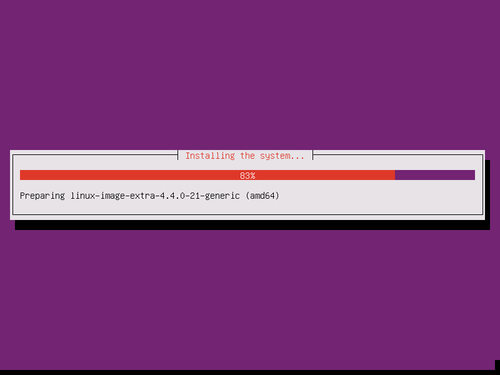
17. 安裝系統

18. 連接網路是否透過 Proxy 設定

19. 設定 apt

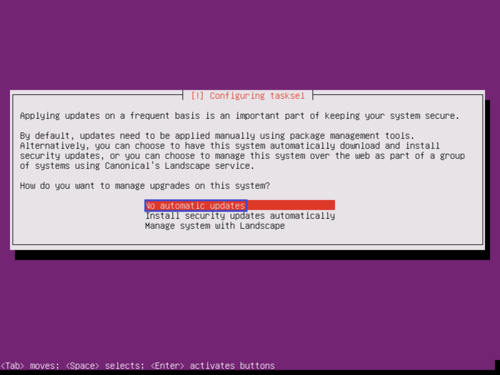
20. 不自動更新系統 No automatic updates

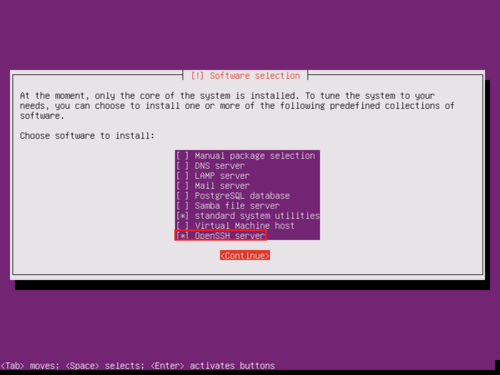
21. 加裝 OpneSSH server,方便做遠端管理

22. 安裝系統

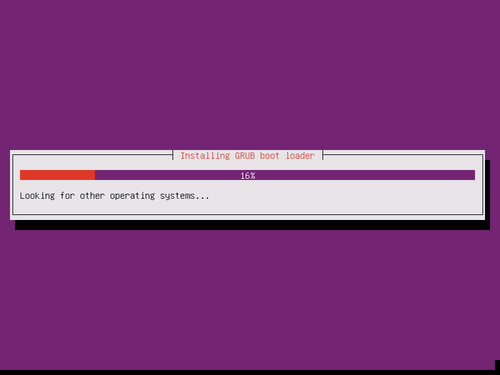
23. 設定 GRUB

24. 完成安裝

解決 客製化 Ubuntu MATE 16.04 安裝光碟執行時的錯誤訊息

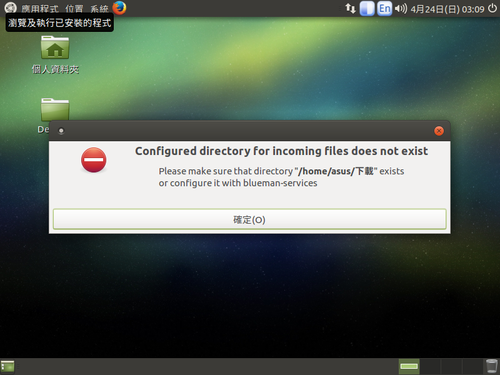
客製化完後,試用時會出現如圖的錯誤訊息

[@more@]解決方式
刪除重製時 os.MATE 目錄下的 /etc/xdg/autostart/blueman.desktop
# cd /root
# rm -rf os.MATE/etc/xdg/autostart/blueman.desktop

壓縮 filesystem.squashfs
# mksquashfs os.MATE iso.MATE/casper/filesystem.squashfs

重製成 ISO 光碟
# cd iso.MATE
# mkisofs -r -V “Ubuntu-MATE 16.0_x64” -J -l -b isolinux/isolinux.bin -c isolinux/boot.cat -no-emul -boot-load-size 4 -boot-info-table -o ../ubuntu-mate-16.04-desktop-amd64_20160422.iso .