使用瀏覽器連上安裝好的網址,會出現下圖的狀況,有安全性警告[@more@]主要是在 Apache Web Server 預設沒有開啟支援 .htaccess 的功能
修改 Apache Web Server 設定檔,加入下面的設定內容
# vim /etc/httpd/conf/httpd.conf
<Directory “/var/www/html/owncloud”>
AllowOverride All
</Directory>
重新啟動 Apache Web Server
# service httpd restart
在 CentOS 6.x 上安裝 ownCloud
ownCloud 是一套功能類似 Dropbox 的雲端儲存系統,詳細的功能介紹可以參考下列網站:
使用ownCloud打造專用的「類Dropbox」雲端儲存系統 | 簡睿隨筆簡睿隨筆 | 學習過程的紀錄與備忘
建置ownCloud雲端硬碟 企業檔案同步分享 – 專題報導 – 網管人NetAdmin
OwnCloud, 一套適合自建的網路同步硬碟(DropBox-Like) (第1頁) – 網路儲存裝置 – Mobile01
ownCloud 官方網站:http://owncloud.org/
[@more@]加入 EPEL 第三方套件庫
# wget http://dl.fedoraproject.org/pub/epel/6/x86_64/epel-release-6-8.noarch.rpm
# rpm -ivh epel-release-6-8.noarch.rpm
# sed -i ‘s/enabled=1/enabled=0/g’ /etc/yum.repos.d/epel.repo
加入 ownCloud 套件庫
# cd /etc/yum.repos.d/
# wget http://download.opensuse.org/repositories/isv:ownCloud:community/CentOS_CentOS-6/isv:ownCloud:community.repo
# yum install owncloud –enablerepo=epel
如果沒有加入 EPEL 第三方套件庫時,它裝 ownCloud 會出現缺少 php-pear-Net-Curl 和 php-pear-MDB2-Driver-mysqli 的錯誤訊息
Error: Package: owncloud-6.0.2-6.1.noarch (isv_ownCloud_community)
Requires: php-pear-Net-Curl
Error: Package: owncloud-6.0.2-6.1.noarch (isv_ownCloud_community)
Requires: php-pear-MDB2-Driver-mysqli
Nagios 的 Web 管理介面 – vshell
Nagios 本身就有一個 Web 管理介面,只是畫面有些稍微複雜,所以有一個使用 PHP 開發的 Web 介面,比較精簡直覺。
Nagios vshell 下載網站:Here
目前最新版本是 1.9.1 版,適用於 Nagios 3.x 和 Nagios XI[@more@]
底下是安裝步驟:
1.下載 vshell
# wget http://assets.nagios.com/downloads/exchange/nagiosvshell/vshell.tar.gz
2.解壓縮
# tar xvzf vshell.tar.gz
3.搬移目錄
# mv vshell /usr/local
4.複製檔案到 /etc/httpd/conf.d 目錄之下
# cp /usr/local/vshell/config/vshell_apache.conf /etc/httpd/conf.d
5.修改 /etc/httpd/conf.d/vshell_apache.conf
# vim /etc/httpd/conf.d/vshell_apache.conf
#modify this file to fit your apache configuration
Alias /vshell “/usr/local/vshell”
<Directory “/usr/local/vshell”>
# SSLRequireSSL
Options None
AllowOverride None
# Order allow,deny
# Allow from all
Order deny,allow
Deny from all
Allow from 127.0.0.1 192.168.1.0/24
Allow from ::1
# Allow from 127.0.0.1
#use the below lines for Nagios XI
# AuthName “Nagios Monitor XI”
# AuthType Basic
# AuthUserFile /usr/local/nagiosxi/etc/htpasswd.users
#Use the below lines for a typical Nagios Core installation
AuthName “Nagios Access”
AuthType Basic
AuthUserFile /etc/nagios/passwd
Require valid-user
</Directory>
6.修改 /usr/local/vshell/config/vshell.conf 設定檔
# vim /usr/local/vshell/config/vshell.conf
把
; Full filesystem path to the Nagios status file
STATUSFILE = “/usr/local/nagios/var/status.dat”
; Full filesystem path to the Nagios object cache file
OBJECTSFILE = “/usr/local/nagios/var/objects.cache”
; Full filesystem path to the Nagios CGI permissions configuration file
CGICFG = “/usr/local/nagios/etc/cgi.cfg”
; Full filesystem path to the Nagios command pipe
NAGCMD = “/usr/local/nagios/var/rw/nagios.cmd”
修改成
; Full filesystem path to the Nagios status file
STATUSFILE = “/var/log/nagios/status.dat“
; Full filesystem path to the Nagios object cache file
OBJECTSFILE = “/var/log/nagios/objects.cache“
; Full filesystem path to the Nagios CGI permissions configuration file
CGICFG = “/etc/nagios/cgi.cfg“
; Full filesystem path to the Nagios command pipe
NAGCMD = “/var/spool/nagios/cmd/nagios.cmd“
7.重新啟動 Apache Web Server
# service httpd restart
8. 如果有問題,可以將設定檔複製到 /etc 目錄之下
# cp /usr/local/vshell/config/vshell.conf /etc
9.一切 OK 了!
後記:其實後來發現,vshell 有提供直接從網頁上安裝的功能,可以直接執行 http://Server’IP/vshell/install.php
但我試了之後好像沒有成功,所以後來還是直接用手動安裝的方式來完成。
最後記得要把安裝目錄中的 install.php 檔案刪除
# rm -rf /usr/local/vshell/install.php
在 CentOS 6.x 上安裝 OpenNMS
OpenNMS 是一套 OpenSource 的網路管理軟體,可以利用 Ping 及 SNMP 的方式來偵測網路設備或服務的啟動狀態。
OpenNMS 官方網站:http://www.opennms.org/本篇文章參考:浮雲雅築: [研究] OpenNMS 1.12.3 快速安裝程式 (yum)(CentOS 6.5 x64)
[@more@]
下載 OpenNMS 套件庫 rpm
# wget http://yum.opennms.org/repofiles/opennms-repo-stable-rhel6.noarch.rpm
進行安裝
# rpm -Uvh opennms-repo-stable-rhel6.noarch.rpm
安裝 PostgreSQL 資料庫
# yum install postgresql postgresql-server
PostgreSQL 初始化資料庫
# service postgresql initdb
正在初始化資料庫: [ 確定 ]
啟動 PostgreSQL Server
# service postgresql start
正在啟動 postgresql 服務: [ 確定 ]
如果沒有先初始化資料庫,而直接啟動,則會出現下面的錯誤訊息
# service postgresql start
/var/lib/pgsql/data is missing. Use “service postgresql initdb” to initialize the cluster first.
[失敗]
設定開機時啟動
# chkconfig –level 3 postgresql on
先備份設定檔,再進行修改
# cp /var/lib/pgsql/data/pg_hba.conf /var/lib/pgsql/data/pg_hba.conf.$(date +%F)
將 70 行後的 ident 取代成 trust
# sed -i ’70,$s/ident/trust/’ /var/lib/pgsql/data/pg_hba.conf
重新啟動 PostgreSQL Server
# service postgresql restart
正在停止 postgresql 服務: [ 確定 ]
正在啟動 postgresql 服務: [ 確定 ]
檢查是否有正常啟動 PostgreSQL Server
# netstat -antulp | grep 5432
tcp 0 0 127.0.0.1:5432 0.0.0.0:* LISTEN 8092/postmaster
tcp 0 0 ::1:5432 :::* LISTEN 8092/postmaster
安裝 Oracle Java JDK
Oracle Java JDK 下載網頁:
http://www.oracle.com/technetwork/java/javase/downloads/jdk7-downloads-1880260.html
# rpm -ivh jdk-7u45-linux-x64.rpm
進行 Oracle Java JDK 設定
# alternatives –install /usr/bin/java java /usr/java/jdk1.7.0_45/bin/java 100
# alternatives –set java /usr/java/jdk1.7.0_45/bin/java
# echo ‘export JAVA_HOME=/usr/java/jdk1.7.0_45’ >> /etc/profile
# echo ‘export PATH=$PATH:$JAVA_HOME/bin’ >> /etc/profile
# echo ‘export CLASSPATH=$JAVA_HOME/jre/lib/ext:$JAVA_HOME/lib/tools.jar’ >> /etc/profile
# source /etc/profile
檢查 Java 版本
# java -version
java version “1.7.0_45”
Java(TM) SE Runtime Environment (build 1.7.0_45-b18)
Java HotSpot(TM) 64-Bit Server VM (build 24.45-b08, mixed mode)
安裝 OpenNMS
# yum -y install opennms opennms-plugins opennms-remote-poller mib2opennms iplike
*** Installation complete. You must still run the installer at
*** $OPENNMS_HOME/bin/install to be sure your database is up
*** to date before you start OpenNMS. See the install guide at
*** http://www.opennms.org/wiki/Installation:RPM and the
*** release notes for details.
設定 OpenNMS 環境變數
# export OPENNMS_HOME=/opt/opennms
# echo ‘export PATH=$PATH:$OPENNMS_HOME/bin’ >> /etc/profile
設定 OpenNMS 使用的 Java
# /opt/opennms/bin/runjava -S /usr/java/latest/bin/java
runjava: checking specified JRE: “/usr/java/latest/bin/java”…
runjava: specified JRE is good.
runjava: value of “/usr/java/latest/bin/java” stored in configuration file
# $OPENNMS_HOME/bin/runjava -s
runjava: Looking for an appropriate JRE…
runjava: Checking for an appropriate JRE in JAVA_HOME…
runjava: found: “/usr/java/jdk1.7.0_45/bin/java” is an appropriate JRE
runjava: value of “/usr/java/jdk1.7.0_45/bin/java” stored in configuration file
建立 OpenNMS 需要的資料庫
# $OPENNMS_HOME/bin/install -dis
最後會出現
Upgrade completed successfully!
啟動 OpenNMS
# service opennms start
Starting OpenNMS: Started OpenNMS, but it has not finished starting up
[失敗]
設定開機時啟動
# chkconfig –level 3 opennms on
雖然最後的訊息出現失敗,但有正常執行
# netstat -antulp | grep 8980
tcp 0 0 :::8980 :::* LISTEN 8956/java
tcp 0 0 :::18980 :::* LISTEN 8956/java
如果不放心,可以檢查 log 檔的訊息
# cat /opt/opennms/logs/daemon/output.log
[DEBUG] System property ‘opennms.library.jicmp’ set to ‘/usr/lib64/libjicmp.so. Attempting to load jicmp library from this location.
[INFO] Successfully loaded jicmp library.
[DEBUG] System property ‘opennms.library.jicmp6’ set to ‘/usr/lib64/libjicmp6.so. Attempting to load jicmp6 library from this location.
[INFO] Successfully loaded jicmp6 library.
顯示 OpenNMS 執行狀態
# /opt/opennms/bin/opennms -v status
OpenNMS.Eventd : running
OpenNMS.Trapd : running
OpenNMS.Queued : running
OpenNMS.Actiond : running
OpenNMS.Notifd : running
OpenNMS.Scriptd : running
OpenNMS.Rtcd : running
OpenNMS.Pollerd : running
OpenNMS.PollerBackEnd : running
OpenNMS.Ticketer : running
OpenNMS.Collectd : running
OpenNMS.Discovery : running
OpenNMS.Vacuumd : running
OpenNMS.EventTranslator: running
OpenNMS.PassiveStatusd : running
OpenNMS.Statsd : running
OpenNMS.Provisiond : running
OpenNMS.Reportd : running
OpenNMS.Alarmd : running
OpenNMS.Ackd : running
OpenNMS.JettyServer : running
opennms is running
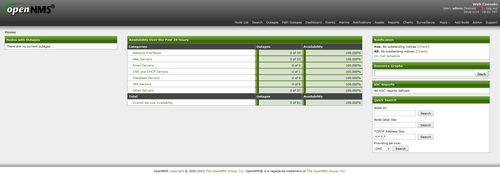
開啟瀏覽器,在網址列上輸入 http://Server’IP:8980/opennms
預設帳號和密碼都是 admin,可以在 Web 介面中更改密碼
設定 OpenNMS 要偵測的網段,也可以在 Web 介面設定
# vim /opt/opennms/etc/discovery-configuration.xml
<discovery-configuration threads=”1″ packets-per-second=”1″
initial-sleep-time=”30000″ restart-sleep-time=”86400000″
retries=”1″ timeout=”2000″>
<include-range>
<begin>192.168.1.1</begin>
<end>192.168.1.254</end>
</include-range>
</discovery-configuration>
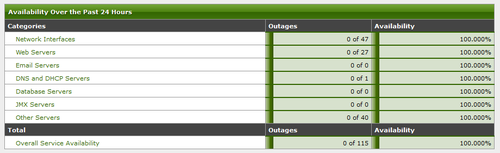
在防火牆中設定
iptables -A INPUT -p tcp -m state –state NEW –dport 389 -j ACCEPT
在 CentOS 6.x 上安裝 Nagios
Nagios 是一套功能非常強大的網路監控系統,可以協助網管人員即時監控系統服務的狀態,並且在系統服務發生異狀時,以 email 通知管理者。
Nagios 官方網站:http://www.nagios.org/
安裝 Nagios
# yum install nagios nagios-plugins-all nagios-plugins-nrpe nrpe –enablerepo=epel
啟動 Nagios
# service nagios start
Starting nagios: done.
設定開機時啟動 Nagios
# chkconfig –level 3 nagios on
[@more@]
設定 Nagios 的管理帳號及密碼 nagiosadmin / 123456
# htpasswd -cb /etc/nagios/passwd nagiosadmin 123456
Adding password for user nagiosadmin
開啟瀏覽器,在網址列輸入 http://Server’IP/nagios
啟動 NRPE 服務
# service nrpe start
Starting nrpe:
[ 確定 ]
設定開機時啟動
# chkconfig –level 3 nrpe on
檢查是否有正常啟動
# netstat -antulp | grep nrpe
tcp 0 0 0.0.0.0:5666 0.0.0.0:* LISTEN 57902/nrpe
在 CentOS 6.x 上安裝 Monitorix
Monitorix 官方網站:http://www.monitorix.org/
安裝 Monitorix 所須套件
# yum install perl-Config-General perl-HTTP-Server-Simple perl-MIME-Lite perl-MailTools perl-XML-Simple rrdtool rrdtool-perl
下載 Monitorix
# wget http://www.monitorix.org/monitorix-3.4.0-1.noarch.rpm
進行安裝
# rpm -ivh monitorix-3.4.0-1.noarch.rpm
或
# yum install monitorix –enablerepo=epel
啟動 Monitorix 服務
# service monitorix start
正在啟動 monitorix: [ 確定 ]
設定開機時啟動
# chkconfig –level 3 monitorix on
檢查 Monitorix 服務是否有正常啟動
# netstat -antulp | grep monitorix
tcp 0 0 0.0.0.0:8080 0.0.0.0:* LISTEN 47040/monitorix-htt
[@more@]
開啟瀏覽器,輸入 http://Server’IP:8080/monitorix
限制可以連線的範圍 192.168.1.0/24
# sed -i ‘s/hosts_deny =/hosts_deny = all/’ /etc/monitorix.conf
# sed -i ‘s/hosts_allow =/hosts_allow = 192.168.1.0/24/’ /etc/monitorix.conf
設定連線時須要輸入密碼
# sed -i ’34s/enabled = n/enabled = y/’ /etc/monitorix.conf
設定可以連線的使用者 admin 密碼 123456
# htpasswd -cb /var/lib/monitorix/htpasswd admin 123456
Adding password for user admin
在 CentOS 6.x 上安裝 Rootkit Hunter
Rootkit Hunter 是一套能偵測 Linux /BSD 作業系統是不是有中木馬、惡意程式、或是病毒的程式,也可以偵測系統是不是有一些不安全的設定,系統管理者可以安裝,用來檢測系統是否有問題,做為防護上的參考。
由於 Rootkit Hunter 不是官方套件庫中的套件,所以要利用 epel 套件庫來安裝
1. 安裝 Rootkit Hunter
# yum install rkhunter –enablerepo=epel
2. 更新 Rootkit Hunter
# rkhunter –update
[ Rootkit Hunter version 1.4.0 ]
Checking rkhunter data files…
Checking file mirrors.dat [ No update ]
Checking file programs_bad.dat [ No update ]
Checking file backdoorports.dat [ No update ]
Checking file suspscan.dat [ No update ]
Checking file i18n/cn [ No update ]
Checking file i18n/de [ No update ]
Checking file i18n/en [ No update ]
Checking file i18n/zh [ No update ]
Checking file i18n/zh.utf8 [ No update ]
3. 使用方式 -c 代表 –check –lang 後面是顯示的語系,預設是英文
# rkhunter -c –lang zh.utf8
[ Rootkit Hunter 版本 1.4.0 ]
檢查系統命令…
執行 ‘字串’ 命令檢查
檢查 ‘字串’ 命令 [ 正常 ]
執行 ‘函式庫’ 的檢查
檢查預先載入的變數 [ 沒發現 ]
檢查預先載入的檔案 [ 沒發現 ]
檢查 LD_LIBRARY_PATH 變數 [ 沒發現 ]
執行檔案屬性檢查
檢查重要的基本程式 [ !注意! ]
/sbin/chkconfig [ 正常 ]
/sbin/depmod [ 正常 ]
/sbin/fsck [ 正常 ]
/sbin/fuser [ 正常 ]
/sbin/ifconfig [ 正常 ]
/sbin/ifdown [ 正常 ]
/sbin/ifup [ 正常 ]
/sbin/init [ 正常 ]
/sbin/insmod [ 正常 ]
[@more@]4. 加入到工作排程 cron
# vim /usr/local/bin/rkhunter_check.sh
#!/bin/bash
(
/usr/bin/rkhunter –update
/usr/bin/rkhunter –cronjob –report-warnings-only
) | /bin/mail -s ‘Rootkit Hunter Daily Run (PutYourServerNameHere)’ your@email.com
給檔案執行權限
# chmod 700 /usr/local/bin/rkhunter_check.sh
加入工作排,每天早上 3 點執行
# crontab -e
加入下面一行
0 3 * * * /usr/local/bin/rkhunter_check.sh
5. 更多的執行參數
# /usr/bin/rkhunter -h
在 CentOS 6.x 上安裝 MariaDB 資料庫
在安裝 Linux 時,大部分人在安裝資料庫時都會安裝 MySQL Server,而比較少安裝 PostgreSQL Server,在 Oracle 購買 MySQL 之後,有些使用者對於 Oracle 保持不信任的態度,轉而支持由 MySQL 公司原創辦人 Michael Widenius 先生另外開發了一個新的資料庫系統,就叫做 MariaDB,並且與原先的 MySQL 保持絕佳的相容性。
MariaDB 官方網站: https://mariadb.com/ https://mariadb.org/en/
[@more@]在 CentOS 6.x 下安裝方式:
1. 最好的方式是在安裝時,不安裝 MySQL 資料庫,否則移除相關套件時,會遇到一些問題,我是採用比較乾淨的方式來安裝
2. 依照官方網站上的 安裝說明 ,建立套件儲存庫,有 5.5 和 10.0 二個版本可以選擇
# vim /etc/yum.repos.d/mariadb.repo
#
MariaDB 5.5 CentOS repository list - created 2014-01-10 13:53 UTChttp://mariadb.org/mariadb/repositories/
#
[mariadb]
name = MariaDB
baseurl = http://yum.mariadb.org/5.5/centos6-amd64
gpgkey = https://yum.mariadb.org/RPM-GPG-KEY-MariaDB
gpgcheck=1#
MariaDB 10.0 CentOS repository list - created 2014-01-10 13:54 UTChttp://mariadb.org/mariadb/repositories/
#
[mariadb]
name = MariaDB
baseurl = http://yum.mariadb.org/10.0/centos6-amd64
gpgkey = https://yum.mariadb.org/RPM-GPG-KEY-MariaDB
gpgcheck=1
更新套件庫
# yum update
安裝 MariaDB
# yum -y install MariaDB-server MariaDB-client
啟動 MariaDB
# service mysql start
開機後啟動
# chkconfig –level 3 mysql on
安裝完成的設定
# /usr/bin/mysql_secure_installation
/usr/bin/mysql_secure_installation: line 379: find_mysql_client:命令找不到
NOTE: RUNNING ALL PARTS OF THIS SCRIPT IS RECOMMENDED FOR ALL MariaDB
SERVERS IN PRODUCTION USE! PLEASE READ EACH STEP CAREFULLY!
In order to log into MariaDB to secure it, we’ll need the current
password for the root user. If you’ve just installed MariaDB, and
you haven’t set the root password yet, the password will be blank,
so you should just press enter here.
Enter current password for root (enter for none):
OK, successfully used password, moving on…
Setting the root password ensures that nobody can log into the MariaDB
root user without the proper authorisation.
Set root password? [Y/n]
New password:
Re-enter new password:
Password updated successfully!
Reloading privilege tables..
… Success!
By default, a MariaDB installation has an anonymous user, allowing anyone
to log into MariaDB without having to have a user account created for
them. This is intended only for testing, and to make the installation
go a bit smoother. You should remove them before moving into a
production environment.
Remove anonymous users? [Y/n]
… Success!
Normally, root should only be allowed to connect from ‘localhost’. This
ensures that someone cannot guess at the root password from the network.
Disallow root login remotely? [Y/n]
… Success!
By default, MariaDB comes with a database named ‘test’ that anyone can
access. This is also intended only for testing, and should be removed
before moving into a production environment.
Remove test database and access to it? [Y/n]
– Dropping test database…
… Success!
– Removing privileges on test database…
… Success!
Reloading the privilege tables will ensure that all changes made so far
will take effect immediately.
Reload privilege tables now? [Y/n]
… Success!
Cleaning up…
All done! If you’ve completed all of the above steps, your MariaDB
installation should now be secure.
Thanks for using MariaDB!
建立 PXE Server 透過網路安裝 Linux
原本自己在安裝 Linux 時,都是自己客製化 Linux,挑選要安裝的套件,並做一些系統的調整後,做成 ISO 光碟,然後利用卡碟機來安裝,雖然很方便,但如果有同時多台要安裝,就會有些麻煩,所以想要利用 PXE(Preboot Execution Environment) 的功能,直接從網路上下載來安裝,另外一方面,現在的電腦主機絕大部分都有支援從 PXE 網路開機的功能,只不過在 BIOS 中預設是關閉的,只要打開就可以了![@more@]底下文章參考 鳥哥的 Linux 私房菜 — 安裝伺服器與 kickstart 和 CentOS 6 PXE Server Install (DHCP+TFTP+HTTP(FTP)+Kickstart) – ghoseliang- 點部落 完成
安裝 PXE Server 的方式
1. 安裝 DHCP Server
# yum install dhcp
2. 設定 DHCP Server
# vim /etc/dhcp/dhcpd.conf
Authoritative;
default-lease-time 259200;
max-lease-time 518400;
option routers 192.168.1.254;
option broadcast-address 192.168.1.255;
option subnet-mask 255.255.255.0;
option domain-name-servers 140.111.66.10,168.95.1.1,8.8.8.8;
ddns-update-style none;
server-name pxe;
subnet 192.168.1.0 netmask 255.255.255.0 {
range 192.168.1.61 192.168.1.65;
option subnet-mask 255.255.255.0;
option domain-name “pxe.tces.edu”;
next-server 192.168.1.6;
filename “pxelinux.0”;
}
3. 啟動 DHCP Server,並設定成開機時啟動
# chkconfig –level 3 dhcpd on
# service dhcpd start
正在啟動 dhcpd: [ 確定 ]
檢查 DHCP Server 是否有正常執行
# netstat -antulp | grep dhcp
udp 0 0 0.0.0.0:67 0.0.0.0:* 5526/dhcpd
4. 安裝 tftp Server
# yum install tftp-server tftp
5. 修改 /etc/xinetd.d/tftp
# vim /etc/xinetd.d/tftp
service tftp
{
socket_type = dgram
protocol = udp
wait = yes
user = root
server = /usr/sbin/in.tftpd
server_args = -s /var/lib/tftpboot
disable = no
per_source = 11
cps = 100 2
flags = IPv4
}
6. 啟動 tftp 服務
# /etc/init.d/xinetd start
正在啟動 xinetd: [ 確定 ]
# chkconfig –level 3 xinetd on
# chkconfig –level 3 tftp on
# netstat -antulp | grep xinetd
udp 0 0 0.0.0.0:69 0.0.0.0:* 5595/xinetd
7. 安裝 syslinux 套件
# yum install syslinux
8.複製設定檔到 /var/lib/tftpboot 目錄
# cp /usr/share/syslinux/menu.c32 /var/lib/tftpboot
# cp /usr/share/syslinux/vesamenu.c32 /var/lib/tftpboot
# cp /usr/share/syslinux/pxelinux.0 /var/lib/tftpboot
# cp /usr/share/syslinux/memdisk /var/lib/tftpboot
# cp /usr/share/syslinux/mboot.c32 /var/lib/tftpboot
# cp /usr/share/syslinux/chain.c32 /var/lib/tftpboot
9. 建立 /var/lib/tftpboot/pxelinux.cfg 目錄,用來存放 PXE 開機時 Client 端的一些設定
# mkdir /var/lib/tftpboot/pxelinux.cfg
10. 下載 Linux ISO 光碟,並掛載
建立掛載目錄
# mkdir -p /mnt/{x86_64,i386}
掛載 ISO 檔
# mount -o loop /var/ftp/pub/CentOS-6.5-x86_64-bin-DVD1.iso /mnt/x86_64
# mount -o loop /var/ftp/pub/CentOS-6.5-i386-bin-DVD1.iso /mnt/i386
11. 建立支援 HTTP 安裝的目錄,並複製 ISO 檔光碟的檔案
# mkdir -p /var/www/html/CentOS/6.5/os/{x86_64,i386}
# cp -ra /mnt/x86_64/* /var/www/html/CentOS/6.5/os/x86_64
# cp -ra /mnt/i386/* /var/www/html/CentOS/6.5/os/i386
如果系統有啟動 SELinux,要多執行下面的動作
# restorecon -R -v /var/www/html
12. 建立支援 FTP 安裝的目錄
# ln -s /var/www/html/CentOS /var/ftp
如果系統有啟動 SELinux,要多執行下面的動作
# restorecon -r /var/ftp
# setsebool -P ftp_home_dir=1
# setsebool -P allow_ftpd_full_access on
13. 建立 PXE 開機所須的目錄,並複製開機檔案到對應的目錄
# mkdir -p /var/lib/tftpboot/images/CentOS/6.5/{x86_64,i386}
# cp /mnt/x86_64/images/pxeboot/vmlinuz /var/lib/tftpboot/images/CentOS/6.5/x86_64
# cp /mnt/x86_64/images/pxeboot/initrd.img /var/lib/tftpboot/images/CentOS/6.5/x86_64
# cp /mnt/i386/images/pxeboot/vmlinuz /var/lib/tftpboot/images/CentOS/6.5/i386
# cp /mnt/i386/images/pxeboot/initrd.img /var/lib/tftpboot/images/CentOS/6.5/i386
建立 PXE 開機的開機選單
# vim /var/lib/tftpboot/pxelinux.cfg/default
UI vesamenu.c32
TIMEOUT 300
DISPLAY ./boot.msg
MENU TITLE Welcom to Tou-Cheng Elementary School PXE Server System
LABEL local
MENU LABEL Boot from local drive
MENU DEFAULT
localboot 0
LABEL Install CentOS 6.5 x86_64 from FTP
MENU LABEL Install CentOS 6.5 x86_64 from FTP
kernel images/CentOS/6.5/x86_64/vmlinuz
append initrd=images/CentOS/6.5/x86_64/initrd.img method=ftp://192.168.1.6/CentOS/6.5/os/x86_64/
LABEL Install CentOS 6.5 x86_64 from HTTP
MENU LABEL Install CentOS 6.5 x86_64 from HTTP
kernel images/CentOS/6.5/x86_64/vmlinuz
append initrd=images/CentOS/6.5/x86_64/initrd.img method=http://192.168.1.6/CentOS/6.5/os/x86_64/
建立 PXE 開機的 boot.msg 開機訊息
# vim /var/lib/tftpboot/boot.msg
Welcom to Tou-Cheng Elementary School PXE Server System
The 1st menu can let you system goto hard disk menu.
The 2st menu can goto interactive installation step.
squid Proxy Server 使用帳號密碼做認證
最近因應某些需求,除了可以用 VPN 來解決外,也思考用 squid Proxy Server 解決的可能方式。
1. 修改設定檔
# vim /etc/squid/squid.conf
在 acl 區段加入下面這二行
acl squid_user proxy_auth REQUIRED
auth_param basic program /usr/lib64/squid/ncsa_auth /etc/squid/passwd
2. 在 /etc/squid/squid.conf 中的 http_access deny all 前面加入下面這一行
http_access allow squid_user
[@more@]
3. 建立所須的密碼檔
這裡建立二個使用者 teacher01 和 student01
# /usr/bin/htpasswd -b -c /etc/squid/passwd teacher01 123456
Adding password for user teacher01
# /usr/bin/htpasswd -b /etc/squid/passwd student01 234567
Adding password for user student01
檢查帳號是否有設定成功
# more /etc/squid/passwd
teacher01:Z6gIorvSGN/UI
student01:jbqLqf5mmJQKE
4. 重新啟動 squid Proxy Server
# service squid restart
5. 開啟瀏覽器,做 Proxy Server 的設定,以 IE 為例
輸入 Proxy Server 的 IP 和使用的 Port,然後按 確定
如果 Firefox 要採用和 IE 一樣的設定