在 CentOS 7.x 中使用 SSD

參考網頁:
RHEL7: Extend the life of a SSD. – CertDepot

1. 備份原檔
# cp /etc/fstab /etc/fstab.$(date +%F)
2. 停止每次存取檔案時寫入 timestamp
# vim  /etc/fstab

UUID=ba1f3566-d4af-4abc-93f7-2dde272f8006 /                       xfs     defaults        0 0
修改成
UUID=ba1f3566-d4af-4abc-93f7-2dde272f8006 /                       xfs     defaults,noatime        0 0[@more@]3. 在開機時執行 trim
# cp /etc/rc.d/rc.local /etc/rc.d/rc.local.$(date +%F)
# vim /etc/rc.d/rc.local
加入
# Trim the SSD at boot
/usr/sbin/fstrim /
/usr/sbin/fstrim /home
/usr/sbin/fstrim /boot

4. 修改 /etc/rc.d/rc.local 權限
# chmod 744 /etc/rc.d/rc.local

5. 設定開機時執行
# sed -i ‘$an[Install]nWantedBy=multi-user.target’ /usr/lib/systemd/system/rc-local.service
# systemctl enable rc-local
Created symlink from /etc/systemd/system/multi-user.target.wants/rc-local.service to /usr/lib/systemd/system/rc-local.service.

6. Limit swap use
修改 /etc/sysctl.conf 加入下面二行
vm.swappiness=1
vm.vfs_cache_pressure=50
# sed -i ‘$avm.swappiness=1nvm.vfs_cache_pressure=50’ /etc/sysctl.conf

7. 讓設定生效
# sysctl -p
vm.swappiness = 1
vm.vfs_cache_pressure = 50

8. Use a SSD-friendly I/O scheduler
修改 /etc/default/grub 在 GRUB_CMDLINE_LINUX 那一行的最後面加上 elevator=deadline
# vim /etc/default/grub
GRUB_CMDLINE_LINUX=”rhgb quiet ipv6.disable=1 net.ifnames=0 biosdevname=0 elevator=deadline

9. 產生新的 grub 設定檔
# grub2-mkconfig -o /boot/grub2/grub.cfg
Generating grub configuration file …
Found linux image: /boot/vmlinuz-3.10.0-327.28.2.el7.x86_64
Found initrd image: /boot/initramfs-3.10.0-327.28.2.el7.x86_64.img
Found linux image: /boot/vmlinuz-3.10.0-327.22.2.el7.x86_64
Found initrd image: /boot/initramfs-3.10.0-327.22.2.el7.x86_64.img
Found linux image: /boot/vmlinuz-0-rescue-d1ae217032434f8a908229e3c9aae7ae
Found initrd image: /boot/initramfs-0-rescue-d1ae217032434f8a908229e3c9aae7ae.img
done

在 CentOS 7.x 上刪除 RAID

參考網站:
6.3.5. Removing a RAID Device
mdadm软RAID的删除方法和注意事项 – 猴叔的博客 – 51CTO技术博客

1. 顯示目前 RAID 狀態
# mdadm –detail /dev/md0 | tail -n 4
    Number   Major   Minor   RaidDevice State
       0       8        1        0      active sync   /dev/sdb1
       1       8       17        1      active sync   /dev/sdc1
       2       8       33        2      active sync   /dev/sdd1

2. 停用 RAID
# mdadm –stop /dev/md0
mdadm: stopped /dev/md0[@more@]3. 移除 RAID
# mdadm –remove /dev/md0

4. 移除 superblocks
# mdadm –zero-superblock /dev/sdb1 /dev/sdc1 /dev/sdd1 /dev/sde1

sed 備忘

參考網頁:
[轉貼] SED單行腳本快速參考 @ 胖虎的祕密基地 :: 痞客邦 PIXNET ::
sed 工具
阿旺的 Linux 開竅手冊
sed, a stream editor Examples
Sed – An Introduction and Tutorial

1. 刪除空白行
# sed -i ‘/^$/d’ testfile
# sed -i ‘/./!d’ testfile

2. 刪除第一行空行後的所有內容
# sed -i ‘/^$/q’ testfile

3. 刪除第一行空行之前的所有內容
# sed -i ‘1,/^$/d’ testfile[@more@]4. 刪除含 pattern 的行
# sed -i ‘/pattern/d’ testfile

# cat /tmp/testfile
1
2
3
4
5
# sed -i ‘/2/’,’/4/d’ /tmp/testfile
# cat /tmp/testfile
1
5

5. 刪除文件中開頭的10行
# sed -i ‘1,10d’ testfile

6. 刪除文件中的最後一行
# sed -i ‘$d’ testfile

7. 顯示 8~12 行
# sed -n ‘8,12p’ testfile

8. 只顯示符合 pattern 的行
# sed -n ‘/pattern/p’ testfile
# sed ‘/pattern/!d’ testfile
# grep pattern testfile

9. 不顯示符合 pattern 的行
# sed -n ‘/pattern/!p’ testfile
# sed ‘/pattern/d’ testfile
# grep -v pattern testfile

10. 一次全部更換多個符合的 pattern
# sed -i ‘s/mysql/red/g;s/php/black/g’ testfile

11. 在每一行前面插入 5 個空白
# sed -i ‘s/^/ /’ testfile

12. 更換指定行(n)符合的字串
# sed -i ‘ns/php/red/’ testfile

13. 在指定行之前插入
# sed -i ‘2i 1234567890’ testfile

14. 在指定行之後插入
# sed -i ‘2a 1234567890’ testfile

15. 在最後一行插入
# sed -i ‘$a 1234567890’ testfile

16. 字串取代
# sed -i ‘s/^(anonymous_enable=).*$/1”NO/’ /etc/vsftpd/vsftpd.conf
# sed -i ‘s/^(SELINUX=).*$/1”disabled/’ /etc/selinux/config

17. 字串取代
# sed -i ‘/foo/ s//bar/g’ testfile

18. 字串取代 指定行範圍
# sed -i ‘34,38 s/ACCEPT/DROP/’ /etc/ufw/before.rules

19. 取出 IP
# ifconfig eth0
inet addr:192.168.1.12 Bcast:192.168.1.255 Mask:255.255.255.0
# ifconfig eth0 | grep ‘inet ‘ | sed ‘s/^.*inet addr://g’ | sed ‘s/ *Bcast.*$//g’
192.168.1.12

20. 多個指令
# sed -i ‘s/123/234/; s/四忠/四義/’ list

21. 將編輯命令放在檔案之中
# cat sedscr
s/123/234/
s/四忠/四義/
# sed -i -f sedscr list

22. 刪除找到 %post 後的所有行數
# sed -i ‘/%post/ ,$d’ /tmp/anaconda-ks.cfg

23. 找到字串的後面插入一行
#PIDFILE 後面插入一行
# sed -i ‘/#PIDFILE/ a PIDFILE=/var/chroot/bind9/var/run/named/named.pid’ /etc/init.d/bind9

24. 多重取代
# sed -i -e ‘s/123/234/’ -e ‘s/四忠/四義/’ list

25. 刪除最後幾個字元
# sed -i ‘s/…$//’ testfile

26. 在每一行後面插入一行空白行
# sed -i G testfile

27. 在最後一個欄位插入字串
# sed -i ‘s/$/@smail.ilc.edu.tw/’ class3

檢查 kickstart file 語法是否正確

在設定 RedHat / CentOS Linux 客製化安裝時,最重要的就是設定 kickstart file 是否設定正確。
1. 檢查一下系統是否有安裝
# which ksvalidator
/usr/bin/ksvalidator

2. ksvalidator 所屬套件
# yum provides /usr/bin/ksvalidator
Loaded plugins: fastestmirror
Loading mirror speeds from cached hostfile
 * epel: ftp.yzu.edu.tw
pykickstart-1.99.66.6-1.el7.noarch : A python library for manipulating kickstart files
Repo        : base
Matched from:
Filename    : /usr/bin/ksvalidator[@more@]3. 進行安裝
# yum install pykickstart

4. 進行檢查,如果沒有出現任何訊息,代表設定無誤
# /usr/bin/ksvalidator /tmp/initrd/ks.cfg

利用 cat 指令建立檔案

在 Shell Script 中利用 cat 指令建立設定檔
# cat createepelrepo.sh
#!/bin/bash
cat > /etc/yum.repos.d/epel.repo << END
[epel]
name=Extra Packages for Enterprise Linux 7 – $basearch
#baseurl=http://download.fedoraproject.org/pub/epel/7/$basearch
mirrorlist=https://mirrors.fedoraproject.org/metalink?repo=epel-7&arch=$basearch
failovermethod=priority
enabled=0
gpgcheck=1
gpgkey=file:///etc/pki/rpm-gpg/RPM-GPG-KEY-EPEL-7

[epel-debuginfo]
name=Extra Packages for Enterprise Linux 7 – $basearch – Debug
#baseurl=http://download.fedoraproject.org/pub/epel/7/$basearch/debug
mirrorlist=https://mirrors.fedoraproject.org/metalink?repo=epel-debug-7&arch=$basearch
failovermethod=priority
enabled=0
gpgkey=file:///etc/pki/rpm-gpg/RPM-GPG-KEY-EPEL-7
gpgcheck=1

[epel-source]
name=Extra Packages for Enterprise Linux 7 – $basearch – Source
#baseurl=http://download.fedoraproject.org/pub/epel/7/SRPMS
mirrorlist=https://mirrors.fedoraproject.org/metalink?repo=epel-source-7&arch=$basearch
failovermethod=priority
enabled=0
gpgkey=file:///etc/pki/rpm-gpg/RPM-GPG-KEY-EPEL-7
gpgcheck=1
END[@more@]2. 改變檔案執行權限
# chmod +x createepelrepo.sh

3. 目前沒有 epel.repo 設定檔
# ls -l /etc/yum.repos.d/epel.repo
ls: cannot access /etc/yum.repos.d/epel.repo: No such file or directory

4. 執行 createepelrepo.sh
# ./createepelrepo.sh

5. 檢查是否有產生設定檔
# ls -l /etc/yum.repos.d/epel.repo
-rw-r–r–. 1 root root 957 Jan 24  2015 /etc/yum.repos.d/epel.repo

6. 查看內容是否正確
# cat /etc/yum.repos.d/epel.repo

清除無用的套件

1. 安裝 yum-utils 套件
# rpm -qa | grep yum-utils
yum-utils-1.1.31-34.el7.noarch
# yum install yum-utils

2. 可以使用的指令
# rpm -ql yum-utils | grep bin
/usr/bin/debuginfo-install
/usr/bin/find-repos-of-install
/usr/bin/needs-restarting
/usr/bin/package-cleanup
/usr/bin/repo-graph
/usr/bin/repo-rss
/usr/bin/repoclosure
/usr/bin/repodiff
/usr/bin/repomanage
/usr/bin/repoquery
/usr/bin/reposync
/usr/bin/repotrack
/usr/bin/show-changed-rco
/usr/bin/show-installed
/usr/bin/verifytree
/usr/bin/yum-builddep
/usr/bin/yum-config-manager
/usr/bin/yum-debug-dump
/usr/bin/yum-debug-restore
/usr/bin/yum-groups-manager
/usr/bin/yumdownloader
/usr/sbin/yum-complete-transaction
/usr/sbin/yumdb[@more@]3. package-cleanup 指令的用法
列出套件相依問題
# package-cleanup –problems
Loaded plugins: fastestmirror, langpacks
No Problems Found

列出孤兒套件(不代表可以刪除)
# package-cleanup –orphans
Loaded plugins: fastestmirror, langpacks
Loading mirror speeds from cached hostfile
colordiff-1.0.13-2.el7.noarch
fail2ban-0.9.1-2.el7.noarch
fail2ban-firewalld-0.9.1-2.el7.noarch
fail2ban-sendmail-0.9.1-2.el7.noarch
fail2ban-server-0.9.1-2.el7.noarch
fail2ban-systemd-0.9.1-2.el7.noarch
kernel-3.10.0-229.14.1.el7.x86_64
remi-release-7.0-1.el7.remi.noarch
rpmforge-release-0.5.3-1.el7.rf.x86_64

移除舊核心及核心發展套件
# package-cleanup –oldkernels
Loaded plugins: fastestmirror, langpacks
–> Running transaction check
—> Package kernel.x86_64 0:3.10.0-229.14.1.el7 will be erased
—> Package kernel.x86_64 0:3.10.0-327.4.5.el7 will be erased
—> Package kernel.x86_64 0:3.10.0-327.10.1.el7 will be erased
–> Finished Dependency Resolution

Dependencies Resolved

=============================================================================================================================================================
 Package                          Arch                             Version                                          Repository                          Size
=============================================================================================================================================================
Removing:
 kernel                           x86_64                           3.10.0-229.14.1.el7                              @updates                           131 M
 kernel                           x86_64                           3.10.0-327.4.5.el7                               @updates                           136 M
 kernel                           x86_64                           3.10.0-327.10.1.el7                              @updates                           136 M

Transaction Summary
=============================================================================================================================================================
Remove  3 Packages

Installed size: 403 M
Is this ok [y/N]:

客製化 CentOS-7-x86_64-1511 安裝光碟

為了測試 NAS 比較方便,所以特別製作了這一片光碟。
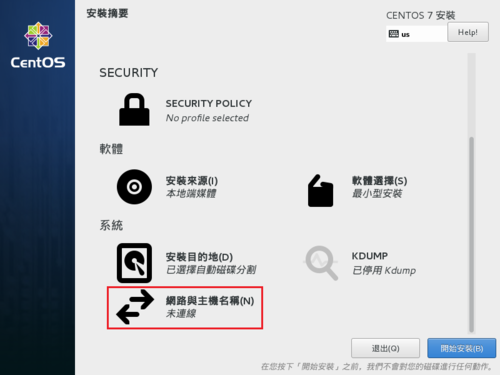
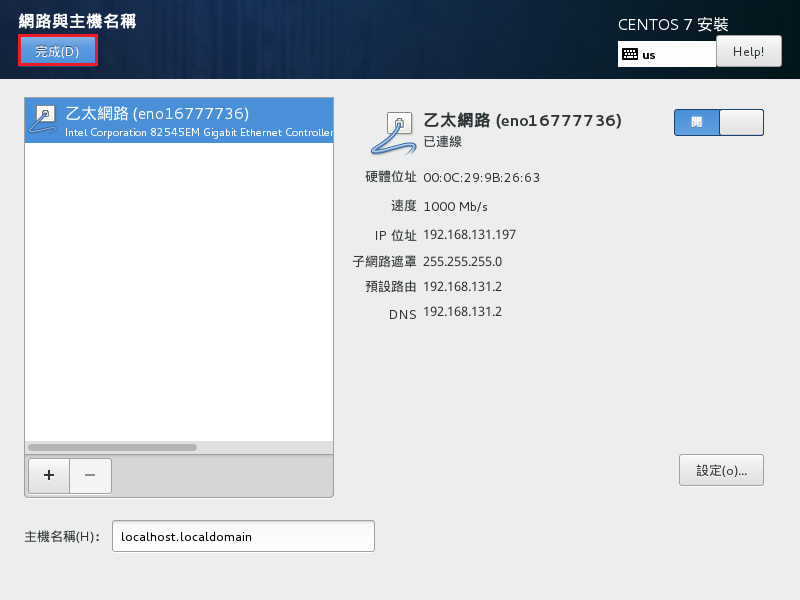
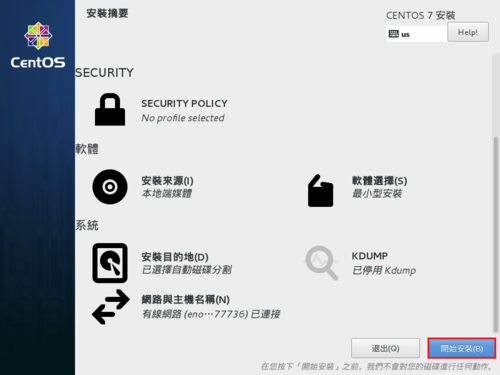
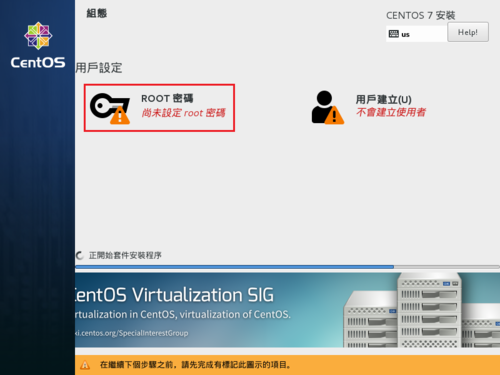
安裝時只要三個步驟:分割硬碟、設定網路、設定 root  管理者密碼
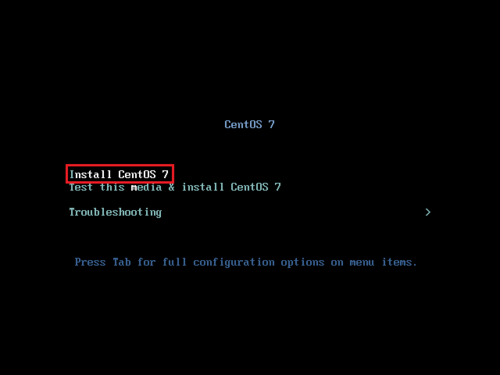
1. 光碟開機畫面,取消倒數計時,預設 Install CentOS 7

[@more@]2. 分割硬碟

3.設定網路

4. 進行安裝

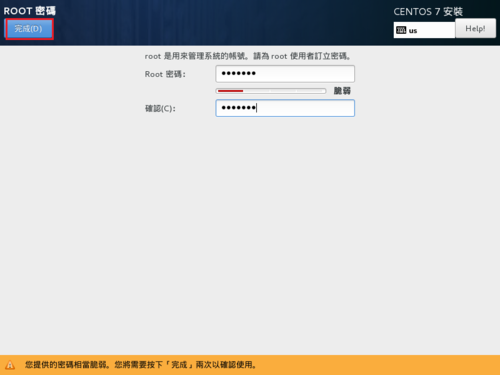
5. 設定 root 管理者密碼

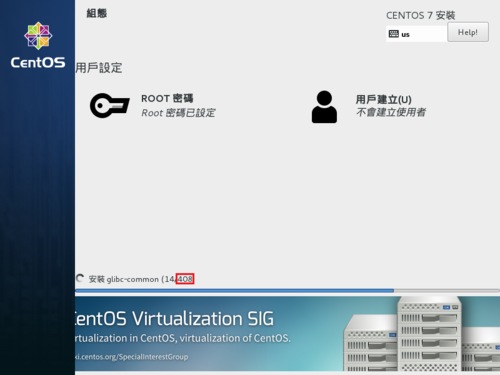
6. 一共安裝 408 個套件

這個版本的特點:
1. 最小化安裝,再補上所需套件,x86-64 光碟容量 724M
2. 套件更新到 2016-06-30
3. 套件更新伺服器改成頭城國小
4. 預設啟動 Samba + vsftpd FTP Server
5. 預先修改 Samba 及 vsftpd FTP Server 基本設定,及 SELinux 相關設定
5. 加入第三方套件庫 EPEL(Extra Packages for Enterprise Linux)
6. 加裝 grive2 套件,讓系統能與 Google Drive 進行目錄同步備份
7. 每天早上 6 點向 time.stdtime.gov.tw 對時
8. 個人使用環境的設定…..等等

解決測試 Samba Server 設定檔時出現的提示訊息

在使用 testparm 測試 Samba Server 設定檔時會出現如下的提示訊息
# testparm
Load smb config files from /etc/samba/smb.conf
rlimit_max: increasing rlimit_max (1024) to minimum Windows limit (16384)
Processing section “[homes]”
Loaded services file OK.
Server role: ROLE_STANDALONE

Press enter to see a dump of your service definitions[@more@]解決方式:
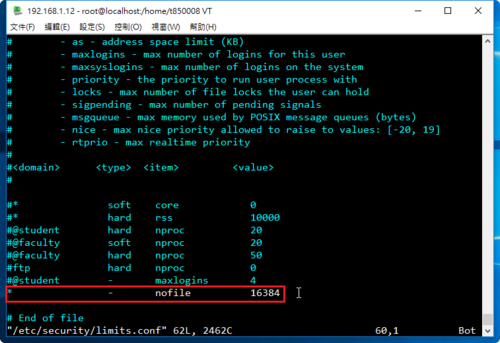
修改 /etc/security/limits.conf 設定檔
# vim /etc/security/limits.conf
加入下面一行
*                –       nofile          16384

重新啟動電腦後,就不會再出現了!
# testparm
Load smb config files from /etc/samba/smb.conf
Processing section “[homes]”
Loaded services file OK.
Server role: ROLE_STANDALONE

Press enter to see a dump of your service definitions

在 CentOS 7.x 上使用 Samba Server

1. 安裝 Samba Server
# yum install samba

2. 修改設定檔 /etc/samba/smb.conf
# cat /etc/samba/smb.conf | grep -E -v ‘^#|^;’
[global]
        workgroup = HOME
        server string = Samba Server Version %v

        # log files split per-machine:
        log file = /var/log/samba/log.%m
        # maximum size of 50KB per log file, then rotate:
        max log size = 50

        security = user
        passdb backend = tdbsam

[homes]
        comment = Home Directories
        browseable = no
        writable = yes
        valid users = %S
        veto files=/.*

[@more@]3. 測試設定檔
# testparm
Load smb config files from /etc/samba/smb.conf
rlimit_max: increasing rlimit_max (1024) to minimum Windows limit (16384)
Processing section “[homes]”
Loaded services file OK.
Server role: ROLE_STANDALONE

Press enter to see a dump of your service definitions

# Global parameters
[global]
        workgroup = HOME
        server string = Samba Server Version %v
        security = USER
        log file = /var/log/samba/log.%m
        max log size = 50
        idmap config * : backend = tdb

[homes]
        comment = Home Directories
        valid users = %S
        read only = No
        veto files = /.*
        browseable = No

4. 建立使用者 Samba 密碼
# /usr/bin/pdbedit -a t850008
new password:
retype new password:
Unix username:        t850008
NT username:
Account Flags:        [U          ]
User SID:             S-1-5-21-1562595748-815096285-1647261660-1000
Primary Group SID:    S-1-5-21-1562595748-815096285-1647261660-513
Full Name:
Home Directory:       \localhostt850008
HomeDir Drive:
Logon Script:
Profile Path:         \localhostt850008profile
Domain:               LOCALHOST
Account desc:
Workstations:
Munged dial:
Logon time:           0
Logoff time:          Wed, 06 Feb 2036 23:06:39 CST
Kickoff time:         Wed, 06 Feb 2036 23:06:39 CST
Password last set:    Wed, 29 Jun 2016 09:06:19 CST
Password can change:  Wed, 29 Jun 2016 09:06:19 CST
Password must change: never
Last bad password   : 0
Bad password count  : 0
Logon hours         : FFFFFFFFFFFFFFFFFFFFFFFFFFFFFFFFFFFFFFFFFF

5. SELinux 在 Samba Server 上設定
# setsebool -P samba_enable_home_dirs on
如果有另外分享的目錄
# semanage fcontext -a -t samba_share_t ‘/sharedpath(/.*)?’
# restorecon -RFvv /sharedpath

6. 設定開機時啟動 Samba Server
# systemctl enable smb
Created symlink from /etc/systemd/system/multi-user.target.wants/smb.service to /usr/lib/systemd/system/smb.service.
# systemctl enable nmb
Created symlink from /etc/systemd/system/multi-user.target.wants/nmb.service to /usr/lib/systemd/system/nmb.service.

7. 啟動 Samba Server
# systemctl start smb
# systemctl start nmb

8. 檢查是否有正常啟動
# netstat -an | grep -E ‘:137|:138|:139|:445’
tcp        0      0 0.0.0.0:139             0.0.0.0:*               LISTEN
tcp        0      0 0.0.0.0:445             0.0.0.0:*               LISTEN
tcp6       0      0 :::139                  :::*                    LISTEN
tcp6       0      0 :::445                  :::*                    LISTEN
udp        0      0 0.0.0.0:137             0.0.0.0:*
udp        0      0 0.0.0.0:138             0.0.0.0:*

解決在 CentOS 7.x vsftpd FTP Server 出現 500 OOPS 的錯誤訊息

一般使用者連線時出現 500 OOPS 的錯誤訊息
# lftp -u t850008 127.0.0.1
Password:
lftp t850008@127.0.0.1:~> ls
ls: Login failed: 500 OOPS: vsftpd: refusing to run with writable root inside chroot()[@more@]解決方式:
1. 修改 /etc/vsftpd/vsftpd.conf 設定檔
# vim /etc/vsftpd/vsftpd.conf
加入下面一行
allow_writeable_chroot=YES

2. 重新啟動 vsftpd FTP Server
# systemctl stop vsftpd
# systemctl start vsftpd

3. 測試一下
# lftp -u t850008 127.0.0.1
Password:
lftp t850008@127.0.0.1:~> ls
-rw——-    1 1000     1000     73121952 Jun 26 00:51 VMware-player-12.1.0-3272444.exe
-rw——-    1 1000     1000     153807839 Jun 26 00:52 Windows 7 Games for Windows 10 and 8.exe
-rw——-    1 1000     1000       324096 Jun 26 00:51 pietty0327.exe