安裝 MariaDB SQL Sever 10.x

在 CentOS 7.x 使用內建的套件庫安裝的 MariaDB SQL Server 版本是 5.x
# /usr/bin/mysql -u root -p
Enter password:
Welcome to the MariaDB monitor.  Commands end with ; or g.
Your MariaDB connection id is 16
Server version: 5.5.52-MariaDB MariaDB Server

Copyright (c) 2000, 2016, Oracle, MariaDB Corporation Ab and others.

Type ‘help;’ or ‘h’ for help. Type ‘c’ to clear the current input statement.

MariaDB [(none)]> quit
Bye

安裝 10.x 版本
1. 使用 MariaDB 網站上的設定網頁
MariaDB – Setting up MariaDB Repositories – MariaDB

[@more@]2. 移除舊版套件
# systemctl disable mariadb.service
Removed symlink /etc/systemd/system/multi-user.target.wants/mariadb.service.
# systemctl stop mariadb.service
# yum remove mariadb mariadb-server mariadb-libs

3. 建立 mariadb.repo
# vim /etc/yum.repos.d/mariadb.repo
# MariaDB 10.1 CentOS repository list – created 2017-03-12 06:10 UTC
# http://downloads.mariadb.org/mariadb/repositories/
[mariadb]
name = MariaDB
baseurl = http://yum.mariadb.org/10.1/centos7-amd64
gpgkey=https://yum.mariadb.org/RPM-GPG-KEY-MariaDB
gpgcheck=1

4. 更新套件庫
# yum update

5. 進行安裝
# yum install MariaDB-server MariaDB-client

6. 啟動 MariaDB SQL Server
# systemctl enable mariadb.service
# systemctl start mariadb.service

7. 版本
# /usr/bin/mysql -u root -p
Enter password:
Welcome to the MariaDB monitor.  Commands end with ; or g.
Your MariaDB connection id is 2
Server version: 10.1.21-MariaDB MariaDB Server

Copyright (c) 2000, 2016, Oracle, MariaDB Corporation Ab and others.

Type ‘help;’ or ‘h’ for help. Type ‘c’ to clear the current input statement.

MariaDB [(none)]> quit
Bye

建置使用帳號及密碼認證的 OpenVPN Server – 1

參考網站:
OpenVPN System Based On User/Password Authentication with mysql & Day Control (shell script)- Debian ~ Mr.TUM’s Blog

參考網站中,OpenVPN 和 MySQL 分別屬於不同主機,在這裡改用同一主機。

1. 安裝 MySQL Server
# apt-get install mariadb-server[@more@]2. 設定 root 密碼及一些安全性上的設定
# /usr/bin/mysql_secure_installation
還未設定 root 密碼,所以直接按 Enter 鍵
Enter current password for root (enter for none):
OK, successfully used password, moving on…

Setting the root password ensures that nobody can log into the MariaDB
root user without the proper authorisation.

設定 MySQL root 密碼
Set root password? [Y/n]
New password:
Re-enter new password:
Password updated successfully!
Reloading privilege tables..
 … Success!

By default, a MariaDB installation has an anonymous user, allowing anyone
to log into MariaDB without having to have a user account created for
them.  This is intended only for testing, and to make the installation
go a bit smoother.  You should remove them before moving into a
production environment.

移除匿名使用者
Remove anonymous users? [Y/n]
 … Success!

Normally, root should only be allowed to connect from ‘localhost’.  This
ensures that someone cannot guess at the root password from the network.

取消 root 可以遠端登入
Disallow root login remotely? [Y/n]
 … Success!

By default, MariaDB comes with a database named ‘test’ that anyone can
access.  This is also intended only for testing, and should be removed
before moving into a production environment.

移除 測試的資料庫
Remove test database and access to it? [Y/n]
 – Dropping test database…
 … Success!
 – Removing privileges on test database…
 … Success!

Reloading the privilege tables will ensure that all changes made so far
will take effect immediately.

重新載入資料表權限
Reload privilege tables now? [Y/n]
 … Success!

Cleaning up…

3. 建立 openvpn 資料庫,並建立一個使用者及設定密碼來進行管理
# /usr/bin/mysql -u root -p
MariaDB [(none)]> CREATE DATABASE openvpn;
MariaDB [(none)]> GRANT ALL ON openvpn.* TO ‘pi’@”%” IDENTIFIED BY ‘123456’;
MariaDB [(none)]> FLUSH PRIVILEGES;
MariaDB [(none)]> exit;

4. 改用 pi 使用者來建立 openvpn 相關資料庫設定
# /usr/bin/mysql -u pi -p

5. 開啟 openvpn 資料庫
MariaDB [(none)]> USE openvpn;

6. 建立 user 資料表

CREATE TABLE IF NOT EXISTS `user` (
    `user_id` varchar(32) COLLATE utf8_unicode_ci NOT NULL,
    `user_pass` varchar(32) COLLATE utf8_unicode_ci NOT NULL DEFAULT ‘1234’,
    `user_mail` varchar(64) COLLATE utf8_unicode_ci DEFAULT NULL,
    `user_phone` varchar(16) COLLATE utf8_unicode_ci DEFAULT NULL,
    `user_online` tinyint(1) NOT NULL DEFAULT ‘0’,
    `user_enable` tinyint(1) NOT NULL DEFAULT ‘1’,
    `user_start_date` date NOT NULL,
    `user_end_date` date NOT NULL,
PRIMARY KEY (`user_id`),
KEY `user_pass` (`user_pass`)
) ENGINE=MyISAM DEFAULT CHARSET=utf8 COLLATE=utf8_unicode_ci;

7. 建立 log 資料表
CREATE TABLE IF NOT EXISTS `log` (
    `log_id` int(10) unsigned NOT NULL AUTO_INCREMENT,
    `user_id` varchar(32) COLLATE utf8_unicode_ci NOT NULL,
    `log_trusted_ip` varchar(32) COLLATE utf8_unicode_ci DEFAULT NULL,
    `log_trusted_port` varchar(16) COLLATE utf8_unicode_ci DEFAULT NULL,
    `log_remote_ip` varchar(32) COLLATE utf8_unicode_ci DEFAULT NULL,
    `log_remote_port` varchar(16) COLLATE utf8_unicode_ci DEFAULT NULL,
    `log_start_time` timestamp NOT NULL DEFAULT CURRENT_TIMESTAMP,
    `log_end_time` timestamp NOT NULL DEFAULT ‘0000-00-00 00:00:00’,
    `log_received` float NOT NULL DEFAULT ‘0’,
    `log_send` float NOT NULL DEFAULT ‘0’,
PRIMARY KEY (`log_id`),
KEY `user_id` (`user_id`)
) ENGINE=MyISAM  DEFAULT CHARSET=utf8 COLLATE=utf8_unicode_ci;
8. 建立使用者資料
INSERT INTO `user` (
    `user_id`, `user_pass`, `user_mail`, `user_phone`,
    `user_online`, `user_enable`, `user_start_date`, `user_end_date`
)
VALUES (
    ‘test’, ‘123456’, ‘test@test.com’,
    ‘+66815447514’, 0, 1, ‘2012-01-01’, ‘0000-00-00’
);

9. 顯示資料庫中的資料表
MariaDB [openvpn]> show tables;
+————————–+
| Tables_in_openvpn |
+—————————+
| log                              |
| user                            |
+—————————-+
2 rows in set (0.00 sec)

10. 列出 user 資料表中的使用者資料
MariaDB [openvpn]> select user_id,user_pass from user;
+———-+—————-+
| user_id | user_pass   |
+———-+—————–+
| test       | 123456        |
+———-+—————–+
1 row in set (0.00 sec)

11. 退出資料庫
MariaDB [openvpn]> exit;

12 . 建立 Script 檔目錄 /etc/openvpn/script
# mkdir /etc/openvpn/script

13. 建立 /etc/openvpn/script/config.sh
# cat etc/openvpn/script/config.sh
#!/bin/bash
##Dababase Server
HOST=’127.0.0.1′
#Default port = 3306
PORT=’3306′
#Username
USER=’pi’
#Password
PASS=’123456′
#database name
DB=’openvpn’

14. 建立 /etc/openvpn/script/test_connect_db.sh
# cat /etc/openvpn/script/test_connect_db.sh
#!/bin/bash
. /etc/openvpn/script/config.sh
##Test Authentication
username=$1
password=$2
user_id=$(mysql -h$HOST -P$PORT -u$USER -p$PASS $DB -sN -e “select user_id from user where user_id = ‘$username’ AND user_pass = ‘$password’ AND user_enable=1 AND user_start_date != user_end_date AND TO_DAYS(now()) >= TO_DAYS(user_start_date) AND (TO_DAYS(now()) <= TO_DAYS(user_end_date) OR user_end_date=’0000-00-00′)”)
##Check user
[ “$user_id” != ” ] && [ “$user_id” = “$username” ] && echo “user : $username” && echo ‘authentication ok.’ && exit 0 || echo ‘authentication failed.’; exit 1

15. 建立 /etc/openvpn/script/login.sh
# cat /etc/openvpn/script/login.sh
#!/bin/bash
. /etc/openvpn/script/config.sh
##Authentication
user_id=$(mysql -h$HOST -P$PORT -u$USER -p$PASS $DB -sN -e “select user_id from user where user_id = ‘$username’ AND user_pass = ‘$password’ AND user_enable=1 AND user_start_date != user_end_date AND TO_DAYS(now()) >= TO_DAYS(user_start_date) AND (TO_DAYS(now()) <= TO_DAYS(user_end_date) OR user_end_date=’0000-00-00′)”)
##Check user
[ “$user_id” != ” ] && [ “$user_id” = “$username” ] && echo “user : $username” && echo ‘authentication ok.’ && exit 0 || echo ‘authentication failed.’; exit 1

16. 建立 /etc/openvpn/script/connect.sh
# cat /etc/openvpn/script/connect.sh
#!/bin/bash
. /etc/openvpn/script/config.sh
##insert data connection to table log
mysql -h$HOST -P$PORT -u$USER -p$PASS $DB -e “INSERT INTO log (log_id,user_id,log_trusted_ip,log_trusted_port,log_remote_ip,log_remote_port,log_start_time,log_end_time,log_received,log_send) VALUES(NULL,’$common_name’,’$trusted_ip’,’$trusted_port’,’$ifconfig_pool_remote_ip’,’$remote_port_1′,now(),’0000-00-00 00:00:00′,’$bytes_received’,’$bytes_sent’)”
##set status online to user connected
mysql -h$HOST -P$PORT -u$USER -p$PASS $DB -e “UPDATE user SET user_online=1 WHERE user_id=’$common_name'”

17. 建立 /etc/openvpn/script/disconnect.sh
# cat /etc/openvpn/script/disconnect.sh
#!/bin/bash
. /etc/openvpn/script/config.sh
##set status offline to user disconnected
mysql -h$HOST -P$PORT -u$USER -p$PASS $DB -e “UPDATE user SET user_online=0 WHERE user_id=’$common_name'”
##insert data disconnected to table log
mysql -h$HOST -P$PORT -u$USER -p$PASS $DB -e “UPDATE log SET log_end_time=now(),log_received=’$bytes_received’,log_send=’$bytes_sent’ WHERE log_trusted_ip=’$trusted_ip’ AND log_trusted_port=’$trusted_port’ AND user_id=’$common_name’ AND log_end_time=’0000-00-00 00:00:00′”

18. 更改 Script 檔案權限
# chmod 755 /etc/openvpn/script/*.sh

19. 修改 /etc/openvpn/server.conf  設定檔
# vim /etc/openvpn/server.conf
加入以下設定
username-as-common-name
client-cert-not-required
auth-user-pass-verify /etc/openvpn/script/login.sh via-env

# 設定使用者登入及登出時要做的動作
##script connect-disconnect
script-security 3 system
client-connect /etc/openvpn/script/connect.sh
client-disconnect /etc/openvpn/script/disconnect.sh

20. 測試 MariaDB SQL Server 可否正常連線(帳號/密碼:test / 123456)
# /etc/openvpn/script/test_connect_db.sh test 123456
user : test
authentication ok.

如果是上面的訊息,則是連線成功!

21. 設定 OpenVPN Client 端 *.ovpn
加入以下設定
auth-user-pass
reneg-sec 0

22. 重新啟動 OpenVPN Server
# systemctl restart openvpn@server.service

23. 列出使用者的登入資料
MariaDB [openvpn]> select user_id,log_trusted_ip,log_remote_ip,log_start_time,log_end_time from log;
+———-+——————–+———————+——————————+—————————–+
| user_id | log_trusted_ip | log_remote_ip | log_start_time             | log_end_time              |
+———-+——————–+———————+——————————+——————————+
| test        | 1.162.15.9      | 10.8.0.6             | 2016-12-29 09:27:32 | 2016-12-29 10:27:36 |
+———-+——————–+———————+——————————+——————————+

LEMP server on CentOS 7.x with FastCGI

參考網頁:LEMP server on CentOS 7 with FastCGI

安裝 epel-release 套件
# yum install epel-release

安裝 Mariadb SQL Server
# yum install mariadb-server mariadb

啟動 Mariadb SQL Server
# systemctl enable mariadb
# systemctl start mariadb

第一次使用時的設定
# /usr/bin/mysql_secure_installation[@more@]安裝 Nginx Web Server
# yum install nginx

修改設定檔 /etc/nginx/nginx.conf
# vim /etc/nginx/nginx.conf
server 區段中加入
   server {
        listen       80 default_server;
        (略)

        error_page 500 502 503 504 /50x.html;
            location = /50x.html {
        }

        location ~ .php$ {
            root           /usr/share/nginx/html;
            fastcgi_pass   127.0.0.1:9000;
            fastcgi_index  index.php;
            fastcgi_param  SCRIPT_FILENAME  $document_root$fastcgi_script_name;
            include        fastcgi_params;
        }
    }

啟動 Nginx Web Server
# systemctl enable nginx
# systemctl start nginx

開啟防火牆設定
# firewall-cmd –permanent –zone=public –add-service=http
# firewall-cmd –permanent –zone=public –add-service=https

安裝 PHP with FastCGI 套件
# yum install php-cli php spawn-fcgi

新增 /usr/bin/php-fastcgi 設定檔
# vim /usr/bin/php-fastcgi
#!/bin/sh
if [ `grep -c “nginx” /etc/passwd` = “1” ]; then
    FASTCGI_USER=nginx
elif [ `grep -c “www-data” /etc/passwd` = “1” ]; then
    FASTCGI_USER=www-data
elif [ `grep -c “http” /etc/passwd` = “1” ]; then
    FASTCGI_USER=http
else
# Set the FASTCGI_USER variable below to the user that
# you want to run the php-fastcgi processes as

FASTCGI_USER=
fi

/usr/bin/spawn-fcgi -a 127.0.0.1 -p 9000 -C 6 -u $FASTCGI_USER -f /usr/bin/php-cgi

更新檔案權限
# chmod +x /usr/bin/php-fastcgi

新增 /etc/systemd/system/php-fastcgi.service 設定檔
# vim /etc/systemd/system/php-fastcgi.service
[Unit]
Description= php-fastcgi systemd service script

[Service]
Type=forking
ExecStart=/usr/bin/php-fastcgi start

[Install]
WantedBy=multi-user.target

啟動相關服務
# systemctl daemon-reload
# systemctl enable php-fastcgi.service
# systemctl start php-fastcgi.service

讓 Cacti 能正常顯示中文

OS:Debian 8.0 jessie
cacti:0.8.8b
安裝完 cacti 之後發現無法呈現中文,輸入中文之後,都會變成 ??

在網路上搜尋了一下,找到下面的文章:
在 Cacti 中顯示中文 | .K.T.’s Blog
電腦中心 | 讓cacti的圖正常出現中文[@more@]底下是設定的步驟:
1. 修改 /usr/share/cacti/site/lib/functions.php
# vim /usr/share/cacti/site/lib/functions.php
在 <?php 下方加入下面一行
setlocale(LC_CTYPE,”zh_TW.UTF-8″);

2. 安裝中文字形
# apt-get install ttf-wqy-microhei ttf-wqy-zenhei fonts-arphic-bkai00mp fonts-arphic-bsmi00lp

3. 加入字型的支援
# /usr/bin/fc-cache -v -f

做了以上的設定還是不行

4. 檢查 MySQL Server 的編碼設定
# /usr/bin/mysql -u root -p
Enter password:
Welcome to the MySQL monitor.  Commands end with ; or g.
Your MySQL connection id is 124
Server version: 5.5.44-0+deb8u1 (Raspbian)

Copyright (c) 2000, 2015, Oracle and/or its affiliates. All rights reserved.

Oracle is a registered trademark of Oracle Corporation and/or its
affiliates. Other names may be trademarks of their respective
owners.

Type ‘help;’ or ‘h’ for help. Type ‘c’ to clear the current input statement.

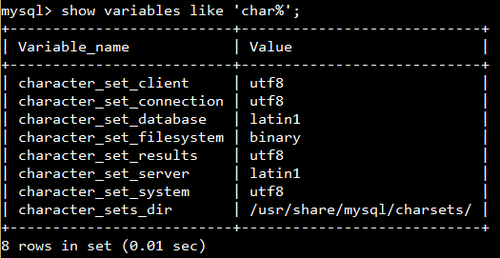
mysql> show variables like ‘char%’;

如果發現有 latin1,代表資料庫編碼要做設定

5. 修改 MySQL Server 設定,加入以下的設定
# vim /etc/mysql/my.cnf
[client]
default-character-set=utf8

[mysqld]
character-set-server=utf8
collation-server=utf8_general_ci
init-connect=’SET NAMES utf8′

[mysql]
default-character-set=utf8

6. 重新啟動 MySQL Server
# systemctl restart mysql

7. 重新檢查 MySQL Server 資料庫編碼
# /usr/bin/mysql -u root -p
Enter password:
Welcome to the MySQL monitor.  Commands end with ; or g.
Your MySQL connection id is 124
Server version: 5.5.44-0+deb8u1 (Raspbian)

Copyright (c) 2000, 2015, Oracle and/or its affiliates. All rights reserved.

Oracle is a registered trademark of Oracle Corporation and/or its
affiliates. Other names may be trademarks of their respective
owners.

Type ‘help;’ or ‘h’ for help. Type ‘c’ to clear the current input statement.

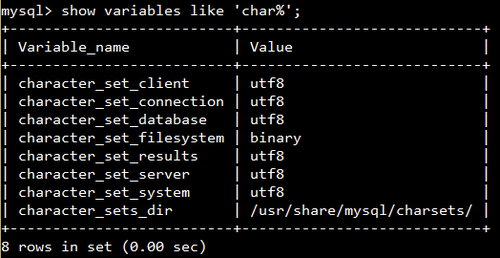
mysql> show variables like ‘char%’;

8. 匯出原 cacti 資料庫
# /usr/bin/mysqldump -u root -p cacti > /root/cacti.sql –default-character-set=latin1

9. 將匯出檔案的 latin1 全部改成 utf8
# sed -i ‘s/latin1/utf8/’ /root/cacti.sql

10. 重新匯入
# /usr/bin/mysql -u root -p /root/cacti < cacti.sql –default-character-set=utf8

終於可以正常顯示中文了!

修正 MySQL Server 啟動後在 log 中顯示的警告訊息

在 MySQL Server 啟動後的 /var/log/mysqld.log 中發現有下列的警告訊息
151202  4:23:49 [Warning] ‘–default-character-set’ is deprecated and will be removed in a future release. Please use ‘–character-set-server’ instead.
151202  4:23:49 [Warning] ‘–default-collation’ is deprecated and will be removed in a future release. Please use ‘–collation-server’ instead.

解決方式:[@more@]修改 /etc/my.cnf 設定檔
# vim /etc/my.cnf
character-set-server=utf8
collation-server=utf8_general_ci
init-connect=’SET NAMES utf8′
# default-character-set=utf8
# default-collation=utf8_general_ci

重新啟動 MySQL Server
# /etc/init.d/mysqld restart

Banana Pi 測試 – 安裝 MariaDB

因為套件庫中沒有 MariaDB,所以採用手動編譯安裝
底下文章參考:
Raspberry Pi • View topic – How I compiled MariaDB and Phidget drivers
Installer MariaDB sur Raspbian – Raspbian France | Raspbian France

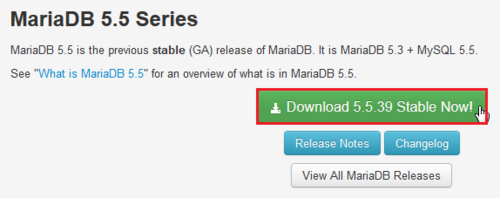
先到 MariaDB 官方網站下載 Source Code
MariaDB 官方網站:https://mariadb.org/en/

[@more@]
下載
# wget -O mariadb-5.5.39.tar.gz “https://downloads.mariadb.org/interstitial/mariadb-5.5.39/source/mariadb-5.5.39.tar.gz/from/http%3A//mirrors.neusoft.edu.cn/mariadb”

解壓縮
# tar xvzf mariadb-5.5.39.tar.gz

切換目錄
# cd mariadb-5.5.39/BUILD

安裝編譯時所須套件
# apt-get install cmake libncurses5-dev bison
# apt-get install build-essential

開始編譯及安裝
# ./autorun.sh
# cd ..
# ./configure
# make;make install

建立 mysql 使用者
# useradd mysql

改變目錄擁有者及群組
# chown -R mysql /usr/local/mysql

切換目錄
# cd /usr/local/mysql

安裝資料庫
# scripts/mysql_install_db –user=mysql

複製啟動檔案到 /etc/init.d 目錄
# cp support-files/mysql.server /etc/init.d/mysqld

啟動 MariaDB SQL Server
# /etc/init.d/mysqld start
Starting MySQL
[ ok …..

安全性設定
# ./bin/mysql_secure_installation

檢查是否有正確啟動
# netstat -ant | grep :3306
tcp        0      0 0.0.0.0:3306            0.0.0.0:*               LISTEN

設定開機後啟動
# /usr/sbin/update-rc.d -f mysqld defaults
update-rc.d: using dependency based boot sequencing

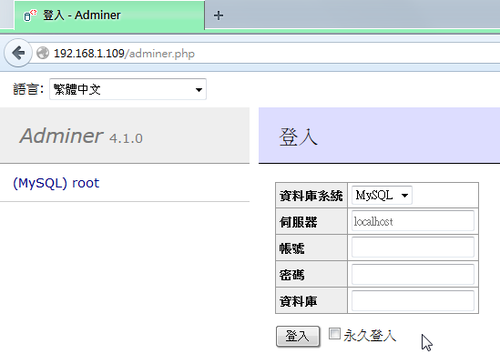
adminer – 管理 MySQL 資料庫的 PHP 程式

一般安裝完 MySQL/MariaDB SQL Server 之後,有些人會安裝 phpMyAdmin 來管理資料庫,不過之前一直有一些安全性上的漏洞,容易遭受攻擊,所以我通常不會安裝,或者是臨時須要時才安裝。
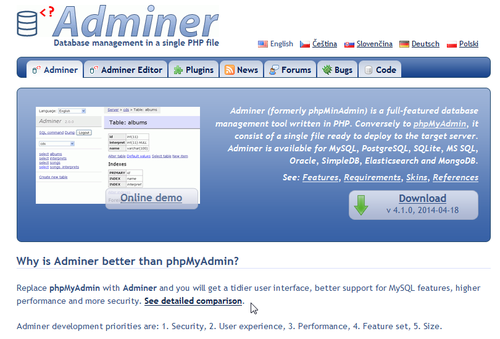
adminer 是一套和 phpMyAdmin 一樣,可以用來管理 SQL Server 的 PHP 程式,而且整個程式只需要一個檔案。
adminer 官方網站:http://www.adminer.org
[@more@]下載
http://www.adminer.org/#download

切換到網站根目錄
# cd /var/www

下載
# wget http://downloads.sourceforge.net/project/adminer/Adminer/Adminer%204.1.0/adminer-4.1.0-mysql.php

更改檔名
# mv adminer-4.1.0-mysql.php adminer.php

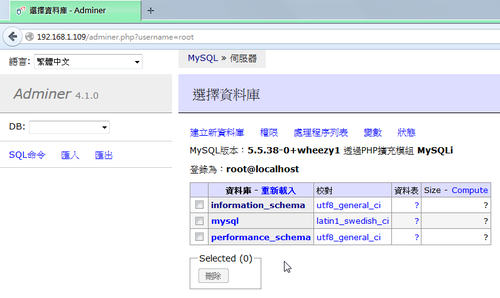
輸入 MySQL SQL Server 的管理者帳號及密碼

登入成功後就可以進行管理

MariaDB Server 調整

參考 – 新安裝 CentOS 6.5 筆記 ~ .阿欣部落. ~
在 /usr/share/mysql/ 下有幾個範例配置檔
    my-innodb-heavy-4G.cnf: 適合大於 4GB RAM 的伺服器使用。
    my-huge.cnf: 適合 1GB – 2GB RAM 的伺服器使用。
    my-large.cnf: 適合 512MB RAM 的伺服器使用。
    my-medium.cnf: 適合 64MB ~ 512 RAM 的伺服器使用。
    my-small.cnf: 適合記憶體小於 64MB的伺服器。
# ls -l /usr/share/mysql/*.cnf
-rw-r–r–. 1 root root  4920 Jun 24 22:24 /usr/share/mysql/my-huge.cnf
-rw-r–r–. 1 root root 20438 Jun 24 22:24 /usr/share/mysql/my-innodb-heavy-4G.cnf
-rw-r–r–. 1 root root  4907 Jun 24 22:24 /usr/share/mysql/my-large.cnf
-rw-r–r–. 1 root root  4920 Jun 24 22:24 /usr/share/mysql/my-medium.cnf
-rw-r–r–. 1 root root  2846 Jun 24 22:24 /usr/share/mysql/my-small.cnf

備份原檔
# mv /etc/my.cnf.d/mysql-clients.cnf /etc/my.cnf.d/mysql-clients.cnf.$(date +%F)
複製範例檔到設定目錄,Server 的 RAM 是 2G
# cp /usr/share/mysql/my-huge.cnf /etc/my.cnf.d/mysql-clients.cnf[@more@]

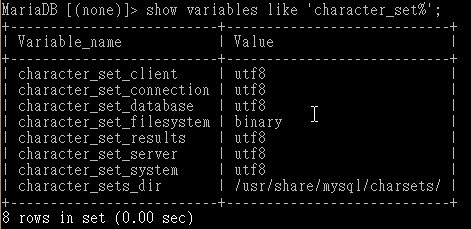
MariaDB Server UTF-8 環境設定
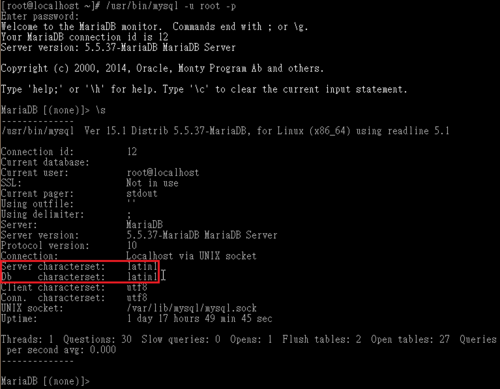
查看目前 MariaDB Server 的設定
# /usr/bin/mysql -u root -p
輸入密碼後,輸入 s
可以看到
Server characterset:    latin1
Db     characterset:    latin1

Client 端設定
# sed -i ‘/[client]/adefault-character-set=utf8’ /etc/my.cnf.d/client.cnf
Server 端設定
# sed -i ‘/[mysqld]/acharacter-set-server=utf8’ /etc/my.cnf.d/server.cnf

重新啟動 MariaDB Server
# systemctl restart mariadb

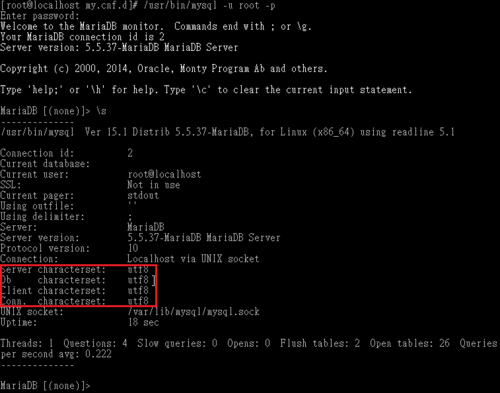
重新檢查一次
# /usr/bin/mysql -u root -p
輸入密碼後,輸入 s
可以看到
Server characterset:    utf8
Db     characterset:    utf8
Client characterset:    utf8
Conn.  characterset:    utf8


> show variables like ‘character_set%’;

在 CentOS 6.x 上安裝 MariaDB 資料庫

在安裝 Linux 時,大部分人在安裝資料庫時都會安裝 MySQL Server,而比較少安裝 PostgreSQL Server,在 Oracle 購買 MySQL 之後,有些使用者對於 Oracle 保持不信任的態度,轉而支持由 MySQL 公司原創辦人 Michael Widenius 先生另外開發了一個新的資料庫系統,就叫做 MariaDB,並且與原先的 MySQL 保持絕佳的相容性。
MariaDB 官方網站: https://mariadb.com/   https://mariadb.org/en/
[@more@]在 CentOS 6.x 下安裝方式:
1. 最好的方式是在安裝時,不安裝 MySQL 資料庫,否則移除相關套件時,會遇到一些問題,我是採用比較乾淨的方式來安裝
2. 依照官方網站上的 安裝說明 ,建立套件儲存庫,有  5.5 和 10.0 二個版本可以選擇
# vim /etc/yum.repos.d/mariadb.repo

# MariaDB 5.5 CentOS repository list - created 2014-01-10 13:53 UTC  
#
http://mariadb.org/mariadb/repositories/
[mariadb]

name = MariaDB
baseurl = http://yum.mariadb.org/5.5/centos6-amd64
gpgkey = https://yum.mariadb.org/RPM-GPG-KEY-MariaDB
gpgcheck=1


# MariaDB 10.0 CentOS repository list - created 2014-01-10 13:54 UTC
#
http://mariadb.org/mariadb/repositories/
[mariadb]

name = MariaDB
baseurl = http://yum.mariadb.org/10.0/centos6-amd64
gpgkey = https://yum.mariadb.org/RPM-GPG-KEY-MariaDB
gpgcheck=1

更新套件庫
# yum update

安裝 MariaDB
# yum -y install MariaDB-server MariaDB-client

啟動 MariaDB
# service mysql start

開機後啟動
# chkconfig –level 3 mysql on

安裝完成的設定
# /usr/bin/mysql_secure_installation
/usr/bin/mysql_secure_installation: line 379: find_mysql_client:命令找不到

NOTE: RUNNING ALL PARTS OF THIS SCRIPT IS RECOMMENDED FOR ALL MariaDB
      SERVERS IN PRODUCTION USE!  PLEASE READ EACH STEP CAREFULLY!

In order to log into MariaDB to secure it, we’ll need the current
password for the root user.  If you’ve just installed MariaDB, and
you haven’t set the root password yet, the password will be blank,
so you should just press enter here.

Enter current password for root (enter for none):
OK, successfully used password, moving on…

Setting the root password ensures that nobody can log into the MariaDB
root user without the proper authorisation.

Set root password? [Y/n]
New password:
Re-enter new password:
Password updated successfully!
Reloading privilege tables..
 … Success!

By default, a MariaDB installation has an anonymous user, allowing anyone
to log into MariaDB without having to have a user account created for
them.  This is intended only for testing, and to make the installation
go a bit smoother.  You should remove them before moving into a
production environment.

Remove anonymous users? [Y/n]
 … Success!

Normally, root should only be allowed to connect from ‘localhost’.  This
ensures that someone cannot guess at the root password from the network.

Disallow root login remotely? [Y/n]
 … Success!

By default, MariaDB comes with a database named ‘test’ that anyone can
access.  This is also intended only for testing, and should be removed
before moving into a production environment.

Remove test database and access to it? [Y/n]
 – Dropping test database…
 … Success!
 – Removing privileges on test database…
 … Success!

Reloading the privilege tables will ensure that all changes made so far
will take effect immediately.

Reload privilege tables now? [Y/n]
 … Success!

Cleaning up…

All done!  If you’ve completed all of the above steps, your MariaDB
installation should now be secure.

Thanks for using MariaDB!

ProFTPd FTP Server 使用 MySQL 虛擬帳號

ProFTPd FTP Server 除了一般系統帳號之外,也支援 MySQL / LDAP 的虛擬帳號,底下是安裝及設定

安裝 MySQL
# yum install mysql mysql-server
安裝 ProFTPd FTP Server
# yum install proftpd proftpd-mysql –enablerepo=rpmforge

建立資料庫 proftpdb
# /usr/bin/mysqladmin -u root -p create proftpdb
建立虛擬群組 virtualgrp GID 501
# groupadd -g 501 virtualgrp
建立虛擬帳號 virtualuser UID 501
# useradd -g 501 -u 501 virtualuser
[@more@]
proftpd 資料庫的 ftpuser 資料表
# cat /root/users.sql
CREATE TABLE IF NOT EXISTS `ftpuser` (
  `id` int(10) unsigned NOT NULL AUTO_INCREMENT,
  `userid` varchar(32) COLLATE utf8_general_ci NOT NULL DEFAULT ”,
  `passwd` varchar(32) COLLATE utf8_general_ci NOT NULL DEFAULT ”,
  `uid` smallint(6) NOT NULL DEFAULT ‘501’,
  `gid` smallint(6) NOT NULL DEFAULT ‘501’,
  `homedir` varchar(255) COLLATE utf8_general_ci NOT NULL DEFAULT ”,
  `shell` varchar(16) COLLATE utf8_general_ci NOT NULL DEFAULT ‘/sbin/nologin’,
  PRIMARY KEY (`id`),
  UNIQUE KEY `userid` (`userid`)
) ENGINE=MyISAM  DEFAULT CHARSET=utf8 COLLATE=utf8_general_ci COMMENT=’ProFTP user table’;
insert into ftpuser values (‘1′,’s0990001’,encrypt(‘123456′),’501′,’501′,’/home/virtualuser/s0990001′,’/sbin/nologin’);
insert into ftpuser values (‘2′,’s0990002’,encrypt(‘123456′),’501′,’501′,’/home/virtualuser/s0990002′,’/sbin/nologin’);

proftpd 資料庫的 ftpgroup 資料表
# cat /root/groups.sql
CREATE TABLE IF NOT EXISTS `ftpgroup` (
  `groupname` varchar(16) COLLATE utf8_general_ci NOT NULL,
  `gid` smallint(6) NOT NULL DEFAULT ‘5500’,
  `members` varchar(16) COLLATE utf8_general_ci NOT NULL,
  KEY `groupname` (`groupname`)
) ENGINE=MyISAM DEFAULT CHARSET=utf8 COLLATE=utf8_general_ci COMMENT=’ProFTP group table’;
insert into ftpgroup values (‘virtualgrp’,’501′,’s0990001′);
insert into ftpgroup values (‘virtualgrp’,’501′,’s0990002′);

匯入資料表 ftpuser
# /usr/bin/mysql -u root -p proftpdb < /root/users.sql
匯入資料表 ftpgroup
# /usr/bin/mysql -u root -p proftpdb < /root/groups.sql
指定 proftpdb 的管理 proftpd 密碼是 proftpdpass
# /usr/bin/mysql -u root -p -e “GRANT ALL PRIVILEGES ON proftpdb.* TO ‘proftpd’@’localhost’ IDENTIFIED BY ‘proftpdpass’;”

修改 ProFTPd FTP Server 設定檔 /etc/proftpd.conf
# vim /etc/proftpd.conf

AuthOrder                       mod_sql.c

<IfModule mod_dso.c>
   LoadModule mod_sql.c
   LoadModule mod_sql_mysql.c
#   LoadModule mod_sql_postgres.c
</IfModule>

  <IfModule mod_sql.c>

    # We need our “default” connection to the userdb database
    SQLConnectInfo proftpdb@localhost proftpd proftpdpass
    SQLBackend mysql
    SQLAuthTypes Backend Plaintext Crypt

    SQLAuthenticate on
    SQLMinUserUID 500
    SQLMinUserGID 500
    RequireValidShell off
    CreateHome on

    # Point mod_sql at our users/groups tables
    SQLUserInfo ftpuser userid passwd uid gid homedir shell
    SQLGroupInfo ftpgroup groupname gid members

  </IfModule>

測試設定檔語法是否正確
# proftpd -t
Checking syntax of configuration file
Syntax check complete.

重新啟動 ProFTPd FTP Server
# service proftpd restart
正在關閉 proftpd:                                         [  確定  ]
正在啟動 proftpd:                                         [  確定  ]

進行測試
# lftp -u s0990001 192.168.1.20
密碼:
lftp s0990001@192.168.1.20:~> ls
lftp s0990001@192.168.1.20:/>

在 Log 檔也可以看到相關記錄
# tail -f /var/log/proftpd/proftpd.log
Jan 04 13:35:15 . proftpd[3875] 192.168.1.20 (192.168.1.20[192.168.1.20]): FTP session opened.
Jan 04 05:35:15 . proftpd[3875] 192.168.1.20 (192.168.1.20[192.168.1.20]): Preparing to chroot to directory ‘/home/virtualuser/s0990001’
Jan 04 05:35:15 . proftpd[3875] 192.168.1.20 (192.168.1.20[192.168.1.20]): USER s0990001: Login successful.
Jan 04 05:35:25 . proftpd[3875] 192.168.1.20 (192.168.1.20[192.168.1.20]): FTP session closed.

虛擬使用者的目錄也會自行建立
# ls -ld /home/virtualuser/*
drwx—— 2 virtualuser virtualgrp 4096 2014-01-04 13:33 /home/virtualuser/s0990001
drwx—— 2 virtualuser virtualgrp 4096 2014-01-04 13:35 /home/virtualuser/s0990002