更新 Mirror CentOS altarch i386 / arm /aarch 套件庫來源

因為原先 Mirror 的站台似乎已經不在了,所以改用其台的站台。
# du -hs /var/ftp/Linux/CentOS/altarch/
106G    /var/ftp/Linux/CentOS/altarch/

目前仍持續更新中[@more@]替換成頭城國小的套件庫來源

修改套件庫來源
1. 備份原檔
# cp /etc/yum.repos.d/CentOS-Base.repo /etc/yum.repos.d/CentOS-Base.repo.$(date +%F)

2. 修改 CentOS-Base.repo
# sed -i ‘s|^baseurl=http://mirror.centos.org/altarch|baseurl=ftp://140.111.74.109/Linux/CentOS/altarch|’ /etc/yum.repos.d/CentOS-Base.repo

3. 清除舊有及更新
# yum clean all;yum update

修改 CentOS i386/arm 套件庫來源

因為有更新的需求,所以自行在學校 mirror 一份。
# du -hs /var/ftp/Linux/CentOS
97G     /var/ftp/Linux/CentOS

修改套件庫來源
1. 備份原檔
# cp /etc/yum.repos.d/CentOS-Base.repo /etc/yum.repos.d/CentOS-Base.repo.$(date +%F)[@more@]2. 修改 CentOS-Base.repo
# sed -i ‘s|^baseurl=http://mirror.centos.org/altarch|baseurl=ftp://140.111.74.109/Linux/CentOS/altarch|’ /etc/yum.repos.d/CentOS-Base.repo

3. 清除舊有及更新
# yum clean all;yum update

讓 Cacti 能正常顯示中文

OS:Debian 8.0 jessie
cacti:0.8.8b
安裝完 cacti 之後發現無法呈現中文,輸入中文之後,都會變成 ??

在網路上搜尋了一下,找到下面的文章:
在 Cacti 中顯示中文 | .K.T.’s Blog
電腦中心 | 讓cacti的圖正常出現中文[@more@]底下是設定的步驟:
1. 修改 /usr/share/cacti/site/lib/functions.php
# vim /usr/share/cacti/site/lib/functions.php
在 <?php 下方加入下面一行
setlocale(LC_CTYPE,”zh_TW.UTF-8″);

2. 安裝中文字形
# apt-get install ttf-wqy-microhei ttf-wqy-zenhei fonts-arphic-bkai00mp fonts-arphic-bsmi00lp

3. 加入字型的支援
# /usr/bin/fc-cache -v -f

做了以上的設定還是不行

4. 檢查 MySQL Server 的編碼設定
# /usr/bin/mysql -u root -p
Enter password:
Welcome to the MySQL monitor.  Commands end with ; or g.
Your MySQL connection id is 124
Server version: 5.5.44-0+deb8u1 (Raspbian)

Copyright (c) 2000, 2015, Oracle and/or its affiliates. All rights reserved.

Oracle is a registered trademark of Oracle Corporation and/or its
affiliates. Other names may be trademarks of their respective
owners.

Type ‘help;’ or ‘h’ for help. Type ‘c’ to clear the current input statement.

mysql> show variables like ‘char%’;

如果發現有 latin1,代表資料庫編碼要做設定

5. 修改 MySQL Server 設定,加入以下的設定
# vim /etc/mysql/my.cnf
[client]
default-character-set=utf8

[mysqld]
character-set-server=utf8
collation-server=utf8_general_ci
init-connect=’SET NAMES utf8′

[mysql]
default-character-set=utf8

6. 重新啟動 MySQL Server
# systemctl restart mysql

7. 重新檢查 MySQL Server 資料庫編碼
# /usr/bin/mysql -u root -p
Enter password:
Welcome to the MySQL monitor.  Commands end with ; or g.
Your MySQL connection id is 124
Server version: 5.5.44-0+deb8u1 (Raspbian)

Copyright (c) 2000, 2015, Oracle and/or its affiliates. All rights reserved.

Oracle is a registered trademark of Oracle Corporation and/or its
affiliates. Other names may be trademarks of their respective
owners.

Type ‘help;’ or ‘h’ for help. Type ‘c’ to clear the current input statement.

mysql> show variables like ‘char%’;

8. 匯出原 cacti 資料庫
# /usr/bin/mysqldump -u root -p cacti > /root/cacti.sql –default-character-set=latin1

9. 將匯出檔案的 latin1 全部改成 utf8
# sed -i ‘s/latin1/utf8/’ /root/cacti.sql

10. 重新匯入
# /usr/bin/mysql -u root -p /root/cacti < cacti.sql –default-character-set=utf8

終於可以正常顯示中文了!

CentOS 7 arm 版本

在使用 Raspberry Pi / Banana Pi / CubieTurck 這些控制板時,覺得比較困擾的是,它支援的 Linux 大部分都是 Arch Linux / Debian / Ubuntu …等等,個人比較習慣的 CentOS 卻一直沒有釋出相對的版本。終於在 2015 年末 、2016 年初時,盼到了 CentOS 支援的版本。
CentOS 7 arm 版本下載路徑:
http://mirror.centos.org/altarch/7.2.1511/isos/armhfp/

看檔案名稱,似乎有支援的是 BananaPi / CubieTruck / Raspberry Pi 2

更詳細的介紹可以參考下列網站:
Raspberry Pi 的基礎 – 安裝 CentOS 7 for ARM ~ IT 技術家
CentOS 7 AMR版正式發布:支持樹莓派2/香蕉派/CubieTruck - 今日頭條

目前手上還有一塊閒置的 Banana Pi,有空的話再來仔細測試看看!

修改 Raspberry Pi Raspbian Jessie Lite 套件庫來源

Raspberry Pi Raspbian 套件庫的更新來源,是系統自動幫我們依回應速度決定要連線的鏡像站,有時候會連線到國外去,速度有些緩慢,這時如果直接指定國內的網站來源,速度會快一些。
本篇文章參考:Raspberry Pi 的基礎 – 系統設定的調教 ~ IT 技術家
1. 備份原設定檔
# cp /etc/apt/sources.list /etc/apt/sources.list.$(date +%F)[@more@]2. 修改套件庫來源
改成國家高速網路中心
# sed -i ‘s”http://mirrordirector.raspbian.org/raspbian/”http://free.nchc.org.tw/raspbian/raspbian/”‘ /etc/apt/sources.list
或 元智大學
# sed -i ‘s”http://mirrordirector.raspbian.org/raspbian/”http://ftp.cse.yzu.edu.tw/raspbian/raspbian/”‘ /etc/apt/sources.list

3. 清除原有的 Cache
# apt-get clean all

4. 更新套件庫來源
# apt-get update
Hit http://archive.raspberrypi.org jessie InRelease
Hit http://archive.raspberrypi.org jessie/main armhf Packages
Hit http://archive.raspberrypi.org jessie/ui armhf Packages
Ign http://archive.raspberrypi.org jessie/main Translation-en_GB
Ign http://archive.raspberrypi.org jessie/main Translation-en
Ign http://archive.raspberrypi.org jessie/ui Translation-en_GB
Ign http://archive.raspberrypi.org jessie/ui Translation-en
Get:1 http://free.nchc.org.tw jessie InRelease [15.0 kB]
Get:2 http://free.nchc.org.tw jessie/main armhf Packages [8,962 kB]
Get:3 http://free.nchc.org.tw jessie/contrib armhf Packages [37.5 kB]
Get:4 http://free.nchc.org.tw jessie/non-free armhf Packages [70.2 kB]
Get:5 http://free.nchc.org.tw jessie/rpi armhf Packages [1,356 B]
Ign http://free.nchc.org.tw jessie/contrib Translation-en_GB
Ign http://free.nchc.org.tw jessie/contrib Translation-en
Ign http://free.nchc.org.tw jessie/main Translation-en_GB
Ign http://free.nchc.org.tw jessie/main Translation-en
Ign http://free.nchc.org.tw jessie/non-free Translation-en_GB
Ign http://free.nchc.org.tw jessie/non-free Translation-en
Ign http://free.nchc.org.tw jessie/rpi Translation-en_GB
Ign http://free.nchc.org.tw jessie/rpi Translation-en
Fetched 9,086 kB in 2min 38s (57.5 kB/s)
Reading package lists… Done

解決 Raspberry Pi Raspbian Jessie Lite 多一個 IP 的問題

使用 Raspberry Pi Raspbian Jessie Lite 架設一個網路監控系統,但很奇怪的是設定好固定 IP 後,系統好像會自動出多一個 IP。
使用 ip 指令可以查詢到 2 個 IP
# ip addr show eth0 | grep ‘inet’ | grep -v ‘inet6’ | awk ‘{print $2}’
192.168.1.74/24
192.168.1.82/24

使用 ifconfig 指令只能查詢一個 IP
# ifconfig eth0 | grep ‘inet addr’ | awk ‘{print $2}’ | awk -F’:’ ‘{print $2}’
192.168.1.74[@more@]可是在 /etc/network/interfaces 只設定了一個 IP
# cat /etc/network/interfaces
iface eth0 inet static
        address 192.168.1.74
        netmask 255.255.255.0
        gateway 192.168.1.254
        dns-nameservers 168.95.1.1

解決方式:
1. 關閉 dhcpcd 服務
# systemctl stop dhcpcd.service

2. 取消開機時啟動 dhcpcd 服務
# systemctl disable dhcpcd.service
Synchronizing state for dhcpcd.service with sysvinit using update-rc.d…
Executing /usr/sbin/update-rc.d dhcpcd defaults
insserv: warning: current start runlevel(s) (empty) of script `dhcpcd’ overrides LSB defaults (2 3 4 5).
insserv: warning: current stop runlevel(s) (0 1 2 3 4 5 6) of script `dhcpcd’ overrides LSB defaults (0 1 6).

Executing /usr/sbin/update-rc.d dhcpcd disable
insserv: warning: current start runlevel(s) (empty) of script `dhcpcd’ overrides LSB defaults (2 3 4 5).
insserv: warning: current stop runlevel(s) (0 1 2 3 4 5 6) of script `dhcpcd’ overrides LSB defaults (0 1 6).

3. 重新啟啟動電腦
# sysnc;sync;reboot

Raspberry Pi – 在 Arch linux 改變記憶體的配置

參考文章:Cortex-A/M: Raspberry Pi: changing the memory split on Arch linux

# grep gpu_mem /boot/config.txt
gpu_mem_512=64
gpu_mem_256=64

gpu_mem_512 是指 512MB 的 Raspberry Pi
gpu_mem_256 提指 256MB 的 Raspberry Pi

gpu_mem_512 最小設定 16MB,最大到 448MB
gpu_mem_256 最小設定 16MB,最大到 192MB

如果是使用圖形介面,可以把數字設大,如果是文字介面,可以把數字設小

修改完畢後,重新啟動電腦,讓設定生效!
# reboot

Raspberry Pi 測試 – ArchLinux 篇 安裝 fail2ban

在 ArchLinux 安裝 fail2ban
# pacman -S fail2ban

但安裝好了之後,在 /var/log 目錄下卻一直找不到相關的 log 檔,後來才又安裝了 syslog-ng 解決了這個問題!
ArchLinux 的系統 ssh log 檔

修改設定檔,加入對 ssh 的攻擊防護,因為根據自己架設的 Server,大部分都是嘗試對 ssh 的錯誤連線,而 ftp 的部分幾乎都沒有。
Chain fail2ban-ssh (1 references)
target     prot opt source               destination
DROP       all  —  61.174.51.232        0.0.0.0/0
DROP       all  —  61.174.51.235        0.0.0.0/0
DROP       all  —  122.225.109.217      0.0.0.0/0
DROP       all  —  218.2.0.123          0.0.0.0/0
RETURN     all  —  0.0.0.0/0            0.0.0.0/0

Chain fail2ban-vsftpd (1 references)
target     prot opt source               destination
RETURN     all  —  0.0.0.0/0            0.0.0.0/0[@more@]# vim /etc/fail2ban/jail.conf
修改並加入下面的設定
[sshd]
enabled = true
port    = ssh
logpath = /var/log/ssh.log
#logpath = %(sshd_log)s
maxretry = 3
bantime  = 86400

重新啟動 fail2ban
# systemctl start fail2ban

設定開機時啟動
# systemctl enable fail2ban

檢查 fail2ban 的狀態
# fail2ban-client status
Status
|- Number of jail:      1
`- Jail list:   sshd

以 Client  IP 192.168.1.10 嘗試對 Server IP 192.168.1.106 嘗試連線錯誤幾次之後
列出 fail2ban 偵測到的 SSH 攻擊
# fail2ban-client status sshd
Status for the jail: sshd
|- Filter
|  |- Currently failed: 0
|  |- Total failed:     3
|  `- File list:        /var/log/ssh.log
`- Actions
   |- Currently banned: 1
   |- Total banned:     1
   `- Banned IP list:   192.168.1.10

列出 f2b-sshd 的規則
# iptables -t filter -L f2b-sshd -n
Chain f2b-sshd (1 references)
target     prot opt source               destination
REJECT     all  —  192.168.1.10         0.0.0.0/0            reject-with icmp-port-unreachable
RETURN     all  —  0.0.0.0/0            0.0.0.0/0

刪除防火牆規則
# iptables -D f2b-sshd  -s 192.168.1.10 -j REJECT

Raspberry Pi 測試 – 成為 WiFi AP

參考網站:
Download Arch Linux Raspberry Pi WiFi Access Point Image – Hayden James
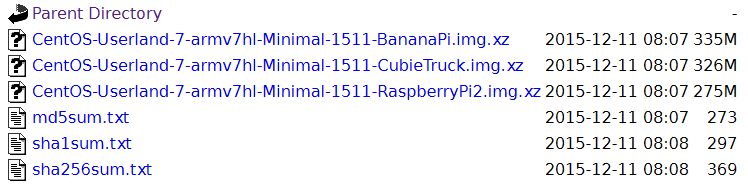
下載網站:
https://sourceforge.net/projects/archwipi/files/latest/download

預設登入帳號及密碼:root / archwipi

請更改密碼
# passwd
Enter new UNIX password:
Retype new UNIX password:
passwd: password updated successfully
[@more@]
更換成台灣的 Server
# sed -i ‘s/^Server/#Server/’ /etc/pacman.d/mirrorlist
# sed -i ’53s/# Server/Server/g’ /etc/pacman.d/mirrorlist

更新套件庫
#
pacman -Syy
:: Synchronizing package databases…
 core                                        159.0 KiB  3.11M/s 00:00 [######################################] 100%
 extra                                         2.2 MiB  4.62M/s 00:00 [######################################] 100%
 community                                     2.4 MiB  5.11M/s 00:00 [######################################] 100%
 alarm                                        29.0 KiB  14.1M/s 00:00 [######################################] 100%
 aur                                          61.7 KiB  15.1M/s 00:00 [######################################] 100%

安裝所需套件
# pacman -S pssh vim mlocate dnsutils

設定時區
# date
Sun Sep 28 09:13:30 MDT 2014
# ls -l /etc/localtime
lrwxrwxrwx 1 root root 34 Aug 13  2013 /etc/localtime -> /usr/share/zoneinfo/America/Denver

刪除舊有設定
# rm -rf /etc/localtime

連結到 Asis/Taipei
# ln -s /usr/share/zoneinfo/Asia/Taipei /etc/localtime

# timedatectl set-timezone Asia/Taipei
# date
Sun Sep 28 23:16:19 CST 2014

設定中文化環境,加入 en_US.UTF-8 和 zh-TW.UTF-8
# sed -i ‘s/#en_US.UTF-8/en_US.UTF-8/’ /etc/locale.gen
# sed -i ‘s/#zh_TW.UTF-8/zh_TW.UTF-8/’ /etc/locale.gen

產生 locale.gen 內指定的語系
locale-gen
Generating locales…
  en_US.UTF-8
  zh_TW.UTF-8
Generation complete.

設定預設語系
# echo ‘LANG=”en_US.UTF-8″‘ > /etc/locale.conf

檢視設定
# grep -v ^# /etc/locale.gen
en_US.UTF-8 UTF-8
zh_TW.UTF-8 UTF-8

更新已安裝程式
# pacman -Syu

超頻
# vim /boot/config.txt
#Custom overclocking: http://haydenjames.io/raspberry-pi-safe-overclocking-settings/

##Overclock – Option 1: Low freq minimum & no over voltage (keeps Pi cool 24/7!)
arm_freq=800
arm_freq_min=600
core_freq=300
sdram_freq=500
boot_delay=0
disable_splash=1

##Overclock Option – 2: High freq maximums & over voltage (usually runs under 60C)
#arm_freq=1000
#core_freq=500
#sdram_freq=500
#over_voltage=6
#boot_delay=0
#disable_splash=1

##The lowest gpu_mem setting of 16MB (NoGUI)
gpu_mem=16

改成
#Custom overclocking: http://haydenjames.io/raspberry-pi-safe-overclocking-settings/

##Overclock – Option 1: Low freq minimum & no over voltage (keeps Pi cool 24/7!)
#arm_freq=800
#arm_freq_min=600
#core_freq=300
#sdram_freq=500
#boot_delay=0
#disable_splash=1

##Overclock Option – 2: High freq maximums & over voltage (usually runs under 60C)
arm_freq=1000
core_freq=500
sdram_freq=500
over_voltage=6
boot_delay=0
disable_splash=1

##The lowest gpu_mem setting of 16MB (NoGUI)
gpu_mem=16

重新啟動電腦
# systemctl reboot

無線網路 SSID及密碼:ArchWiPi / 1010101010

更改無線網路密碼
# vim /usr/lib/systemd/system/create_ap.service
[Unit]
Description=Create AP Service

[Service]
Type=simple
ExecStart=/usr/bin/bash create_ap wlan0 eth0 ArchWiPi 1010101010
KillSignal=SIGINT
Restart=on-failure
RestartSec=5

[Install]
WantedBy=multi-user.target

檢查 CPU 速度和溫度,可以執行
# cd /root;./bcmstat.sh

使用瀏覽器來觀看:http://192.168.12.1:8080/archwipi

 (powered by Monitorix)

系統開啟的服務
# netstat -antulp
Active Internet connections (servers and established)
Proto Recv-Q Send-Q Local Address           Foreign Address         State       PID/Program name
tcp        0      0 0.0.0.0:8080            0.0.0.0:*               LISTEN      344/monitorix-httpd
tcp        0      0 127.0.0.1:53            0.0.0.0:*               LISTEN      342/dnsmasq
tcp        0      0 192.168.12.1:53         0.0.0.0:*               LISTEN      342/dnsmasq
tcp        0      0 0.0.0.0:22              0.0.0.0:*               LISTEN      119/dropbear
udp        0      0 0.0.0.0:5353            0.0.0.0:*                           136/avahi-daemon: r
udp        0      0 127.0.0.1:53            0.0.0.0:*                           342/dnsmasq
udp        0      0 192.168.12.1:53         0.0.0.0:*                           342/dnsmasq
udp        0      0 0.0.0.0:67              0.0.0.0:*                           342/dnsmasq
udp        0      0 0.0.0.0:68              0.0.0.0:*                           384/dhcpcd
udp        0      0 0.0.0.0:40054           0.0.0.0:*                           136/avahi-daemon: r