解決在 Windows 8.1 DRBL-winroll 無法自動更改主機名稱的問題

偶然發現在 Windows 8.1 安裝完 DRBL-winroll 後,主機名稱不會自動更改。
[@more@]解決的方式:參考:Google 網上論壇
1. 切換到 C:cygwindrbl_winroll-config 目錄,並修改 hosts.confwinroll.conf

2. 修改 hosts.conf

3. 修改 winroll.conf
    把原先設定檔中的
    HN_WSNAME_PARAM = /RDF:C:cygwindrbl_winroll-confighosts.conf /DFK:$MAC
    改成
    HN_WSNAME_PARAM = /RDF:C:cygwindrbl_winroll-confighosts.conf /DFK:$IP

4. 重新啟動電腦後,可以發現電腦主機名稱已經可以自動更改了!

Acer M480 Windows 8.1 網路喚醒

電腦教室本來是以 Windows 7 和 Ezgo 為主,這次加上 Windows 8.1,網路喚醒的部分也要重新做設定。
設定的方式和 Windows 7 大致相同,只針對不同的地方做說明。
1. 在 電腦管理 頁面,取消 允許電腦關閉這個裝置以節省電源(A),但要 勾選下面二個選項
    不過,我重新開機之後,發現 允許這個裝置喚醒電腦的選項會取消勾選
     所以這個步驟我後來就沒有做
[@more@]2. 選擇 開始設定(S)控制台(C)

3. 選擇 電源選項

4. 選擇 選擇按下電源按鈕時的行為

5. 選擇 變更目前無法使用的設定

6. 取消勾選 開啟快速啟動(建議選項),最後按 儲存變更

不過設定完之後,試過各種網路喚醒的方式都無法喚醒,不知道是什麼原因?

Acer M480 Windows 7 網路喚醒

因為整個電腦教室重新安裝,所以之前的設定全部都清除掉了!
底下是設定步驟:
1. 在桌面上的 電腦,按滑鼠右鍵,選擇 內容
[@more@]2.  選擇 網路卡介面

3. 按滑鼠右鍵,選擇 內容

4.  選擇 進階 頁面

5. 選擇 從關閉狀態喚醒,再選擇 開啟

6. 選擇 喚醒功能,再選擇 Magic Packet 喚醒模式

或選擇 MP和PM喚醒模式,二者試過都可以

7. 選擇 電源管理 頁面

8. 取消 允許電腦關閉這個裝置以節省電源(A),最後按 確定

Wake-on-LAN Client on Linux

關於 Wake-on-LAN 網路喚醒的介紹,可以參考:網路喚醒 – 維基百科,自由的百科全書

在 Ubuntu 14.04 LTS Server 上安裝
$ sudo apt-get install wakeonlan

在 CentOS 6.x 上安裝
# yum install wol –enablerepo=epel

# yum install net-tools[@more@]使用方式:
在 Ubuntu 14.04 LTS Server
$ sudo wakeonlan 00:11:22:33:44:55

在 CentOS 6.x
# wol 00:11:22:33:44:55

# ether-wake -i eth1 00:11:22:33:44:55

利用 arp-scan 來查詢區域網路的 IP 和 Mac address

在 Ubuntu 14.04 LTS Server 上安裝 arp-scan 工具
# apt-get install arp-scan

在 CentOS 6.x 上安裝
# yum install arp-scan –enablerepo=epel

利用 arp-scan 進行偵測
# arp-scan –localnet
Interface: eth0, datalink type: EN10MB (Ethernet)
Starting arp-scan 1.8.1 with 256 hosts (http://www.nta-monitor.com/tools/arp-scan/)
192.168.1.2     ac:22:0b:50:49:ea       (Unknown)
192.168.1.5     00:1d:7d:c5:2f:d3       GIGA-BYTE TECHNOLOGY CO.,LTD.
192.168.1.100   00:11:23:0c:da:e2       Synology Incorporated
192.168.1.101   28:cf:e9:80:0c:76       (Unknown)
192.168.1.112   00:0c:29:ac:47:64       VMware, Inc.
192.168.1.254   50:67:fa:19:cf:a4       ZyXEL Communications Corporation

9 packets received by filter, 0 packets dropped by kernel
Ending arp-scan 1.8.1: 256 hosts scanned in 2.316 seconds (110.54 hosts/sec). 7 responded[@more@]利用 sed / egrep 來過濾一些不要的資料,和使用 awk 來取得所要的資料
# arp-scan –localnet | sed -n ‘/Starting/,/^$/p’ | egrep -v ‘(Starting|^$)’ | awk ‘{print $1,$2}’
192.168.1.2 ac:22:0b:50:49:ea
192.168.1.5 00:1d:7d:c5:2f:d3
192.168.1.100 00:11:23:0c:da:e2
192.168.1.101 28:cf:e9:80:0c:76
192.168.1.112 00:0c:29:ac:47:64
192.168.1.254 50:67:fa:19:cf:a4

Windows 版本的 putty 工具程式

如果不習慣在 Linux 下操作 putty-tools 工具,也可以使用 Windows 的版本。

下載網頁:http://www.chiark.greenend.org.uk/~sgtatham/putty/download.html[@more@]這裡我只下載 PSCP 和 Plink 這二個程式
使用的參數應該與 Linux 版本相同

1. 連線到遠端的 Windows 主機
d:>plink.exe -l Administrator -pw 123456 192.168.1.112

2. 關閉遠端 Windows 主機
d:>echo y | plink.exe -l Administrator -pw 123456 192.168.1.112 “shutdown -s -t 0”

3. 遠端 Windows 主機重新啟動
d:>echo y | plink.exe -l Administrator -pw 123456 192.168.1.112 “shutdown -r -t 0”

4. 自動安裝遠端 Windows 主機 Administrator 使用者桌面上的 PotPlayer
d:>echo y | plink -pw 123456 Administrator@192.168.1.112 “/cygdrive/c/Users/Administrator/Desktop/PotPlayerSetup64.exe /S”

5. 複製檔案到遠端 Windows 主機 Administrator 使用者桌面上
d:>echo -y | pscp -pw 123456  PotPlayerSetup64.exe Administrator@192.168.1.112:/cygdrive/c/Users/Administrator/Desktop

不過使用 plink 連線到遠端 Windows 主機時,會有一些奇怪的控制碼顯示在上面,雖然不影響連線,但看起來總是有些礙眼

使用 putty-tools 工具中的 pscp 來管理電腦教室

pscp 可以將檔案複製到 Windows 的主機,功能類似 Linux  的 scp。
pscp 使用參數
# /usr/bin/pscp
PuTTY Secure Copy client
Unidentified build, Mar 14 2015 13:36:11
Usage: pscp [options] [user@]host:source target
       pscp [options] source [source…] [user@]host:target
       pscp [options] -ls [user@]host:filespec
Options:
  -V        print version information and exit
  -pgpfp    print PGP key fingerprints and exit
  -p        preserve file attributes
  -q        quiet, don’t show statistics
  -r        copy directories recursively
  -v        show verbose messages
  -load sessname  Load settings from saved session
  -P port   connect to specified port
  -l user   connect with specified username
  -pw passw login with specified password
  -1 -2     force use of particular SSH protocol version
  -4 -6     force use of IPv4 or IPv6
  -C        enable compression
  -i key    private key file for authentication
  -noagent  disable use of Pageant
  -agent    enable use of Pageant
  -batch    disable all interactive prompts
  -unsafe   allow server-side wildcards (DANGEROUS)
  -sftp     force use of SFTP protocol
  -scp      force use of SCP protocol[@more@]常用的參數
  -q        quiet, don’t show statistics  安靜模式
  -r        copy directories recursively  遞迴模式,複製時包含子目錄
  -l user   connect with specified username  登入的使用者
  -pw passw login with specified password   使用者的密碼

底下列出幾個實例
將 PotPlayerSetup64.exe 檔案複製到 Administrator 使用者的桌面
# echo -y | pscp -pw 123456  PotPlayerSetup64.exe Administrator@192.168.1.112:/cygdrive/c/Users/Administrator/Desktop

不顯示檔案傳輸時的訊息
# echo -y | pscp -pw 123456  -q CentOS-Server-6.5-x86_64_20140917.iso Administrator@192.168.1.112:/cygdrive/c/Users/Administrator/Desktop

複製時包含子目錄
# echo -y | pscp -pw 123456 -r noip-2.1.9-1 Administrator@192.168.1.112:/cygdrive/c/Users/Administrator/Desktop
noip2                     | 70 kB |  71.0 kB/s | ETA: 00:00:00 | 100%
._redhat.noip.sh          | 0 kB |   0.2 kB/s | ETA: 00:00:00 | 100%
redhat.noip.sh            | 1 kB |   1.2 kB/s | ETA: 00:00:00 | 100%
noip2.c                   | 75 kB |  75.1 kB/s | ETA: 00:00:00 | 100%
Makefile                  | 0 kB |   1.0 kB/s | ETA: 00:00:00 | 100%
mac.osx.startup           | 1 kB |   1.2 kB/s | ETA: 00:00:00 | 100%
README.FIRST_PT           | 14 kB |  14.3 kB/s | ETA: 00:00:00 | 100%
debian.noip2.sh           | 0 kB |   0.9 kB/s | ETA: 00:00:00 | 100%
README.FIRST.pt_BR        | 12 kB |  12.2 kB/s | ETA: 00:00:00 | 100%
._mac.osx.startup         | 0 kB |   0.2 kB/s | ETA: 00:00:00 | 100%
LIESMICH.ERST.deutsch     | 14 kB |  14.1 kB/s | ETA: 00:00:00 | 100%
._debian.noip2.sh         | 0 kB |   0.2 kB/s | ETA: 00:00:00 | 100%
._README.FIRST.FRANCAIS   | 0 kB |   0.2 kB/s | ETA: 00:00:00 | 100%
._COPYING                 | 0 kB |   0.2 kB/s | ETA: 00:00:00 | 100%
._README.FIRST.ITALIANO   | 0 kB |   0.2 kB/s | ETA: 00:00:00 | 100%
._Makefile                | 0 kB |   0.2 kB/s | ETA: 00:00:00 | 100%
._noip2.c                 | 0 kB |   0.2 kB/s | ETA: 00:00:00 | 100%
LISEZMOI.ENPREMIER        | 13 kB |  13.3 kB/s | ETA: 00:00:00 | 100%
README.FIRST.JAPANESE     | 15 kB |  15.3 kB/s | ETA: 00:00:00 | 100%
README.FIRST.FRANCAIS     | 13 kB |  13.1 kB/s | ETA: 00:00:00 | 100%
COPYING                   | 17 kB |  17.7 kB/s | ETA: 00:00:00 | 100%
gentoo.noip2.sh           | 0 kB |   0.5 kB/s | ETA: 00:00:00 | 100%
README.FIRST-SWE          | 12 kB |  12.9 kB/s | ETA: 00:00:00 | 100%
._README.FIRST            | 0 kB |   0.2 kB/s | ETA: 00:00:00 | 100%
._noip2-i686              | 0 kB |   0.2 kB/s | ETA: 00:00:00 | 100%
._noip2-x86_64            | 0 kB |   0.2 kB/s | ETA: 00:00:00 | 100%
._gentoo.noip2.sh         | 0 kB |   0.2 kB/s | ETA: 00:00:00 | 100%
._binaries                | 0 kB |   0.2 kB/s | ETA: 00:00:00 | 100%
README.FIRST.ITALIANO     | 14 kB |  14.1 kB/s | ETA: 00:00:00 | 100%
._README.FIRST.JAPANESE   | 0 kB |   0.2 kB/s | ETA: 00:00:00 | 100%
._README.FIRST.pt_BR      | 0 kB |   0.2 kB/s | ETA: 00:00:00 | 100%
._README.FIRST_PT         | 0 kB |   0.2 kB/s | ETA: 00:00:00 | 100%
._README.FIRST-SWE        | 0 kB |   0.2 kB/s | ETA: 00:00:00 | 100%
README.FIRST              | 12 kB |  12.5 kB/s | ETA: 00:00:00 | 100%
._LISEZMOI.ENPREMIER      | 0 kB |   0.2 kB/s | ETA: 00:00:00 | 100%
._LIESMICH.ERST.deutsch   | 0 kB |   0.2 kB/s | ETA: 00:00:00 | 100%
._LEEME.PRIMERO           | 0 kB |   0.2 kB/s | ETA: 00:00:00 | 100%
LEEME.PRIMERO             | 13 kB |  13.5 kB/s | ETA: 00:00:00 | 100%

同樣的,搭配 Script 也可以複製給電腦教室全部的電腦。

使用 putty-tools 工具中的 plink 來管理電腦教室

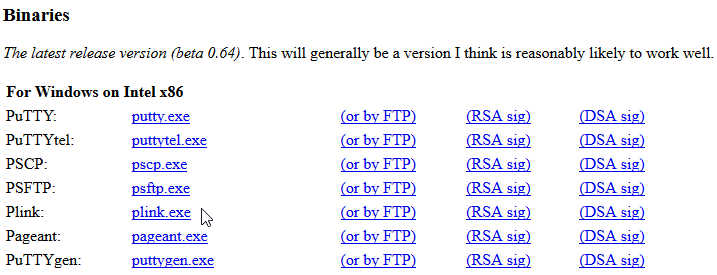
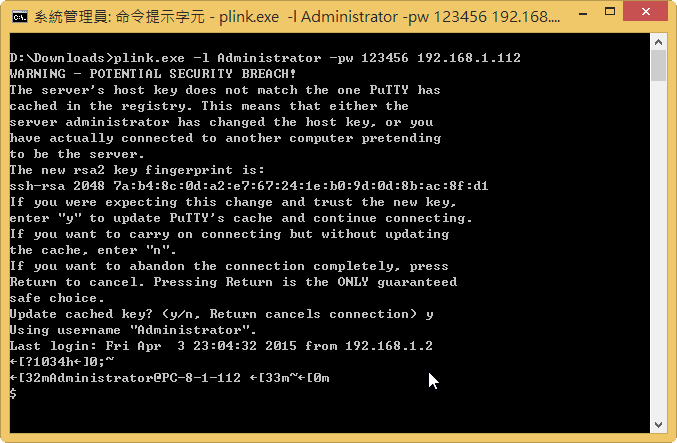
plink 是一個可以用來遠端連線管理主機的程式。
plink 使用參數
# /usr/bin/plink
PuTTY Link: command-line connection utility
Unidentified build, Mar 14 2015 13:36:11
Usage: plink [options] [user@]host [command]
       (“host” can also be a PuTTY saved session name)
Options:
  -V        print version information and exit
  -pgpfp    print PGP key fingerprints and exit
  -v        show verbose messages
  -load sessname  Load settings from saved session
  -ssh -telnet -rlogin -raw -serial
            force use of a particular protocol
  -P port   connect to specified port
  -l user   connect with specified username
  -batch    disable all interactive prompts
The following options only apply to SSH connections:
  -pw passw login with specified password
  -D [listen-IP:]listen-port
            Dynamic SOCKS-based port forwarding
  -L [listen-IP:]listen-port:host:port
            Forward local port to remote address
  -R [listen-IP:]listen-port:host:port
            Forward remote port to local address
  -X -x     enable / disable X11 forwarding
  -A -a     enable / disable agent forwarding
  -t -T     enable / disable pty allocation
  -1 -2     force use of particular protocol version
  -4 -6     force use of IPv4 or IPv6
  -C        enable compression
  -i key    private key file for authentication
  -noagent  disable use of Pageant
  -agent    enable use of Pageant
  -m file   read remote command(s) from file
  -s        remote command is an SSH subsystem (SSH-2 only)
  -N        don’t start a shell/command (SSH-2 only)
  -nc host:port
            open tunnel in place of session (SSH-2 only)
  -sercfg configuration-string (e.g. 19200,8,n,1,X)
            Specify the serial configuration (serial only)

[@more@]比較常用的參數
-l 要登入的使用者
-pw 登入的密碼

底下列出幾個實例

1. 關閉遠端 Windows 主機
# echo y | /usr/bin/plink -l Administrator -pw 123456 192.168.1.112 “shutdown -s -t 0”

2. 遠端 Windows 主機重新啟動
# echo y | /usr/bin/plink -l Administrator -pw 123456 192.168.1.112 “shutdown -r -t 0”

3. 自動安裝桌面上的 PotPlayer
    /S 是 PotPlayer 的自動安裝參數
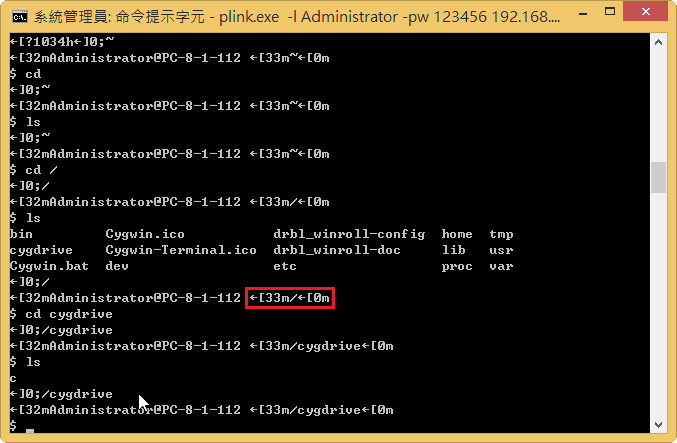
# echo y | /usr/bin/plink -pw 123456 Administrator@192.168.1.112 “/cygdrive/c/Users/Administrator/Desktop/PotPlayerSetup64.exe /S”

以上是針對一台電腦,如果是整個電腦教室,則可以利用 Script 檔的方式來達成!

安裝 DRBL-Winroll

為了徹底揚棄 EzBack,所以改用 DRBL Live+DRBL-Winroll,至於 DRBL-Winroll 的介紹,可以參考:DRBL-Winroll
下載 DRBL-Winroll:http://sourceforge.net/projects/drbl-winroll/files/Stable/
底下進行安裝
1. 選擇 Chinese(Traditional),然後按 OK
[@more@]2. 按 下一步(N)

3. 選擇 我接受(I)

4. 選擇 下一步(N)

5. 安裝路徑,選擇 安裝(I)

6. 要以 Administrator 的身份執行,並按  任意鍵繼續

7. 安裝中

8. 安裝 cygwin,按 任意鍵繼續

9. 安裝 cygwin 中

10. 「自動主機名稱」,請選擇 Y

11. 設定主機名稱樣式及啟動「自動工作群組名稱」,請選擇 Y

主機樣式名稱的設定

12. 設定工作群組樣式

13. 設定群組名稱的前置字元

14. 設定網路模式

15. 配置是否自動加入 AD 網域服務

16. 是否要安裝系統監測服務

17. 是否安裝「自動主機 SID」服務

18. 是否配置 sshd 服務

19. 按 任意鍵繼續

20. 安裝說明

21. 按 任意鍵繼續

22. 按 任意鍵繼續

23. 按 任意鍵繼續

24. 在防火牆中開啟 sshd 22/TCP 服務

25. 終於安裝完成!

電腦教室安裝的軟體

主要是一些自由軟體及免費軟體,並搭配縣網購買的商業軟體。

一、工具軟體
1. 開始功能表 ClassicShell:
http://www.classicshell.net/
2. 時鐘 ClocX:
http://www.clocx.net/
3. 電腦教室監控 iTALC:
http://italc.sourceforge.net/
4. 螢幕放大 ZoomIt:
https://technet.microsoft.com/en-us/sysinternals/bb897434.aspx
5. 螢幕畫記 Pointfix:
http://www.pointofix.de/download.php
6. 抓圖軟體 FastStone Capture:
http://www.faststone.org/FSCaptureDetail.htm[@more@]二、縮壓軟體
1. Easy 7-Zip:
http://www.e7z.org
2. Bandzip:
http://www.bandisoft.com/bandizip/tw/

三、播放軟體
1. Daum PotPlayer:
https://potplayer.daum.net/
2. Apple QuickTime:
https://www.apple.com/tw/quicktime/download/

四、防毒軟體
1. ESET Endpoint Antivirus:
http://nod32.ilc.edu.tw
2. VirusTotal Uploader:
https://www.virustotal.com/en/documentation/desktop-applications/virustotal-uploader

五、看圖軟體
1. FastStone Image Viewer:
http://www.faststone.org/
2. IrfanView:
http://www.irfanview.com/

六、瀏覽器
1. Google Chrome:
https://www.google.com.tw/chrome/browser/desktop/index.html
https://www.google.com/chrome/browser/desktop/index.html?platform=win64
2. Firefox:
http://mozilla.com.tw/firefox/new/

七、燒錄軟體
1. ImgBurn:
http://www.imgburn.com/
2. InfraRecorder:
http://infrarecorder.org/
3. Ashampoo Burning Studio Free:
https://www.ashampoo.com/en/usd/pin/7110/burning-software/Ashampoo-Burning-Studio-FREE

八、辦公軟體
1. Microsoft Office 2010
2. LibreOffice:
https://zh-tw.libreoffice.org/

九、文字編輯
1. NotePad++:
http://notepad-plus-plus.org/
2. PSPad:
http://www.pspad.com/

十、Scratch / Arduino / S4A
1. Scratch 1.4:
https://scratch.mit.edu/scratch_1.4/
2. Scratch 2.0:
http://scratch.mit.edu/scratch2download/
3. MakeBlock(Scratchbot)
http://learn.makeblock.cc/learning-scratch/
http://mblock.cc
4. S4A
http://s4a.cat/
5. Arduino
http://www.arduino.cc/
http://sourceforge.net/projects/ardublock/
6. S2A
https://github.com/MrYsLab/s2a_fm

十二、影像編輯 / 照片管理 / 美工繪圖
1. Photocap:
http://www.photocap.com.tw/forum/
2. PhotoScape:
http://www.photoscape.org/ps/main/index.php
3. Google Picasa:
https://www.google.com/intl/zh-TW/picasa/
4. 非常好色:
5. Microsoft Cartoon Maker (微軟卡通秀)

十三、影片製作
1. CyberLink PowerDirector
2. Movie Maker(Windows Live):
http://windows.microsoft.com/zh-tw/windows-live/essentials
3. Microsoft Photo Story 3 for Windows XP:
http://www.microsoft.com/zh-TW/download/details.aspx?id=11132

十四、公文系統
1. Microsoft Silverlight:
http://www.microsoft.com/silverlight/
https://www.microsoft.com/taiwan/msdn/silverlightnet/getstarted/default.aspx
2. HiCOS PKI Smart Card:
http://moica.nat.gov.tw/download_1.html

十五、Adobe
1. Adobe PDF Reader:
https://get.adobe.com/reader/?loc=tw
2. Adobe Flash Player:
https://get.adobe.com/tw/flashplayer/
3. Adobe Air:
https://get.adobe.com/air/?loc=tw
4. Adobe Shockwave Player:
https://get.adobe.com/shockwave/

十六、音樂
1. MAGIX Music Maker 16 Premium
2. Audacity:
http://audacity.sourceforge.net/download/?lang=zh-TW

十七:Tux 系列
1. TuxMath:
http://tux4kids.alioth.debian.org/tuxmath/
2. Tux Paint:
http://www.tuxpaint.org/
3. Tux Typing:
http://tux4kids.alioth.debian.org/tuxtype/index.php
4. SuperTux:
http://supertux.lethargik.org/

十八:其它
1. 心智圖 Mindomo:
https://www.mindomo.com/zh/desktop/index.htm
2. Skype:
http://www.skype.com/zh-Hant/home/
3. FileZilla:
https://filezilla-project.org/
4. 英語認證:
5. Google Earth Pro:
http://www.google.com/earth/download/gep/agree.html
6. Oracle Java:
https://java.com/zh_TW/download/
7. Evernote:
https://evernote.com/intl/zh-tw/
8. Fastest Tube:
http://kwizzu.com/
9. 格式工廠