Linux 下的 S.M.A.R.T.

S.M.A.R.T. 是 Self – Monitoring, Analysis and Reporting Technology (硬碟自我監測、分析及報告技術) 的縮寫,可以在硬碟發生故障之前,先提出警訊,可以提早因應。
在 Linux 下只要安裝 smartmontools 套件即可
# rpm -qf /usr/sbin/smartctl
smartmontools-5.42-2.el5

啟動 smartd 服務
# chkconfig –level 3 smartd on
# chkconfig –list | grep smartd
smartd          0:關閉  1:關閉  2:關閉  3:開啟  4:關閉  5:關閉  6:關閉
[@more@]檢查硬碟是否有開啟 smart 功能
# smartctl -i /dev/sda
smartctl 5.42 2011-10-20 r3458 [i686-linux-2.6.18-8.1.10.el5] (local build)
Copyright (C) 2002-11 by Bruce Allen, http://smartmontools.sourceforge.net

=== START OF INFORMATION SECTION ===
Model Family:     Seagate Barracuda 7200.10
Device Model:     ST3160815AS
Serial Number:    5RA19L2P
Firmware Version: 3.AAD
User Capacity:    160,040,803,840 bytes [160 GB]
Sector Size:      512 bytes logical/physical
Device is:        In smartctl database [for details use: -P show]
ATA Version is:   7
ATA Standard is:  Exact ATA specification draft version not indicated
Local Time is:    Tue Oct 22 16:14:33 2013 CST
SMART support is: Available – device has SMART capability.
SMART support is: Enabled

如果有沒開啟
# smartctl -s on /dev/sda
smartctl 5.42 2011-10-20 r3458 [i686-linux-2.6.18-8.1.10.el5] (local build)
Copyright (C) 2002-11 by Bruce Allen, http://smartmontools.sourceforge.net

=== START OF ENABLE/DISABLE COMMANDS SECTION ===
SMART Enabled.

檢查硬碟狀況
# smartctl -H /dev/sda
smartctl 5.42 2011-10-20 r3458 [i686-linux-2.6.18-8.1.10.el5] (local build)
Copyright (C) 2002-11 by Bruce Allen, http://smartmontools.sourceforge.net

=== START OF READ SMART DATA SECTION ===
SMART overall-health self-assessment test result: PASSED

不過這邊出現 PASSED 並不代表一定沒有問題,要進一步檢查

進行快速檢查,大概需要 1 分多鐘
# smartctl -t short /dev/sda
smartctl 5.42 2011-10-20 r3458 [i686-linux-2.6.18-8.1.10.el5] (local build)
Copyright (C) 2002-11 by Bruce Allen, http://smartmontools.sourceforge.net

=== START OF OFFLINE IMMEDIATE AND SELF-TEST SECTION ===
Sending command: “Execute SMART Short self-test routine immediately in off-line mode”.
Drive command “Execute SMART Short self-test routine immediately in off-line mode” successful.
Testing has begun.
Please wait 1 minutes for test to complete.
Test will complete after Tue Oct 22 16:19:21 2013

Use smartctl -X to abort test.

# smartctl -l selftest /dev/sda
smartctl 5.42 2011-10-20 r3458 [i686-linux-2.6.18-8.1.10.el5] (local build)
Copyright (C) 2002-11 by Bruce Allen, http://smartmontools.sourceforge.net

=== START OF READ SMART DATA SECTION ===
SMART Self-test log structure revision number 1
Num  Test_Description    Status                  Remaining  LifeTime(hours)  LBA_of_first_error
# 1  Short offline       Completed: read failure       90%     46396         3103025
# 2  Short offline       Completed: read failure       90%     46387         3103025
# 3  Short offline       Completed: read failure       90%     46387         3103025
# 4  Short offline       Completed: read failure       90%     45099         3103019

由上面可以看出有 read faillure 的狀況,應該趕快備份資料了!

# smartctl -l selftest /dev/sdb
smartctl 5.42 2011-10-20 r3458 [i686-linux-2.6.18-8.1.10.el5] (local build)
Copyright (C) 2002-11 by Bruce Allen, http://smartmontools.sourceforge.net

=== START OF READ SMART DATA SECTION ===
SMART Self-test log structure revision number 1
Num  Test_Description    Status                  Remaining  LifeTime(hours)  LBA_of_first_error
# 1  Short offline       Completed without error       00%     46426         –
# 2  Short offline       Completed without error       00%     46418         –

上面這一台,是沒有問題的。

更詳細的使用參數
# smartctl –help

列出取不到 IP 的網路卡卡號

針對一些不容易查到網路卡卡號的設備
# cat /var/log/messages | grep “no free leases” | awk ‘{OFS=”,”}{print $1,$2,$8,$10,$12}’ | sort | uniq
Oct,15,00:0c:29:67:73:72,eth0:,140.111.74.0/24:
Oct,15,00:11:93:88:7a:00,eth0:,140.111.74.0/24:
Oct,15,00:14:2a:3e:c7:5e,eth2:,192.168.250.0/24:
Oct,15,00:14:2a:3e:d1:00,eth2:,192.168.250.0/24:
Oct,15,00:26:51:0d:53:40,eth0:,140.111.74.0/24:
Oct,15,00:26:5a:be:5a:88,eth1:,192.168.249.0/24:
Oct,15,14:7d:c5:9f:68:b1,eth2:,192.168.250.0/24:
Oct,15,18:34:51:c0:40:14,eth2:,192.168.250.0/24:
Oct,15,6c:62:6d:63:8f:80,eth0:,140.111.74.0/24:

[@more@]或
# awk ‘{OFS=”,”}/no free leases/{print $1,$2,$8,$10,$12}’ /var/log/messages | sort | uniq
Oct,15,00:0c:29:67:73:72,eth0:,140.111.74.0/24:
Oct,15,00:11:93:88:7a:00,eth0:,140.111.74.0/24:
Oct,15,00:14:2a:3e:c7:5e,eth2:,192.168.250.0/24:
Oct,15,00:14:2a:3e:d1:00,eth2:,192.168.250.0/24:
Oct,15,00:26:51:0d:53:40,eth0:,140.111.74.0/24:
Oct,15,00:26:5a:be:5a:88,eth1:,192.168.249.0/24:
Oct,15,14:7d:c5:9f:68:b1,eth2:,192.168.250.0/24:
Oct,15,18:34:51:c0:40:14,eth2:,192.168.250.0/24:
Oct,15,6c:62:6d:63:8f:80,eth0:,140.111.74.0/24:

離線安裝 Windows Live

現在很多軟體在安裝時,都是直接從網路上下載下來安裝,所以安裝檔都非常小,這樣的好處就是可以讓使用者在安裝時,都是目前的最新版本,但有時候在安裝軟體時,電腦沒有連上網路,這時候安裝就會出現問題。
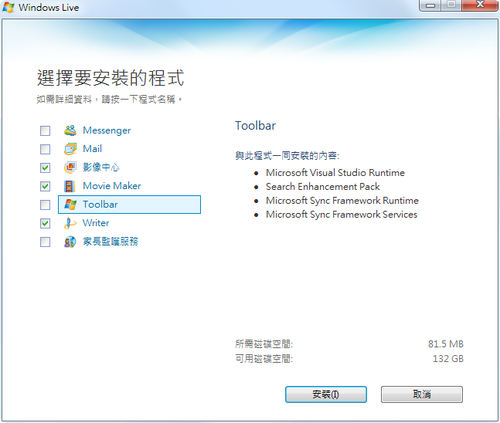
以 Windows Live 為例,安裝時會依照要安裝的軟體,再到網路上下載下來安裝
[@more@]個人很不喜歡這樣的安裝方式,比較喜歡離線安裝,就像是 Windows 平台的修正檔,也比較習慣離線安裝,所以在網路上搜尋了一下,終於在微軟的官網上,找到解決的方法。
下載網址:
http://wl.dlservice.microsoft.com/download/7/0/0/700CB50E-C1CB-4550-B513-A6B8A184D98D/zh-tw/wlsetup-all.exe

網路安裝和離線安裝的檔案大小比較

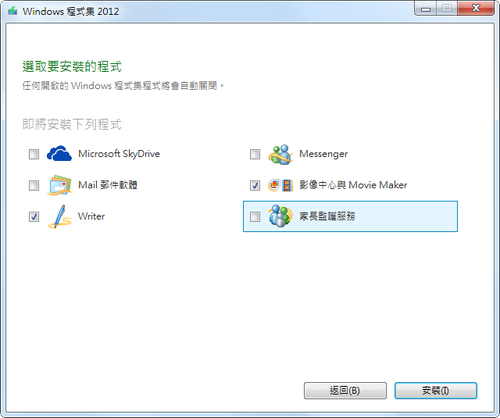
離線安裝畫面

semanage 指令找不到

semanage 是一個在 Linux 中設定 SELinux 權限的工具,但預設似乎不會安裝,所以要用的時候找不到。

找不到這一個程式
# which semanage
/usr/bin/which: no semanage in (/usr/lib64/qt-3.3/bin:/usr/local/sbin:/usr/local/bin:/sbin:/bin:/usr/sbin:/usr/bin:/root/bin)

系統中沒有安裝
# rpm -qa | grep semanage
libsemanage-2.0.43-4.2.el6.x86_64

yum search 也找不到
# yum search semanage
Loaded plugins: fastestmirror, security
Loading mirror speeds from cached hostfile
Warning: No matches found for: semanage
No Matches found
[@more@]查詢哪一個套件有提供這一個程式
# yum provides /usr/sbin/semanage
Loaded plugins: downloadonly, fastestmirror
Loading mirror speeds from cached hostfile
 * base: ftp.twaren.net
 * extras: ftp.twaren.net
 * updates: ftp.twaren.net
policycoreutils-python-2.0.83-19.30.el6.x86_64 : SELinux policy core python utilities
Repo        : base
Matched from:
Filename    : /usr/sbin/semanage

終於找到了,是 policycoreutils-python 這一個套件
進行安裝
# yum install policycoreutils-python

wget 指令

最近想要把原本 Mirror 在別台的 Scientific Linux 複製到新的 CentOS Mirror 主機,但一直無法成功,使用了 lftp / ncftp 來下載,似乎不支援下載整個目錄,使用 mirrordir 也會遇到 ISO 檔案不能超過 2G 的問題,看來似乎只能使用 rsync 的方式來處理,因為單單一個 Scientific 6 就高達 36x G,重新再 Mirror 一次真是有些累。
後來想到可以使用 wget 的指令來解決這樣的問題,wget 的用法及參數非常繁多,可以先查看一下。[@more@]# wget –help
GNU Wget 1.12,非互動式檔案下載工具。
用法: wget [選項]… [URL]…

長選項必須用的參數在使用短選項時也是必須的。

啟動:
  -V,  –version           顯示 Wget 版本並離開
  -h,  –help              印出這段說明文字
  -b,  –background        啟動後進入背景作業
  -e,  –execute=指令      執行 ‘.wgetrc’ 形式的指令

紀錄訊息及輸入檔案:
  -o,  –output-file=檔案    將紀錄訊息寫入<檔案>中
  -a,  –append-output=檔案  將紀錄訊息加入<檔案>末端
  -d,  –debug               印出偵錯訊息
  -q,  –quiet               安靜模式 (不輸出訊息)
  -v,  –verbose             詳細輸出模式 (預設使用這個模式)
  -nv, –non-verbose         關閉詳細輸出模式,但不啟用安靜模式
  -i,  –input-file=FILE     download URLs found in local or external FILE.
  -F,  –force-html          以 HTML 方式處理輸入檔
  -B,  –base=URL            resolves HTML input-file links (-i -F)
                             relative to URL.

下載:
  -t,  –tries=次數              設定重試次數 (0 表示無限)
       –retry-connrefused       即使連線被拒仍然會不斷嘗試
  -O   –output-document=檔案    將資料寫入指定檔案中
  -nc, –no-clobber              不覆寫已經存在的檔案
  -c,  –continue                繼續下載已下載了一部份的檔案
       –progress=方式           選擇下載進度的表示方式
  -N,  –timestamping           除非遠端檔案比較新,否則不下載遠端檔案
  -S,  –server-response         顯示伺服器回應訊息
       –spider                  不下載任何資料
  -T,  –timeout=秒數            指定所有時限為同一數值
       –dns-timeout=秒數        指定 DNS 查找主機的時限
       –connect-timeout=秒數    指定連線時限
       –read-timeout=秒數       指定讀取資料的時限
  -w,  –wait=秒數               每次下載檔案之前等待指定秒數
       –waitretry=秒數          每次重覆嘗試前稍等一段時間 (由 1 秒至指
                                 定秒數不等)
       –random-wait             每次下載之前隨機地指定等待的時間
       –no-proxy                禁止使用代理伺服器
  -Q,  –quota=大小              設定下載資料的限額大小
       –bind-address=位址       使用本機的指定位址 (主機名稱或 IP) 進行連線
       –limit-rate=速率         限制下載速率
       –no-dns-cache            不記憶 DNS 查找主機的資料
       –restrict-file-names=OS  只使用作業系統能夠接受的字元作為檔案字元
       –ignore-case             ignore case when matching files/directories.
  -4,  –inet4-only              只會連接 IPv4 地址
  -6,  –inet6-only              只會連接 IPv6 地址
       –prefer-family=FAMILY    優先採用指定的位址格式,可以是 IPv6、IPv4
                                 或者 none
       –user=用戶               指定 ftp 和 http 用戶名稱
       –password=PASS           指定 ftp 和 http 密碼
       –ask-password            prompt for passwords.
       –no-iri                  turn off IRI support.
       –local-encoding=ENC      use ENC as the local encoding for IRIs.
       –remote-encoding=ENC     use ENC as the default remote encoding.
目錄:
  -nd  –no-directories           不建立目錄
  -x,  –force-directories        強制建立目錄
  -nH, –no-host-directories      不建立含有遠端主機名稱的目錄
       –protocol-directories     在目錄中加上通訊協定名稱
  -P,  –directory-prefix=名稱    儲存檔案前先建立指定名稱的目錄
       –cut-dirs=數目            忽略遠端目錄中指定<數目>的目錄層
HTTP 選項:
       –http-user=用戶        指定 HTTP 用戶名稱
       –http-passwd=密碼      指定 HTTP 密碼
       –no-cache              不使用伺服器中的快取記憶資料
       –default-page=NAME     Change the default page name (normally
                               this is `index.html’.).
  -E,  –adjust-extension      save HTML/CSS documents with proper extensions.
       –ignore-length         忽略 ‘Content-Length’ 標頭欄位
       –header=字串           在連線資料標頭中加入指定字串
       –max-redirect          maximum redirections allowed per page.
       –proxy-user=用戶       設定代理伺服器用戶名稱
       –proxy-password=密碼   設定代理伺服器密碼
       –referer=URL           在 HTTP 請求中包括 ‘Referer: URL’ 標頭
       –save-headers          將 HTTP 連線資料標頭存檔
  -U,  –user-agent=AGENT      宣稱為 AGENT 而不是 Wget/VERSION
       –no-http-keep-alive    不使用 HTTP keep-alive (持久性連線)
       –no-cookies            不使用 cookie
       –load-cookies=檔案     程式啟動時由指定檔案載入 cookie
       –save-cookies=檔案     程式結束後將 cookie 儲存至指定檔案
       –keep-session-cookies  會載入和儲存暫時性的 cookie
       –post-data=字串        使用 POST 方式送出字串
       –post-file=檔案        使用 POST 方式送出檔案內容
       –content-disposition   honor the Content-Disposition header when
                               choosing local file names (EXPERIMENTAL).
       –auth-no-challenge     send Basic HTTP authentication information
                               without first waiting for the server’s
                               challenge.

HTTPS (SSL/TLS) 選項:
       –secure-protocol=PR     選擇安全通訊協定,可以使用 auto, SSLv2,
                                SSLv3 或 TLSv1
       –no-check-certificate   不檢驗伺服器的憑證
       –certificate=檔案       指定用戶端的憑證檔案名稱
       –certificate-type=類型  用戶端憑證的類型,可以是 PEM 或 DER
       –private-key=檔案       指定私鑰檔案
       –private-key-type=類型  私鑰的類型,可以是 PEM 或 DER
       –ca-certificate=檔案    載有憑證管理中心 (CA) 簽章的檔案
       –ca-directory=目錄      載有憑證管理中心 (CA) 簽章的目錄
       –random-file=檔案       作為 SSL 隨機數產生程序 (PRNG) 的來源數據檔案
       –egd-file=檔案          產生隨機數據的 EGD socket 檔案名稱

FTP 選項:
       –ftp-user=用戶         指定 FTP 用戶名稱
       –ftp-password=密碼     設定 FTP 密碼
       –no-remove-listing     不刪除 ‘.listing’ 檔案
       –no-glob               不展開有萬用字元的 FTP 檔名
       –no-passive-ftp        不使用「被動」傳輸模式
       –retr-symlinks         在遞迴模式中,下載鏈結指示的目標檔案
                               (不包括目錄)

遞迴下載:
  -r,  –recursive          遞迴下載
  -l,  –level=數字         最大搜尋深度 (inf 或 0 表示無限)
       –delete-after       刪除下載後的檔案
  -k,  –convert-links      make links in downloaded HTML or CSS point to
                            local files.
  -K,  –backup-converted   將檔案 X 轉換前先備份為 X.orig
  -m,  –mirror             相等於 -N -r -l inf –no-remove-listing 選項
  -p,  –page-requisites    下載所有顯示網頁所需的檔案,例如圖片等
       –strict-comments    用嚴格方式 (SGML) 處理 HTML 注釋。

遞迴下載時有關接受/拒絕的選項:
  -A,  –accept=清單               接受的檔案樣式,以逗號分隔
  -R,  –reject=清單               排除的檔案樣式,以逗號分隔
  -D,  –domains=清單              接受的網域,以逗號分隔
       –exclude-domains=清單      排除的網域,以逗號分隔
       –follow-ftp                跟隨 HTML 文件中的 FTP 鏈結
       –follow-tags=清單          會跟隨的 HTML 標籤,以逗號分隔
  -G,  –ignore-tags=清單          會忽略的 HTML 標籤,以逗號分隔
  -H,  –span-hosts                遞迴模式中可進入其它主機
  -L,  –relative                  只跟隨相對鏈結
  -I,  –include-directories=清單  準備下載的目錄
  -X,  –exclude-directories=清單  準備排除的目錄
  -np, –no-parent                 不進入上層的目錄

請將錯誤報告或建議寄給 <bug-wget@gnu.org>。

列紅色的部分是個人比較可能常用的參數。

# wget -m ftp://140.111.74.3/pub/Linux/scientific

我覺得 Linux 很吸引人的地方就是一個小小的指令,就可以解決困擾多時的問題,其實 Windows 平台也有 wget 可以使用,不過要另外安裝。

刪除 Windows 8.1 微軟注音輸入法

Windows 8 已經釋出一段時間了,但自己一直沒有轉移到 Windows 8,大部分的時間還是使用 Windows 7,偶爾也會用 Apple Mac OSX 或是 Ubuntu Linux,最主要是 Windows 8 新的介面有些難以適應,再加上中文輸入法有些難用,和之前的 Windows 7 相差很多,最近 Windows 8.1 也快要正式釋出了,於是就下載下來安裝看看。
安裝起來的介面和 Windows 8 相去不遠。

但輸入法一樣難用,一般來說,我都是直接切換到桌面模式,但系統都會預設安裝微軟注音輸入法,可是我是習慣使用行列輸入法,每次由英文鍵盤切換到中文鍵盤,又要多切換一次,可是預設安裝的微軟注音輸入法又不能移除,後來在網路上搜尋了一下,找到了這一篇, 如何刪除 Windows 8 的微軟新注音輸入法 @ 呆丸北拜  痞客邦 PIXNET ,可是執行後,好像還是無法刪除,經仔細比對後,發現 Windows 8 和 Windows 8.1 的位置似乎有了不同。[@more@]下面這一個檔案是修改自 呆丸北拜 的檔案,只是路徑不同而已,有須要的人可以由 此處 下載。

解壓縮後,以 系統管理員身份執行 即可。

選擇 移除 即可!

如果要還原的話,請下載下面的登錄檔案,再匯入即可!
Microsoft Bopomofo