在 Ubuntu 16.04 上安裝 OpenVAS

參考網頁:
openvas 8 vulnerability scanner : Mohammad Razavi
Install OpenVAS 8 on Ubuntu 16.04
How to Install OpenVAS Vulnerability Scanner on Ubuntu 16.04 – Vultr.com
用開源工具檢查主機漏洞 自建OpenVAS弱點掃描 – 技術專欄 – 網管人NetAdmin

新增 OpenVAS 儲存庫
# apt install software-properties-common
# apt-get install python-software-properties
# add-apt-repository ppa:mrazavi/openvas
 OpenVAS is a framework of several services and tools offering a comprehensive and powerful vulnerability scanning and vulnerability management solution.

Homepage: http://www.openvas.org/

* Openvas 9 BETA is now available *

To install openvas 8, install the “openvas” package from this ppa. It is only tested on ubuntu 14.04 trusty and 16.04 xenial.

You have to update openvas scripts/data after installation with the following commands:

sudo apt-get install sqlite3
sudo openvas-nvt-sync
sudo openvas-scapdata-sync
sudo openvas-certdata-sync

sudo service openvas-scanner restart
sudo service openvas-manager restart
sudo openvasmd –rebuild –progress

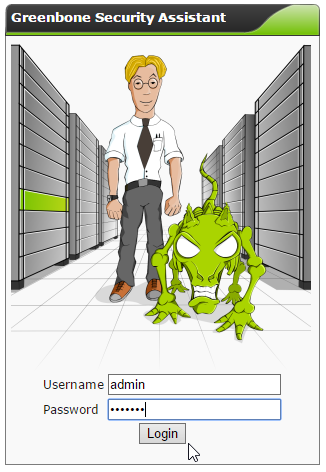
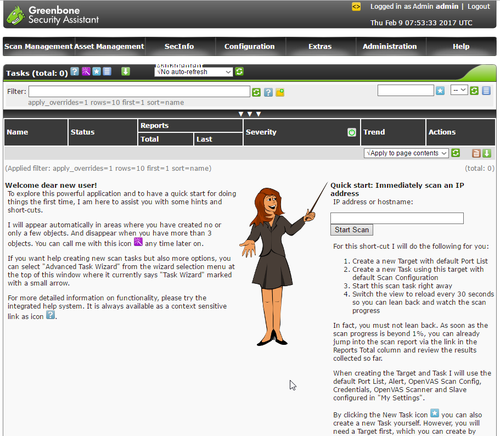
Login into https://localhost:443 with “admin” as username and password.

In case of “Secure Connection Failed” in firefox, use chromium.

To enable pdf reports:
sudo apt-get install texlive-latex-extra –no-install-recommends

To install openvas-nasl utility:
sudo apt-get install libopenvas8-dev

*** Openvas 9 BETA ***

A set of new packages for openvas 9 BETA is now included. If you prefer to install them, you just have to install “openvas9” package instead of “openvas”. Then, update scripts/data with the following commands:

sudo apt-get install sqlite3
sudo greenbone-nvt-sync
sudo greenbone-scapdata-sync
sudo greenbone-certdata-sync

sudo service openvas-scanner restart
sudo service openvas-manager restart
sudo openvasmd –rebuild –progress

Please note that the default port number of the web interface for the new packages are changed to 4000. So, to access the web interface for version 9, go to https://localhost:4000

You can change the web interface port number by modifying /etc/default/openvas-gsa. Then, restart its service by issuing “sudo service openvas-gsa restart”.
 More info: https://launchpad.net/~mrazavi/+archive/ubuntu/openvas
Press [ENTER] to continue or ctrl-c to cancel adding it

gpg: keyring `/tmp/tmp_ss7i1fn/secring.gpg’ created
gpg: keyring `/tmp/tmp_ss7i1fn/pubring.gpg’ created
gpg: requesting key 4AA450E0 from hkp server keyserver.ubuntu.com
gpg: /tmp/tmp_ss7i1fn/trustdb.gpg: trustdb created
gpg: key 4AA450E0: public key “Launchpad PPA for Mohammad Razavi” imported
gpg: Total number processed: 1
gpg:               imported: 1  (RSA: 1)
OK
[@more@]2. 更新套件庫
# apt-get update

3. 安裝 OpenVAS
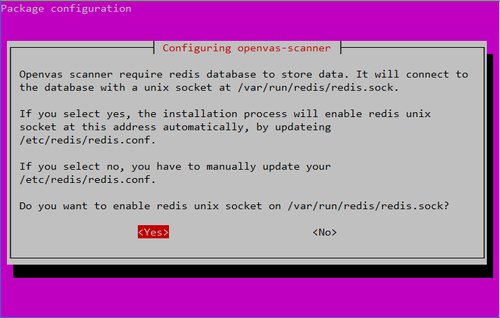
# apt install openvas
4. 安裝其它相關套件
# apt install sqlite3
# apt-get install texlive-latex-extra –no-install-recommends
# apt-get install libopenvas8-dev

5. 進行更新
# /usr/sbin/openvas-nvt-sync
# /usr/sbin/openvas-scapdata-sync
# /usr/sbin/openvas-certdata-sync

6. 啟動服務
# service openvas-scanner restart
# service openvas-manager restart
修改 /etc/init.d/openvas-gsa
# vim /etc/init.d/openvas-gsa

DAEMON_ARGS=”
修改成
DAEMON_ARGS= –listen “OpenVAS’IP”
# service openvas-gsa restart
# /usr/sbin/openvasmd –rebuild –progress

7. 開啟防火牆
# ufw allow https

8. 設定管理密碼
# /usr/sbin/openvasmd –user=admin –new-password=<new-password>

9. 建立憑證
# /usr/bin/openvas-mkcert-client
This script will now ask you the relevant information to create the SSL client certificates for OpenVAS.

Client certificates life time in days [365]: 3650
Your country (two letter code) [DE]: TW
Your state or province name [none]: Yilan
Your location (e.g. town) [Berlin]: TouCheng
Your organization [none]: Elementary School
Your organizational unit [none]:
**********
We are going to ask you some question for each client certificate.

If some question has a default answer, you can force an empty answer by entering a single dot ‘.’

*********
Client certificates life time in days [3650]:
Country (two letter code) [TW]:
State or province name [Yilan]:
Location (e.g. town) [TouCheng]:
Organization [Elementary School]:
Organization unit []:
e-Mail []: t850008@gmail.com
Generating RSA private key, 4096 bit long modulus
…………….++
……….++
e is 65537 (0x10001)
You are about to be asked to enter information that will be incorporated
into your certificate request.
What you are about to enter is what is called a Distinguished Name or a DN.
There are quite a few fields but you can leave some blank
For some fields there will be a default value,
If you enter ‘.’, the field will be left blank.
—–
Country Name (2 letter code) [DE]:State or Province Name (full name) [Some-State]:Locality Name (eg, city) []:Organization Name (eg, company) [Internet Widgits Pty Ltd]:Organizational Unit Name (eg, section) []:Common Name (eg, your name or your server’s hostname) []:Email Address []:Using configuration from /tmp/openvas-mkcert-client.18290/stdC.cnf
Check that the request matches the signature
Signature ok
The Subject’s Distinguished Name is as follows
countryName           :PRINTABLE:’TW’
stateOrProvinceName   :ASN.1 12:’Yilan’
localityName          :ASN.1 12:’TouCheng’
organizationName      :ASN.1 12:’Elementary School’
commonName            :ASN.1 12:’om’
emailAddress          :IA5STRING:’xxxx@gmail.com’
Certificate is to be certified until Mar 11 15:06:51 2027 GMT (3650 days)

Write out database with 1 new entries
Data Base Updated
Your client certificates are in /tmp/openvas-mkcert-client.18290 .

You will have to copy them by hand.

# cp /tmp/openvas-mkcert-client.18290/key_om.pem /var/lib/openvas/private/CA/clientkey.pem
# cp /tmp/openvas-mkcert-client.18290/cert_om.pem /var/lib/openvas/CA/clientcert.pem

解決 OpenVAS 掃描 Linux 主機出現的「SSH Weak ….」的問題

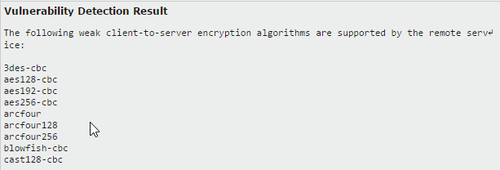
使用 OpenVAS 掃描 CentOS Linux 主機會出現如下的警告訊息
SSH Weak Encryption Algorithms Supported


SSH Weak MAC Algorithms Supported

點選可以查看相關訊息


SSH Weak Encryption Algorithms Supported

SSH Weak MAC Algorithms Supported

[@more@]解決方式:
修改 /etc/ssh/sshd_config 設定檔
# cp /etc/ssh/sshd_config /etc/ssh/sshd_config.$(date +%F)
# vim /etc/ssh/sshd_config
加入下面二行
Ciphers aes128-ctr,aes192-ctr,aes256-ctr,aes128-gcm@openssh.com,aes256-gcm@openssh.com,chacha20-poly1305@openssh.com
MACs hmac-sha1

重新啟動 SSH Server
# systemctl restart sshd.service;systemctl status sshd.service

解決 OpenVAS 掃描 Linux 主機出現的「Check if Mailserver answer to VRFY and EXPN requestsd」訊息

使用 OpenVAS 掃描 CentOS 7.x Linux 主機時,出現「Check if Mailserver answer to VRFY and EXPN requestsd」訊息

# telnet 127.0.0.1 25
Trying 127.0.0.1…
Connected to 127.0.0.1.
Escape character is ‘^]’.
220 localhost.localdomain ESMTP Postfix
VRFY
501 5.5.4 Syntax: VRFY address[@more@]解決方式:
參考網站:
Mail Server Security question – Google 網上論壇

修改 /etc/postfix/main.cf
# cp /etc/postfix/main.cf /etc/postfix/main.cf.$(date +%F)
# vim /etc/postfix/main.cf
加入下面一行
disable_vrfy_command=yes

測試一下
# telnet 127.0.0.1 25
Trying 127.0.0.1…
Connected to 127.0.0.1.
Escape character is ‘^]’.
220 localhost.localdomain ESMTP Postfix
VRFY
502 5.5.1 VRFY command is disabled

重新啟動 Postfix
# systemctl restart postfix.service;systemctl status postfix.service

利用 OpenVAS 進行掃描

參考網頁:
自建OpenVAS弱點掃描 資安稽核報表不求人(上) – 技術專欄 – 網管人NetAdmin
自建OpenVAS弱點掃描 資安稽核報表不求人(下) – 技術專欄 – 網管人NetAdmin

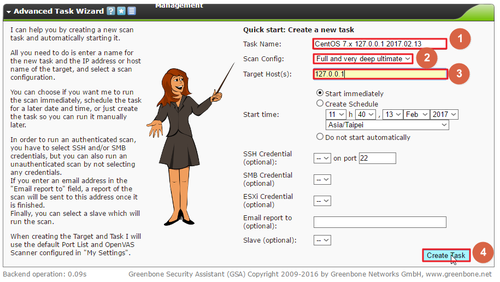
1. 選擇 Wizard / Advanced Task Wizard

[@more@]2. Task Name: 識別名稱
     Scan Config: 掃描方式
     Target Host(s): 掃描主機
     127.0.0.1 or 192.168.1.0/24 or 192.168.1.3,192.168.1.5

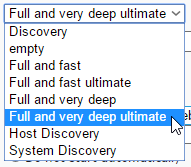
3. 掃描的深度,從最淺層的 Discovery 到最深層的 Full and very deep ultimate,以及用來大量找尋設備的 Host Discovery,和取得系統資訊的 System Discover。愈深層所需的掃描時間愈久,但愈能掃描出問題。

4. 新增的掃描任務

5. 掃描中

6. 當出現 Done 代表掃描完成

7. 點選日期可以查看掃描結果

8. 掃描結果

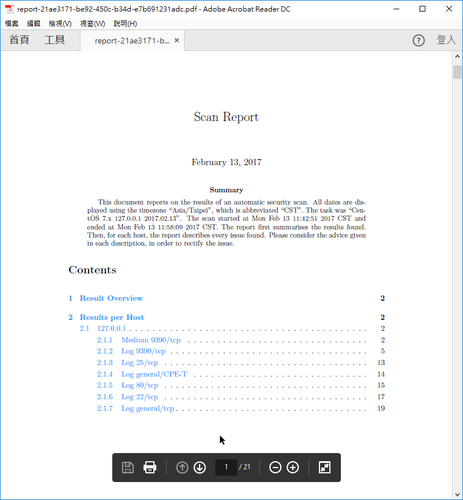
9. 下載 PDF 檔案

10. PDF 檔

在 CentOS 7.x 上安裝 OpenVAS

官方網站:
http://www.openvas.org/index.html

參考網站:
http://forums.atomicorp.com/viewtopic.php?f=31&t=8047
電腦筆記本: OpenVas8 on CentOS7
塵世浮沉近千秋: Cent OS 7 Install OpenVAS 8
OpenVAS6 – Itsmw
TWNIC 2015電子報
Install OpenVAS on CentOS 7 / RHEL 7
OpenVas – Itsmw

1) Disable SELINUX.
Edit /etc/selinux/config, save and reboot
# sed -i ‘s/SELINUX=enforcing/SELINUX=disabled/’ /etc/selinux/config
2) Add required packages
# yum install wget bzip2 texlive net-tools 
3) Add Atomicorp repo
# wget -q -O – http://www.atomicorp.com/installers/atomic | sh
Do you agree to these terms? (yes/no) [Default: yes]

Configuring the [atomic] repo archive for this system

Installing the Atomic GPG keys: OK

Downloading atomic-release-1.0-21.el7.art.noarch.rpm: Preparing…                          ################################# [100%]
Updating / installing…
   1:atomic-release-1.0-21.el7.art    ################################# [100%]
OK

Enable repo by default? (yes/no) [Default: yes]:

The Atomic repo has now been installed and configured for your system
The following channels are available:
  atomic          – [ACTIVATED] – contains the stable tree of ART packages
  atomic-testing  – [DISABLED]  – contains the testing tree of ART packages
  atomic-bleeding – [DISABLED]  – contains the development tree of ART packages

[@more@]4) Install OpenVAS
# yum update
# yum install openvas alien

5) edit /etc/redis.conf. Add/uncomment the following
unixsocket /tmp/redis.sock
unixsocketperm 700
# cp /etc/redis.conf /etc/redis.conf.$(date +%F)
# sed -i ‘s/^# unixsocket/unixsocket/’ /etc/redis.conf

6) Restart Redis
# systemctl enable redis && systemctl restart redis
# systemctl status redis
● redis.service – Redis persistent key-value database
   Loaded: loaded (/usr/lib/systemd/system/redis.service; enabled; vendor preset: disabled)
  Drop-In: /etc/systemd/system/redis.service.d
           mqlimit.conf
   Active: active (running) since 四 2017-02-09 15:16:46 CST; 40min ago
 Main PID: 1030 (redis-server)
   CGroup: /system.slice/redis.service
           mq1030 /usr/bin/redis-server 127.0.0.1:6379

 2月 09 15:16:46 localhost.localdomain systemd[1]: Started Redis persistent key-value database.
 2月 09 15:16:46 localhost.localdomain systemd[1]: Starting Redis persistent key-value database…

7) openvas-setup
follow instructions. If rsync throws error, check that your network allows outgoing TCP 873 to internet

# /usr/bin/openvas-setup
Openvas Setup, Version: 1.0

Step 1: Update NVT, CERT, and SCAP data
Please note this step could take some time.
Once completed, this will be updated automatically every 24 hours

Select download method
* wget (NVT download only)
* curl (NVT download only)
* rsync

  Note: If rsync requires a proxy, you should define that before this step.
Downloader [Default: rsync]
Updating NVTs….
[i] This script synchronizes an NVT collection with the ‘OpenVAS NVT Feed’.
[i] The ‘OpenVAS NVT Feed’ is provided by ‘The OpenVAS Project’.
[i] Online information about this feed: ‘http://www.openvas.org/openvas-nvt-feed.html’.
[i] NVT dir: /var/lib/openvas/plugins
[w] Could not determine feed version.
[i] rsync is not recommended for the initial sync. Falling back on http.
[i] Will use wget
[i] Using GNU wget: /usr/bin/wget
[i] Configured NVT http feed: http://www.openvas.org/openvas-nvt-feed-current.tar.bz2
[i] Downloading to: /tmp/openvas-nvt-sync.Q53foiaQhA/openvas-feed-2017-02-09-1275.tar.bz2
–2017-02-09 15:26:23–  http://www.openvas.org/openvas-nvt-feed-current.tar.bz2
正在查找主機 www.openvas.org (www.openvas.org)… 5.9.98.186
正在連接 www.openvas.org (www.openvas.org)|5.9.98.186|:80… 連上了。
已送出 HTTP 要求,正在等候回應… 200 OK
長度: 28323931 (27M) [application/x-bzip2]
Saving to: ‘/tmp/openvas-nvt-sync.Q53foiaQhA/openvas-feed-2017-02-09-1275.tar.bz2’

Step 2: Configure GSAD
The Greenbone Security Assistant is a Web Based front end
for managing scans. By default it is configured to only allow
connections from localhost.

Allow connections from any IP? [Default: yes]
Redirecting to /bin/systemctl restart  gsad.service

Step 3: Choose the GSAD admin users password.
The admin user is used to configure accounts,
Update NVT’s manually, and manage roles.

Enter administrator username [Default: admin] :
Enter Administrator Password:
Verify Administrator Password:

Redirecting to /bin/systemctl start  redis.service

Setup complete, you can now access GSAD at:
  https://<IP>:9392

Created symlink from /etc/systemd/system/multi-user.target.wants/openvas-scanner.service to /usr/lib/systemd/system/openvas-scanner.service.
Created symlink from /etc/systemd/system/multi-user.target.wants/openvas-manager.service to /usr/lib/systemd/system/openvas-manager.service.
Created symlink from /etc/systemd/system/multi-user.target.wants/gsad.service to /usr/lib/systemd/system/gsad.service.

8 ) To access OV-8 from network, either disable firewall or add exception for tcp 9392
# firewall-cmd –permanent –zone=public –add-port=9392/tcp
# firewall-cmd –reload

Go to https://<IP-ADDRESS>:9392 and login.

[Optional] : Greenbone Security Assistant (GSAD)
For those who wants to install proper SSL cert. Download certificate and key file to your CentOS box. I place them inside /etc/openvas/ssl.
Edit /etc/sysconfig/gsad and modify the OPTIONS tag e.g.

OPTIONS=”–ssl-certificate=/etc/openvas/ssl/openvas.crt –ssl-private-key=/etc/openvas/ssl/openvas.key”

Restart gsad
systemctl restart gsad

Those who wants stronger ciphers can will need to add gnutls-priorities, e.g.
OPTIONS=”–ssl-certificate=/etc/openvas/ssl/openvas.crt –ssl-private-key=/etc/openvas/ssl/openvas.key –gnutls-priorities=SECURE128:+SECURE192:-VERS-TLS-ALL:+VERS-TLS1.2″

(See explanation at http://gnutls.org/manual/html_node/Priority-Strings.html)

# openvas-check-setup
openvas-check-setup 2.3.7
  Test completeness and readiness of OpenVAS-8
  (add ‘–v6’ or ‘–v7’ or ‘–v9’
   if you want to check for another OpenVAS version)

  Please report us any non-detected problems and
  help us to improve this check routine:
  http://lists.wald.intevation.org/mailman/listinfo/openvas-discuss

  Send us the log-file (/tmp/openvas-check-setup.log) to help analyze the problem.

  Use the parameter –server to skip checks for client tools
  like GSD and OpenVAS-CLI.

Step 1: Checking OpenVAS Scanner …
        OK: OpenVAS Scanner is present in version 5.0.7.
        OK: OpenVAS Scanner CA Certificate is present as /var/lib/openvas/CA/cacert.pem.
        OK: redis-server is present in version v=3.0.7.
        OK: scanner (kb_location setting) is configured properly using the redis-server socket: /tmp/redis.sock
        OK: redis-server is running and listening on socket: /tmp/redis.sock.
        OK: redis-server configuration is OK and redis-server is running.
        OK: NVT collection in /var/lib/openvas/plugins contains 51765 NVTs.
        WARNING: Signature checking of NVTs is not enabled in OpenVAS Scanner.
        SUGGEST: Enable signature checking (see http://www.openvas.org/trusted-nvts.html).
        OK: The NVT cache in /var/cache/openvas contains 51765 files for 51765 NVTs.
Step 2: Checking OpenVAS Manager …
        OK: OpenVAS Manager is present in version 6.0.9.
        OK: OpenVAS Manager client certificate is present as /var/lib/openvas/CA/clientcert.pem.
        OK: OpenVAS Manager database found in /var/lib/openvas/mgr/tasks.db.
        OK: Access rights for the OpenVAS Manager database are correct.
        OK: sqlite3 found, extended checks of the OpenVAS Manager installation enabled.
        OK: OpenVAS Manager database is at revision 146.
        OK: OpenVAS Manager expects database at revision 146.
        OK: Database schema is up to date.
        OK: OpenVAS Manager database contains information about 51765 NVTs.
        OK: At least one user exists.
        OK: OpenVAS SCAP database found in /var/lib/openvas/scap-data/scap.db.
        OK: OpenVAS CERT database found in /var/lib/openvas/cert-data/cert.db.
        OK: xsltproc found.
Step 3: Checking user configuration …
        WARNING: Your password policy is empty.
        SUGGEST: Edit the /etc/openvas/pwpolicy.conf file to set a password policy.
Step 4: Checking Greenbone Security Assistant (GSA) …
        OK: Greenbone Security Assistant is present in version 6.0.11.
Step 5: Checking OpenVAS CLI …
        OK: OpenVAS CLI version 1.4.5.
Step 6: Checking Greenbone Security Desktop (GSD) …
        SKIP: Skipping check for Greenbone Security Desktop.
Step 7: Checking if OpenVAS services are up and running …
        OK: netstat found, extended checks of the OpenVAS services enabled.
        OK: OpenVAS Scanner is running and listening on all interfaces.
        OK: OpenVAS Scanner is listening on port 9391, which is the default port.
        OK: OpenVAS Manager is running and listening on all interfaces.
        OK: OpenVAS Manager is listening on port 9390, which is the default port.
        OK: Greenbone Security Assistant is listening on port 9392, which is the default port.
Step 8: Checking nmap installation …
        WARNING: Your version of nmap is not fully supported: 6.47
        SUGGEST: You should install nmap 5.51 if you plan to use the nmap NSE NVTs.
Step 10: Checking presence of optional tools …
        OK: pdflatex found.
        OK: PDF generation successful. The PDF report format is likely to work.
        OK: ssh-keygen found, LSC credential generation for GNU/Linux targets is likely to work.
        OK: rpm found, LSC credential package generation for RPM based targets is likely to work.
        WARNING: Could not find alien binary, LSC credential package generation for DEB based targets will not work.
        SUGGEST: Install alien.
        OK: nsis found, LSC credential package generation for Microsoft Windows targets is likely to work.
        OK: SELinux is disabled.

It seems like your OpenVAS-8 installation is OK.

If you think it is not OK, please report your observation
and help us to improve this check routine:
http://lists.wald.intevation.org/mailman/listinfo/openvas-discuss
Please attach the log-file (/tmp/openvas-check-setup.log) to help us analyze the problem.