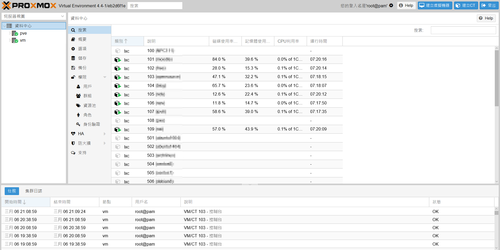
Proxmox – 忘了 root 密碼

參考網頁:
Root Password Reset – Proxmox VE

方法一:
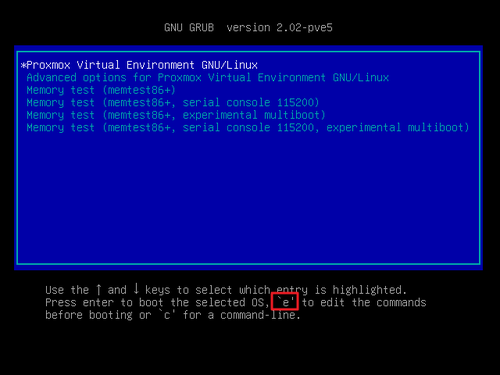
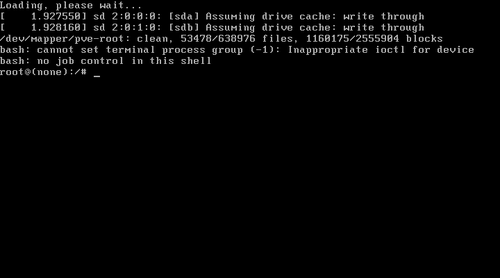
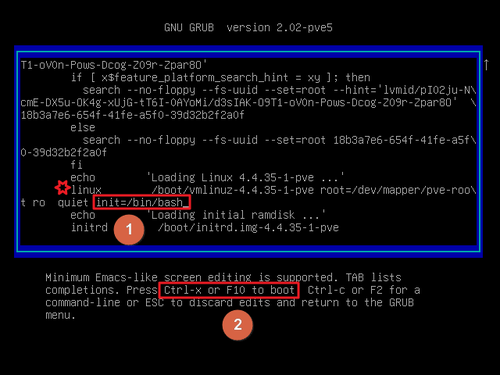
1. 在 grub 開機畫面按 e

2. 找到 linux /boot/vmlinuz.. 這一行,在最後面加上 init=/bin/bash
    按 Ctrl+xF10 啟動系統

[@more@]3. 開機完成

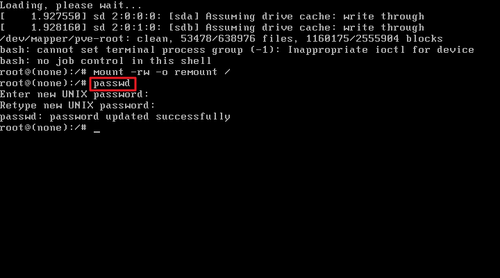
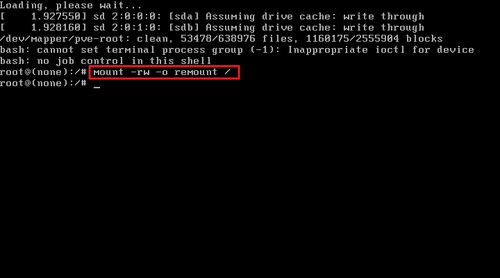
4. 掛載 / 分割區
    # mount -rw -o remount /

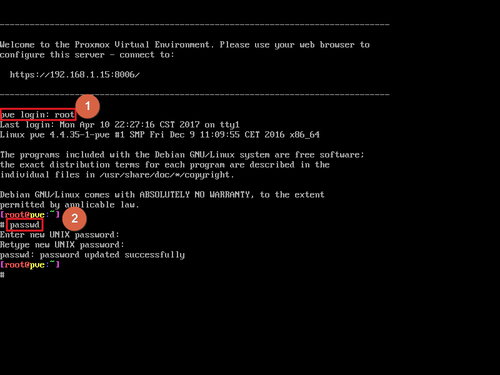
5. 重新設定密碼,並做確認
    # passwd

6. 重新開機就能以新密碼登入!

方法二:
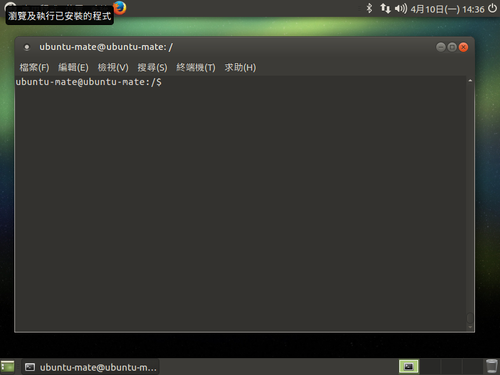
1. 以任何的 Linux LiveCD 開機

2. 開啟終端機

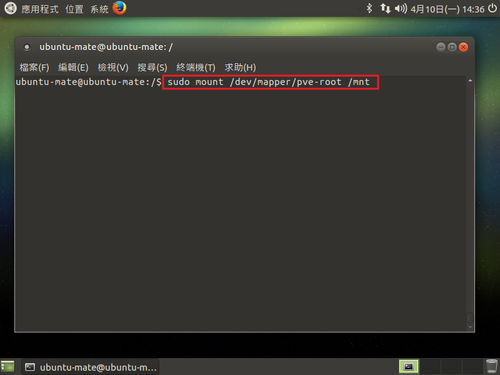
3. 掛載分割區
    $ sudo mount /dev/mapper/pve-root /mnt

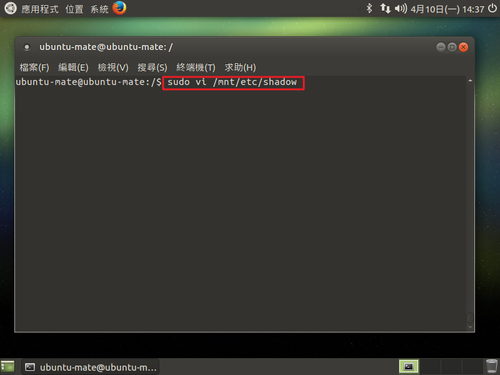
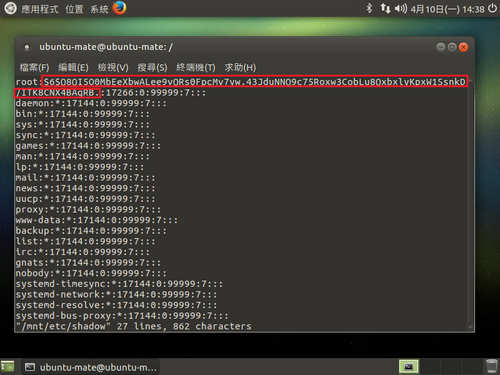
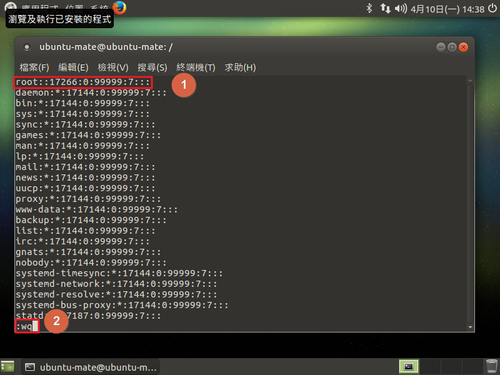
4. 修改 etc/shadow 密碼檔
    $ sudo vi /mnt/etc/shadow

5. 把 root 後面的 : 和下一個 : 之間的密碼字元清除並存檔離開

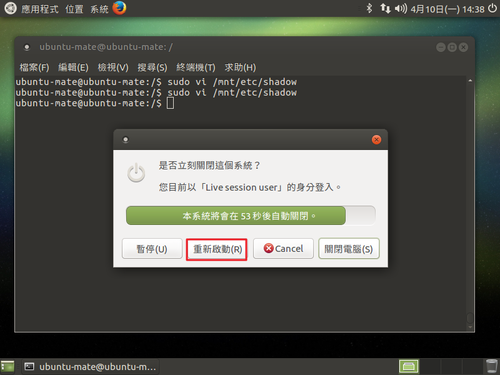
6. 重新啟動系統

7. 重新開機後,不用輸入輸入密碼即可登入,請設定新的密碼

Proxmox – 匯入 ESXi 匯出的 OVF 檔案

1. 將產生的 .vmdk 上傳到 Proxmox Server

2. 進行轉換
-f 來源格式
-O 轉換格式
-p 顯示進度
# qemu-img convert -f vmdk Nginx-disk1.vmdk -O qcow2 Nginx.qcow2 -p
    (100.00/100%)

3. 轉換後比較
# ls -l Nginx*
-rw-r–r– 1 root root  872952320 Mar 28 10:24 Nginx-disk1.vmdk
-rw-r–r– 1 root root 2101805056 Mar 28 10:43 Nginx.qcow2[@more@]
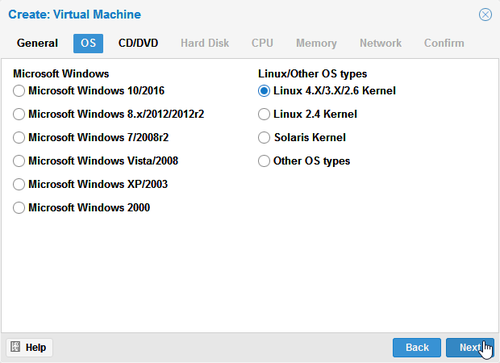
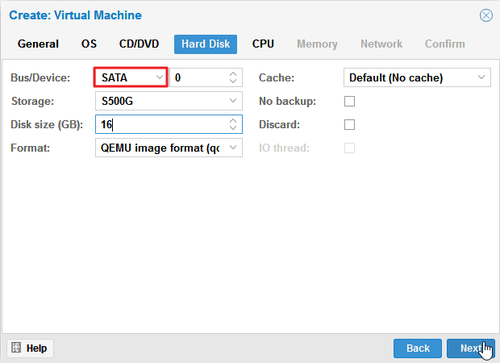
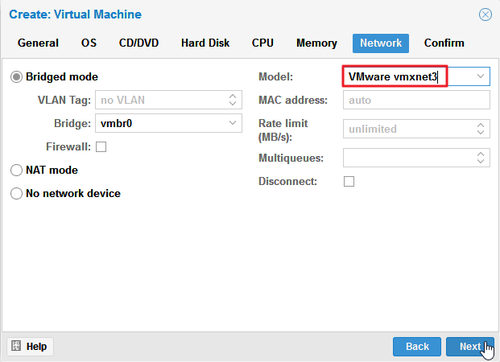
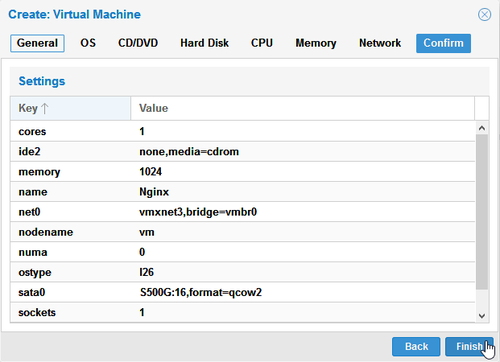
4. 使用 Proxmox 建立一個 KVM,設定依 ESXi Server 上的設定
    再用轉換完成的 .qcow2 檔替換掉 KVM 上的檔案

# cp Nginx.qcow2 /VM/images/400/vm-400-disk-1.qcow2

Proxmox – 解決出現 cluster not ready – no quorum? 的問題

目前學校是使用 Proxmox Cluster 來當做虛擬機器,有一天突然無預警斷電,之後復電後,有一台 Proxmox Server 沒有自動開機啟動,所以其它台的 Proxmox Server 上的虛擬機器要執行時,都會出現下面的錯誤訊息。
# pct start 200
cluster not ready – no quorum?

# pvecm status
Quorum information
——————
Date:             Sat Mar 18 14:04:32 2017
Quorum provider:  corosync_votequorum
Nodes:            1
Node ID:          0x00000002
Ring ID:          2/160
Quorate:          No

Votequorum information
———————-
Expected votes:   2
Highest expected: 2
Total votes:      1
Quorum:           2 Activity blocked
Flags:

Membership information
———————-
    Nodeid      Votes Name
0x00000002          1 192.168.1.39 (local)

造成 Cluster 錯誤的原因中,最常見的就是節點之間網路的斷線, Cluster 中節點數量低於 2 時, Cluster 就會被鎖住,會陷入「no quorum」的狀態。這是因為 Proxmox VE Cluster 預設期待 Cluster 中必須要有 2 個節點(Node)以上,可是因為網路斷線的緣故,才會出現「Quorum: 2 Activity blocked」這個狀態。[@more@]
解決方式:
參考網頁:
修復Proxmox VE:集叢未啟動 / Fix Proxmox VE: Cluster Not Ready – 布丁布丁吃什麼?

暫時把 Cluster 的期待數量從 2 降低為 1
# pvecm expected 1

重新啟動 Proxmox VE Cluster
# service pve-cluster restart

也可以用參考網頁中提到的方式,用 Script 工作排程來解除鎖定的狀態

判別 Linux 系統是不是在虛擬機器

方式很多種
以下針對 VMware 所架設的虛擬機器
1. 使用 lshw 指令
# yum install lshw
# lshw | grep -m 1 product
    product: VMware Virtual Platform

2. 使用 lspci 指令
# yum install pciutils
# lspci | grep -m 1 System
00:07.7 System peripheral: VMware Virtual Machine Communication Interface (rev 10)

3. 使用 dmidecode 指令
# yum install dmidecode
# dmidecode | grep -m 1 Product
        Product Name: VMware Virtual Platform[@more@]4. 使用 virt-what 指令
# yum install virt-what
# apt-get install virt-what
在 VMware
# virt-what
vmware
在 Proxmox
# virt-what
lxc
在 VirtualBox
# virt-what
virtualbox

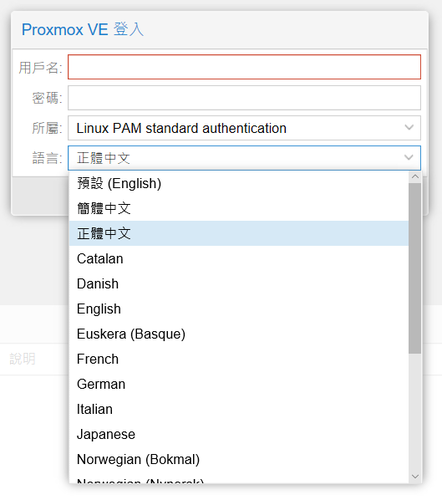
Proxmox 介面中文化

雖然已經很習慣英文版的介面,但無聊閒暇之餘,還是自己動手改了一下!
[@more@]1. 備份原檔
# cp /usr/share/pve-manager/ext6/pvemanagerlib.js /usr/share/pve-manager/ext6/pvemanagerlib.js.$(date +%F)

2. 將簡體中文部分由 Chinese 改成簡體中文
# sed -i ‘s/Chinese/簡體中文/’ /usr/share/pve-manager/ext6/pvemanagerlib.js

3. 在簡體中文之下新增一行
# sed -i “/簡體中文/atzh_TW: ‘正體中文’,” /usr/share/pve-manager/ext6/pvemanagerlib.js

4. 轉換簡體中文的語系檔
# cd /usr/share/pve-manager/locale
# iconv pve-lang-zh_CN.js -f utf8 -t gb2312 | iconv -f gb2312 -t big5 | iconv -f big5 -t utf8 -o pve-lang-zh_TW.js
或下載
# wget https://2blog.ilc.edu.tw/wp-content/uploads/sites/985/25793/25793-3787742.zip

5. 解壓縮並設定擁有者及群組
# apt-get install zip unzip
# unzip 25793-3787742.zip -d /usr/share/pve-manager/locale
# chown -R www-data:www-data /usr/share/pve-manager/locale/pve-lang-zh_TW.js

6. 成果,已儘量修改

Proxmox – Debian 8 LXC 初始環境設定

1. 將更新的 Server 都指向國家高速網路中心
$ sudo cp /etc/apt/sources.list /etc/apt/sources.list.$(date +%F)
$ sudo sed -i ‘s/ftp.debian.org/free.nchc.org.tw/g’ /etc/apt/sources.list

清除所有的
$ sudo apt-get clean all
更新套件庫
$ sudo apt-get update

2. 進行套件更新
$ sudo apt-get upgrade

[@more@]3. 補足缺少的套件
$ sudo apt-get install vim zip unzip mailutils ntpdate rsync sysv-rc-conf

4. 讓終端機程式可以輸入及顯示中文
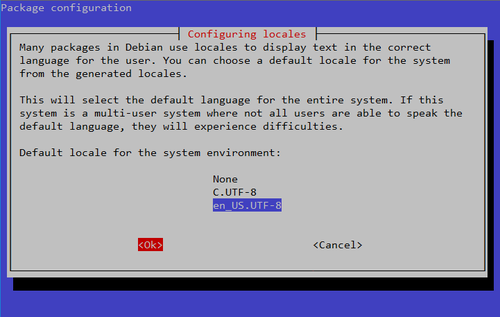
$ sudo dpkg-reconfigure locales
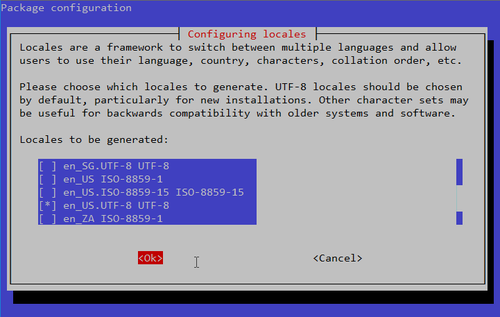
 

$ cat /etc/default/locale
LANG=en_US.UTF-8
LANGUAGE=en_US.UTF-8

$ /usr/bin/locale
LANG=en_US.UTF-8
LANGUAGE=
LC_CTYPE=”en_US.UTF-8″
LC_NUMERIC=”en_US.UTF-8″
LC_TIME=”en_US.UTF-8″
LC_COLLATE=”en_US.UTF-8″
LC_MONETARY=”en_US.UTF-8″
LC_MESSAGES=”en_US.UTF-8″
LC_PAPER=”en_US.UTF-8″
LC_NAME=”en_US.UTF-8″
LC_ADDRESS=”en_US.UTF-8″
LC_TELEPHONE=”en_US.UTF-8″
LC_MEASUREMENT=”en_US.UTF-8″
LC_IDENTIFICATION=”en_US.UTF-8″
LC_ALL=

5. 時區及預設編輯器設定
$ sudo tail -2 /etc/profile
export TZ=”Asia/Taipei”
export EDITOR=”/usr/bin/vim”

# /usr/bin/tzselect
Please identify a location so that time zone rules can be set correctly.
Please select a continent, ocean, “coord”, or “TZ”.
 1) Africa
 2) Americas
 3) Antarctica
 4) Arctic Ocean
 5) Asia
 6) Atlantic Ocean
 7) Australia
 8) Europe
 9) Indian Ocean
10) Pacific Ocean
11) coord – I want to use geographical coordinates.
12) TZ – I want to specify the time zone using the Posix TZ format.
#? 5
Please select a country whose clocks agree with yours.
 1) Afghanistan           18) Israel                35) Palestine
 2) Armenia               19) Japan                 36) Philippines
 3) Azerbaijan            20) Jordan                37) Qatar
 4) Bahrain               21) Kazakhstan            38) Russia
 5) Bangladesh            22) Korea (North)         39) Saudi Arabia
 6) Bhutan                23) Korea (South)         40) Singapore
 7) Brunei                24) Kuwait                41) Sri Lanka
 8) Cambodia              25) Kyrgyzstan            42) Syria
 9) China                 26) Laos                  43) Taiwan
10) Cyprus                27) Lebanon               44) Tajikistan
11) East Timor            28) Macau                 45) Thailand
12) Georgia               29) Malaysia              46) Turkmenistan
13) Hong Kong             30) Mongolia              47) United Arab Emirates
14) India                 31) Myanmar (Burma)       48) Uzbekistan
15) Indonesia             32) Nepal                 49) Vietnam
16) Iran                  33) Oman                  50) Yemen
17) Iraq                  34) Pakistan
#? 43

The following information has been given:

        Taiwan

Therefore TZ=’Asia/Taipei’ will be used.
Local time is now:      Tue Feb 28 22:47:26 CST 2017.
Universal Time is now:  Tue Feb 28 14:47:26 UTC 2017.
Is the above information OK?
1) Yes
2) No
#? 1

You can make this change permanent for yourself by appending the line
        TZ=’Asia/Taipei’; export TZ
to the file ‘.profile’ in your home directory; then log out and log in again.

Here is that TZ value again, this time on standard output so that you
can use the /usr/bin/tzselect command in shell scripts:
Asia/Taipei

6. 安裝 snmpd
$ sudo apt-get install snmpd snmp
$ sudo mv /etc/snmp/snmpd.conf /etc/snmp/snmpd.conf.$(date +%F)

$ sudo echo ‘rocommunity public’ > /etc/snmp/snmpd.conf
$ sudo  chmod 600 /etc/snmp/snmpd.conf
$ sudo update-rc.d snmpd defaults
$ sudo /etc/init.d/snmpd restart
Proxmox – 解決在 LXC 無法啟動 OpenVPN

在 Proxmox LXC 安裝 OpenVPN,並設定完成啟動後,出現下面的錯誤訊息
# systemctl status openvpn@server.service
● openvpn@server.service – OpenVPN connection to server
   Loaded: loaded (/lib/systemd/system/openvpn@.service; enabled; vendor preset: enabled)
   Active: failed (Result: exit-code) since Mon 2017-02-20 19:17:06 CST; 6s ago
     Docs: man:openvpn(8)
           https://community.openvpn.net/openvpn/wiki/Openvpn23ManPage
           https://community.openvpn.net/openvpn/wiki/HOWTO
  Process: 1585 ExecStart=/usr/sbin/openvpn –daemon ovpn-%i –status /run/openvpn/%i.status 10 –cd /etc/openvpn –script-security 2 –config /etc/openvpn/%i.conf –writepid /run/openvpn/%i.pid (code=exited, st
 Main PID: 1586 (code=exited, status=1/FAILURE)

Feb 20 19:17:06 vpn systemd[1]: Starting OpenVPN connection to server…
Feb 20 19:17:06 vpn systemd[1]: openvpn@server.service: PID file /run/openvpn/server.pid not readable (yet?) after start: No such file or directory
Feb 20 19:17:06 vpn systemd[1]: Started OpenVPN connection to server.
Feb 20 19:17:06 vpn systemd[1]: openvpn@server.service: Main process exited, code=exited, status=1/FAILURE
Feb 20 19:17:06 vpn systemd[1]: openvpn@server.service: Unit entered failed state.
Feb 20 19:17:06 vpn systemd[1]: openvpn@server.service: Failed with result ‘exit-code’.[@more@]參考網站:
Setup OpenVPN on Proxmox LXC – Hungred Dot Com

登入 LXC 後
# cd /dev
# mkdir net
# mknod net/tun c 10 200
# chmod 0666 net/tun
# ls -l /dev/net/tun
crw-rw-rw- 1 root root 10, 200 Feb 20 19:24 /dev/net/tun

或直接寫在 /etc/rc.local 之中
# vim /etc/rc.local
加入下面幾行
mkdir /dev/net
mknod /dev/net/tun c 10 200
chmod 0666 /dev/net/tun

OpenVPN 可以正常執行
# systemctl status openvpn@server.service
● openvpn@server.service – OpenVPN connection to server
   Loaded: loaded (/lib/systemd/system/openvpn@.service; enabled; vendor preset: enabled)
   Active: active (running) since Mon 2017-02-20 19:24:33 CST; 18s ago
     Docs: man:openvpn(8)
           https://community.openvpn.net/openvpn/wiki/Openvpn23ManPage
           https://community.openvpn.net/openvpn/wiki/HOWTO
  Process: 1600 ExecStart=/usr/sbin/openvpn –daemon ovpn-%i –status /run/openvpn/%i.status 10 –cd /etc/openvpn –script-security 2 –config /etc/openvpn/%i.conf –writepid /run/openvpn/%i.pid (code=exited, st
 Main PID: 1601 (openvpn)
   CGroup: /system.slice/system-openvpn.slice/openvpn@server.service
           mq1601 /usr/sbin/openvpn –daemon ovpn-server –status /run/openvpn/server.status 10 –cd /etc/openvpn –script-security 2 –config /etc/openvpn/server.conf –writepid /run/openvpn/server.pid

Feb 20 19:24:33 vpn systemd[1]: Starting OpenVPN connection to server…
Feb 20 19:24:33 vpn systemd[1]: openvpn@server.service: PID file /run/openvpn/server.pid not readable (yet?) after start: No such file or directory
Feb 20 19:24:33 vpn systemd[1]: Started OpenVPN connection to server.

server.pid 沒有找不到
# ls -l /var/run/openvpn/server.pid
-rw-r–r– 1 root root 5 Feb 20 19:24 /var/run/openvpn/server.pid
# ls -l /run/openvpn/server.pid
-rw-r–r– 1 root root 5 Feb 20 19:24 /run/openvpn/server.pid

執行 OpenVPN 後產生的 tun0 介面
# ifconfig tun0
tun0      Link encap:UNSPEC  HWaddr 00-00-00-00-00-00-00-00-00-00-00-00-00-00-00-00
          inet addr:10.1.0.1  P-t-P:10.1.0.2  Mask:255.255.255.255
          UP POINTOPOINT RUNNING NOARP MULTICAST  MTU:1500  Metric:1
          RX packets:0 errors:0 dropped:0 overruns:0 frame:0
          TX packets:0 errors:0 dropped:0 overruns:0 carrier:0
          collisions:0 txqueuelen:100
          RX bytes:0 (0.0 B)  TX bytes:0 (0.0 B)

Proxmox – 解決在 CentOS 7 上啟動 fail2ban 出現的錯誤訊息

啟動 fail2ban 出現錯誤訊息
# systemctl status fail2ban
● fail2ban.service – Fail2Ban Service
   Loaded: loaded (/usr/lib/systemd/system/fail2ban.service; enabled; vendor preset: disabled)
   Active: failed (Result: start-limit) since Fri 2017-02-17 12:46:16 CST; 2min 55s ago
     Docs: man:fail2ban(1)
  Process: 972 ExecStart=/usr/bin/fail2ban-client -x start (code=exited, status=255)

Feb 17 12:46:16 NPC11 systemd[1]: Failed to start Fail2Ban Service.
Feb 17 12:46:16 NPC11 systemd[1]: Unit fail2ban.service entered failed state.
Feb 17 12:46:16 NPC11 systemd[1]: fail2ban.service failed.
Feb 17 12:46:16 NPC11 systemd[1]: fail2ban.service holdoff time over, sche…t.
Feb 17 12:46:16 NPC11 systemd[1]: start request repeated too quickly for f…ce
Feb 17 12:46:16 NPC11 systemd[1]: Failed to start Fail2Ban Service.
Feb 17 12:46:16 NPC11 systemd[1]: Unit fail2ban.service entered failed state.
Feb 17 12:46:16 NPC11 systemd[1]: fail2ban.service failed.
Hint: Some lines were ellipsized, use -l to show in full.

檢查 /var/log/message 中的紀錄
# grep -i fail2ban /var/log/message
Feb 17 04:46:15 NPC11 systemd: Starting Fail2Ban Service…

Feb 17 04:46:15 NPC11 fail2ban-client: ERROR  There is no directory /var/run/fail2ban to contain the socket file /var/run/fail2ban/fail2ban.sock.
Feb 17 04:46:15 NPC11 systemd: fail2ban.service: control process exited, code=exited status=255
Feb 17 04:46:15 NPC11 systemd: Failed to start Fail2Ban Service.
Feb 17 04:46:15 NPC11 systemd: Unit fail2ban.service entered failed state.
Feb 17 04:46:15 NPC11 systemd: fail2ban.service failed.

看起來似乎是在 /var/run/fail2ban 目錄下找不到 fail2ban.sock 這一個檔案
[@more@]解決方式:
1. 建立目錄
# mkdir /var/run/fail2ban

2. 重新啟動 fail2ban 就正常了!
# systemctl enable fail2ban.service;systemctl start fail2ban.service

Proxmox – LVM

掃描目前實體卷冊的狀態
# pvscan
  PV /dev/sda3   VG pve   lvm2 [118.99 GiB / 14.61 GiB free]
  Total: 1 [118.99 GiB] / in use: 1 [118.99 GiB] / in no VG: 0 [0   ]

掃描目前卷冊群組的狀態
# vgscan
  Reading all physical volumes.  This may take a while…
  Found volume group “pve” using metadata type lvm2

顯示目前系統上面的 VG 狀態
# vgdisplay pve
  — Volume group —
  VG Name               pve
  System ID
  Format                lvm2
  Metadata Areas        1
  Metadata Sequence No  80
  VG Access             read/write
  VG Status             resizable
  MAX LV                0
  Cur LV                5
  Open LV               2
  Max PV                0
  Cur PV                1
  Act PV                1
  VG Size               118.99 GiB
  PE Size               4.00 MiB
  Total PE              30461
  Alloc PE / Size       26720 / 104.38 GiB
  Free  PE / Size       3741 / 14.61 GiB
  VG UUID               M7GUTE-om2m-DMcv-1D0G-o3FQ-Ta3I-HCsZa3
[@more@]

# lvs
  LV                    VG   Attr       LSize  Pool Origin        Data%  Meta%  Move Log Cpy%Sync Convert
  data                  pve  twi-aotz– 66.74g                    1.69   1.36
  root                  pve  -wi-ao—- 29.50g
  snap_vm-103-disk-1_OK pve  Vri—tz-k  8.00g data vm-103-disk-1
  swap                  pve  -wi-ao—-  8.00g
  vm-103-disk-1         pve  Vwi-a-tz–  8.00g data               13.88

顯示硬碟分割
# fdisk -l
Device      Start       End   Sectors  Size Type
/dev/sda1    2048      4095      2048    1M BIOS boot
/dev/sda2    4096    528383    524288  256M EFI System
/dev/sda3  528384 250069646 249541263  119G Linux LVM

Disk /dev/mapper/pve-root: 29.5 GiB, 31675383808 bytes, 61865984 sectors
Units: sectors of 1 * 512 = 512 bytes
Sector size (logical/physical): 512 bytes / 512 bytes
I/O size (minimum/optimal): 512 bytes / 512 bytes
Disk /dev/mapper/pve-swap: 8 GiB, 8589934592 bytes, 16777216 sectors
Units: sectors of 1 * 512 = 512 bytes
Sector size (logical/physical): 512 bytes / 512 bytes
I/O size (minimum/optimal): 512 bytes / 512 bytes
Disk /dev/mapper/pve-vm–103–disk–1: 8 GiB, 8589934592 bytes, 16777216 sectors
Units: sectors of 1 * 512 = 512 bytes
Sector size (logical/physical): 512 bytes / 512 bytes
I/O size (minimum/optimal): 65536 bytes / 65536 bytes

掃描目前邏輯卷冊的狀態
# lvscan
  ACTIVE            ‘/dev/pve/swap‘ [8.00 GiB] inherit
  ACTIVE            ‘/dev/pve/root‘ [29.50 GiB] inherit
  ACTIVE            ‘/dev/pve/data‘ [66.74 GiB] inherit
  ACTIVE            ‘/dev/pve/vm-103-disk-1‘ [8.00 GiB] inherit
  inactive          ‘/dev/pve/snap_vm-103-disk-1_OK‘ [8.00 GiB] inherit

# vgs
  VG   #PV #LV #SN Attr   VSize   VFree
  pve    1   5   0 wz–n- 118.99g 14.61g