解決 FTP 時 550 Failed to change directory. 的問題

在建立 PXE Server 時,有透過 FTP 的方式來網路安裝 Linux,是使用 ln -s(Symbolic Link) 的方式來連結。
# ln -s /var/www/html/CentOS /var/ftp/CentOS

但建立完之後,使用 ftp 連線時,卻發現無法切換到 CentOS 目錄,出現 550 Failed to change directory 的錯誤訊息
# lftp 192.168.1.6
lftp 192.168.1.6:~> ls
lrwxrwxrwx    1 0        0              20 Jan 08 09:31 CentOS -> /var/www/html/CentOS
drwxr-xr-x    2 0        0            4096 Jan 08 09:29 Linux
drwxr-xr-x    2 0        0            4096 Jan 06 19:16 pub
lftp 192.168.1.6:/> cd CentOS/
cd: Access failed: 550 Failed to change directory. (/CentOS)
lftp 192.168.1.6:/> bye
[@more@]本來以為是 SELinux 的問題,幾乎把所有有關 ftp 的選項都打開了,也是沒有辦法
# getsebool -a | grep ftp
allow_ftpd_anon_write –> off
allow_ftpd_full_access –> on
allow_ftpd_use_cifs –> off
allow_ftpd_use_nfs –> off
ftp_home_dir –> on
ftpd_connect_db –> off
ftpd_use_fusefs –> off
ftpd_use_passive_mode –> on
httpd_enable_ftp_server –> off
tftp_anon_write –> off
tftp_use_cifs –> off
tftp_use_nfs –> off

後來乾脆來 SELinux 整個關掉,也是不行

後來在網路上找了很久,終於找到這一篇文章 網路一族: vsftp 出現 550 failed to change directory
文章中提到的第 2 點,可能是 Soft Link 的問題,因為 chroot 不能使用 Link 的功能

根據這一個提示,在網路上搜尋 Soft Link 550,在 FileZilla Forums • View topic – Symbolic links cause error 550 because path is too deep  找到了解決的方式

刪除原來的 Link
# rm -rf /var/ftp/CentOS
建立要連結的目錄
# mkdir /var/ftp/CentOS
使用 mount –bind 的方式來建立連結
 # mount –bind /var/www/html/CentOS /var/ftp/CentOS

這樣子就可以正常切換到 /var/ftp/CentOS 目錄了!

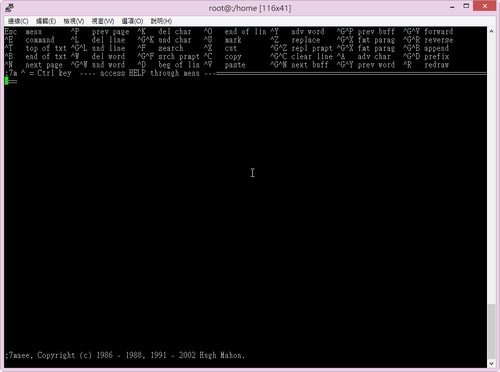
安裝 aeasyedit 文字編輯器

剛接觸 Linux / BSD 對於系統上的文字編輯器 vi  / vim,一時之間不太習慣它的用法,所以才有各式各樣的編輯器,如:joe / ee…等等的替代編輯器,aeasyedit 也是其中的一套,它是由 Hugh Mahon 所開發,它的特別之處是它把常用到的一些功能按鍵就直接顯示在畫面上,並且使用了一些在 Windows 平台上軟體常用的快速鍵,如:Ctrl+C / Ctrl+V / Ctrl+X 等。使用者就不用記那麼多的按鍵了。
[@more@]安裝方式:
因為 aeasyedit 不是官方套件中的套件,所以要使用 rpmforge 套件庫來安裝
# yum install aeasyedit –enablerepo=rpmforge

安裝之後執行 aee 即可
# aee

Esc 鍵 — 出現功能表
Ctrl+E — 呼叫命令列,類似 vi / vim 的 Esc 鍵 + :
Ctrl+T — 檔案最前面
Ctrl+B — 檔案最後面
Ctrl+N– 下一頁
Ctrl+P — 上一頁
Ctrl+L — 刪除游標所在行
Ctrl+G+L — 復原刪掉的那一行
Ctrl+W — 刪除一個字串
Ctrl+G+W — 復原刪除的字串
Ctrl+K —  刪除字元
Ctrl+G+K — 復原刪除的字元
Ctrl+F — 搜尋
Ctrl+G+F — 輸入要搜尋的字串
Ctrl+D — 移動游標到所在行的開頭
Ctrl+O — 移動游標到所在行的尾端
Ctrl+U — 標記
Ctrl+X — 剪下
Ctrl+C — 複製
Ctrl+V — 貼上
Ctrl+Z — 取代

squid Proxy Server 使用 LDAP Server 做認證

1. 修改設定檔
# vim /etc/squid/squid.conf
在 acl 區段加入下面這二行,192.168.154.167 為 LDAP Server’ IP
acl squid_user proxy_auth REQUIRED
auth_param basic program /usr/lib64/squid/squid_ldap_auth -b “dc=ldap,dc=tces.ilc.edu.tw” -h 192.168.154.167 -f “uid=%s”

2. 在 /etc/squid/squid.conf 中的 http_access deny all 前面加入下面這一行
http_access allow squid_user

3. 重新啟動 Squid Proxy Server
# server squid restart
[@more@]

檢驗是否有成功
# grep -v t850008 /var/log/squid/access.log | tail -5
1389089280.327     32 192.168.220.14 TCP_CLIENT_REFRESH_MISS/200 2722 GET http://safebrowsing-cache.google.com/safebrowsing/rd/ChNnb29nLW1hbHdhcmUtc2hhdmFyEAEYtdwHILrcByoFOe4BAAMyBTXuAQAP t850008 DIRECT/2404:6800:4008:c02::64 application/vnd.google.safebrowsing-chunk
1389089280.368     12 192.168.220.14 TCP_CLIENT_REFRESH_MISS/200 4471 GET http://safebrowsing-cache.google.com/safebrowsing/rd/ChNnb29nLW1hbHdhcmUtc2hhdmFyEAAYhZIIIJiSCCoGDwkCAP8DMgYFCQIA_wM t850008 DIRECT/2404:6800:4008:c02::64 application/vnd.google.safebrowsing-chunk
1389089280.414     12 192.168.220.14 TCP_CLIENT_REFRESH_MISS/200 4977 GET http://safebrowsing-cache.google.com/safebrowsing/rd/ChFnb29nLXBoaXNoLXNoYXZhchABGOe5CSDsuQkyBedcAgA_ t850008 DIRECT/2404:6800:4008:c02::64 application/vnd.google.safebrowsing-chunk
1389089280.460     12 111.249.220.14 TCP_CLIENT_REFRESH_MISS/200 2445 GET http://safebrowsing-cache.google.com/safebrowsing/rd/ChFnb29nLXBoaXNoLXNoYXZhchABGO25CSCAugkqB-5cAgD__wcyBe1cAgAB t850008 DIRECT/2404:6800:4008:c02::64 application/vnd.google.safebrowsing-chunk
1389089280.494     12 192.168.220.14 TCP_CLIENT_REFRESH_MISS/200 4918 GET http://safebrowsing-cache.google.com/safebrowsing/rd/ChFnb29nLXBoaXNoLXNoYXZhchAAGMPyEiDM8hIqBUa5BAB_MgVDuQQABw t850008 DIRECT/2404:6800:4008:c02::64 application/vnd.google.safebrowsing-chunk

將 ldapsearch 輸出內容 (LDIF) 轉 UTF-8 編碼

因為 LDAP 的中文是使用 Base64 編碼過,所以要經過轉換成 utf8,才能夠看的懂,之前已經有找到是利用 php 程式來轉換,不過並不是所有的電腦都會安裝 php,最好的方式是直接使用系統內部的程式來轉換,經過一番搜尋,終於在 O老猴的失憶錄: OpenLDAP 中文顯示亂碼 ,找到了解答。
方式就是利用 alias 命令別名
# vim /etc/profile 或 vim $HOME/.bash_profile

alias un64=’awk ”’BEGIN{FS=”:: “;c=”base64 -d”}{if(/w+:: /) {print $2 |& c; close(c,”to”); c |& getline $2; close(c); printf(“%s:: %sn”, $1, $2); next} print $0 }””

讓命令生效
# source /etc/profile

# source $HOME/.bash_profile

使用方式:
# /usr/bin/ldapsearch -x -b “ou=Teacher,dc=ldap,dc=tces.ilc.edu.tw” uid=* | un64

建立 PXE Server 透過網路安裝 Linux

原本自己在安裝 Linux 時,都是自己客製化 Linux,挑選要安裝的套件,並做一些系統的調整後,做成 ISO 光碟,然後利用卡碟機來安裝,雖然很方便,但如果有同時多台要安裝,就會有些麻煩,所以想要利用 PXE(Preboot Execution Environment)  的功能,直接從網路上下載來安裝,另外一方面,現在的電腦主機絕大部分都有支援從 PXE 網路開機的功能,只不過在 BIOS 中預設是關閉的,只要打開就可以了![@more@]底下文章參考 鳥哥的 Linux 私房菜 — 安裝伺服器與 kickstart 和 CentOS 6 PXE Server Install (DHCP+TFTP+HTTP(FTP)+Kickstart) – ghoseliang- 點部落 完成

安裝 PXE Server 的方式
1. 安裝 DHCP Server
# yum install dhcp

2. 設定 DHCP Server
# vim /etc/dhcp/dhcpd.conf
Authoritative;
default-lease-time                      259200;
max-lease-time                          518400;
option routers                          192.168.1.254;
option broadcast-address                192.168.1.255;
option subnet-mask                      255.255.255.0;
option domain-name-servers              140.111.66.10,168.95.1.1,8.8.8.8;
ddns-update-style                       none;
server-name                             pxe;

subnet 192.168.1.0 netmask 255.255.255.0 {
    range 192.168.1.61 192.168.1.65;
    option subnet-mask                  255.255.255.0;
    option domain-name                  “pxe.tces.edu”;
    next-server 192.168.1.6;
    filename “pxelinux.0”;

}

3. 啟動 DHCP Server,並設定成開機時啟動
# chkconfig –level 3 dhcpd on
# service dhcpd start
正在啟動 dhcpd:                                           [  確定  ]
檢查 DHCP Server 是否有正常執行
# netstat -antulp | grep dhcp
udp        0      0 0.0.0.0:67                  0.0.0.0:*                               5526/dhcpd

4. 安裝 tftp Server
# yum install tftp-server tftp

5. 修改 /etc/xinetd.d/tftp
# vim /etc/xinetd.d/tftp
service tftp
{
        socket_type             = dgram
        protocol                = udp
        wait                    = yes
        user                    = root
        server                  = /usr/sbin/in.tftpd
        server_args             = -s /var/lib/tftpboot
        disable                 = no
        per_source              = 11
        cps                     = 100 2
        flags                   = IPv4
}

6. 啟動 tftp 服務
# /etc/init.d/xinetd start
正在啟動 xinetd:                                          [  確定  ]
# chkconfig –level 3 xinetd on
# chkconfig –level 3 tftp on
# netstat -antulp | grep xinetd
udp        0      0 0.0.0.0:69                  0.0.0.0:*                               5595/xinetd

7. 安裝 syslinux 套件
# yum install syslinux

8.複製設定檔到 /var/lib/tftpboot 目錄
# cp /usr/share/syslinux/menu.c32  /var/lib/tftpboot
# cp /usr/share/syslinux/vesamenu.c32 /var/lib/tftpboot
# cp /usr/share/syslinux/pxelinux.0 /var/lib/tftpboot
# cp /usr/share/syslinux/memdisk /var/lib/tftpboot
# cp /usr/share/syslinux/mboot.c32 /var/lib/tftpboot
# cp /usr/share/syslinux/chain.c32 /var/lib/tftpboot

9. 建立 /var/lib/tftpboot/pxelinux.cfg 目錄,用來存放 PXE 開機時 Client 端的一些設定
# mkdir /var/lib/tftpboot/pxelinux.cfg

10. 下載 Linux ISO 光碟,並掛載
建立掛載目錄
# mkdir -p /mnt/{x86_64,i386}
掛載 ISO 檔
# mount -o loop /var/ftp/pub/CentOS-6.5-x86_64-bin-DVD1.iso /mnt/x86_64
# mount -o loop /var/ftp/pub/CentOS-6.5-i386-bin-DVD1.iso /mnt/i386

11.  建立支援 HTTP 安裝的目錄,並複製 ISO 檔光碟的檔案
# mkdir -p /var/www/html/CentOS/6.5/os/{x86_64,i386}
# cp -ra /mnt/x86_64/* /var/www/html/CentOS/6.5/os/x86_64
# cp -ra /mnt/i386/* /var/www/html/CentOS/6.5/os/i386
如果系統有啟動 SELinux,要多執行下面的動作
# restorecon -R -v /var/www/html

12. 建立支援 FTP 安裝的目錄
# ln -s /var/www/html/CentOS /var/ftp
如果系統有啟動 SELinux,要多執行下面的動作
# restorecon -r /var/ftp
# setsebool -P ftp_home_dir=1
# setsebool -P allow_ftpd_full_access on

13. 建立 PXE 開機所須的目錄,並複製開機檔案到對應的目錄
# mkdir -p /var/lib/tftpboot/images/CentOS/6.5/{x86_64,i386}
# cp /mnt/x86_64/images/pxeboot/vmlinuz /var/lib/tftpboot/images/CentOS/6.5/x86_64
# cp /mnt/x86_64/images/pxeboot/initrd.img /var/lib/tftpboot/images/CentOS/6.5/x86_64
# cp /mnt/i386/images/pxeboot/vmlinuz /var/lib/tftpboot/images/CentOS/6.5/i386
# cp /mnt/i386/images/pxeboot/initrd.img /var/lib/tftpboot/images/CentOS/6.5/i386

建立 PXE 開機的開機選單
# vim /var/lib/tftpboot/pxelinux.cfg/default
UI vesamenu.c32
TIMEOUT 300
DISPLAY ./boot.msg
MENU TITLE Welcom to Tou-Cheng Elementary School PXE Server System

LABEL local
  MENU LABEL Boot from local drive
  MENU DEFAULT
  localboot 0

LABEL Install CentOS 6.5 x86_64 from FTP
  MENU LABEL Install CentOS 6.5 x86_64 from FTP
  kernel images/CentOS/6.5/x86_64/vmlinuz
  append initrd=images/CentOS/6.5/x86_64/initrd.img method=ftp://192.168.1.6/CentOS/6.5/os/x86_64/

LABEL Install CentOS 6.5 x86_64 from HTTP
  MENU LABEL Install CentOS 6.5 x86_64 from HTTP
  kernel images/CentOS/6.5/x86_64/vmlinuz
  append initrd=images/CentOS/6.5/x86_64/initrd.img method=http://192.168.1.6/CentOS/6.5/os/x86_64/

  建立 PXE 開機的 boot.msg 開機訊息
# vim /var/lib/tftpboot/boot.msg
Welcom to Tou-Cheng Elementary School PXE Server System

The 1st menu can let you system goto hard disk menu.
The 2st menu can goto interactive installation step.

備份及還原 Pietty 的連線設定

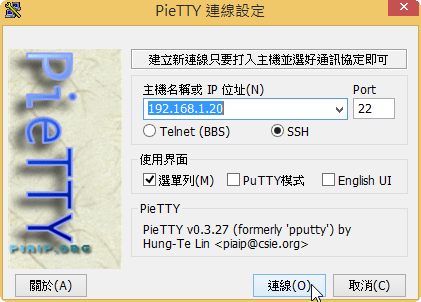
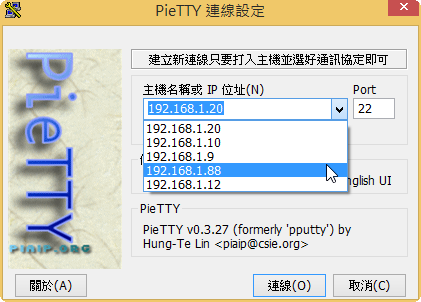
pietty 是一套在 Windows 平台中 ssh client 的連線程式,它是我每天必用的一套程式,程式非常小,不用安裝,支援終端機的彩色設定,但它缺乏一些像是分頁功能和站台管理的功能。
pietty 官方網站:http://ntu.csie.org/~piaip/pietty/
pietty 執行畫面

沒有站台管理可以使用,到另外一台,又要重新設定一次
[@more@]解決方式:
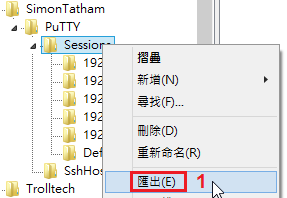
1. 使用 Windows 登錄編輯器,匯出 pietty 的設定 [HKEY_CURRENT_USERSoftwareSimonTathamPuTTYSessions]

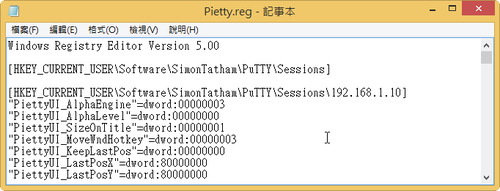
匯出的檔案內容

到別台電腦再匯入登錄檔即可!

使用登錄檔來設定 Internet Explorer 的 Proxy Server

Internet Explorer 中 Proxy Server 的設定步驟非常的多, 如果可以利用 Windows 登錄檔來做設定,一定方便許多。
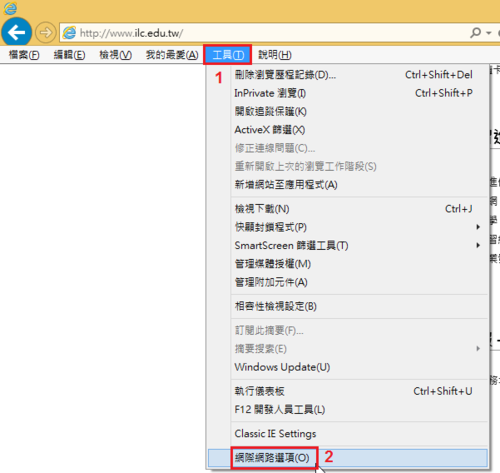
選擇 工具 / 網際網路選項
[@more@]
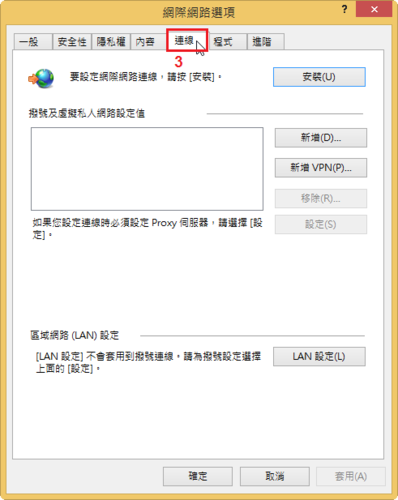
選擇 連線

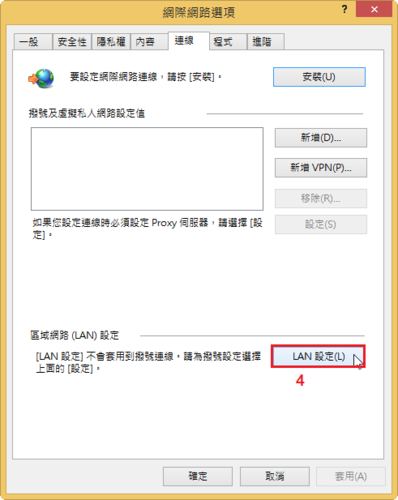
選擇 LAN 設定

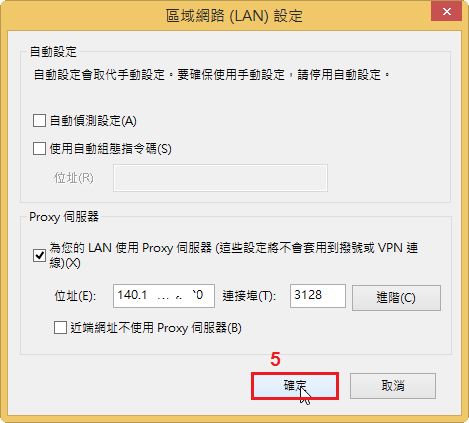
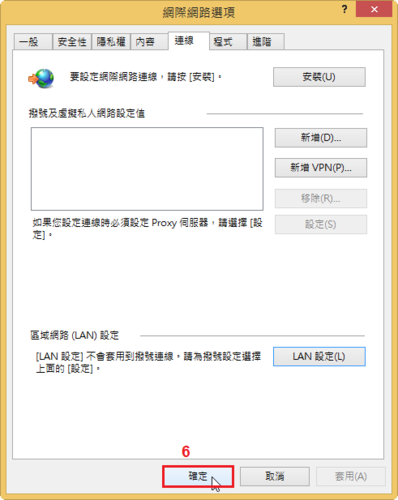
輸入 Proxy Server 的 IP 和使用的 Port,然後按 確定

最後再按 確定

1. 首先先下載設定好的登錄檔,請按 這裡

2. 使用 7zip 解壓縮

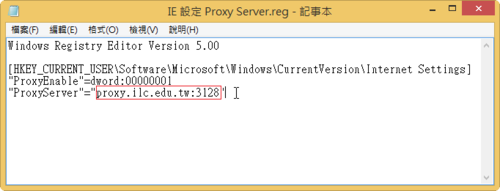
3. 修改 IE 設定 Proxy Server.reg 中的 Proxy Server 的 IP 或 Domain Name 和使用的 Port
檔案中的設定是宜蘭縣網的 Proxy Server:proxy.ilc.edu.tw:3128
                         中華電信是 proxy.hinet.net:80

4. 最後按二下就可以完成設定

5. 如果要還原設定,就按二下 IE 解除 Proxy Server.reg 即可!

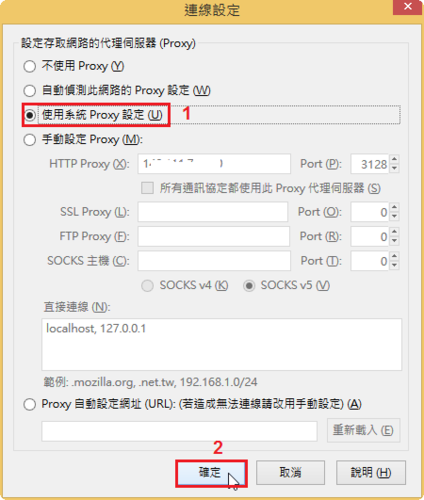
Google Chrome 會自動抓 Internet Explorer 的設定,Mozilla Firefox 則只要設定成 使用系統 Proxy 設定 即可!
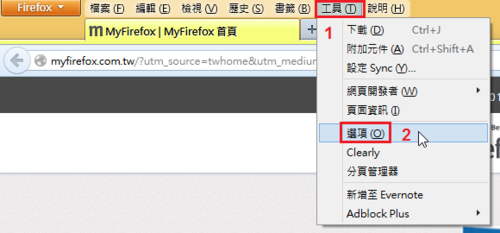
選擇 工具 / 選項

選擇 進階 / 網路 / 設定

選擇 使用系統 Proxy 設定,然後按 確定

squid Proxy Server 使用帳號密碼做認證

最近因應某些需求,除了可以用 VPN 來解決外,也思考用 squid Proxy Server 解決的可能方式。
1. 修改設定檔
# vim /etc/squid/squid.conf
在 acl 區段加入下面這二行
acl squid_user proxy_auth REQUIRED
auth_param basic program /usr/lib64/squid/ncsa_auth /etc/squid/passwd

2. 在 /etc/squid/squid.conf 中的 http_access deny all 前面加入下面這一行
http_access allow squid_user
[@more@]
3. 建立所須的密碼檔
這裡建立二個使用者 teacher01 和 student01
# /usr/bin/htpasswd -b -c /etc/squid/passwd teacher01 123456
Adding password for user teacher01
# /usr/bin/htpasswd -b  /etc/squid/passwd student01 234567
Adding password for user student01

檢查帳號是否有設定成功
# more /etc/squid/passwd
teacher01:Z6gIorvSGN/UI
student01:jbqLqf5mmJQKE

4. 重新啟動 squid Proxy Server
# service squid restart

5. 開啟瀏覽器,做 Proxy Server 的設定,以 IE 為例

選擇 工具 / 網際網路選項

選擇 連線

選擇 LAN 設定

輸入 Proxy Server 的 IP 和使用的 Port,然後按 確定

最後再按 確定

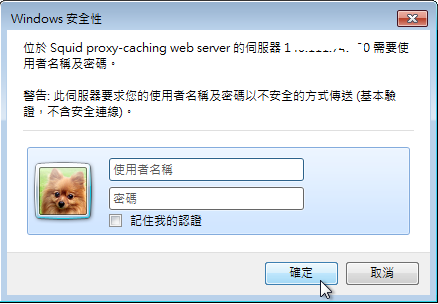
設定完成之後,要連線時,會出現要求輸入帳號及密碼的畫面

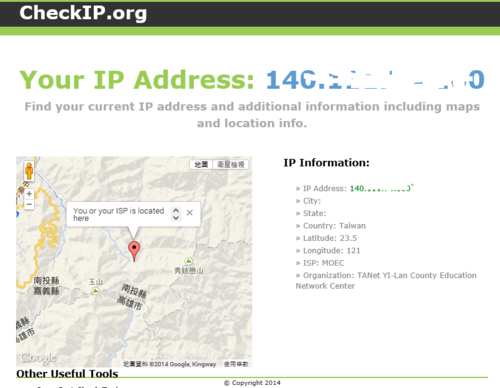
連線 IP 已改成 Proxy Server IP

員工業務網也沒有問題

如果 Firefox 要採用和 IE 一樣的設定

選擇 工具 / 選項

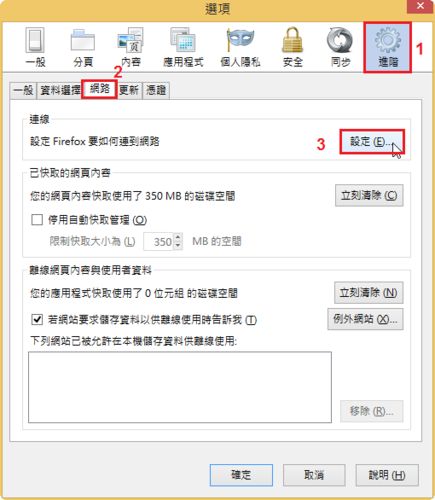
選擇 進階 / 網路 / 設定

選擇 使用系統 Proxy 設定,然後按 確定

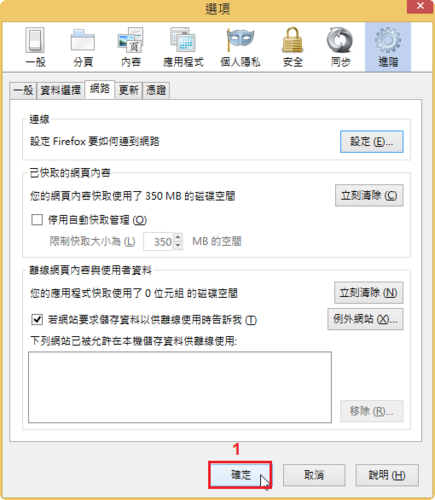
最後按 確定

FTP Server 的被動模式 – vsftpd FTP Server & Pure-FTPd FTP Server

vsftpd FTP Server 的被動模式
# vim /etc/vsftpd/vsftpd.conf
加入下面三行
pasv_enable=YES
pasv_min_port=60000
pasv_max_port=61000

重新啟動 vsftpd FTP Server
# service vsftpd restart
正在關閉 vsftpd:                                          [  確定  ]
正在啟動 vsftpd 中的 vsftpd:                              [  確定  ]
[@more@]

修改 Pure-FTPd FTP Server 設定檔
# vim /etc/pure-ftpd/pure-ftpd.conf
找到
# PassivePortRange          30000 50000
把前面的 # 刪除即可
PassivePortRange          60000 61000

重新啟動 Pure-FTPd FTP Server
# service pure-ftpd restart
正在停止 pure-ftpd:                                       [  確定  ]
正在啟動 pure-ftpd:                                       [  確定  ]

FTP Server 的被動模式 – ProFTP FTP Server

在測試 FTP Server 是否可以正常連線時,通常都是用指令模式來測試,後來在 Windows 平台上用 FileZilla / Xftp 時,才發現無法連線,測試一下,原來是 FTP Server 沒有設定成被動模式,而防火牆中也沒有開啟 FTP Server 被動模式所要用的 Port。
底下是以 FileZilla 做測試
在 FTP Server 和 iptables 防火牆沒做任何設定時

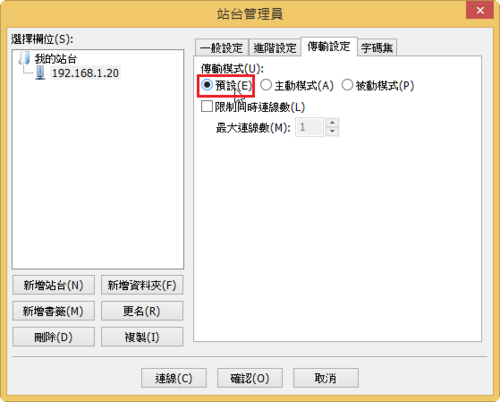
1. 使用預設模式
[@more@]
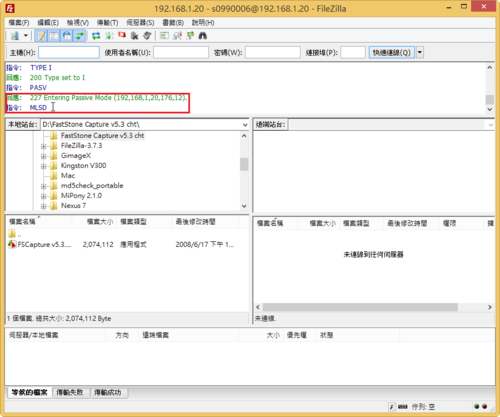
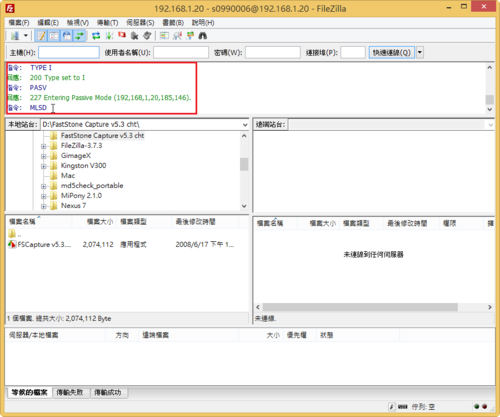
卡在 MLSD 很久

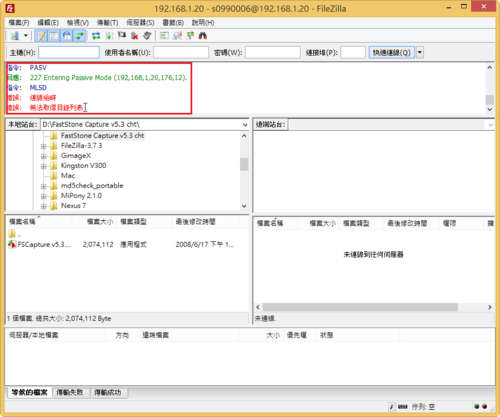
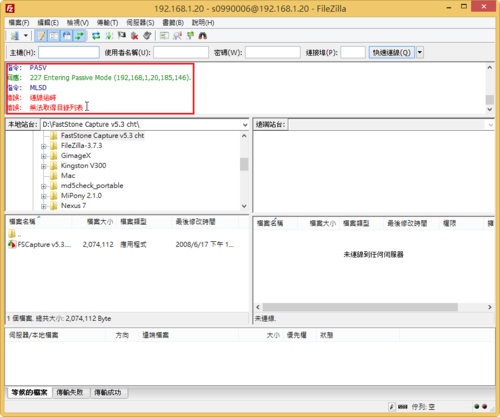
出現連線逾時,無法取得目錄列表的訊息

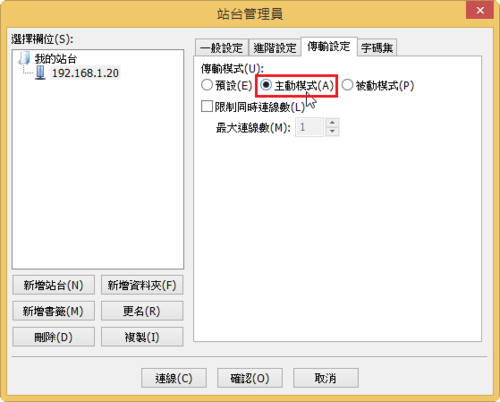
2. 改成主動模式

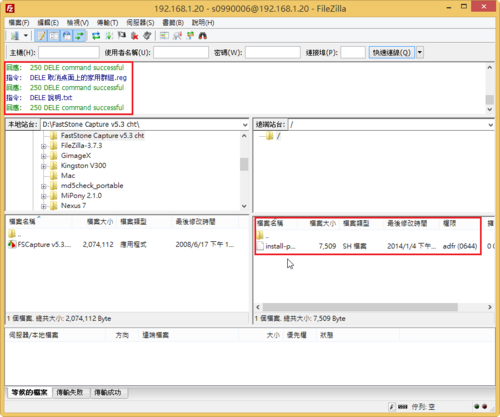
可以正常連線

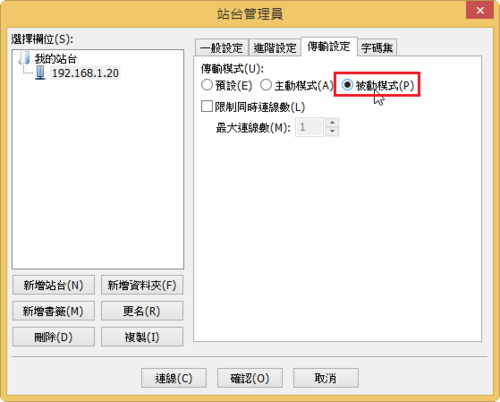
3. 改成被動模式

卡在 MLSD

出現連線逾時,無法取得目錄列表的訊息

解決方式:
1. ProFTPd FTP Server 連線埠可以自訂
# vim /etc/proftpd.conf
PassivePorts                    60000   61000

重新啟動 FTP Server
# service proftpd restart
正在關閉 proftpd:                                         [  確定  ]
正在啟動 proftpd:                                         [  確定  ]

修改防火牆設定
# vim /etc/sysconfig/iptables
-A INPUT -m state –state NEW -m tcp -p tcp –dport 60000:61000 -j ACCEPT

重新啟動 iptables 防火牆
# service iptables stop
iptables:正在設定 chains 為 ACCEPT 政策:filter           [  確定  ]
iptables:正在清除防火牆規則:                             [  確定  ]
iptables:正在卸載模組:                                   [  確定  ]
# service iptables start
iptables:正在套用防火牆規則:                             [  確定  ]

檢查規則是否有產生
# iptables -L -n
Chain INPUT (policy ACCEPT)
target     prot opt source               destination
ACCEPT     all  —  0.0.0.0/0            0.0.0.0/0           state RELATED,ESTABLISHED
ACCEPT     icmp —  0.0.0.0/0            0.0.0.0/0
ACCEPT     all  —  0.0.0.0/0            0.0.0.0/0
ACCEPT     tcp  —  0.0.0.0/0            0.0.0.0/0           state NEW tcp dpt:22
ACCEPT     tcp  —  0.0.0.0/0            0.0.0.0/0           state NEW tcp dpt:21
ACCEPT     tcp  —  0.0.0.0/0            0.0.0.0/0           state NEW tcp dpts:60000:61000
REJECT     all  —  0.0.0.0/0            0.0.0.0/0           reject-with icmp-host-prohibited

Chain FORWARD (policy ACCEPT)
target     prot opt source               destination
REJECT     all  —  0.0.0.0/0            0.0.0.0/0           reject-with icmp-host-prohibited

Chain OUTPUT (policy ACCEPT)
target     prot opt source               destination

這時候,應該都可以正常連線了!