設定 ownCloud 主要是設定管理者帳號及密碼和資料庫的設定
1. 點選 進階 [@more@]可以使用 SQLite 或是 MySQL 資料庫,這裡使用 MySQL 資料庫
MySQL 資料庫的設定
最後點選 完成設定
ownCloud 有支援的應用程式 Desktop/Android/IOS
不過 Android/IOS 都是要收費的 US 0.99 / NT 30
完成安裝設定畫面

全新的繁體中文 WordPress 網站《宜蘭部落格教育平台 網站》
設定 ownCloud 主要是設定管理者帳號及密碼和資料庫的設定
1. 點選 進階[@more@]可以使用 SQLite 或是 MySQL 資料庫,這裡使用 MySQL 資料庫
MySQL 資料庫的設定
最後點選 完成設定
ownCloud 有支援的應用程式 Desktop/Android/IOS
不過 Android/IOS 都是要收費的 US 0.99 / NT 30
完成安裝設定畫面
使用瀏覽器連上安裝好的網址,會出現下圖的狀況,有安全性警告 [@more@]主要是在 Apache Web Server 預設沒有開啟支援 .htaccess 的功能
修改 Apache Web Server 設定檔,加入下面的設定內容
# vim /etc/httpd/conf/httpd.conf
<Directory “/var/www/html/owncloud”>
AllowOverride All
</Directory>
重新啟動 Apache Web Server
# service httpd restart
再次連線時,就不會出現安全性警告
ownCloud 是一套功能類似 Dropbox 的雲端儲存系統,詳細的功能介紹可以參考下列網站:
使用ownCloud打造專用的「類Dropbox」雲端儲存系統 | 簡睿隨筆簡睿隨筆 | 學習過程的紀錄與備忘
建置ownCloud雲端硬碟 企業檔案同步分享 – 專題報導 – 網管人NetAdmin
OwnCloud, 一套適合自建的網路同步硬碟(DropBox-Like) (第1頁) – 網路儲存裝置 – Mobile01
ownCloud 官方網站:http://owncloud.org/
[@more@]加入 EPEL 第三方套件庫
# wget http://dl.fedoraproject.org/pub/epel/6/x86_64/epel-release-6-8.noarch.rpm
# rpm -ivh epel-release-6-8.noarch.rpm
# sed -i ‘s/enabled=1/enabled=0/g’ /etc/yum.repos.d/epel.repo
加入 ownCloud 套件庫
# cd /etc/yum.repos.d/
# wget http://download.opensuse.org/repositories/isv:ownCloud:community/CentOS_CentOS-6/isv:ownCloud:community.repo
# yum install owncloud –enablerepo=epel
如果沒有加入 EPEL 第三方套件庫時,它裝 ownCloud 會出現缺少 php-pear-Net-Curl 和 php-pear-MDB2-Driver-mysqli 的錯誤訊息
Error: Package: owncloud-6.0.2-6.1.noarch (isv_ownCloud_community)
Requires: php-pear-Net-Curl
Error: Package: owncloud-6.0.2-6.1.noarch (isv_ownCloud_community)
Requires: php-pear-MDB2-Driver-mysqli
學校有一台 Fuji Xerox DocuPrint 305 雷射印表機,自己安裝驅動程式都安裝不起來,不好意思每次都要麻煩廠商,所以就花時間測試了一下,但疑問的是,在中文官方網站上下載的驅動程式,印表機可以安裝起來,但都不能列印。
中文官方網站網址:http://www.fujixerox.com.tw/downloads?product_id=41 [@more@]英文版的官方下載網站:http://www.fujixerox.co.jp/download/eng/docuprint/dp205series.html
後來在英文版的官方下載網站下載的就可以了!
Mac OSX 中的 Finder 和 Windows 中的檔案總管的功能差不多,但缺少一些常用的功能,如分頁…等功能,雖然 Apple App Store 上有 TotalFinder 之類的程式可以補完這些功能,但 TotalFinder 是付費軟體,而 XtraFinder 是一套免費的軟體,剛好可以補這方式的不足。
原本的 Finder
XtraFinder 官方網站:http://www.trankynam.com/xtrafinder/
目前最新版本是 0.18.2
[@more@]
下載之後按二下掛載
按二下開始安裝
選擇 繼續
選擇 安裝
輸入密碼後,選擇 安裝軟體
安裝完成,選擇 關閉
上方列會出現 笑臉
把 分頁 功能打開
選擇 功能 設定項目
視情況勾選所須功能
完成的成果
Mac OSX 上的 Safari 瀏覽器在下載 zip 檔後,會自動解壓縮,有些人會覺得很方便,但我不是很習慣這樣的功能,還是希望能自己解壓縮。
選擇 Safari / 偏好設定
把前面的打勾取消
這樣就不會自動解壓縮了!
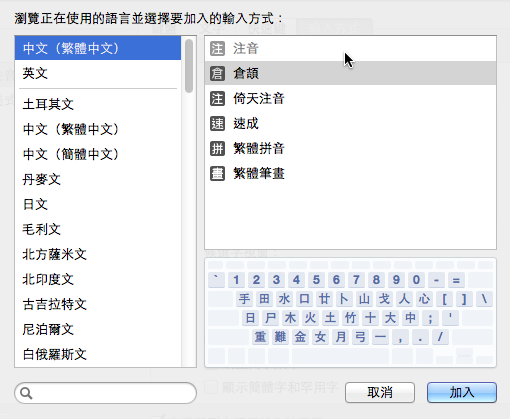
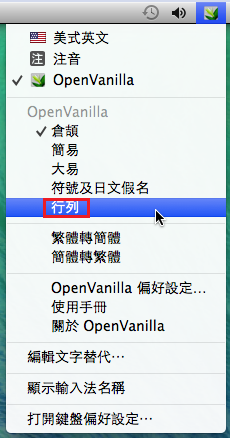
在 Mac OSX 上預設提供的中文輸入法中,並沒有提供 行列輸入法,所以要另外安裝香草輸入法
預設提供的中文輸入法
香草輸入法的官方網站: https://openvanilla.org/
香草輸入法的維基百科上的介紹: http://zh.wikipedia.org/wiki/OpenVanilla
[@more@]目前最新的版本是 1.0.10 版

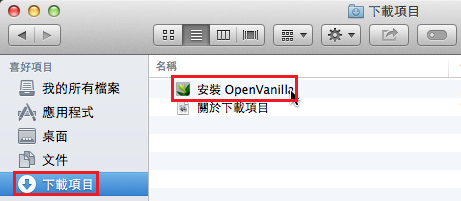
下載完成後,請到 下載項目中,選擇 安裝 OpenVanilla
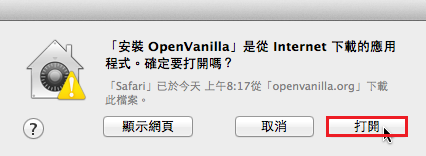
選擇 打開
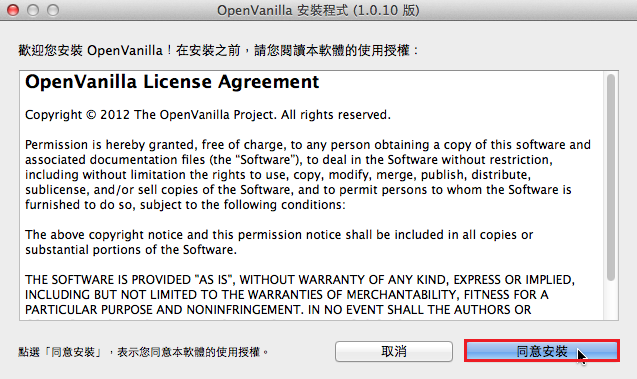
選擇 同意安裝
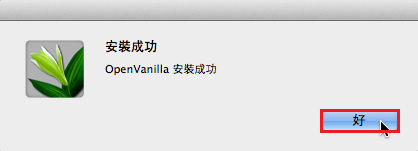
安裝完成,請選擇 好
在右上方按滑鼠左鍵

選擇安裝的 OpenVanilla

圖示會換成 OpenVanilla 的圖示

在 OpenVanilla 上按滑鼠右鍵,選擇 行列輸入法
就可以開始使用了!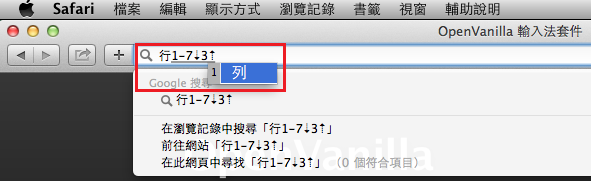
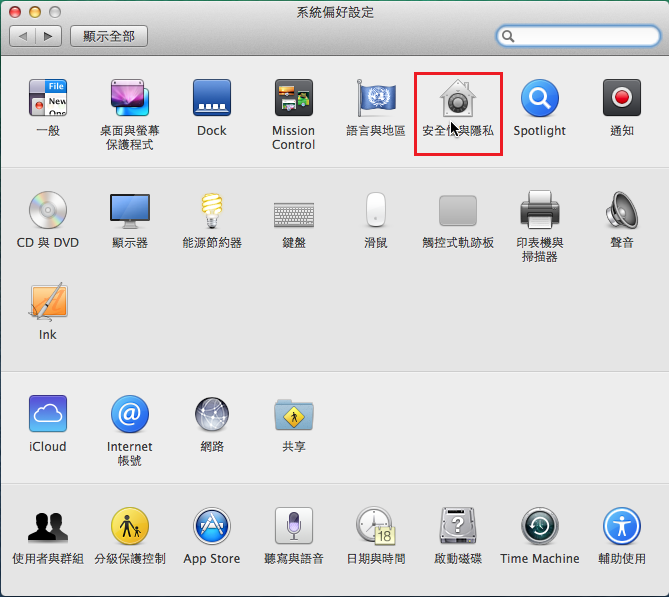
Mac OSX 了系統安全,預設是不能安裝第三方軟體套件,但有些軟體是在 Apple Store 上沒有提供,卻又是自己需要的,如 OpenVanilla(香草輸入法),所以在安裝這一類程式時,要先把這一項限制打開。
執行 Dock 上的 系統偏好設定

選擇 安全性與隱私
 [@more@]選擇左下角的 解鎖
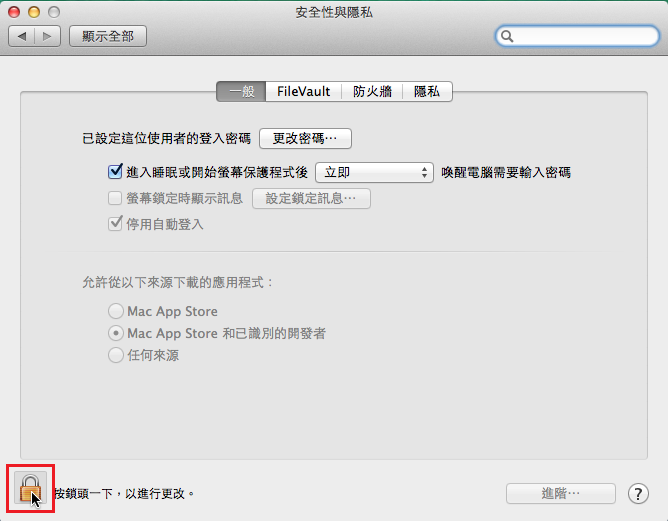
輸入使用者密碼,並按 解鎖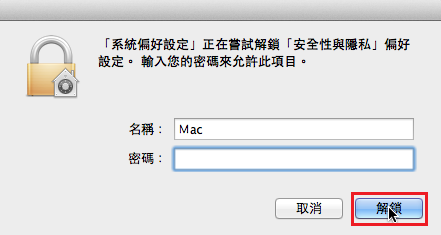
選擇 任何來源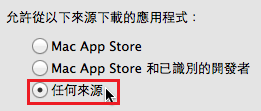
按一下 允許任何來源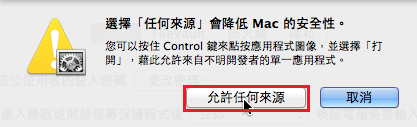
最後關設定視窗即可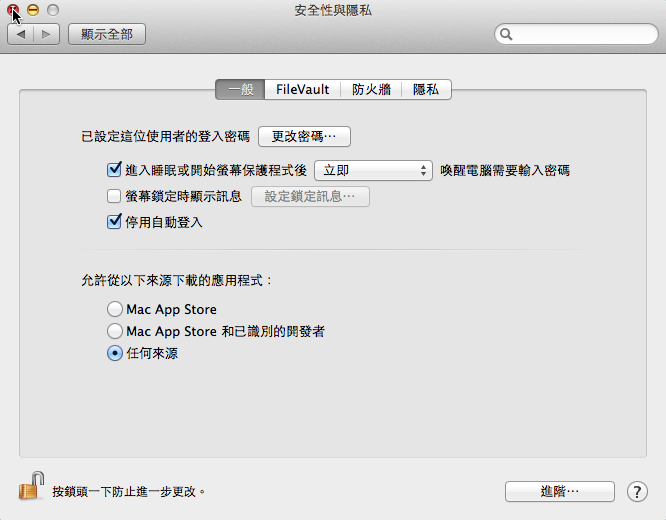
為了安全起見,可以安裝好套件後,再把來源改成 Mac App Store 和已識別的開發者
MySQL Server 為了安全,所以大部分都不建立連線埠,或者是僅限本機連線,不允許遠端連線,所以偵測 MySQL Server 就比較沒有那麼實際,而且在檢查時,密碼是以明碼傳送,會有安全性上的問題。
1. 檢查是否有 check_mysql 檢查指令
# locate check_mysql
/usr/lib64/nagios/plugins/check_mysql
/usr/lib64/nagios/plugins/check_mysql_query
2. 檢查一下,check_mysql 須要加入的參數
# /usr/lib64/nagios/plugins/check_mysql -h
Options:
-h, –help
Print detailed help screen
-V, –version
Print version information
–extra-opts=[section][@file]
Read options from an ini file. See http://nagiosplugins.org/extra-opts
for usage and examples.
-H, –hostname=ADDRESS
Host name, IP Address, or unix socket (must be an absolute path)
-P, –port=INTEGER
Port number (default: 3306)
-s, –socket=STRING
Use the specified socket (has no effect if -H is used)
-d, –database=STRING
Check database with indicated name
-u, –username=STRING
Connect using the indicated username
-p, –password=STRING
Use the indicated password to authenticate the connection
==> IMPORTANT: THIS FORM OF AUTHENTICATION IS NOT SECURE!!! <==
Your clear-text password could be visible as a process table entry
-S, –check-slave
Check if the slave thread is running properly.
-w, –warning
Exit with WARNING status if slave server is more than INTEGER seconds
behind master
-c, –critical
Exit with CRITICAL status if slave server is more then INTEGER seconds
behind master[@more@]3. 建立資料庫和資料庫使用者及密碼
# /usr/local/bin/mysqladmin -u root -p create nagiostest
# /usr/bin/mysql -u root -p -e “GRANT ALL PRIVILEGES ON nagiostest.* TO ‘ntest’@’localhost’ IDENTIFIED BY ‘123test’;”
4. 測試一下
# /usr/lib64/nagios/plugins/check_mysql -H 127.0.0.1 -P 3306 -u ntest -d nagiostest -p 123test
Uptime: 178009 Threads: 1 Questions: 348 Slow queries: 0 Opens: 16 Flush tables: 1 Open tables: 9 Queries per second avg: 0.1
5. 在 /etc/nagios/objects/commands.cfg 檔案加入
# ‘check_mysql’ command definition
define command{
command_name check_mysql
command_line $USER1$/check_mysql -H $ARG1$ -P $ARG2$ -u $ARG3$ -d $ARG4$ -p $ARG5$
}
6. 在要偵測的 MySQL Server 主機加入
# vim /etc/nagios/objects/localhost.cfg
define service{
use local-service ; Name of service template to use
host_name localhost
service_description MySQL
check_command check_mysql!127.0.0.1!3306!ntest!nagiostest!123test
notifications_enabled 1
}
重新啟動 Nagios
# service nagios restart
Running configuration check…done.
Stopping nagios: .done.
Starting nagios: done.
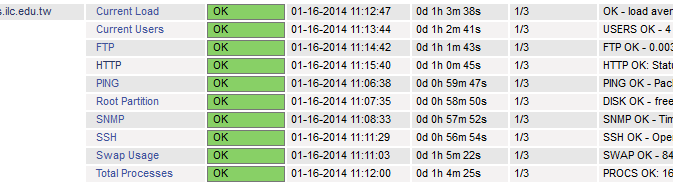
如果沒有出現錯誤訊息,代表設定成功
這時候應該可以看到下面的圖
1. 檢查是否有 check_snmp 檢查指令
一個是使用採用簡單認證,另外一個是支援加密傳輸
# locate check_snmp
/usr/lib64/nagios/plugins/check_snmp
2. 檢查一下,check_snmp 須要加入的參數
# /usr/lib64/nagios/plugins/check_snmp -h
-H, –hostname=ADDRESS
Host name, IP Address, or unix socket (must be an absolute path)
-p, –port=INTEGER
Port number (default: 161)
-n, –next
Use SNMP GETNEXT instead of SNMP GET
-P, –protocol=[1|2c|3]
SNMP protocol version
-L, –seclevel=[noAuthNoPriv|authNoPriv|authPriv]
SNMPv3 securityLevel
-a, –authproto=[MD5|SHA]
SNMPv3 auth proto
-x, –privproto=[DES|AES]
SNMPv3 priv proto (default DES)
-C, –community=STRING
Optional community string for SNMP communication (default is “public”)
-U, –secname=USERNAME
SNMPv3 username
-A, –authpassword=PASSWORD
SNMPv3 authentication password
-X, –privpasswd=PASSWORD
SNMPv3 privacy password
-o, –oid=OID(s)
Object identifier(s) or SNMP variables whose value you wish to query
[@more@]3. 測試一下
# /usr/lib64/nagios/plugins/check_snmp -H SNMP_Server’IP -o .1.3.6.1.2.1.1.3.0
SNMP OK – Timeticks: (41154894) 4 days, 18:19:08.94 |
4. 在 /etc/nagios/objects/commands.cfg 檔案加入
# ‘check_snmp’ command definition
define command{
command_name check_snmp
command_line $USER1$/check_snmp -H $HOSTADDRESS$ -o $ARG1$
}
5. 在要偵測的 SNMP 主機加入
# vim /etc/nagios/servers/snmp.cfg
define service{
use generic-service ; Name of service template to use
host_name snmp.test.ilc.edu.tw
service_description SNMP
check_command check_snmp!.1.3.6.1.2.1.1.3.0
notifications_enabled 1
}
重新啟動 Nagios
# service nagios restart
Running configuration check…done.
Stopping nagios: .done.
Starting nagios: done.
如果沒有出現錯誤訊息,代表設定成功
這時候應該可以看到下面的圖