Debian / Ubuntu update-rc.d 用法 另一章

在這之前曾經試用 update.rc.d 來啟動或關閉服務,但很詭異的是有些服務,我明明沒有啟動,但有啟動,究竟是什麼原因呢?
這是在 Cubie Truck Ubuntu Server 14.04 中碰到的狀況。
如 Samba 服務
# netstat -antulp | egrep ‘:137|:138|:139|:445’
tcp        0      0 0.0.0.0:139             0.0.0.0:*               LISTEN      1597/smbd
tcp        0      0 0.0.0.0:445             0.0.0.0:*               LISTEN      1597/smbd
tcp6       0      0 :::139                  :::*                    LISTEN      1597/smbd
tcp6       0      0 :::445                  :::*                    LISTEN      1597/smbd
udp        0      0 192.168.1.255:137       0.0.0.0:*                           1587/nmbd
udp        0      0 192.168.1.105:137       0.0.0.0:*                           1587/nmbd
udp        0      0 0.0.0.0:137             0.0.0.0:*                           1587/nmbd
udp        0      0 192.168.1.255:138       0.0.0.0:*                           1587/nmbd
udp        0      0 192.168.1.105:138       0.0.0.0:*                           1587/nmbd
udp        0      0 0.0.0.0:138             0.0.0.0:*                           1587/nmbd
[@more@]使用 sysv-rc-conf –list 來列出服務的啟用狀態
# sysv-rc-conf –list
apache2      0:off      1:off   2:on    3:on    4:on    5:on    6:off
apparmor     S:on
atd
console-setu
cron
dbus
dns-clean    1:on       2:on    3:on    4:on    5:on
exim4        0:off      1:off   2:on    3:on    4:on    5:on    6:off
firstrun
friendly-rec
halt         0:on
irqbalance
killprocs    1:on
kmod
memcached    0:off      1:off   2:on    3:on    4:on    5:on    6:off
minidlna     0:off      1:off   2:on    3:on    4:on    5:on    6:off
mysql
networking
nmbd
ntp          1:off      2:on    3:on    4:on    5:on
ondemand     2:on       3:on    4:on    5:on
pppd-dns     1:on       2:on    3:on    4:on    5:on
pptpd        1:off      2:on    3:on    4:on    5:on
procps
rc.local     2:on       3:on    4:on    5:on
reboot       6:on
resolvconf
rsync        0:off      1:off   2:on    3:on    4:on    5:on    6:off
rsyslog
samba        2:off      3:off   4:off   5:off
samba-ad-dc  2:off      3:off   4:off   5:off
sendsigs     0:on       6:on
single       1:on
smbd
ssh
sudo
udev
umountfs     0:on       6:on
umountroot   0:on       6:on
urandom      0:on       6:on    S:on
vsftpd

目前的執行層級
# /sbin/runlevel
N 2

列出執行層級 2 啟動的服務,裡面根本沒有與 Samba 相關的服務
# sysv-rc-conf –list | grep 2:on
apache2      0:off      1:off   2:on    3:on    4:on    5:on    6:off
dns-clean    1:on       2:on    3:on    4:on    5:on
exim4        0:off      1:off   2:on    3:on    4:on    5:on    6:off
memcached    0:off      1:off   2:on    3:on    4:on    5:on    6:off
minidlna     0:off      1:off   2:on    3:on    4:on    5:on    6:off
ntp          1:off      2:on    3:on    4:on    5:on
ondemand     2:on       3:on    4:on    5:on
pppd-dns     1:on       2:on    3:on    4:on    5:on
pptpd        1:off      2:on    3:on    4:on    5:on
rc.local     2:on       3:on    4:on    5:on
rsync        0:off      1:off   2:on    3:on    4:on    5:on    6:off

列出 smbd / nmbd 服務,奇特的是沒有任何狀態
# sysv-rc-conf –list smbd
smbd
# sysv-rc-conf –list nmbd
nmbd

執行 sysv-rc-conf –level 2345 在 level 2345 層級關閉 smbd/nmbd 服務
# sysv-rc-conf –level 2345 smbd off
# sysv-rc-conf –level 2345 nmbd off

列出 smbd / nmbd 服務,終於有執行層級的狀態了!
# sysv-rc-conf –list smbd
smbd         2:off      3:off   4:off   5:off
# sysv-rc-conf –list nmbd
nmbd         2:off      3:off   4:off   5:off

重新啟動電腦
# reboot

重新開機後,發現還是會啟動 Samba Server

後來,我發現在 sys-rc-conf –list 看不到狀態的,似乎都會啟動
# sysv-rc-conf –list | egrep -v ‘on|off’
atd
dbus
firstrun
friendly-rec
irqbalance
kmod
mysql
networking
nmbd
procps
rsyslog
samba
samba-ad-dc
smbd
ssh
sudo
udev
vsftpd

真是不知道這是什麼狀態了,只能先在 /etc/rc.local 中把這些不想啟動的服務給停了,或是直接移除,眼不見為淨!
但是我天真了,開機後這些服務依然還是執行中!

後來又與 Banana Pi 的 Bananian 做比對,我說服我自己,這應該是特例,但我也馬上把這一個 Ubuntu 的 Image 也清除了!
# lsb_release -a
No LSB modules are available.
Distributor ID: Debian
Description:    Debian GNU/Linux 7.6 (wheezy)
Release:        7.6
Codename:       wheezy

# sysv-rc-conf –list
apache2      0:off      1:off   2:on    3:on    4:on    5:on    6:off
bootlogs     1:on       2:on    3:on    4:on    5:on
console-setu S:on
cpufrequtils 2:on       3:on    4:on    5:on
cron         2:on       3:on    4:on    5:on
exim4        0:off      1:off   2:on    3:on    4:on    5:on    6:off
fail2ban     0:off      1:off   2:on    3:on    4:on    5:on    6:off
halt         0:off
haveged      0:off      1:off   2:on    3:on    4:on    5:on    6:off
kbd          S:on
keyboard-set S:on
killprocs    1:on
kmod         S:on
loadcpufreq  2:on       3:on    4:on    5:on
motd         1:on       2:on    3:on    4:on    5:on
mysql        0:off      1:off   2:on    3:on    4:on    5:on    6:off
networking   0:off      6:off   S:on
noip2        0:off      1:off   2:on    3:on    4:on    5:on    6:off
ntp          2:on       3:on    4:on    5:on
openvpn      0:off      1:off   2:on    3:on    4:on    5:on    6:off
pppd-dns     S:on
procps       S:on
rc.local     2:on       3:on    4:on    5:on
reboot       6:off
rmnologin    2:on       3:on    4:on    5:on
rsync        2:on       3:on    4:on    5:on
rsyslog      0:off      1:off   2:on    3:on    4:on    5:on    6:off
screen-clean S:on
sendsigs     0:off      6:off
single       1:on
ssh          2:on       3:on    4:on    5:on
udev         S:on
udev-mtab    S:on
umountfs     0:off      6:off
umountroot   0:off      6:off
urandom      0:off      6:off   S:on
vsftpd       1:off      2:on    3:on    4:on    5:on

Cubie Truck Ubuntu Server
# lsb_release -a
No LSB modules are available.
Distributor ID: Linaro
Description:    Linaro 14.04
Release:        14.04
Codename:       trusty

# sysv-rc-conf –list
apache2      0:off      1:off   2:on    3:on    4:on    5:on    6:off
apparmor     S:on
atd
console-setu
cron
dbus
dns-clean    1:on       2:on    3:on    4:on    5:on
exim4        0:off      1:off   2:on    3:on    4:on    5:on    6:off
firstrun
friendly-rec
halt         0:on
irqbalance
killprocs    1:on
kmod
memcached    0:off      1:off   2:on    3:on    4:on    5:on    6:off
minidlna     0:off      1:off   2:on    3:on    4:on    5:on    6:off
mysql
networking
nmbd
ntp          1:off      2:on    3:on    4:on    5:on
ondemand     2:on       3:on    4:on    5:on
pppd-dns     1:on       2:on    3:on    4:on    5:on
pptpd        1:off      2:on    3:on    4:on    5:on
procps
rc.local     2:on       3:on    4:on    5:on
reboot       6:on
resolvconf
rsync        0:off      1:off   2:on    3:on    4:on    5:on    6:off
rsyslog
samba
samba-ad-dc
sendsigs     0:on       6:on
single       1:on
smbd
snmbd        2:off      3:off   4:off   5:off
ssh
sudo
udev
umountfs     0:on       6:on
umountroot   0:on       6:on
urandom      0:on       6:on    S:on
vsftpd

Debian / Ubuntu update-rc.d 用法

長久以來,自己對 RedHat/CentOS Linux 以 rpm 為主的系統比較熟悉,對於以 deb 為主的 Debian/Ubuntu Linux 則比較陌生,但最近因為使用 Raspiberry Pi / Banana Pi / Cubie Truck  這一系列的,每天在操作的,幾乎都是以 Debian / Ubuntu 為主的系統,少部分是 ArchLinux,但對其中系統服務啟動與關閉,並不熟悉。
在 RedHat/CentOS Linux 之前的版本是使用 chkconfig / service,新的版本則改用 systemctl,而 Debian/Ubuntu 則是使用 update-rc.d / service ….。
底下文章參考:
Update-rc.d 命令用法详解 – Shb_derek技术专栏 – 博客频道 – CSDN.NET
小小工程師的生活雜記: [Ubuntu]關於update-rc.d 用法
IT 亂亂寫: 讓ubuntu開機後自動執行指定的script[@more@]
設定開機時啟動 vsftpd FTP Server
# update-rc.d -f vsftpd defaults
update-rc.d: warning: /etc/init.d/vsftpd missing LSB information
update-rc.d: see <http://wiki.debian.org/LSBInitScripts>
 Adding system startup for /etc/init.d/vsftpd …
   /etc/rc0.d/K20vsftpd -> ../init.d/vsftpd
   /etc/rc1.d/K20vsftpd -> ../init.d/vsftpd
   /etc/rc6.d/K20vsftpd -> ../init.d/vsftpd
   /etc/rc2.d/S20vsftpd -> ../init.d/vsftpd
   /etc/rc3.d/S20vsftpd -> ../init.d/vsftpd
   /etc/rc4.d/S20vsftpd -> ../init.d/vsftpd
   /etc/rc5.d/S20vsftpd -> ../init.d/vsftpd

設定開機時關閉 vsftpd FTP Server
# update-rc.d -f vsftpd remove
 Removing any system startup links for /etc/init.d/vsftpd …
   /etc/rc0.d/K20vsftpd
   /etc/rc1.d/K20vsftpd
   /etc/rc2.d/S20vsftpd
   /etc/rc3.d/S20vsftpd
   /etc/rc4.d/S20vsftpd
   /etc/rc5.d/S20vsftpd
   /etc/rc6.d/K20vsftpd

如果 B 服務要 A 服務先啟動時才能正常啟動
第一個數字愈大,代表開機時愈晚被啟動
第二個數字愈大,代表關機時愈晚被關閉
通常會把這二個數字設計成加起來等於 100
# update-rc.d -f A defaults 80 20
# update-rc.d -f B defaults 90 10

使用 sysv-rc-conf 來做檢查
# apt-get install sysv-rc-conf

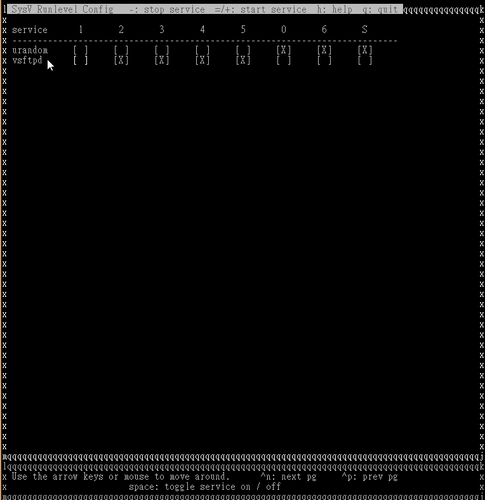
執行 sysv-rc-conf 來檢查 vsftpd 服務
# sysv-rc-conf

開啟 Nginx Web Server 的使用者家目錄

底下是在 Banaana Pi 下使用 Bananian 手動編譯 Nginx Web Server
修改 Nginx Web Server 的設定
# vim /etc/nginx/nginx.conf
        location ~ ^/~(?<userdir_user>.+?)(?<userdir_uri>/.*)?$ {
                 alias /home/$userdir_user/www$userdir_uri;
                 index index.php index.html index.htm;
                 autoindex on;

                 location ~ .*.php(/.*)*$ {
                    fastcgi_pass   unix:/var/run/php5-fpm.sock;
                    fastcgi_index  index.php;
                    fastcgi_param  SCRIPT_FILENAME /home/$userdir_user/www$userdir_uri$fastcgi_script_name;
                    include        fastcgi_params;
                }
        }

關閉 Nginx Web Server
# kill -9 $(ps aux | grep nginx | grep -v grep | awk ‘{print $2}’)

重新啟動 Nginx Web Server
# /usr/sbin/nginx
[@more@]
建立 pi 使用者測試
# /usr/sbin/useradd -d /home/pi -m -s /bin/false pi

建立使用者網頁目錄
# mkdir /home/pi/www

建立 php 測試檔案
# vim /home/pi/www/index.php
<?php
phpinfo();
?>

改變目錄及檔案的擁有者
# chown -R pi:pi /home/pi

更改目錄權限
# chmod 711 /home/pi

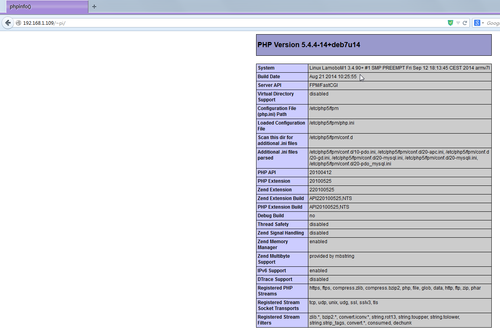
使用瀏覽器檢查

adminer – 管理 MySQL 資料庫的 PHP 程式

一般安裝完 MySQL/MariaDB SQL Server 之後,有些人會安裝 phpMyAdmin 來管理資料庫,不過之前一直有一些安全性上的漏洞,容易遭受攻擊,所以我通常不會安裝,或者是臨時須要時才安裝。
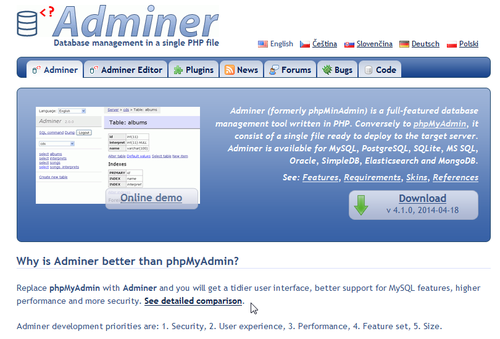
adminer 是一套和 phpMyAdmin 一樣,可以用來管理 SQL Server 的 PHP 程式,而且整個程式只需要一個檔案。
adminer 官方網站:http://www.adminer.org
[@more@]下載
http://www.adminer.org/#download

切換到網站根目錄
# cd /var/www

下載
# wget http://downloads.sourceforge.net/project/adminer/Adminer/Adminer%204.1.0/adminer-4.1.0-mysql.php

更改檔名
# mv adminer-4.1.0-mysql.php adminer.php

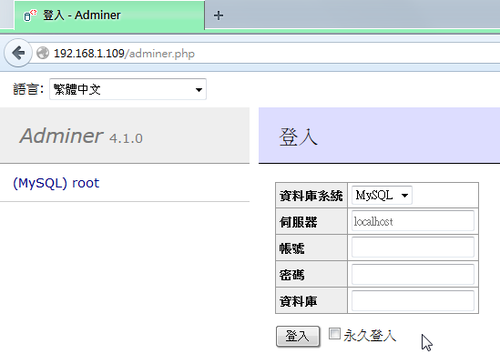
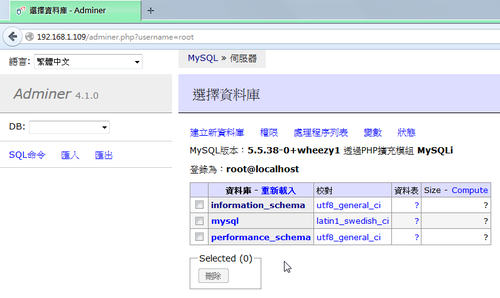
輸入 MySQL SQL Server 的管理者帳號及密碼

登入成功後就可以進行管理

Cubie Truck 測試 – Lubuntu 篇 – 擴展 root 分割區

Cubie Truck  Lubuntu Desktop 硬碟分割
$ sudo fdisk -l

Disk /dev/nand: 15.9 GB, 15938355200 bytes
255 heads, 63 sectors/track, 1937 cylinders, total 31129600 sectors
Units = sectors of 1 * 512 = 512 bytes
Sector size (logical/physical): 512 bytes / 512 bytes
I/O size (minimum/optimal): 512 bytes / 512 bytes
Disk identifier: 0x00000000

Disk /dev/nand doesn’t contain a valid partition table

Disk /dev/nanda: 67 MB, 67108864 bytes
255 heads, 63 sectors/track, 8 cylinders, total 131072 sectors
Units = sectors of 1 * 512 = 512 bytes
Sector size (logical/physical): 512 bytes / 512 bytes
I/O size (minimum/optimal): 512 bytes / 512 bytes
Disk identifier: 0x00000000

     Device Boot      Start         End      Blocks   Id  System

Disk /dev/nandb: 2147 MB, 2147483648 bytes
255 heads, 63 sectors/track, 261 cylinders, total 4194304 sectors
Units = sectors of 1 * 512 = 512 bytes
Sector size (logical/physical): 512 bytes / 512 bytes
I/O size (minimum/optimal): 512 bytes / 512 bytes
Disk identifier: 0x00000000

Disk /dev/nandb doesn’t contain a valid partition table

Disk /dev/nandc: 13.7 GB, 13706985472 bytes
255 heads, 63 sectors/track, 1666 cylinders, total 26771456 sectors
Units = sectors of 1 * 512 = 512 bytes
Sector size (logical/physical): 512 bytes / 512 bytes
I/O size (minimum/optimal): 512 bytes / 512 bytes
Disk identifier: 0xffffffff

Disk /dev/nandc doesn’t contain a valid partition table[@more@]/dev/nanda 是系統開機分割區
/dev/nandb 是 /root 分割區
/dev/nandc 是還沒使用的區域

參考網頁:
Cubietruck-Resize NAND | www.maruscha.org
cubieboard nand 重新分区扩容 – 我喜欢智能化 – 博客频道 – CSDN.NET

查看 Nand 硬碟分割表資訊
$ sudo nand-part -f a20 /dev/nand
check partition table copy 0: mbr: version 0x00000200, magic softw411
OK
check partition table copy 1: mbr: version 0x00000200, magic softw411
OK
check partition table copy 2: mbr: version 0x00000200, magic softw411
OK
check partition table copy 3: mbr: version 0x00000200, magic softw411
OK
mbr: version 0x00000200, magic softw411
3 partitions
partition  1: class =         DISK, name =   bootloader, partition start =    32768, partition size =   131072 user_type=0
partition  2: class =         DISK, name =       rootfs, partition start =   163840, partition size =  4194304 user_type=0
partition  3: class =         DISK, name =        UDISK, partition start =  4358144, partition size = 26574848 user_type=0

綠色是分割區的名字,粉紅色是分割區的起始位置,橘色是分割區的大小
以 root 分割為例
它的大小是 size =4194304  ; 4194304/1024/2=2048 = 2G
UDISK 是還未用到的區域,也就是 root 分割區要擴展的區域
如果要把全部的空間用完,root 分割區的大小 = 4194304 + 26574848 = 30769152

進行設定
$ sudo nand-part -f a20 /dev/nand 32768 ‘boot 131072’ ‘rootfs 30769152’  
check partition table copy 0: mbr: version 0x00000200, magic softw411
OK
check partition table copy 1: mbr: version 0x00000200, magic softw411
OK
check partition table copy 2: mbr: version 0x00000200, magic softw411
OK
check partition table copy 3: mbr: version 0x00000200, magic softw411
OK
mbr: version 0x00000200, magic softw411
3 partitions
partition  1: class =         DISK, name =   bootloader, partition start =    32768, partition size =   131072 user_type=0
partition  2: class =         DISK, name =       rootfs, partition start =   163840, partition size =  4194304 user_type=0
partition  3: class =         DISK, name =        UDISK, partition start =  4358144, partition size = 26574848 user_type=0
check partition table copy 0: mbr: version 0x00000200, magic softw411
check partition table copy 1: mbr: version 0x00000200, magic softw411
check partition table copy 2: mbr: version 0x00000200, magic softw411
check partition table copy 3: mbr: version 0x00000200, magic softw411

ready to write new partition tables:
mbr: version 0x00000200, magic softw411
2 partitions
partition  1: class =         DISK, name =         boot, partition start =    32768, partition size =   131072 user_type=0
partition  2: class =         DISK, name =       rootfs, partition start =   163840, partition size = 30769152 user_type=0

write new partition tables? (Y/N)
y
Failed rereading partition table: Device or resource busy

verifying new partition tables:
check partition table copy 0: mbr: version 0x00000200, magic softw411
OK
check partition table copy 1: mbr: version 0x00000200, magic softw411
OK
check partition table copy 2: mbr: version 0x00000200, magic softw411
OK
check partition table copy 3: mbr: version 0x00000200, magic softw411
OK
mbr: version 0x00000200, magic softw411
2 partitions
partition  1: class =         DISK, name =         boot, partition start =    32768, partition size =   131072 user_type=0
partition  2: class =         DISK, name =       rootfs, partition start =   163840, partition size = 30769152 user_type=0
rereading partition table… returned -1

重新啟動電腦
$ sudo reboot

重新設定 /dev/nandb 分割區大小
$ sudo resize2fs /dev/nandb
resize2fs 1.42.5 (29-Jul-2012)
Filesystem at /dev/nandb is mounted on /; on-line resizing required
old_desc_blocks = 1, new_desc_blocks = 1
The filesystem on /dev/nandb is now 3870720 blocks long.

原本 /root 分割區的大小
$ df -h
Filesystem      Size  Used Avail Use% Mounted on
/dev/root       2.0G 1020M  894M  54% /
devtmpfs        889M  4.0K  889M   1% /dev
tmpfs            20M  224K   20M   2% /tmp
none            197M  220K  197M   1% /run
none            5.0M     0  5.0M   0% /run/lock
none            985M  132K  985M   1% /run/shm
none            100M   12K  100M   1% /run/user

擴展 /root 分割區後的大小
$ df -h
Filesystem      Size  Used Avail Use% Mounted on
/dev/root        15G 1021M   13G   8% /
devtmpfs        889M  4.0K  889M   1% /dev
tmpfs            20M  4.0K   20M   1% /tmp
none            197M  212K  197M   1% /run
none            5.0M     0  5.0M   0% /run/lock
none            985M     0  985M   0% /run/shm
none            100M   12K  100M   1% /run/user

Lamobo M1 測試 – Bananian 篇 安裝 Nginx / MySQL / PHP Server

安裝 Nginx Web Server
# apt-get install nginx

不過安裝的版本有些舊
# nginx -v
nginx version: nginx/1.2.1

移除 nginx 套件
# apt-get remove –purge libfreetype6 libgd2-noxpm libgeoip1 libjpeg8 libpcre3 libpng12-0 libxml2 libxslt1.1 nginx-common nginx-full nginx

所以改用 Source Code 的方式來安裝[@more@]底下文章參考 Linux Pi的奇幻旅程(22)-編譯Nginx – iT邦幫忙::IT知識分享社群

安裝編譯時所需套件
# apt-get install build-essential

Nginx 官方網站:http://nginx.org/

下載 Source Code
# wget http://nginx.org/download/nginx-1.6.2.tar.gz

解壓縮
# tar xvzf nginx-1.6.2.tar.gz

切換目錄
# cd nginx-1.6.2

安裝編譯 nginx 所需套件
# apt-get install libpcre3* libssl-dev

進行編譯
# ./configure –prefix=/usr –sbin-path=/usr/sbin/nginx –conf-path=/etc/nginx/nginx.conf –pid-path=/var/run/nginx.pid –lock-path=/var/lock/nginx.lock –user=www-data –group=www-data –http-log-path=/var/log/nginx/access.log –error-log-path=/var/log/nginx/error.log –http-client-body-temp-path=/var/lib/nginx/body –http-proxy-temp-path=/var/lib/nginx/proxy –http-fastcgi-temp-path=/var/lib/nginx/proxy –http-uwsgi-temp-path=/var/lib/nginx/uwsgi –http-scgi-temp-path=/var/lib/nginx/scgi –with-http_ssl_module –with-http_stub_status_module –with-debug

進行安裝
# make;make install

執行時出現錯誤
# /usr/sbin/nginx
nginx: [emerg] mkdir() “/var/lib/nginx/body” failed (2: No such file or directory)

建立目錄
# mkdir -p /var/lib/nginx/body

檢查是否有執行成功
# netstat -ant | grep :80
tcp        0      0 0.0.0.0:80              0.0.0.0:*               LISTEN

安裝的 nginx 版本
# nginx -v
nginx version: nginx/1.6.2

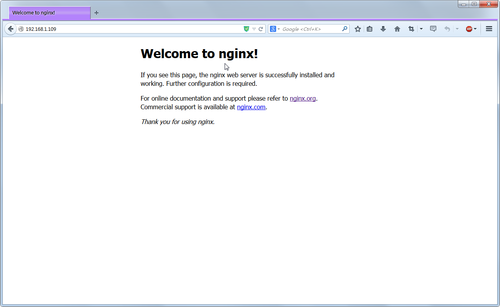
使用瀏覽器檢查

安裝 MySQL Server
# apt-get install mysql-server mysql-client

MySQL Server 安裝後設定
# /usr/bin/mysql_secure_installation

安裝 PHP
# apt-get install php5-fpm php5-mysql php5-gd php-apc php5

PHP 版本
# php5-fpm -v
PHP 5.4.4-14+deb7u14 (fpm-fcgi) (built: Aug 21 2014 10:32:42)
Copyright (c) 1997-2009 The PHP Group
Zend Engine v2.4.0, Copyright (c) 1998-2012 Zend Technologies

建立網站根目錄
# mkdir /var/www

改變目錄擁有者及群組
# chown -R www-data:www-data /var/www

查看 php5-fpm 執行時產生的 socket 檔
# ls -ls /var/run/php5-fpm.sock
0 srw-rw—- 1 www-data www-data 0 Sep 27 16:20 /var/run/php5-fpm.sock

修改 nginx Web Server 設定檔
# vim /etc/nginx/nginx.conf
    server {
        listen       80;
        server_name  localhost;

        #charset koi8-r;

        #access_log  logs/host.access.log  main;

        location / {
            root   /var/www;
            index  index.php index.html index.htm;
        }

        #error_page  404              /404.html;

        # redirect server error pages to the static page /50x.html
        #
        error_page   500 502 503 504  /50x.html;
        location = /50x.html {
            root   html;
        }

        # proxy the PHP scripts to Apache listening on 127.0.0.1:80
        #
        #location ~ .php$ {
        #    proxy_pass   http://127.0.0.1;
        #}

        # pass the PHP scripts to FastCGI server listening on 127.0.0.1:9000
        #
        location ~ .php$ {
            root           /var/www;
        #    fastcgi_pass   127.0.0.1:9000;
            try_files $uri =404;
            fastcgi_split_path_info ^(.+.php)(/.+)$;
            fastcgi_pass unix:/var/run/php5-fpm.sock;
            fastcgi_index  index.php;
            fastcgi_param  SCRIPT_FILENAME $document_root$fastcgi_script_name;
            include        fastcgi_params;
        }

        # deny access to .htaccess files, if Apache’s document root
        # concurs with nginx’s one
        #
        location ~ /.ht {
            deny  all;
        }
    }

檢查設定檔是否正確
# /usr/sbin/nginx -t
nginx: the configuration file /etc/nginx/nginx.conf syntax is ok
nginx: configuration file /etc/nginx/nginx.conf test is successful

關閉 nginx web Server
# kill -9 $(ps aux | grep nginx | grep -v grep | awk ‘{print $2}’)
or
# killall nginx

重新執行
# /usr/sbin/nginx

執行 php5-fpm
# /etc/init.d/php5-fpm start

檢查 php 是否能正常執行
# vim /var/www/index.php
<?php
phpinfo();
?>

Adobe Flash Player 15.0.0.189

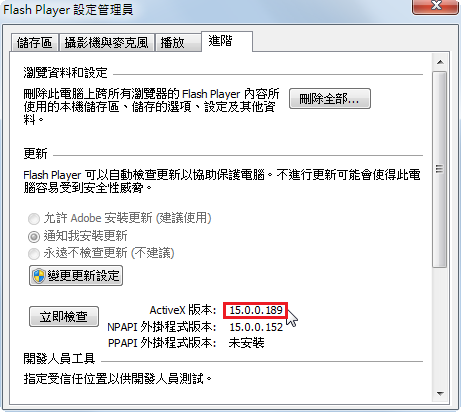
Adobe Flash Player 15.0.0.189 釋出

Windows 平台
Internet Explorer:
http://download.macromedia.com/pub/flashplayer/current/support/install_flash_player_ax.exe
Windows 8/8.1 版則要從 Windows Update 中更新

All Other Browsers(Firefox,Safari & Opera):
http://download.macromedia.com/pub/flashplayer/current/support/install_flash_player.exe

Mac 版本:
http://download.macromedia.com/pub/flashplayer/current/support/install_flash_player_osx.dmg