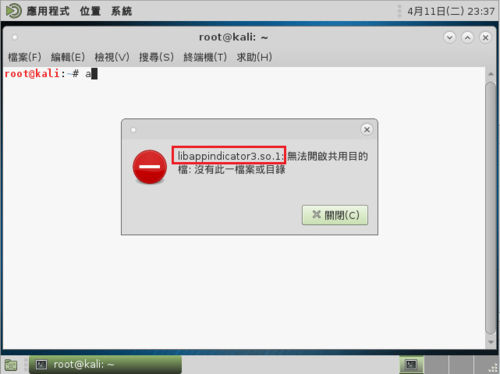
Kail Linux – 解決無法開啟共用目的檔 libappindicator3.so1.

在 Kali Linux 中安裝 gcin 後,登入 X Window 就會出現如下圖的錯誤訊息

[@more@]找尋與 libappindicator3 相關的套件
# apt-cache search libappindicator3
gir1.2-appindicator3-0.1 – Typelib files for libappindicator3-1
libappindicator3-0.1-cil – CLI binding for appindicator3 using GObject introspection
libappindicator3-0.1-cil-dev – CLI binding for libappindicator3 using GObject introspection
libappindicator3-1 – allow applications to export a menu into the panel — GTK3 version
libappindicator3-dev – allow applications to export a menu into the panel — GTK3 development

安裝 libappindicator3-1 套件
# apt-get install libappindicator3-1

SSH Tunnel

內部 IP:192.168.131.219 Server A
外部 IP:140.111.74.17      Server B
外部 IP:1.161.49.150        Server C

1. 在 Server A 上執行
# ssh -NfR 2222:localhost:22 root@140.111.74.17
# ssh -BfR 2222:192.168.131.219 root@140.111.74.17
-N Do not execute a remote command.
-f Requests ssh to go to background just before command execution.
-R [bind_address:]port:host:hostport

2. 在 Server B 上執行
# netstat -antp | grep 2222
tcp        0      0 127.0.0.1:2222          0.0.0.0:*               LISTEN      519/sshd: root
tcp6       0      0 ::1:2222                :::*                    LISTEN      519/sshd: root
# ss -antp | grep 2222
LISTEN     0      128    127.0.0.1:2222                     *:*                   users:((“sshd”,pid=519,fd=9))
LISTEN     0      128        ::1:2222                    :::*                   users:((“sshd”,pid=519,fd=8))

3. 在 Server C 上想要連線到 Server A,先連線到 Server B
# ssh root@140.111.74.17
# ssh -p 2222 root@127.0.0.1

CentOS 7.x 安裝 PXE Server

參考網頁:
Linux . 無限: 在 CentOS7/RHEL7 上架設 PXE 系統(一)
Install PXE Server On CentOS 7 | Unixmen
CentOS 7 : PXE Boot : Network Install : Server World
Install PXE Server And Configure PXE Client On CentOS 7 | Unixmen
CentOS 7 : PXE Boot : Configure PXE Server : Server World

1. 安裝所需套件
# yum install tftp-server dhcp syslinux vsftpd httpd

2. 設定 DHCP Server
# vim /etc/dhcp/dhcpd.conf
Authoritative;
default-lease-time                      259200;
max-lease-time                          518400;
option routers                          192.168.1.254;
option broadcast-address                192.168.1.255;
option subnet-mask                      255.255.255.0;
option domain-name-servers              168.95.1.1,140.111.66.1,8.8.8.8;
ddns-update-style                       interim;
ignore client-updates;
allow booting;
allow bootp;
allow unknown-clients;
server-name                             pxis;

subnet 192.168.1.0 netmask 255.255.255.0 {
    range 192.168.1.56 192.168.1.60;
    option subnet-mask                  255.255.255.0;
    option domain-name                  “test.ilc.edu.tw”;
    next-server 192.168.1.41;
    filename “pxelinux.0”;

}[@more@]3. 設定 tftp Server
# cp /usr/lib/systemd/system/tftp.service /root/tftp.service.$(date +%F)
# vim /usr/lib/systemd/system/tftp.service
[Unit]
Description=Tftp Server
Requires=tftp.socket
Documentation=man:in.tftpd

[Service]
ExecStart=/usr/sbin/in.tftpd -s /tftpboot
StandardInput=socket

[Install]
Also=tftp.socket

4. 複製 syslinux 必要檔案到 tftp Server 分享的目錄
# cd /usr/share/syslinux
# cp pxelinux.0 menu.c32 memdisk mboot.c32 chain.c32 /tftpboot

5. 在 tftp Server 目錄下,建立可供 Linux 開機核心的目錄
# mkdir /tftpboot/{pxelinux.cfg,netboot}

6. 將 Linux ISO 檔內容複製到 vfftpd Server 目錄
# mount -o loop CentOS-LEMP-7.3-x86_64-1611_20170320.iso /mnt
mount: /dev/loop0 is write-protected, mounting read-only
# cp -a /mnt/* /var/ftp/pub

7. 將 Linux PXE 開機核心檔案,複製到 vfftpd Server 目錄
# cd /var/ftp/pub/images/pxeboot
# cp vmlinuz initrd.img /tftpboot/netboot

8. 複製 CentOS Linux 自動安裝設定檔 ks.cfg 到 /var/ftp/pub  目錄之下
# cp /root/ks.cfg /var/ftp/pub
# chmod 644 /var/ftp/pub/ks.cfg

9. 修改 SELinux 相關設定
# yum install policycoreutils-python
# semanage fcontext -a -t public_content_t “/tftpboot(/.*)?”
# restorecon -F -R -v /tftpboot
# restorecon -R -F -v /var/ftp/pub/

10. 建立 PXE Server 開機選單
# vim /tftpboot/pxelinux.cfg/default
default menu.c32
prompt 0
timeout 30
MENU TITLE example.com PXE Menu
LABEL CentOS7_x64
MENU LABEL CentOS 7.3 x86_64
KERNEL /netboot/vmlinuz
APPEND initrd=/netboot/initrd.img inst.repo=ftp://192.168.5.104/pub ks=ftp://192.168.5.104/pub/ks.cfg

11. 啟動相關服務
# systemctl enable vsftpd
Created symlink from /etc/systemd/system/multi-user.target.wants/vsftpd.service to /usr/lib/systemd/system/vsftpd.service
# systemctl start vsftpd
# systemctl enable tftp
Created symlink from /etc/systemd/system/sockets.target.wants/tftp.socket to /usr/lib/systemd/system/tftp.socket.
# systemctl start tftp
# systemctl daemon-reload
# systemctl enable dhcpd
Created symlink from /etc/systemd/system/multi-user.target.wants/dhcpd.service to /usr/lib/systemd/system/dhcpd.service.
# systemctl start dhcpd
# systemctl enable httpd
Created symlink from /etc/systemd/system/multi-user.target.wants/httpd.service to /usr/lib/systemd/system/httpd.service
# systemctl start httpd

12. 防火牆上設定
# firewall-cmd –permanent –add-service=dhcp
# firewall-cmd –permanent –add-service=ftp
# firewall-cmd –permanent –add-service=http
# firewall-cmd –permanent –add-service=tftp
# firewall-cmd –reload

Debian / Ubuntu 安裝 Let’s Encrypt 到 Apache

參考網站:
Debian / Ubuntu 安裝 Let’s Encrypt 到 Apache – Linux 技術手札

1. 安裝 Apache Web Server
# apt-get install apache2

2. 啟用 SSL 模組並重新啟動 Apache Web Server
# a2enmod ssl
Considering dependency setenvif for ssl:
Module setenvif already enabled
Considering dependency mime for ssl:
Module mime already enabled
Considering dependency socache_shmcb for ssl:
Enabling module socache_shmcb.
Enabling module ssl.
See /usr/share/doc/apache2/README.Debian.gz on how to configure SSL and create self-signed certificates.
To activate the new configuration, you need to run:
  service apache2 restart

# a2ensite default-ssl.conf
Enabling site default-ssl.
To activate the new configuration, you need to run:
  service apache2 reload

# /etc/init.d/apache2 restart
or
# systemctl restart apache2.service[@more@]3. 安裝 git 套件
# apt-get install git

4. 下載 Let’s Encrypt 的目錄
# cd /usr/local
# git clone https://github.com/letsencrypt/letsencrypt
Cloning into ‘letsencrypt’…
remote: Counting objects: 43808, done.
remote: Compressing objects: 100% (76/76), done.
remote: Total 43808 (delta 40), reused 0 (delta 0), pack-reused 43732
Receiving objects: 100% (43808/43808), 12.74 MiB | 2.16 MiB/s, done.
Resolving deltas: 100% (31283/31283), done.
Checking connectivity… done.

5. 產生憑證
# ./letsencrypt-auto –apache -d test.ilc.edu.tw -d www.test.ilc.edu.tw

Enter email address (used for urgent renewal and security notices) (Enter ‘c’ to
cancel):

——————————————————————————-
Please read the Terms of Service at
https://letsencrypt.org/documents/LE-SA-v1.1.1-August-1-2016.pdf. You must agree
in order to register with the ACME server at
https://acme-v01.api.letsencrypt.org/directory
——————————————————————————-
(A)gree/(C)ancel: A

——————————————————————————-
Would you be willing to share your email address with the Electronic Frontier
Foundation, a founding partner of the Let’s Encrypt project and the non-profit
organization that develops Certbot? We’d like to send you email about EFF and
our work to encrypt the web, protect its users and defend digital rights.
——————————————————————————-
(Y)es/(N)o: Y
Obtaining a new certificate
Performing the following challenges:
tls-sni-01 challenge for test.ilc.edu.tw
tls-sni-01 challenge for www.test.ilc.edu.tw
Waiting for verification…
Cleaning up challenges
Failed authorization procedure. nxi.tces.ilc.edu.tw (tls-sni-01): urn:acme:error:connection :: The server could not connect to the client to verify the domain :: Failed to connect to 192.168.1.1:443 for TLS-SNI-01 challenge

IMPORTANT NOTES:
 – If you lose your account credentials, you can recover through
   e-mails sent to t850008@gmail.com.
 – The following errors were reported by the server:

   Domain: www.test.ilc.edu.tw
   Type:   connection
   Detail: Failed to connect to 192.168.1.1:443 for TLS-SNI-01
   challenge

   To fix these errors, please make sure that your domain name was
   entered correctly and the DNS A record(s) for that domain
   contain(s) the right IP address. Additionally, please check that
   your computer has a publicly routable IP address and that no
   firewalls are preventing the server from communicating with the
   client. If you’re using the webroot plugin, you should also verify
   that you are serving files from the webroot path you provided.
 – Your account credentials have been saved in your Certbot
   configuration directory at /etc/letsencrypt. You should make a
   secure backup of this folder now. This configuration directory will
   also contain certificates and private keys obtained by Certbot so
   making regular backups of this folder is ideal.