VMware ESXi – 新增 iSCSI 磁碟機 – VMware vSphere Client

參考網站:
在 VMWare ESXi 上設定連接 iSCSI | WordPress

1. 選擇 主機 / 組態

2. 選擇 儲存裝置介面卡

[@more@]3. 選擇 新增

4. 選擇 新增軟體 iSCSI 介面卡(I)

5. 選擇 確定

6. 可以看到新增的介面卡

7. 按滑鼠右鍵,選擇 內容

8. 選擇 一般 / 設定

9. 輸入 iSCSI 名稱,勾選 已啟用,然後按 確定

10. 選擇 動態探索 / 新增

11. 輸入 iSCSI 伺服器 ,選擇 CHAP(C)

12. 輸入相關資料

13. 選擇 確定

14. 選擇 靜態探索 / 關閉

15. 選擇 是(Y)

16. 新增的 iSCSI 介面

17. 新增 iSCSI 資料存放區,選擇 儲存區

18. 選擇  新增儲存區

19. 新增過程

20. 新增完成

Windows 10 連線 iSCSI 設備

參考網頁:
CentOS 7 安裝 iSCSI Server

步驟與 Windows 7 相同
1.選擇 開始 / 設定(S) / 控制台(C)

2. 執行 系統管理工具

[@more@]
3. 執行 iSCSI 啟動器

4. 啟動 iSCSI 服務

5. 選擇 設定 / 變更(H)

6. 輸入啟動名稱,然後選擇 確定

7. 選擇 目標 / 輸入 iSCSI Server IP / 快速連線(O)

8. 選擇要連線的名稱,然後選擇 連線

9. 已顯示 連線

10. 已經可以直接使用,因為之前在 Windows 7 已經做過格式化

在 Windows 7 和 Windows 10 之間彼此看不到彼此的檔案

Windows 7 連線 iSCSI 設備

參考網頁:
CentOS 7 安裝 iSCSI Server

1.選擇 開始 / 設定(S) / 控制台(C)

2. 執行 系統管理工具

[@more@]
3. 執行 iSCSI 啟動器

4. 啟動 iSCSI 服務

5. 選擇 設定 / 變更(H)

6. 輸入啟動名稱,然後選擇 確定

7. 選擇 目標 / 輸入 iSCSI Server IP / 快速連線(O)

8. 選擇要連線的名稱,然後選擇 連線

9. 選擇 完成(D)

10. 選擇 確定

11. 執行 控制台 / 系統管理工具 / 電腦管理

12. 選擇 磁碟管理

13. 硬碟分割


14. 已經可以使用了!

在 CentOS 7 下安裝 iSCSI Initiator

參考網站:
CentOS 7 : Configure iSCSI Initiator(CentOS) : Server World
CentOS 7 安裝 iSCSI Server

1. 安裝 iscsi-initiator-utils 套件
# yum -y install iscsi-initiator-utils

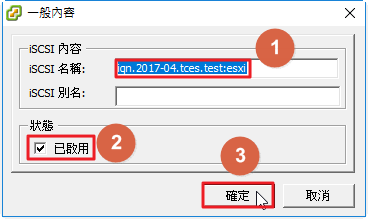
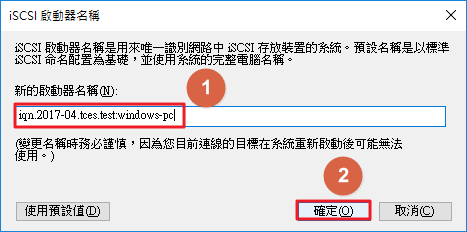
2. 修改 /etc/iscsi/initiatorname.iscsi 設定檔
# vim /etc/iscsi/initiatorname.iscsi
InitiatorName=iqn.2017-04.tces.test:linux-pc

3. 修改 /etc/iscsi/iscsid.conf  設定檔
# cp /etc/iscsi/iscsid.conf /etc/iscsi/iscsid.conf.$(date +%F)
# vim /etc/iscsi/iscsid.conf

#node.session.auth.authmethod = CHAP
#node.session.auth.username = username
#node.session.auth.password = password
修改成
node.session.auth.authmethod = CHAP
node.session.auth.username = username
node.session.auth.password = password[@more@]
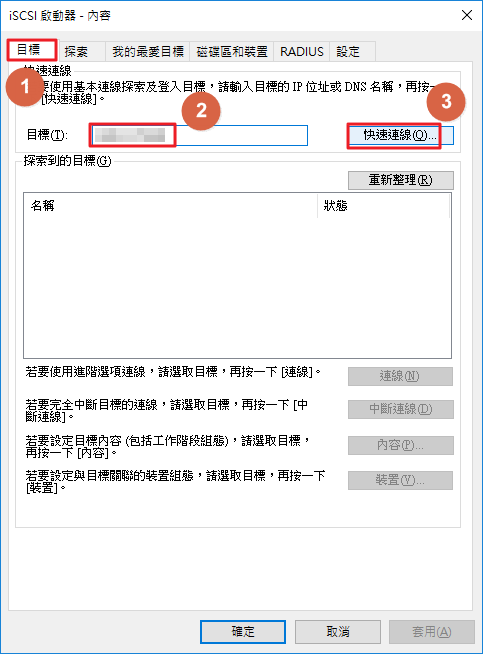
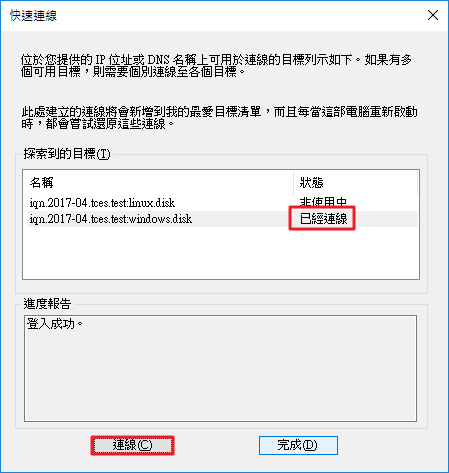
4. 尋找 iSCSI Server 分享的設備
# /usr/sbin/iscsiadm -m discovery -t sendtargets -p 192.168.1.46
192.168.1.46:3260,1 iqn.2017-04.tces.test:linux.disk

5. 顯示 iSCSI Server 狀態
# /usr/sbin/iscsiadm -m node -o show
# BEGIN RECORD 6.2.0.873-35
node.name = iqn.2017-04.tces.test:linux.disk
node.tpgt = 1
node.startup = automatic
node.leading_login = No
iface.hwaddress = <empty>
iface.ipaddress = <empty>
iface.iscsi_ifacename = default
iface.net_ifacename = <empty>
iface.gateway = <empty>
iface.subnet_mask = <empty>
iface.transport_name = tcp
iface.initiatorname = <empty>
iface.state = <empty>
iface.vlan_id = 0
iface.vlan_priority = 0
iface.vlan_state = <empty>
iface.iface_num = 0
iface.mtu = 0
iface.port = 0
iface.bootproto = <empty>
iface.dhcp_alt_client_id_state = <empty>
iface.dhcp_alt_client_id = <empty>
iface.dhcp_dns = <empty>
iface.dhcp_learn_iqn = <empty>
iface.dhcp_req_vendor_id_state = <empty>
iface.dhcp_vendor_id_state = <empty>
iface.dhcp_vendor_id = <empty>
iface.dhcp_slp_da = <empty>
iface.fragmentation = <empty>
iface.gratuitous_arp = <empty>
iface.incoming_forwarding = <empty>
iface.tos_state = <empty>
iface.tos = 0
iface.ttl = 0
iface.delayed_ack = <empty>
iface.tcp_nagle = <empty>
iface.tcp_wsf_state = <empty>
iface.tcp_wsf = 0
iface.tcp_timer_scale = 0
iface.tcp_timestamp = <empty>
iface.redirect = <empty>
iface.def_task_mgmt_timeout = 0
iface.header_digest = <empty>
iface.data_digest = <empty>
iface.immediate_data = <empty>
iface.initial_r2t = <empty>
iface.data_seq_inorder = <empty>
iface.data_pdu_inorder = <empty>
iface.erl = 0
iface.max_receive_data_len = 0
iface.first_burst_len = 0
iface.max_outstanding_r2t = 0
iface.max_burst_len = 0
iface.chap_auth = <empty>
iface.bidi_chap = <empty>
iface.strict_login_compliance = <empty>
iface.discovery_auth = <empty>
iface.discovery_logout = <empty>
node.discovery_address = 140.111.74.46
node.discovery_port = 3260
node.discovery_type = send_targets
node.session.initial_cmdsn = 0
node.session.initial_login_retry_max = 8
node.session.xmit_thread_priority = -20
node.session.cmds_max = 128
node.session.queue_depth = 32
node.session.nr_sessions = 1
node.session.auth.authmethod = CHAP
node.session.auth.username = test
node.session.auth.password = ********
node.session.auth.username_in = <empty>
node.session.auth.password_in = <empty>
node.session.timeo.replacement_timeout = 120
node.session.err_timeo.abort_timeout = 15
node.session.err_timeo.lu_reset_timeout = 30
node.session.err_timeo.tgt_reset_timeout = 30
node.session.err_timeo.host_reset_timeout = 60
node.session.iscsi.FastAbort = Yes
node.session.iscsi.InitialR2T = No
node.session.iscsi.ImmediateData = Yes
node.session.iscsi.FirstBurstLength = 262144
node.session.iscsi.MaxBurstLength = 16776192
node.session.iscsi.DefaultTime2Retain = 0
node.session.iscsi.DefaultTime2Wait = 2
node.session.iscsi.MaxConnections = 1
node.session.iscsi.MaxOutstandingR2T = 1
node.session.iscsi.ERL = 0
node.conn[0].address = 192.168.1.46
node.conn[0].port = 3260
node.conn[0].startup = manual
node.conn[0].tcp.window_size = 524288
node.conn[0].tcp.type_of_service = 0
node.conn[0].timeo.logout_timeout = 15
node.conn[0].timeo.login_timeout = 15
node.conn[0].timeo.auth_timeout = 45
node.conn[0].timeo.noop_out_interval = 5
node.conn[0].timeo.noop_out_timeout = 5
node.conn[0].iscsi.MaxXmitDataSegmentLength = 0
node.conn[0].iscsi.MaxRecvDataSegmentLength = 262144
node.conn[0].iscsi.HeaderDigest = None
node.conn[0].iscsi.IFMarker = No
node.conn[0].iscsi.OFMarker = No
# END RECORD

6. 登入使用 iSCSI 設備
# /usr/sbin/iscsiadm -m node –login
Logging in to [iface: default, target: iqn.2017-04.tces.test:linux.disk, portal: 192.168.1.46,3260] (multiple)
Login to [iface: default, target: iqn.2017-04.tces.test:linux.disk, portal: 192.168.1.46,3260] successful.

7. 顯示連線狀態
# /usr/sbin/iscsiadm -m session -o show
tcp: [1] 192.168.1.46:3260,1 iqn.2017-04.tces.test:linux.disk (non-flash)

8. 檢查是否有多個一個硬碟
# cat /proc/partitions
major minor  #blocks  name

   8        0   20971520 sda
   8        1    1048576 sda1
   8        2   19921920 sda2
  11        0    4277248 sr0
 253        0   17821696 dm-0
 253        1    2097152 dm-1
   8       16   10485760 sdb

# fdisk -l

Disk /dev/sda: 21.5 GB, 21474836480 bytes, 41943040 sectors
Units = sectors of 1 * 512 = 512 bytes
Sector size (logical/physical): 512 bytes / 512 bytes
I/O 大小 (最小/最佳化):512 位元組 / 512 位元組
Disk label type: dos
磁碟識別碼:0x000a2798

所用裝置 開機      開始         結束      區塊   識別號  系統
/dev/sda1   *        2048     2099199     1048576   83  Linux
/dev/sda2         2099200    41943039    19921920   8e  Linux LVM

Disk /dev/mapper/cl-root: 18.2 GB, 18249416704 bytes, 35643392 sectors
Units = sectors of 1 * 512 = 512 bytes
Sector size (logical/physical): 512 bytes / 512 bytes
I/O 大小 (最小/最佳化):512 位元組 / 512 位元組

Disk /dev/mapper/cl-swap: 2147 MB, 2147483648 bytes, 4194304 sectors
Units = sectors of 1 * 512 = 512 bytes
Sector size (logical/physical): 512 bytes / 512 bytes
I/O 大小 (最小/最佳化):512 位元組 / 512 位元組

Disk /dev/sdb: 10.7 GB, 10737418240 bytes, 20971520 sectors
Units = sectors of 1 * 512 = 512 bytes
Sector size (logical/physical): 512 bytes / 512 bytes
I/O 大小 (最小/最佳化):512 位元組 / 4194304 位元組

# file /dev/sdb
/dev/sdb: block special

9. 建立掛目錄及格式化硬碟
# mkdir /iscsidisk
# mkfs.xfs /dev/sdb
meta-data=/dev/sdb               isize=512    agcount=4, agsize=655360 blks
         =                       sectsz=512   attr=2, projid32bit=1
         =                       crc=1        finobt=0, sparse=0
data     =                       bsize=4096   blocks=2621440, imaxpct=25
         =                       sunit=0      swidth=0 blks
naming   =version 2              bsize=4096   ascii-ci=0 ftype=1
log      =internal log           bsize=4096   blocks=2560, version=2
         =                       sectsz=512   sunit=0 blks, lazy-count=1
realtime =none                   extsz=4096   blocks=0, rtextents=0

# mount /dev/sdb /iscsidisk
# df -h
檔案系統             容量  已用  可用 已用% 掛載點
/dev/mapper/cl-root   17G   11G  7.0G   60% /
devtmpfs             982M     0  982M    0% /dev
tmpfs                993M     0  993M    0% /dev/shm
tmpfs                993M  8.7M  984M    1% /run
tmpfs                993M     0  993M    0% /sys/fs/cgroup
/dev/sda1           1014M  176M  839M   18% /boot
tmpfs                199M     0  199M    0% /run/user/0
/dev/sdb              10G   33M   10G    1% /iscsidisk

10. 寫入到 /etc/fstab
# blkid | grep /dev/sdb
/dev/sdb: UUID=”8f933fbf-a56d-40bb-8c88-cb9ec851095f” TYPE=”xfs”

# vim /etc/fstab
加入下面一行
/dev/sdb: UUID=8f933fbf-a56d-40bb-8c88-cb9ec851095f /iscsidisk xfs default,_netdev 0 0

在 CentOS 7 下安裝 iSCSI Target

參考網站:
CentOS 7 : Configure iSCSI Target : Server World
CentOS 7 安裝 iSCSI Server
Configure iSCSI Target & Initiator on CentOS 7 / RHEL7

1. 安裝 targetcli 套件
# yum -y install targetcli

2. 建立目錄
# mkdir /iscsi_disks[@more@]
3. 進入 iscsi 管理介面
# /usr/bin/targetcli
Warning: Could not load preferences file /root/.targetcli/prefs.bin.
targetcli shell version 2.1.fb41
Copyright 2011-2013 by Datera, Inc and others.
For help on commands, type ‘help’.

/> cd backstores/fileio
/backstores/fileio> create linux-disk /iscsi_disks/linux-disk.img 10G
Created fileio linux-disk with size 10737418240
/backstores/fileio> cd /iscsi
/iscsi> create iqn.2017-04.tces.test:linux.disk
Created target iqn.2017-04.tces.test:linux.disk.
Created TPG 1.
Global pref auto_add_default_portal=true
Created default portal listening on all IPs (0.0.0.0), port 3260.
/iscsi> cd iqn.2017-04.tces.test:linux.disk/tpg1/luns
/iscsi/iqn.20…isk/tpg1/luns> create /backstores/fileio/linux-disk
Created LUN 0.
/iscsi/iqn.20…isk/tpg1/luns> cd ../acls
/iscsi/iqn.20…isk/tpg1/acls> create iqn.2017-04.tces.test:linux-pc
Created Node ACL for iqn.2017-04.tces.test:linux-pc
Created mapped LUN 0.
/iscsi/iqn.20…isk/tpg1/acls> cd iqn.2017-04.tces.test:linux-pc
/iscsi/iqn.20…test:linux-pc> set auth userid=user
Parameter userid is now ‘user.
/iscsi/iqn.20…test:linux-pc> set auth password=password
Parameter password is now ‘password’.
/iscsi/iqn.20…test:linux-pc> exit
Global pref auto_save_on_exit=true
Last 10 configs saved in /etc/target/backup.
Configuration saved to /etc/target/saveconfig.json

4. 檢查是否有正常執行
# ss -napt | grep 3260
LISTEN     0      256          *:3260                     *:*

# netstat -napt | grep 3260
tcp        0      0 0.0.0.0:3260            0.0.0.0:*               LISTE

5. 防火牆設定
# firewall-cmd –permanent –add-service=iscsi-target
# firewall-cmd –reload

# firewall-cmd –permanent –add-port=3260/tcp
# firewall-cmd –reload

# iptables -A INPUT -s 192.168.1.0/24 -p tcp -m state –state NEW –dport 3260 -j ACCEPT

For Windows
# /usr/bin/targetcli
Warning: Could not load preferences file /root/.targetcli/prefs.bin.
targetcli shell version 2.1.fb41
Copyright 2011-2013 by Datera, Inc and others.
For help on commands, type ‘help’.

/> cd backstores/fileio

/backstores/fileio> create windows-disk /iscsi_disks/windows-disk.img 4G
Created fileio windows-disk with size 4294967296
/backstores/fileio> cd /iscsi
/iscsi> create iqn.2017-04.tces.test:windows.disk
Created target iqn.2017-04.tces.test:windows.disk.
Created TPG 1.
Global pref auto_add_default_portal=true
Created default portal listening on all IPs (0.0.0.0), port 3260.
/iscsi> cd iqn.2017-04.tces.test:windows.disk/tpg1/luns
/iscsi/iqn.20…isk/tpg1/luns> create /backstores/fileio/windows-disk
Created LUN 0.
/iscsi/iqn.20…isk/tpg1/luns> cd ../acls
/iscsi/iqn.20…isk/tpg1/acls> create iqn.2017-04.tces.test:windows-pc
Created Node ACL for iqn.2017-04.tces.test:windows-pc
Created mapped LUN 0.
/iscsi/iqn.20…isk/tpg1/acls> cd /iscsi/iqn.2017-04.tces.test:windows.disk/tpg1/
/iscsi/iqn.20…ows.disk/tpg1> set attribute authentication=0
Parameter authentication is now ‘0’.
/iscsi/iqn.20…ows.disk/tpg1> cd /iscsi/iqn.2017-04.tces.test:windows.disk/tpg1/
/iscsi/iqn.20…ows.disk/tpg1> set attribute generate_node_acls=0
Parameter generate_node_acls is now ‘0’.
/iscsi/iqn.20…ows.disk/tpg1> exit
Global pref auto_save_on_exit=true
Last 10 configs saved in /etc/target/backup.
Configuration saved to /etc/target/saveconfig.json

VMware ESXi – 忘了 root 密碼

參考網頁:
Changing a forgotten root password on an ESX/ESXi host (1317898) | VMware KB
How to Reset Forgotten VMware ESXi Root Password with Ubuntu Live CD

如果忘了 ESXi root 密碼

依官方的說法,唯一的方式是重新安裝。

[@more@]解決方式:
1. 找一片 LiveCD,使用 LiveCD 光碟開機

2. 選擇 應用程式 / 系統工具 / MATE 終端機

3. 查看硬碟分割
     $ sudo fdisk -l

檔案在 /dev/sda5

4. 建立掛載目錄
    $ sudo mkdir /mnt/sda5

5. 掛載分割區
    $ sudo mount /dev/sda5 /mnt/sda5

6. 列出檔案
    $ ls /mnt/sda5

7. 複製檔案到使用者目錄
    $ cp /mnt/sda5/state.tgz ~

8. 目錄切換回使用者根目錄
    $ cd ~

9. 解壓縮
    $ tar xvzf state.tgz
    $ tar xvzf local.tgz

10. 修改 etc/shadow
      $ vi etc/shadow

11. 把第一個 : 和第二個 : 之間的字元刪除

12. 刪除原檔
      $ rm -rf local.tgz state.tgz

13. 把 etc 目錄壓縮成 local.tgz
      $ tar czf local.tgz etc

14. 把 local.tgz 壓縮成 state.tgz
      $ tar czf state.tgz local.tgz

15. 刪除原檔
      $ sudo rm -rf /mnt/sda5/state.tgz

16. 複製修改好的檔案回原目錄
      $ sudo cp state.tgz /mnt/sda5

17. 卸載目錄
      $ sudo umount /mnt/sda5

18. 重新啟動電腦

19. 按 F2 進入設定

20. 密碼不用輸入

21. 選擇 Configuration Password,可以看出來目前密碼還未設定

22. 設定新的密碼,要注意的是,這裡的密碼要求比較高,不像在安裝時,設定密碼強度要求比較寬鬆

23. 設定成功!

VMware ESXi – ghettoVCB 還原 ESXi 虛擬機器

參考網站:
ghettoVCB 還原 ESXI Guest OS

1. VM 備份檔的位置

2. 刪除 VM

[@more@]
3. 建立要還原的 VM 虛擬機器清單
[root@esxi:~]  vi /vmfs/volumes/ST500G/vm_to_restore.lst
# DISK_FORMATS
# 1 = zeroedthick  (一次給足全部的硬碟大小,需要時才初使化未使用的空間)
# 2 = 2gbsparse  (將硬碟分割成多個 2G 的硬碟)
# 3 = thin  (隨著使用量而增加硬碟大小,達到設定上限時就不會在增加)
# 4 = eagerzeroedthick  (一次給足全部的硬碟大小,全部初始化可直接使用)
# 格式,以 ; 做分隔
# “VM 備份檔所在的完整路徑;還原後的 VM 要存放的完整路徑;還原時硬碟的格式”

“/vmfs/volumes/SynologyNAS/CentOS 7 Base/CentOS 7 Base-2017-04-05_12-33-10;/vmfs/volumes/ST500G;3”

4. 進行復原
[root@esxi:~] /opt/ghettovcb/bin/ghettoVCB-restore.sh -c /vmfs/volumes/ST500G/vm_to_restore.lst -l /vmfs/volumes/ST500G/ghettoVCB_log/ghettoVCB-restore.$(date +%F)

################## Restoring VM: CentOS 7 Base  #####################
Start time: Wed Apr  5 23:40:28 CST 2017
Restoring VM from: “/vmfs/volumes/SynologyNAS/CentOS 7 Base/CentOS 7 Base-2017-04-05_12-33-10”
Restoring VM to Datastore: “/vmfs/volumes/ST500G” using Disk Format: “thin”
Creating VM directory: “/vmfs/volumes/ST500G/CentOS 7 Base” …
Copying “CentOS 7 Base.vmx” file …
Restoring VM’s VMDK(s) …
Updating VMDK entry in “CentOS 7 Base.vmx” file …
Option –adaptertype is deprecated and hence will be ignored
Destination disk format: VMFS thin-provisioned
Cloning disk ‘/vmfs/volumes/SynologyNAS/CentOS 7 Base/CentOS 7 Base-2017-04-05_12-33-10/CentOS 7 Base_0.vmdk’…
Clone: 100% done.
Registering CentOS 7 Base …
33
End time: Thu Apr  6 00:04:58 CST 2017
################## Completed restore for CentOS 7 Base! #####################

Start time: Wed Apr  5 23:40:28 CST 2017
End   time: Thu Apr  6 00:04:58 CST 2017
Duration  : 24.50 Minutes

—————————————————————————————————————

5. 更多 ghettoVCB-restore.sh 指令用法
[root@esxi:~]  /opt/ghettovcb/bin/ghettoVCB-restore.sh
###############################################################################
#
# ghettoVCB-restore for ESX/ESXi 3.5, 4.x, 5.x & 6.x
# Author: William Lam
# http://www.virtuallyghetto.com/
# Documentation: http://communities.vmware.com/docs/DOC-8760
# Created: 08/18/2009
# Last modified: 2015_04_04_1
#
###############################################################################

Usage: /opt/ghettovcb/bin/ghettoVCB-restore.sh -c [VM_BACKUP_UP_LIST] -l [LOG_FILE] -d [DRYRUN_DEBUG_INFO]

OPTIONS:
   -c     VM backup list
   -l     File ot output logging
   -d     Dryrun/Debug Info [1|2]

(e.g.)

Output will go to stdout
        /opt/ghettovcb/bin/ghettoVCB-restore.sh -c vms_to_restore

Output will log to /tmp/ghettoVCB-restore.log
        /opt/ghettovcb/bin/ghettoVCB-restore.sh -c vms_to_restore -l /tmp/ghettoVCB-restore.log

Dryrun/Debug Info (dryrun only)
        /opt/ghettovcb/bin/ghettoVCB-restore.sh -c vms_to_restore -d 1
        /opt/ghettovcb/bin/ghettoVCB-restore.sh -c vms_to_restore -d 2

VMware ESXi – ghettoVCB 排程備份

1. 備份 /var/spool/cron/crontabs/root/vmfs/volumes/ST500G/crontabsroot
[root@esxi:~] cp /var/spool/cron/crontabs/root /vmfs/volumes/ST500G/crontabsroot

2. 進行修改
[root@esxi:~] cat /vmfs/volumes/ST500G/crontabsroot
#min hour day mon dow command
1    1    *   *   *   /sbin/tmpwatch.py
1    *    *   *   *   /sbin/auto-backup.sh
0    *    *   *   *   /usr/lib/vmware/vmksummary/log-heartbeat.py
*/5  *    *   *   *   /bin/hostd-probe.sh ++group=host/vim/vmvisor/hostd-probe/stats/sh
00   1    *   *   *   localcli storage core device purge
30   1    *   *   *   /opt/ghettovcb/bin/ghettoVCB.sh -g /opt/ghettovcb/ghettoVCB.conf -f /vmfs/volumes/ST500G/ghetto.lst > /dev/null 2>&1[@more@]
3. 建立 /vmfs/volumes/ST500G/crondtab.sh
[root@esxi:~] vi /vmfs/volumes/ST500G/crondtab.sh
#!/bin/sh
#add backup crond shell
/bin/kill $(cat /var/run/crond.pid)
cp /vmfs/volumes/ST500G/crontabsroot /var/spool/cron/crontabs/root
/usr/lib/vmware/busybox/bin/busybox crond

4. 更改檔案權限
[root@esxi:~] chmod 755 /vmfs/volumes/ST500G/crondtab.sh

5. 將 crondtab.sh 加入開機設定檔 /etc/rc.local.d/local.sh
[root@esxi:~] vi /etc/rc.local.d/local.sh
#backup crond
/vmfs/volumes/ST500G/crondtab.sh
# 時區設定
if [ -e /etc/localtime ];then
     rm -rf /etc/localtime
     cp /vmfs/volumes/ST500G/localtime /etc
else
     cp /vmfs/volumes/ST500G/localtime /etc
fi

VMware ESXi – ghettoVCB 備份 ESXi 虛擬機器

參考網站:
ghettoVCB 備份 ESXI Guest OS
ESXi 5.1 / 5.5 定期排程備份線上VM;NFS、sendmail-ghettoVCB | Mr. 沙先生
Backing up VMware ESXi VMs with ghettoVCB – Miscellaneous Knowledge

虛擬機器不用先關機,ghettoVCB.sh 會先為虛擬機器建立快照,然後進行備份,當備份完成之後會刪除快照。

1.下載 ghettoVCB

2. 上傳到 資料存放區

3. 開啟 ESXi 伺服器可安裝非原廠的額外套件
[root@esxi:~] esxcli software acceptance set –level=CommunitySupported
Host acceptance level changed to ‘CommunitySupported’.

4. 進行安裝 ghettoVCB,似乎沒有進行第 3 步驟,也可以進行安裝
[root@esxi:~] esxcli software vib install -v /vmfs/volumes/ST500G/vghetto-ghettoVCB.vib  -f
Installation Result
   Message: Operation finished successfully.
   Reboot Required: false
   VIBs Installed: virtuallyGhetto_bootbank_ghettoVCB_1.0.0-0.0.0
   VIBs Removed:
   VIBs Skipped:

檔案安裝位置
[root@esxi:~] ls -l /opt/ghettovcb/bin/*
-r-xr-xr-x    1 root     root         17555 Jan 11 14:31 /opt/ghettovcb/bin/ghettoVCB-restore.sh
-r-xr-xr-x    1 root     root         65458 Jan 11 14:31 /opt/ghettovcb/bin/ghettoVCB.sh[@more@]
5. 建立 ghettoVCB.conf 設定檔
[root@esxi:~] vi /opt/ghettoVCB/ghettoVCB.conf
# 備份到 SynologyNAS
VM_BACKUP_VOLUME=/vmfs/volumes/SynologyNAS
# 備份虛擬機格式,採用精簡建
DISK_BACKUP_FORMAT=thin
# 定義備份保留的數量
VM_BACKUP_ROTATION_COUNT=3
# 虛擬機器 POWER OFF 時不會要求 snapshottting
POWER_VM_DOWN_BEFORE_BACKUP=0
# 定義沒有安裝 VMware Tools 的虛擬機器是否可以在硬碟 POWER OFF 時啟用
ENABLE_HARD_POWER_OFF=0
# 如果啟用 ENABLE_HARD_POWER_OFF,將強制執行關閉時會侄數運算,時間是 3 分鐘
ITER_TO_WAIT_SHUTDOWN=3
# 設定 POWER DOWN 的時間,等待關閉時,VM 會放棄或忽略特定的 VM 備份。時間是 5 分鐘
POWER_DOWN_TIMEOUT=5
# 不進行壓縮
ENABLE_COMPRESSION=0
# 不啟用 VM 虛擬機器的快照記憶體
VM_SNAPSHOT_MEMORY=0
# 不啟用對停止的 VM 虛擬機器使用快照(需要有安裝 VMware Tools)
VM_SNAPSHOT_QUIESCE=0
ALLOW_VMS_WITH_SNAPSHOTS_TO_BE_BACKEDUP=0
# 開啟 NFS
ENABLE_NON_PERSISTENT_NFS=1
# 執行完畢就 unmount
UNMOUNT_NFS=0
# NFS Server IP
NFS_SERVER=xxx.xxx.xxx.xxx
# NFS 版本
NFS_VERSION=nfs
# NFS Host 掛載目錄
NFS_MOUNT=/volume1/homes/test/Server/esxi
NFS_LOCAL_NAME=SynologyNAS
NFS_VM_BACKUP_DIR=mybackups

6. 建立 log 檔存放目錄
[root@esxi:~] mkdir /vmfs/volumes/ST500G/ghettoVCB_log

7. 修改 /opt/ghettovcb/bin/ghettoVCB.sh
[root@esxi:~] vi /opt/ghettovcb/bin/ghettoVCB.sh
找到
    #if no logfile then provide default logfile in /tmp
    if [[ -z “${LOG_OUTPUT}” ]] ; then
        LOG_OUTPUT=”/tmp/ghettoVCB-$(date +%F_%H-%M-%S)-$$.log”
        echo “Logging output to “${LOG_OUTPUT}” …”
    fi
修改成
    #if no logfile then provide default logfile in /tmp
    if [[ -z “${LOG_OUTPUT}” ]] ; then
        LOG_OUTPUT=”//vmfs/volumes/ST500G/ghettoVCB_log/ghettoVCB-$(date +%F_%H-%M-%S)-$$.log”
        echo “Logging output to “${LOG_OUTPUT}” …”
    fi

8. 列出安裝的虛擬機器
[root@esxi:~] vim-cmd vmsvc/getallvms
Vmid             Name                                            File                                       Guest OS         Version                                                                                                                                                                                                                                                       Annotation                                                                                                                                                                                                                                                   
1      OB2D Linux 2017 1.0         [ST500G] ob2d/ob2d.vmx                                             other26xLinux64Guest   vmx-13                                                                                                                                                                                                                                                                                                                                                                                                                                                                                                                     
2      Custom CentOS 7.x           [ST500G] Custom CentOS 7.x/Custom CentOS 7.x.vmx                   centos7_64Guest        vmx-13                                                                                                                                                                                                                                                                                                                                                                                                                                                                                                                     
21     OpenNMS                     [ST500G] OpenNMS/OpenNMS.vmx                                       centos7_64Guest        vmx-13                                                                                                                                                                                                                                                                                                                                                                                                                                                                                                                     
22     Nginx                       [ST500G] Nginx/Nginx.vmx                                           centos7_64Guest        vmx-13                                                                                                                                                                                                                                                                                                                                                                                                                                                                                                                     
24     Ubuntu 16.04.2              [ST500G] Ubuntu 16.04.2/Ubuntu 16.04.2.vmx                         ubuntu64Guest          vmx-13                                                                                                                                                                                                                                                                                                                                                                                                                                                                                                                     
25     ArchLinux                   [ST500G] ArchLinux/ArchLinux.vmx                                   other26xLinux64Guest   vmx-13                                                                                                                                                                                                                                                                                                                                                                                                                                                                                                                     
26     Windows 10 1607 14393.0     [ST500G] Windows 10 1607 14393.969/Windows 10 1607 14393.969.vmx   windows9_64Guest       vmx-13
31     Photon OS                   [ST500G] Photon OS/Photon OS.vmx                                   other3xLinux64Guest    vmx-13                                                                                                                                                                                                                                                                                                                                                                                                                                                                                                                     
32     CentOS 7 Base               [ST500G] CentOS 7 Base/CentOS 7 Base.vmx                           centos7_64Guest        vmx-13

9. 進行備份
備份 CentOS 7 Base
[root@esxi:~] /opt/ghettovcb/bin/ghettoVCB.sh -g /opt/ghettovcb/ghettoVCB.conf -m “CentOS 7 Base” -l /vmfs/volumes/ST500G/ghettoVCB_log/ghettoVCB-backup.$(date +%F)

備份全部
[root@esxi:~] /opt/ghettovcb/bin/ghettoVCB.sh -g /opt/ghettovcb/ghettoVCB.conf -a -l /vmfs/volumes/ST500G/ghettoVCB_log/ghettoVCB-backup.$(date +%F)

備份清單
[root@esxi:~] cat /vmfs/volumes/ST500G/vm_to_backup.lst
OpenNMS
Nginx
ArchLinux
[root@esxi:~] /opt/ghettovcb/bin/ghettoVCB.sh -g /opt/ghettovcb/ghettoVCB.conf -f /vmfs/volumes/ST500G/vm_to_backup.lst -l /vmfs/volumes/ST500G/ghettoVCB_log/ghettoVCB-backup.$(date +%F)

10. ghettoVCB.sh 指令用法
[root@esxi:~] /opt/ghettovcb/bin/ghettoVCB.sh
###############################################################################
#
# ghettoVCB for ESX/ESXi 3.5, 4.x+, 5.x & 6.x
# Author: William Lam
# http://www.virtuallyghetto.com/
# Documentation: http://communities.vmware.com/docs/DOC-8760
# Created: 11/17/2008
# Last modified: 2016_11_20 Version 1
#
###############################################################################

Usage: ghettoVCB.sh [options]

OPTIONS:
   -a     Backup all VMs on host(備份所有的 VM)
   -f     List of VMs to backup(備份清單中的 VM,一行一個 VM)
   -m     Name of VM to backup (overrides -f)(備份 VM)
   -c     VM configuration directory for VM backups
   -g     Path to global ghettoVCB configuration file(ghettoVCB.conf 設定檔位置)
   -l     File to output logging(log 檔位置)
   -w     ghettoVCB work directory (default: /tmp/ghettoVCB.work)
   -d     Debug level [info|debug|dryrun] (default: info)

(e.g.)

Backup VMs stored in a list
        /opt/ghettovcb/bin/ghettoVCB.sh -f vms_to_backup

Backup a single VM
        /opt/ghettovcb/bin/ghettoVCB.sh -m vm_to_backup

Backup all VMs residing on this host
        /opt/ghettovcb/bin/ghettoVCB.sh -a

Backup all VMs residing on this host except for the VMs in the exclusion list
        /opt/ghettovcb/bin/ghettoVCB.sh -a -e vm_exclusion_list

Backup VMs based on specific configuration located in directory
        /opt/ghettovcb/bin/ghettoVCB.sh -f vms_to_backup -c vm_backup_configs

Backup VMs using global ghettoVCB configuration file
        /opt/ghettovcb/bin/ghettoVCB.sh -f vms_to_backup -g /global/ghettoVCB.conf

Output will log to /tmp/ghettoVCB.log (consider logging to local or remote datastore to persist logs)
        /opt/ghettovcb/bin/ghettoVCB.sh -f vms_to_backup -l /vmfs/volume/local-storage/ghettoVCB.log

Dry run (no backup will take place)
        /opt/ghettovcb/bin/ghettoVCB.sh -f vms_to_backup -d dryrun