Nignx 加入網頁密碼保護

參考網頁:
Linux . 無限: 在 CentOS7/RHEL7上,使用 Nginx 設定基本 Web 帳號密碼

1. 安裝 httpd-tools 套件
# yum install httpd-tools

2. 建立目錄及測試檔
# mkdir /usr/share/nginx/html/admin
# echo “<h2>This is a secure file</h2>” > /usr/share/nginx/html/admin/test.html

3. 建立密碼檔
# /bin/htpasswd -c /usr/share/nginx/html/admin/.htpasswd test
New password:
Re-type new password:
Adding password for user test[@more@]
4. 俢改 /etc/nginx/conf.d/default.conf 設定檔
# vim /etc/nginx/conf.d/default.conf
    location ~ ^/admin/.* {
        root /usr/share/nginx/html;
        index index.php index.html index.htm;
        location ~ .php$ {
           try_files $uri = 404;
           fastcgi_pass   127.0.0.1:9000;
           fastcgi_index  index.php;
           fastcgi_param  SCRIPT_FILENAME  $document_root$fastcgi_script_name;
           include        fastcgi_params;
        }
        auth_basic “Administrator Login”;
        auth_basic_user_file /usr/share/nginx/html/admin/.htpasswd;
    }

    location ~ ^/admin/.* {
        root /usr/share/nginx/html;
        index index.php index.html index.htm;
            auth_basic            “
Administrator Login“;
            auth_basic_user_file  “/
usr/share/nginx/html/admin/.htpasswd“;
        }

5. 重新啟動 Nginx Web Server
# systemctl restart nginx.service

6. 觀看成果 http://Server’IP/admin/test.html

Nginx 加入Memcached 模組

參考網站:
Linux . 無限: 在 CentOS7/RHEL7 上安裝 Memcached 套件
Linux . 無限: 在 CentOS7/RHEL7 上架設 Nginx Web Server(一)

1. 安裝 memcache 相關套件 
# yum install memcached php-pecl-memcache

2. 查看 /etc/sysconfig/memcached 設定檔
# cat /etc/sysconfig/memcached
# 連線 Port
PORT=”11211″
# 執行身份
USER=”memcached”
# 最多連線
MAXCONN=”1024″
# 使用 Cache 容量
CACHESIZE=”64″

3. 啟動 memcached 服務
# systemctl enable memcached.service
Created symlink from /etc/systemd/system/multi-user.target.wants/memcached.service to /usr/lib/systemd/system/memcached.service.
# systemctl start memcached.service[@more@]
4. 檢查服務是否有正常啟動
# systemctl status memcached.service
● memcached.service – Memcached
   Loaded: loaded (/usr/lib/systemd/system/memcached.service; enabled; vendor preset: disabled)
   Active: active (running) since Sat 2017-03-11 15:02:39 CST; 10s ago
 Main PID: 1107 (memcached)
   CGroup: /system.slice/memcached.service
           mq1107 /usr/bin/memcached -u memcached -p 11211 -m 64 -c 1024

Mar 11 15:02:39 mis systemd[1]: Started Memcached.
Mar 11 15:02:39 mis systemd[1]: Starting Memcached…

# ss -tnl | grep 11211
LISTEN     0      128          *:11211                    *:*
LISTEN     0      128         :::11211                   :::*

5. 重新啟動 Web Server
for Apache Web Server
# systemctl restart httpd.service

for Nginx Web Server
# vim /etc/nginx/conf.d/default.conf
    location ^~ /cache/ {
        set            $memcached_key $request_uri;
        memcached_pass 127.0.0.1:11211;
    }
# systemctl restart nginx.service
# systemctl restart php-fpm

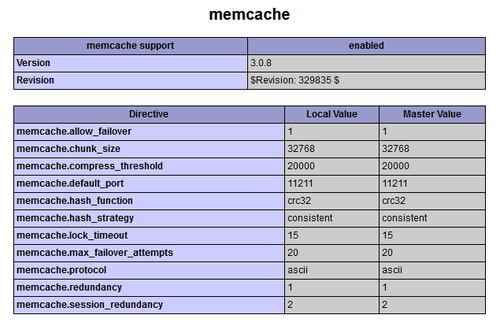
觀看成果 http://Server’IP/info.php

改成 Socket 的使用方式
# cat /etc/sysconfig/memcached
PORT=”11211″
USER=”memcached”
MAXCONN=”1024″
CACHESIZE=”64″
OPTIONS=”-s /tmp/memcached.sock -a 666″

# vim /etc/php.d/memcache.ini
;  Use memcache as a session handler
session.save_handler=memcache
;  Defines a comma separated of server urls to use for session storage
session.save_path=”/tmp/memcached.sock”

# vim /etc/nginx/conf.d/default.conf
    location ^~ /cache/ {
        set            $memcached_key $request_uri;
        memcached_pass unix:/tmp/memcached.sock;
    }

# systemctl restart memcached.service
# systemctl restart nginx.service
# systemctl restart php-fpm

# ls -l /tmp/memcached.sock
srw-rw-rw- 1 memcached memcached 0 Mar 11 16:00 /tmp/memcached.sock

Nginx 加入 php 模組

參考網頁:
Linux . 無限: 在 CentOS7/RHEL7 上架設 Nginx Web Server(一)
CentOS 7 : Nginx : PHP-FPM : Server World
[CentOS 7] 整合 Nginx、MariaDB、PHP 7 組成 LEMP Server | IT 技術家

1. 安裝 php-fpm 套件
# yum install php-fpm php-mbstring php-pear

2. 修改 /etc/php-fpm.d/www.conf 設定檔,改變執行者及群組
# vim /etc/php-fpm.d/www.conf
user = apache
group = apache

3. 啟動php-fpm 服務
# systemctl enable php-fpm.service
Created symlink from /etc/systemd/system/multi-user.target.wants/php-fpm.service to /usr/lib/systemd/system/php-fpm.service.
# systemctl start php-fpm.service[@more@]
4. 修改 /etc/nginx/conf.d/default.conf 設定檔
# cp /etc/nginx/conf.d/default.conf /etc/nginx/conf.d/default.conf.$(date +%F)
# vim /etc/nginx/conf.d/default.conf
server {
    listen       80;
    server_name  localhost;

    charset utf-8;
    access_log  /var/log/nginx/access.log  main;
    error_log /var/log/nginx/error.log warn;

    location / {
        root   /usr/share/nginx/html;
        index  index.php index.html index.htm;
    }

    error_page  404              /404.html;

    location ~ .php$ {
        root           /usr/share/nginx/html;
        fastcgi_pass   127.0.0.1:9000;
        fastcgi_index  index.php;
        fastcgi_param  SCRIPT_FILENAME $document_root$fastcgi_script_name;
        include        fastcgi_params;
    }
    location ~ /.ht {
        deny  all;
    }
}

5. 修改 /etc/php.ini
# sed -i ‘s/;cgi.fix_pathinfo=1/cgi.fix_pathinfo=0/’ /etc/php.ini

6. 重新啟動 Nginx Web Server
# systemctl restart nginx.service
# systemctl status nginx.service

7. 編輯 php 測試檔
# echo “<?php phpinfo(); ?>” > /usr/share/nginx/html/info.php

8. SELinux 設定
# chcon -R -t httpd_sys_rw_content_t /usr/share/nginx/html

9. 開啟瀏覽器 http://Server’IP/info.php


修改 /etc/php-fpm.d/www.conf 設定檔,改變執行者及群組
# vim /etc/php-fpm.d/www.conf
user = nginx
group = nginx
listen = /var/run/php-fpm.sock
listen.owner = nginx
listen.group = nginx
listen.mode = 0666

# vim /etc/nginx/conf.d/default.conf
    location ~ .php$ {
        root           /usr/share/nginx/html;
        fastcgi_pass   unix:/var/run/php-fpm.sock;
        fastcgi_index  index.php;
        fastcgi_param  SCRIPT_FILENAME $document_root$fastcgi_script_name;
        include        fastcgi_params;
    }

在 CentOS 7.x 下安裝 Nignx Web Server

使用 nginx 套件庫安裝
1. 建立 nginx 套件庫
# vim /etc/yum.repos.d/nginx.repo
[nginx]
name=nginx repo
baseurl=http://nginx.org/packages/centos/$releasever/$basearch/
gpgcheck=0
enabled=1

2. 套件庫更新
# yum update

3. 安裝 Nginx Web Server
# yum install nginx

4. 安裝的版本
# /sbin/nginx -V
nginx version: nginx/1.10.3[@more@]或使用 epel 套件庫安裝
1. 安裝 Nginx Web Server
# yum install nginx –enablerepo=epel

2. 安裝的版本
# /sbin/nginx -V
nginx version: nginx/1.10.2

二者差別
1. 用 nginx 套件庫安裝的版本比較新 1.10.3 > 1.10.2
2. 用 epel 套件庫安裝的套件數比較多 25 > 3

設定開機時啟動
# systemctl enable nginx.service
Created symlink from /etc/systemd/system/multi-user.target.wants/nginx.service to /usr/lib/systemd/system/nginx.service.
# systemctl start nginx.service

防火牆上設定
# firewall-cmd –add-service=http –permanent
# firewall-cmd –add-service=https –permanent
# firewall-cmd –reload

# iptables -A INPUT -p tcp –syn -m state –state NEW –dport 80 -j ACCEPT
# iptables -A INPUT -p tcp –syn -m state –state NEW –dport 443 -j ACCEPT

觀看成果 http://Server’IP
Nginx 套件庫

EPEL 套件庫

在 CentOS 7.x 下安裝 mrtg


參考網頁:
CentOS 7 : MRTG : Install : Server World

mrtg Server : 192.168.1.10
1. 安裝 mrtg
# yum install net-snmp net-snmp-utils mrtg

2. 設定 snmp
# echo ‘rocommunity public’ > /etc/snmp/snmpd.conf
# systemctl enable snmpd.service
# systemctl start snmpd.service[@more@]
3. 防火牆設定
# firewall-cmd –add-rich-rule=”rule family=”ipv4″ source address=”192.168.1.0/24″ service name=”snmpd” accept” –permanent

# iptables -A INPUT  -p udp -s 192.168.1.0/24 -m state –state NEW –dport 161 -j ACCEPT

4. 測試
# /bin/snmpwalk -v2c -c public 127.0.0.1

5. 建立 mrtg /etc/mrtg/mrtg.cfg 設定檔
# /bin/cfgmaker –snmp-options=:::::2 –ifref=descr –ifdesc=descr 192.168.1.10 > /etc/mrtg/mrtg.cfg

6. 修改 mrtg 設定檔 /etc/mrtg/mrtg.cfg
# cp /etc/mrtg/mrtg.cfg /etc/mrtg/mrtg.cfg.$(date +%F)
# vim /etc/mrtg/mrtg.cfg
### Global Config Options

#  for UNIX
# WorkDir: /home/http/mrtg
WorkDir: /var/www/mrtg

### Global Defaults

#  to get bits instead of bytes and graphs growing to the right
Options[_]: growright, bits

7. 執行三次,不用理會警告,因為一剛開始沒有資料,所以會出現,再執行一次就會沒有
# for (( i=1 ; i <= 3 ; i++ )); do env LANG=C mrtg /etc/mrtg/mrtg.cfg; done
2017-03-11 11:57:18, Rateup WARNING: /usr/bin/rateup could not read the primary log file for 192.168.1.10_eth0
2017-03-11 11:57:18, Rateup WARNING: /usr/bin/rateup The backup log file for 192.168.1.10_eth0 was invalid as well
2017-03-11 11:57:18, Rateup WARNING: /usr/bin/rateup Can’t rename 192.168.1.10_eth0.log to 192.168.1.10_eth0.old updating log file

8. 產生 index 檔
# /bin/indexmaker –columns=1 /etc/mrtg/mrtg.cfg > /var/www/mrtg/index.html

9. 建立 mrtg cron
# vim /etc/cron.d/mrtg
*/5 * * * * root LANG=C LC_ALL=C /usr/bin/mrtg /etc/mrtg/mrtg.cfg –lock-file /var/lock/mrtg/mrtg_l –confcache-file /var/lib/mrtg/mrtg.ok

10. 修改 /etc/httpd/conf.d/mrtg.conf
# vim /etc/httpd/conf.d/mrtg.conf
Alias /mrtg /var/www/mrtg

<Location /mrtg>
    Require local
    Require ip 192.168.1.0/24
    # Require ip 10.1.2.3
    # Require host example.org
</Location>

11. 重新啟動 Web Server
# systemctl restart httpd.service

12. 觀看成果 http://Server’IP/mrtg

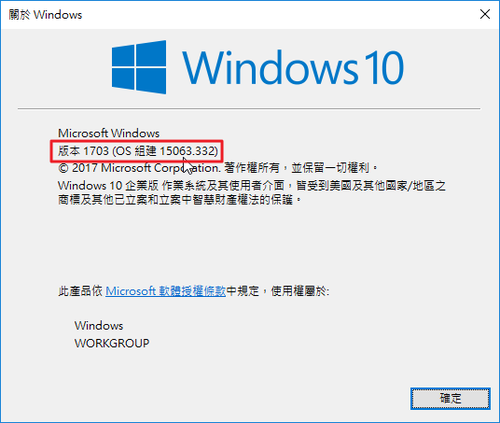
Windows 10 1703 更新至 15063.332

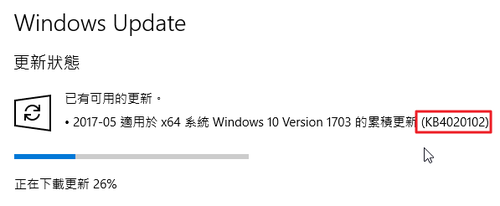
主要是更新 KB4020102
[@more@]檔案不在 Microsoft Update Catalog 網站:
直接下載
x86
http://download.windowsupdate.com/c/msdownload/update/software/updt/2017/05/windows10.0-kb4020102-x86_ad90b5bc48387b6332dcf4d9ab3c8e639f936d4b.cab

x64
http://download.windowsupdate.com/c/msdownload/update/software/updt/2017/05/windows10.0-kb4020102-x64_5ee8874a880b6976a1fdc935e969047822e1e5c6.cab

cab 更新檔安裝可以參考:
Win10技巧:如何手動安裝CAB和MSU格式更新包? – 每日頭條

補上 msu 連結
x86
http://download.windowsupdate.com/c/msdownload/update/software/updt/2017/05/windows10.0-kb4020102-x86_ddad7b48020dc02a7b0f9b059eaa248a95c9cd70.msu

x64
http://download.windowsupdate.com/c/msdownload/update/software/updt/2017/05/windows10.0-kb4020102-x64_9d406340d67caa80a55bc056e50cf87a2e7647ce.msu

SSH Server – 使用 pssh 一次同時操控多台 Server

參考網頁:
CentOS 7 : SSH Server : Use Parallel SSH : Server World

如果有多台 Server 要查看或進行設定,可以考慮使用 pssh。
使用限制:
這幾台 Server 的密碼要一樣,或是先好 頭城國小資訊組 | 免密碼登入 SSH Server 的設定。

1. 安裝 pssh
# yum install pssh –enablerepo=epel

2. 查看 192.168.1.9 / 192.168.1.10 的開機時間
-H 要操作的主機
-i 要執行的命令
# pssh -H “192.168.1.9 192.168.1.10” -i “uptime”
[1] 11:19:10 [FAILURE] 192.168.1.10 Exited with error code 255
Stderr: pssh error: SSH requested a password. Please create SSH keys or use
the -A option to provide a password.
Permission denied (publickey,password).
[2] 11:19:20 [FAILURE] 192.168.1.9 Exited with error code 255
Stderr: pssh error: SSH requested a password. Please create SSH keys or use
the -A option to provide a password.
Permission denied (publickey,password).

上面提示需要輸入密碼,可以使用 -A 參數[@more@]3. 加上 -A 參數
# pssh -A -H “192.168.1.9 192.168.1.10” -i “uptime”
Warning: do not enter your password if anyone else has superuser
privileges or access to your account.
Password:
[1] 11:24:20 [SUCCESS] 192.168.1.9
11:24:20 up 13 days, 16:43, 2 users, load average: 0.57, 0.48, 0.47
[2] 11:24:20 [SUCCESS] 192.168.1.10
11:24:20 up 4 days, 20:20, 0 users, load average: 0.02, 0.06, 0.07

4. 如果二台密碼不相同,就要使用 ssh key 的方式來處理
# pssh -A -H “192.168.1.99 192.168.1.8” -i “uptime”
Warning: do not enter your password if anyone else has superuser
privileges or access to your account.
Password:
[1] 11:26:18 [SUCCESS] 192.168.1.99
11:26:18 up 13 days, 16:45, 2 users, load average: 0.29, 0.39, 0.44
[2] 11:26:20 [FAILURE] 192.168.1.8 Exited with error code 255
Stderr: Permission denied (publickey,gssapi-keyex,gssapi-with-mic,password).

5. 將要連線的 Server 清單放在檔案之中
# cat pssh_hosts.txt
root@192.168.1.9
root@192.168.1.10
# pssh -A -h pssh_hosts.txt -i “uptime”
Warning: do not enter your password if anyone else has superuser
privileges or access to your account.
Password:
[1] 11:24:20 [SUCCESS] 192.168.1.9
11:24:20 up 13 days, 16:43, 2 users, load average: 0.57, 0.48, 0.47
[2] 11:24:20 [SUCCESS] 192.168.1.10
11:24:20 up 4 days, 20:20, 0 users, load average: 0.02, 0.06, 0.07

6. 更多的參數
# pssh –help
Usage: pssh [OPTIONS] command […]

Options:
–version show program’s version number and exit
–help show this help message and exit
-h HOST_FILE, –hosts=HOST_FILE
hosts file (each line “[user@]host[:port]”)
-H HOST_STRING, –host=HOST_STRING
additional host entries (“[user@]host[:port]”)
-l USER, –user=USER username (OPTIONAL)
-p PAR, –par=PAR max number of parallel threads (OPTIONAL)
-o OUTDIR, –outdir=OUTDIR
output directory for stdout files (OPTIONAL)
-e ERRDIR, –errdir=ERRDIR
output directory for stderr files (OPTIONAL)
-t TIMEOUT, –timeout=TIMEOUT
timeout (secs) (0 = no timeout) per host (OPTIONAL)
-O OPTION, –option=OPTION
SSH option (OPTIONAL)
-v, –verbose turn on warning and diagnostic messages (OPTIONAL)
-A, –askpass Ask for a password (OPTIONAL)
-x ARGS, –extra-args=ARGS
Extra command-line arguments, with processing for
spaces, quotes, and backslashes
-X ARG, –extra-arg=ARG
Extra command-line argument
-i, –inline inline aggregated output and error for each server
–inline-stdout inline standard output for each server
-I, –send-input read from standard input and send as input to ssh
-P, –print print output as we get it

Example: pssh -h hosts.txt -l irb2 -o /tmp/foo uptime

SSH Server – 使用 sshpass 免輸入密碼登入

參考網站:
CentOS 7 : SSH Server : Use SSHPass : Server World

1. 安裝 sshpass 套件
# yum install sshpass –enablerepo=epel

2. 使用命令列來輸入密碼,登入成功之後執行 free 指令查看記憶體使用狀況
# sshpass -p 123456 ssh 192.168.1.101 free
             total       used       free     shared    buffers     cached
Mem:      16122192   15946676     175516     252788     914424   12375072
-/+ buffers/cache:    2657180   13465012
Swap:      7340028      30684    7309344
[@more@]3. 使用密碼檔
# echo ‘123456’ > sshpass.txt
# chmod 600 sshpass.txt
# sshpass -f sshpass.txt ssh 192.168.1.101 free

4. 使用環境變數
# export SSHPASS=123456
# sshpass -e ssh 192.168.1.101 free

5. 更多參數
# sshpass -help
Usage: sshpass [-f|-d|-p|-e] [-hV] command parameters
   -f filename   Take password to use from file
   -d number     Use number as file descriptor for getting password
   -p password   Provide password as argument (security unwise)
   -e            Password is passed as env-var “SSHPASS”
   With no parameters – password will be taken from stdin

   -P prompt     Which string should sshpass search for to detect a password prompt
   -v            Be verbose about what you’re doing
   -h            Show help (this screen)
   -V            Print version information
At most one of -f, -d, -p or -e should be used

SSH Server – SFTP only + Chroot

參考網站:
CentOS 7 : SSH Server : SFTP only + Chroot : Server World

以前的作法都是不開放一般使用者使用 ssh,讓使用者使用 ftp 來傳輸檔案,不過 FTP Server 算是比較不安全的通訊協定而且還要安裝建置 FTP Server,所以改用 SFTP,因為帳號密碼及傳輸資料都有經過加密,會比較安全。
以前的作法:
# useradd test -d /home/test -m -s /bin/nologin
改用 SFTP 的作法:
1. 建立 sftp 群組
# groupadd sftp_users
2. 新增使用者
# useradd test -G sftp_users -d /home/test -m
如果使用者已經建立完成
# usermod -G sftp_users test
3. 設定帳號密碼
# passwd test
Changing password for user test.
New password:
Retype new password:
passwd: all authentication tokens updated successfully.
[@more@]4. 修改 SSH Server 設定
# cp /etc/ssh/sshd_config /etc/ssh/sshd_config.$(date +%F)
# vim /etc/ssh/sshd_config
#Subsystem      sftp    /usr/libexec/openssh/sftp-server
Subsystem       sftp    internal-sftp

Match Group sftp_users
        X11Forwarding no
        AllowTcpForwarding no
        ChrootDirectory /home
        ForceCommand internal-sftp

5. 重新啟動 SSH Server
# systemctl restart sshd.service

6. 進行測試
# ssh test@192.168.1.17
test@192.168.1.17’s password:
Could not chdir to home directory /home/test: No such file or directory
This service allows sftp connections only.
Connection to 192.168.1.17 closed.

# sftp test@192.168.1.17
Connecting to 192.168.1.17…
test@192.168.1.17’s password:
sftp> ls -l
drwx–x–x    2 1000     1001         4096 Mar 11 02:05 test
sftp> bye

一般使用者可以使用 FileZilla 或是 WinSCP

Cacti 使用 OpenLDAP 認證

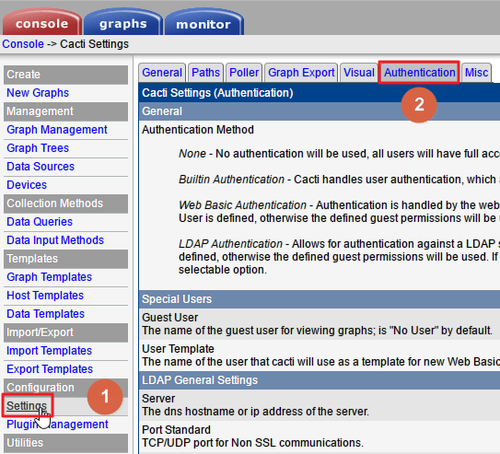
選擇 Console / Setting / Authentication

原本是使用 Builtin Authentication

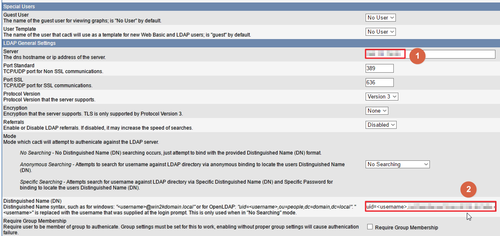
[@more@]改成 LDAP Authentication

LDAP Server IP
Distinguished Name (DN)

Search Base
Search Filter
Search Distingished Name (DN)
Search Password

登入畫面

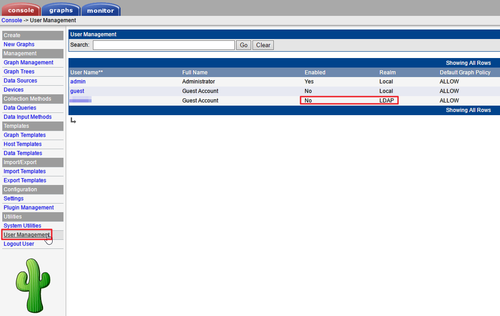
如果無法登入,請執行 User Management,檢查帳號是否有 enable

把使用者  enable