客製化 CentOS 6.9 x86_64 LAMP 安裝光碟

為了方便測試系統而製作
光碟開機畫面

硬碟資料清除確認

[@more@]設定 root 密碼

硬碟分割

GRUB 開機管理程式安裝

開始安裝

安裝完成

主要特點:
1. 簡化安裝步驟
2. 採用最小化安裝,再補上一些缺少的套件 vim/nano/zip/unzip…….
3. 安裝 Apache + MariaDB(10.1) + PHP,並做系統調整
4. 安裝 Fail2ban,啟動 SSH Server 防護
5. 系統更新改至頭城國小 140.111.74.109

預設啟動 fail2ban 及 ssh 防護
[root@localhost ~]# iptables -L -n
Chain INPUT (policy ACCEPT)
target     prot opt source               destination
f2b-SSH    tcp  —  0.0.0.0/0            0.0.0.0/0           tcp dpt:22

Chain FORWARD (policy ACCEPT)
target     prot opt source               destination

Chain OUTPUT (policy ACCEPT)
target     prot opt source               destination

Chain f2b-SSH (1 references)
target     prot opt source               destination
RETURN     all  —  0.0.0.0/0            0.0.0.0/0

開啟服務
[root@localhost ~]# netstat -antulp
Active Internet connections (servers and established)
Proto Recv-Q Send-Q Local Address               Foreign Address             State       PID/Program name
tcp        0      0 0.0.0.0:22                  0.0.0.0:*                   LISTEN      1447/sshd
tcp        0      0 :::80                       :::*                        LISTEN      1788/httpd
tcp        0      0 :::22                       :::*                        LISTEN      1447/sshd
tcp        0      0 ::1:22                      ::1:54878                   ESTABLISHED 1706/sshd
tcp        0      0 ::1:54878                   ::1:22                      ESTABLISHED 1705/ssh
udp        0      0 0.0.0.0:68                  0.0.0.0:*                               1201/dhclient

加入對時工作排程
[root@localhost ~]# crontab -l
# 格式
# 分 時 日 月 星期幾 執行命令
# 對時
0 6 * * * /usr/sbin/ntpdate -s time.stdtime.gov.tw > /dev/null 2>&1;/sbin/hwclock -w > /dev/null 2>&1

安裝完成的後續設定

MariaDB SQL Server 後續設定
# /usr/bin/mysql_secure_installation

開啟防火牆上 HTTPD Web Server
# iptables -A INPUT -m state –state NEW -m tcp -p tcp –dport 80 -j ACCEPT
# iptables-save > /etc/sysconfig/iptables

解決 OpenVAS 掃描 Linux 主機出現的「SSH Weak ….」的問題

使用 OpenVAS 掃描 CentOS Linux 主機會出現如下的警告訊息
SSH Weak Encryption Algorithms Supported


SSH Weak MAC Algorithms Supported

點選可以查看相關訊息


SSH Weak Encryption Algorithms Supported

SSH Weak MAC Algorithms Supported

[@more@]解決方式:
修改 /etc/ssh/sshd_config 設定檔
# cp /etc/ssh/sshd_config /etc/ssh/sshd_config.$(date +%F)
# vim /etc/ssh/sshd_config
加入下面二行
Ciphers aes128-ctr,aes192-ctr,aes256-ctr,aes128-gcm@openssh.com,aes256-gcm@openssh.com,chacha20-poly1305@openssh.com
MACs hmac-sha1

重新啟動 SSH Server
# systemctl restart sshd.service;systemctl status sshd.service

CentOS Linux 6.9

CentOS Linux 6.9 已經釋出,可以下載 ISO 檔來安裝,或使用 yum update 來更新到最新版本。
# yum update

# cat /etc/redhat-release
CentOS release 6.9 (Final)

CentOS Linux ISO 6.9 版下載
i386
樹德科技大學
ftp://ftp.stu.edu.tw/Linux/CentOS/6.9/isos/i386/
元智大學 (目前暫時無法連線)
ftp://ftp.yzu.edu.tw/Linux/CentOS/6.9/isos/i386/
國立交通大學資訊工程學系
http://centos.cs.nctu.edu.tw/6.9/isos/i386/
Hinet IDC (目前暫時無法連線)
http://mirror01.idc.hinet.net/CentOS/6.9/isos/i386/
義守大學
http://ftp.isu.edu.tw/pub/Linux/CentOS/6.9/isos/i386/
崑山科技大學
http://ftp.ksu.edu.tw/pub/CentOS/6.9/isos/i386/
國家高速網路與計算中心
ftp://ftp.twaren.net/Linux/CentOS/6.9/isos/i386/
台中市教網
http://ftp.tc.edu.tw/Linux/CentOS/6.9/isos/i386/
頭城國小
ftp://140.111.74.109/CentOS/6.9/isos/i386/

[@more@]
x86_64
樹德科技大學
ftp://ftp.stu.edu.tw/Linux/CentOS/6.9/isos/x86_64/
元智大學 (目前暫時無法連線)
ftp://ftp.yzu.edu.tw/Linux/CentOS/6.9/isos/x86_64/
國立交通大學資訊工程學系
http://centos.cs.nctu.edu.tw/6.9/isos/x86_64/
Hinet IDC (目前暫時無法連線)
http://mirror01.idc.hinet.net/CentOS/6.9/isos/x86_64/
義守大學
http://ftp.isu.edu.tw/pub/Linux/CentOS/6.9/isos/x86_64/
崑山科技大學
http://ftp.ksu.edu.tw/pub/CentOS/6.9/isos/x86_64/
國家高速網路與計算中心
ftp://ftp.twaren.net/Linux/CentOS/6.9/isos/x86_64/
台中市教網
http://ftp.tc.edu.tw/Linux/CentOS/6.9/isos/x86_64/
頭城國小
ftp://140.111.74.109/CentOS/6.9/isos/x86_64/

試裝 Windows 10 Enterprise Version 1703 (Updated March 2017)

剛安裝完成版本是 1703 15063.0

[@more@]更新後版本

主要是更新 KB4016251

KB4016251
x86 下載
http://download.windowsupdate.com/d/msdownload/update/software/crup/2017/04/windows10.0-kb4016251-x86_293eb375d62be54ac0101f5dc37d298b46b74495.msu

x64 下載
http://download.windowsupdate.com/c/msdownload/update/software/crup/2017/04/windows10.0-kb4016251-x64_b97ea37e1904ccf9940199694b4460d74260ba42.msu

解決 OpenVAS 掃描 Linux 主機出現的「Check if Mailserver answer to VRFY and EXPN requestsd」訊息

使用 OpenVAS 掃描 CentOS 7.x Linux 主機時,出現「Check if Mailserver answer to VRFY and EXPN requestsd」訊息

# telnet 127.0.0.1 25
Trying 127.0.0.1…
Connected to 127.0.0.1.
Escape character is ‘^]’.
220 localhost.localdomain ESMTP Postfix
VRFY
501 5.5.4 Syntax: VRFY address[@more@]解決方式:
參考網站:
Mail Server Security question – Google 網上論壇

修改 /etc/postfix/main.cf
# cp /etc/postfix/main.cf /etc/postfix/main.cf.$(date +%F)
# vim /etc/postfix/main.cf
加入下面一行
disable_vrfy_command=yes

測試一下
# telnet 127.0.0.1 25
Trying 127.0.0.1…
Connected to 127.0.0.1.
Escape character is ‘^]’.
220 localhost.localdomain ESMTP Postfix
VRFY
502 5.5.1 VRFY command is disabled

重新啟動 Postfix
# systemctl restart postfix.service;systemctl status postfix.service

利用 OpenVAS 進行掃描

參考網頁:
自建OpenVAS弱點掃描 資安稽核報表不求人(上) – 技術專欄 – 網管人NetAdmin
自建OpenVAS弱點掃描 資安稽核報表不求人(下) – 技術專欄 – 網管人NetAdmin

1. 選擇 Wizard / Advanced Task Wizard

[@more@]2. Task Name: 識別名稱
     Scan Config: 掃描方式
     Target Host(s): 掃描主機
     127.0.0.1 or 192.168.1.0/24 or 192.168.1.3,192.168.1.5

3. 掃描的深度,從最淺層的 Discovery 到最深層的 Full and very deep ultimate,以及用來大量找尋設備的 Host Discovery,和取得系統資訊的 System Discover。愈深層所需的掃描時間愈久,但愈能掃描出問題。

4. 新增的掃描任務

5. 掃描中

6. 當出現 Done 代表掃描完成

7. 點選日期可以查看掃描結果

8. 掃描結果

9. 下載 PDF 檔案

10. PDF 檔

在 CentOS 7.x 上安裝 OpenVAS

官方網站:
http://www.openvas.org/index.html

參考網站:
http://forums.atomicorp.com/viewtopic.php?f=31&t=8047
電腦筆記本: OpenVas8 on CentOS7
塵世浮沉近千秋: Cent OS 7 Install OpenVAS 8
OpenVAS6 – Itsmw
TWNIC 2015電子報
Install OpenVAS on CentOS 7 / RHEL 7
OpenVas – Itsmw

1) Disable SELINUX.
Edit /etc/selinux/config, save and reboot
# sed -i ‘s/SELINUX=enforcing/SELINUX=disabled/’ /etc/selinux/config
2) Add required packages
# yum install wget bzip2 texlive net-tools 
3) Add Atomicorp repo
# wget -q -O – http://www.atomicorp.com/installers/atomic | sh
Do you agree to these terms? (yes/no) [Default: yes]

Configuring the [atomic] repo archive for this system

Installing the Atomic GPG keys: OK

Downloading atomic-release-1.0-21.el7.art.noarch.rpm: Preparing…                          ################################# [100%]
Updating / installing…
   1:atomic-release-1.0-21.el7.art    ################################# [100%]
OK

Enable repo by default? (yes/no) [Default: yes]:

The Atomic repo has now been installed and configured for your system
The following channels are available:
  atomic          – [ACTIVATED] – contains the stable tree of ART packages
  atomic-testing  – [DISABLED]  – contains the testing tree of ART packages
  atomic-bleeding – [DISABLED]  – contains the development tree of ART packages

[@more@]4) Install OpenVAS
# yum update
# yum install openvas alien

5) edit /etc/redis.conf. Add/uncomment the following
unixsocket /tmp/redis.sock
unixsocketperm 700
# cp /etc/redis.conf /etc/redis.conf.$(date +%F)
# sed -i ‘s/^# unixsocket/unixsocket/’ /etc/redis.conf

6) Restart Redis
# systemctl enable redis && systemctl restart redis
# systemctl status redis
● redis.service – Redis persistent key-value database
   Loaded: loaded (/usr/lib/systemd/system/redis.service; enabled; vendor preset: disabled)
  Drop-In: /etc/systemd/system/redis.service.d
           mqlimit.conf
   Active: active (running) since 四 2017-02-09 15:16:46 CST; 40min ago
 Main PID: 1030 (redis-server)
   CGroup: /system.slice/redis.service
           mq1030 /usr/bin/redis-server 127.0.0.1:6379

 2月 09 15:16:46 localhost.localdomain systemd[1]: Started Redis persistent key-value database.
 2月 09 15:16:46 localhost.localdomain systemd[1]: Starting Redis persistent key-value database…

7) openvas-setup
follow instructions. If rsync throws error, check that your network allows outgoing TCP 873 to internet

# /usr/bin/openvas-setup
Openvas Setup, Version: 1.0

Step 1: Update NVT, CERT, and SCAP data
Please note this step could take some time.
Once completed, this will be updated automatically every 24 hours

Select download method
* wget (NVT download only)
* curl (NVT download only)
* rsync

  Note: If rsync requires a proxy, you should define that before this step.
Downloader [Default: rsync]
Updating NVTs….
[i] This script synchronizes an NVT collection with the ‘OpenVAS NVT Feed’.
[i] The ‘OpenVAS NVT Feed’ is provided by ‘The OpenVAS Project’.
[i] Online information about this feed: ‘http://www.openvas.org/openvas-nvt-feed.html’.
[i] NVT dir: /var/lib/openvas/plugins
[w] Could not determine feed version.
[i] rsync is not recommended for the initial sync. Falling back on http.
[i] Will use wget
[i] Using GNU wget: /usr/bin/wget
[i] Configured NVT http feed: http://www.openvas.org/openvas-nvt-feed-current.tar.bz2
[i] Downloading to: /tmp/openvas-nvt-sync.Q53foiaQhA/openvas-feed-2017-02-09-1275.tar.bz2
–2017-02-09 15:26:23–  http://www.openvas.org/openvas-nvt-feed-current.tar.bz2
正在查找主機 www.openvas.org (www.openvas.org)… 5.9.98.186
正在連接 www.openvas.org (www.openvas.org)|5.9.98.186|:80… 連上了。
已送出 HTTP 要求,正在等候回應… 200 OK
長度: 28323931 (27M) [application/x-bzip2]
Saving to: ‘/tmp/openvas-nvt-sync.Q53foiaQhA/openvas-feed-2017-02-09-1275.tar.bz2’

Step 2: Configure GSAD
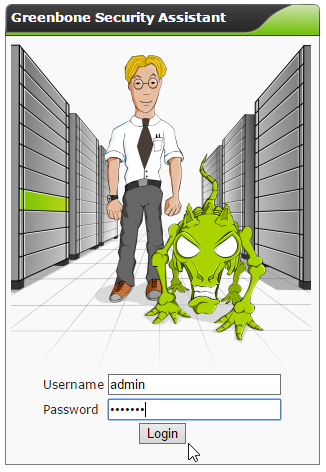
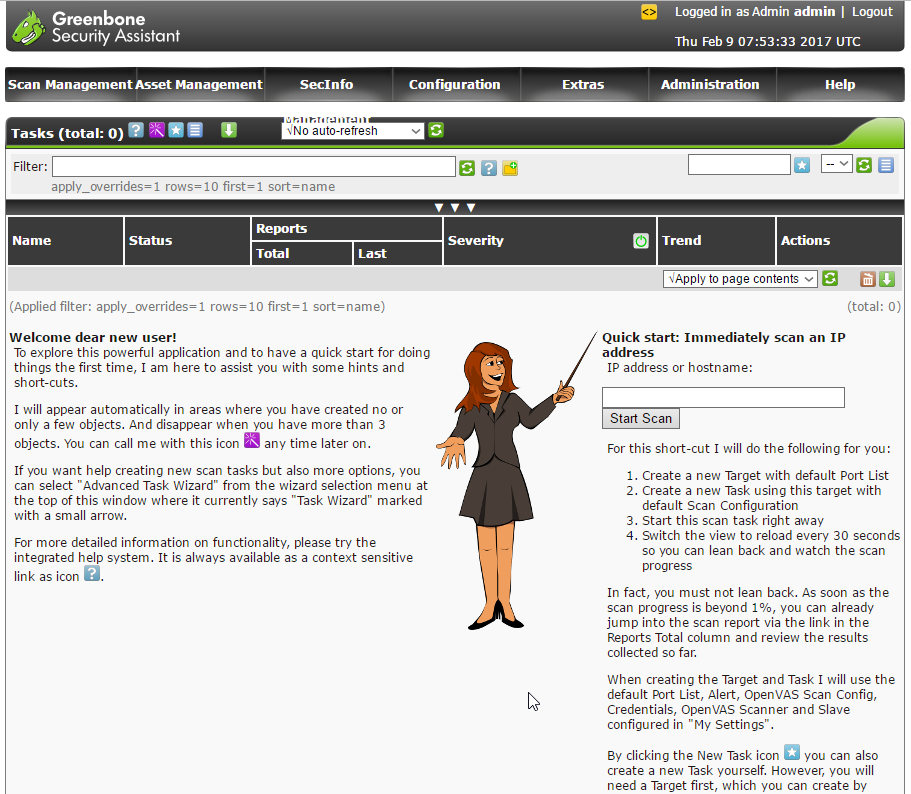
The Greenbone Security Assistant is a Web Based front end
for managing scans. By default it is configured to only allow
connections from localhost.

Allow connections from any IP? [Default: yes]
Redirecting to /bin/systemctl restart  gsad.service

Step 3: Choose the GSAD admin users password.
The admin user is used to configure accounts,
Update NVT’s manually, and manage roles.

Enter administrator username [Default: admin] :
Enter Administrator Password:
Verify Administrator Password:

Redirecting to /bin/systemctl start  redis.service

Setup complete, you can now access GSAD at:
  https://<IP>:9392

Created symlink from /etc/systemd/system/multi-user.target.wants/openvas-scanner.service to /usr/lib/systemd/system/openvas-scanner.service.
Created symlink from /etc/systemd/system/multi-user.target.wants/openvas-manager.service to /usr/lib/systemd/system/openvas-manager.service.
Created symlink from /etc/systemd/system/multi-user.target.wants/gsad.service to /usr/lib/systemd/system/gsad.service.

8 ) To access OV-8 from network, either disable firewall or add exception for tcp 9392
# firewall-cmd –permanent –zone=public –add-port=9392/tcp
# firewall-cmd –reload

Go to https://<IP-ADDRESS>:9392 and login.

[Optional] : Greenbone Security Assistant (GSAD)
For those who wants to install proper SSL cert. Download certificate and key file to your CentOS box. I place them inside /etc/openvas/ssl.
Edit /etc/sysconfig/gsad and modify the OPTIONS tag e.g.

OPTIONS=”–ssl-certificate=/etc/openvas/ssl/openvas.crt –ssl-private-key=/etc/openvas/ssl/openvas.key”

Restart gsad
systemctl restart gsad

Those who wants stronger ciphers can will need to add gnutls-priorities, e.g.
OPTIONS=”–ssl-certificate=/etc/openvas/ssl/openvas.crt –ssl-private-key=/etc/openvas/ssl/openvas.key –gnutls-priorities=SECURE128:+SECURE192:-VERS-TLS-ALL:+VERS-TLS1.2″

(See explanation at http://gnutls.org/manual/html_node/Priority-Strings.html)

# openvas-check-setup
openvas-check-setup 2.3.7
  Test completeness and readiness of OpenVAS-8
  (add ‘–v6’ or ‘–v7’ or ‘–v9’
   if you want to check for another OpenVAS version)

  Please report us any non-detected problems and
  help us to improve this check routine:
  http://lists.wald.intevation.org/mailman/listinfo/openvas-discuss

  Send us the log-file (/tmp/openvas-check-setup.log) to help analyze the problem.

  Use the parameter –server to skip checks for client tools
  like GSD and OpenVAS-CLI.

Step 1: Checking OpenVAS Scanner …
        OK: OpenVAS Scanner is present in version 5.0.7.
        OK: OpenVAS Scanner CA Certificate is present as /var/lib/openvas/CA/cacert.pem.
        OK: redis-server is present in version v=3.0.7.
        OK: scanner (kb_location setting) is configured properly using the redis-server socket: /tmp/redis.sock
        OK: redis-server is running and listening on socket: /tmp/redis.sock.
        OK: redis-server configuration is OK and redis-server is running.
        OK: NVT collection in /var/lib/openvas/plugins contains 51765 NVTs.
        WARNING: Signature checking of NVTs is not enabled in OpenVAS Scanner.
        SUGGEST: Enable signature checking (see http://www.openvas.org/trusted-nvts.html).
        OK: The NVT cache in /var/cache/openvas contains 51765 files for 51765 NVTs.
Step 2: Checking OpenVAS Manager …
        OK: OpenVAS Manager is present in version 6.0.9.
        OK: OpenVAS Manager client certificate is present as /var/lib/openvas/CA/clientcert.pem.
        OK: OpenVAS Manager database found in /var/lib/openvas/mgr/tasks.db.
        OK: Access rights for the OpenVAS Manager database are correct.
        OK: sqlite3 found, extended checks of the OpenVAS Manager installation enabled.
        OK: OpenVAS Manager database is at revision 146.
        OK: OpenVAS Manager expects database at revision 146.
        OK: Database schema is up to date.
        OK: OpenVAS Manager database contains information about 51765 NVTs.
        OK: At least one user exists.
        OK: OpenVAS SCAP database found in /var/lib/openvas/scap-data/scap.db.
        OK: OpenVAS CERT database found in /var/lib/openvas/cert-data/cert.db.
        OK: xsltproc found.
Step 3: Checking user configuration …
        WARNING: Your password policy is empty.
        SUGGEST: Edit the /etc/openvas/pwpolicy.conf file to set a password policy.
Step 4: Checking Greenbone Security Assistant (GSA) …
        OK: Greenbone Security Assistant is present in version 6.0.11.
Step 5: Checking OpenVAS CLI …
        OK: OpenVAS CLI version 1.4.5.
Step 6: Checking Greenbone Security Desktop (GSD) …
        SKIP: Skipping check for Greenbone Security Desktop.
Step 7: Checking if OpenVAS services are up and running …
        OK: netstat found, extended checks of the OpenVAS services enabled.
        OK: OpenVAS Scanner is running and listening on all interfaces.
        OK: OpenVAS Scanner is listening on port 9391, which is the default port.
        OK: OpenVAS Manager is running and listening on all interfaces.
        OK: OpenVAS Manager is listening on port 9390, which is the default port.
        OK: Greenbone Security Assistant is listening on port 9392, which is the default port.
Step 8: Checking nmap installation …
        WARNING: Your version of nmap is not fully supported: 6.47
        SUGGEST: You should install nmap 5.51 if you plan to use the nmap NSE NVTs.
Step 10: Checking presence of optional tools …
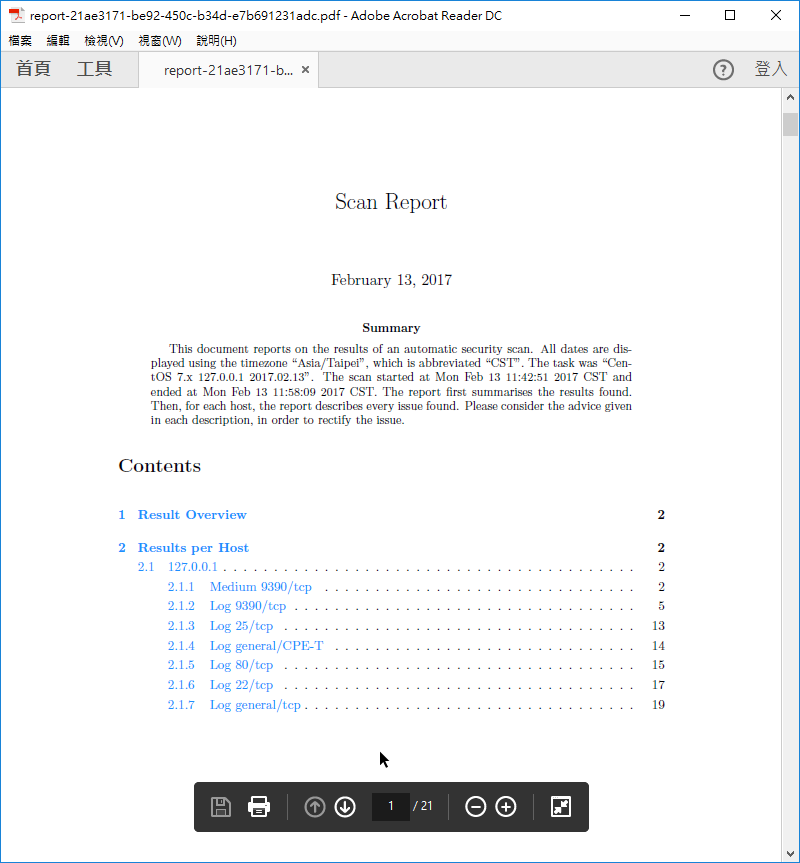
        OK: pdflatex found.
        OK: PDF generation successful. The PDF report format is likely to work.
        OK: ssh-keygen found, LSC credential generation for GNU/Linux targets is likely to work.
        OK: rpm found, LSC credential package generation for RPM based targets is likely to work.
        WARNING: Could not find alien binary, LSC credential package generation for DEB based targets will not work.
        SUGGEST: Install alien.
        OK: nsis found, LSC credential package generation for Microsoft Windows targets is likely to work.
        OK: SELinux is disabled.

It seems like your OpenVAS-8 installation is OK.

If you think it is not OK, please report your observation
and help us to improve this check routine:
http://lists.wald.intevation.org/mailman/listinfo/openvas-discuss
Please attach the log-file (/tmp/openvas-check-setup.log) to help us analyze the problem.

LVM – LV 指令

lvcreate 從 VG 中建立 LV
# lvcreate -L <size> [-n <lv name>] <vg>
# lvcreate -L 50M -n v1 diskvg
  Rounding up size to full physical extent 52.00 MiB
  Logical volume “v1” created
# lvcreate -L 150M -n v2 diskvg
  Rounding up size to full physical extent 152.00 MiB
  Logical volume “v2” created
# lvcreate -L 250M -n v3 diskvg
  Rounding up size to full physical extent 252.00 MiB
  Logical volume “v3” created
以 32 個 PE 空間來建立 LV
# lvcreate -l 32 -n v4 diskvg

lvdisplay 顯示 LV 資訊
# lvdisplay /dev/diskvg/v1
  — Logical volume —
  LV Name                /dev/diskvg/v1
  VG Name                diskvg
  LV UUID                50dHxI-bwNi-xksv-P4rS-XS1W-suNi-z3ljTc
  LV Write Access        read/write
  LV Status              available
  # open                 0
  LV Size                52.00 MiB
  Current LE             13
  Segments               1
  Allocation             inherit
  Read ahead sectors     auto
  – currently set to     1024
  Block device           253:0

[@more@]lvscan 用來掃描系統中所有 LV 的資訊
# lvscan
  inactive          ‘/dev/diskvg/v1’ [52.00 MiB] inherit
  inactive          ‘/dev/diskvg/v2’ [152.00 MiB] inherit
  inactive          ‘/dev/diskvg/v3’ [252.00 MiB] inherit
  ACTIVE            ‘/dev/diskvg/v4’ [128.00 MiB] inherit

lvextend 用來放大 Logical volume 的大小
# lvextend {-L [+]LogicalVolumeSize | -1 [+]LogicalExtentsNumber } <lv>
把 v1 空間加大 100M
# lvextend -L +100M /dev/diskvg/v1
  Extending logical volume v1 to 152.00 MiB
  Logical volume v1 successfully resized
# lvdisplay /dev/diskvg/v1
  — Logical volume —
  LV Name                /dev/diskvg/v1
  VG Name                diskvg
  LV UUID                50dHxI-bwNi-xksv-P4rS-XS1W-suNi-z3ljTc
  LV Write Access        read/write
  LV Status              NOT available
  LV Size                152.00 MiB
  Current LE             38
  Segments               2
  Allocation             inherit
  Read ahead sectors     auto

lvremove 刪除 Logical Volume
# lvremove /dev/diskvg/v4
Do you really want to remove active logical volume v4? [y/n]: y
  Logical volume “v4” successfully removed
# lvscan
  inactive          ‘/dev/diskvg/v1’ [152.00 MiB] inherit
  inactive          ‘/dev/diskvg/v2’ [152.00 MiB] inherit
  inactive          ‘/dev/diskvg/v3’ [252.00 MiB] inherit

LVM – VG 指令

vgcreate 將一個或一個以上的 PV 組成一個 VG
 # vgcreate diskvg /dev/sdb1 /dev/sdb2 /dev/sdb3
  Volume group “diskvg” successfully created

vgdisplay 顯示 VG 的相關訊息,包括 PE 的數量、大小等資訊
# vgdisplay diskvg
  — Volume group —
  VG Name               diskvg
  System ID
  Format                lvm2
  Metadata Areas        3
  Metadata Sequence No  4
  VG Access             read/write
  VG Status             resizable
  MAX LV                0
  Cur LV                3
  Open LV               0
  Max PV                0
  Cur PV                3
  Act PV                3
  VG Size               2.99 GiB
  PE Size               4.00 MiB
  Total PE              765
  Alloc PE / Size       114 / 456.00 MiB
  Free  PE / Size       651 / 2.54 GiB
  VG UUID               KP7wM8-DDuZ-a5jy-RsBP-Be22-5nVu-dk9hCl

[@more@]vgscan 掃描系統中所有的 VG 資訊
# vgscan
  Reading all physical volumes.  This may take a while…
  Found volume group “diskvg” using metadata type lvm2

vgextend 擴充 VG 容量,把 PV 加入已存在的 VG
# vgextend diskvg /dev/sdc1
  Volume group “diskvg” successfully extended
# vgdisplay diskvg
  — Volume group —
  VG Name               diskvg
  System ID
  Format                lvm2
  Metadata Areas        4
  Metadata Sequence No  5
  VG Access             read/write
  VG Status             resizable
  MAX LV                0
  Cur LV                3
  Open LV               0
  Max PV                0
  Cur PV                4
  Act PV                4
  VG Size               3.98 GiB
  PE Size               4.00 MiB
  Total PE              1020
  Alloc PE / Size       114 / 456.00 MiB
  Free  PE / Size       906 / 3.54 GiB
  VG UUID               KP7wM8-DDuZ-a5jy-RsBP-Be22-5nVu-dk9hCl

vgchange 停止 VG 的作用,目的是讓所有程式不能再存取此 VG
# vgchange -a n diskvg
0 logical volume(s) in volume group “diskvg” now active

vgremove 刪除 VG
要先停止 VG 後,才能刪除 VG
# vgremove diskvg
Volume group “diskvg” sucessfully removed

vgreduce 移除加入到 VG 的 PV
# vgreduce diskvg /dev/sdc1
Removed “/dev/sdc1” from volume group “diskvg”