Proxmox – Debian 8 LXC 初始環境設定

1. 將更新的 Server 都指向國家高速網路中心
$ sudo cp /etc/apt/sources.list /etc/apt/sources.list.$(date +%F)
$ sudo sed -i ‘s/ftp.debian.org/free.nchc.org.tw/g’ /etc/apt/sources.list

清除所有的
$ sudo apt-get clean all
更新套件庫
$ sudo apt-get update

2. 進行套件更新
$ sudo apt-get upgrade

[@more@]3. 補足缺少的套件
$ sudo apt-get install vim zip unzip mailutils ntpdate rsync sysv-rc-conf
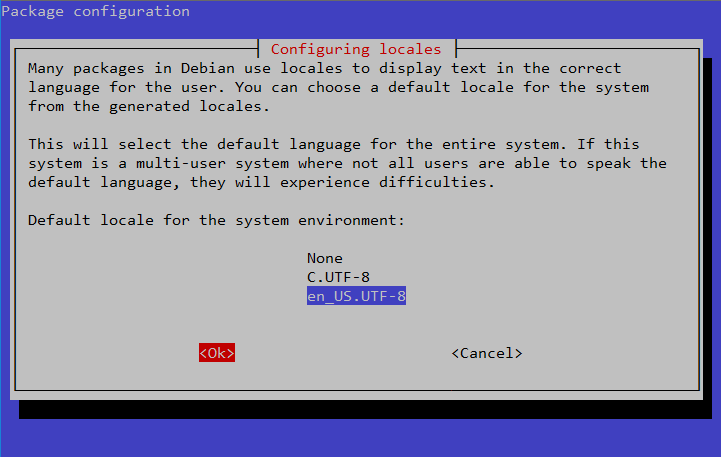
4. 讓終端機程式可以輸入及顯示中文
$ sudo dpkg-reconfigure locales


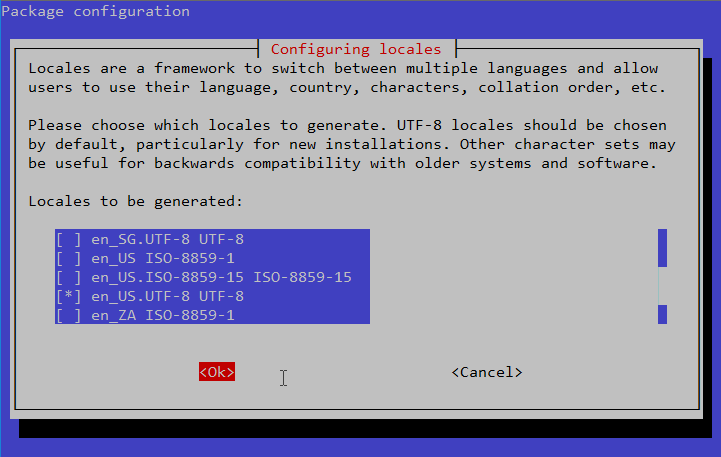
$ cat /etc/default/locale
LANG=en_US.UTF-8
LANGUAGE=en_US.UTF-8

$ /usr/bin/locale
LANG=en_US.UTF-8
LANGUAGE=
LC_CTYPE=”en_US.UTF-8″
LC_NUMERIC=”en_US.UTF-8″
LC_TIME=”en_US.UTF-8″
LC_COLLATE=”en_US.UTF-8″
LC_MONETARY=”en_US.UTF-8″
LC_MESSAGES=”en_US.UTF-8″
LC_PAPER=”en_US.UTF-8″
LC_NAME=”en_US.UTF-8″
LC_ADDRESS=”en_US.UTF-8″
LC_TELEPHONE=”en_US.UTF-8″
LC_MEASUREMENT=”en_US.UTF-8″
LC_IDENTIFICATION=”en_US.UTF-8″
LC_ALL=

5. 時區及預設編輯器設定
$ sudo tail -2 /etc/profile
export TZ=”Asia/Taipei”
export EDITOR=”/usr/bin/vim”

# /usr/bin/tzselect
Please identify a location so that time zone rules can be set correctly.
Please select a continent, ocean, “coord”, or “TZ”.
 1) Africa
 2) Americas
 3) Antarctica
 4) Arctic Ocean
 5) Asia
 6) Atlantic Ocean
 7) Australia
 8) Europe
 9) Indian Ocean
10) Pacific Ocean
11) coord – I want to use geographical coordinates.
12) TZ – I want to specify the time zone using the Posix TZ format.
#? 5
Please select a country whose clocks agree with yours.
 1) Afghanistan           18) Israel                35) Palestine
 2) Armenia               19) Japan                 36) Philippines
 3) Azerbaijan            20) Jordan                37) Qatar
 4) Bahrain               21) Kazakhstan            38) Russia
 5) Bangladesh            22) Korea (North)         39) Saudi Arabia
 6) Bhutan                23) Korea (South)         40) Singapore
 7) Brunei                24) Kuwait                41) Sri Lanka
 8) Cambodia              25) Kyrgyzstan            42) Syria
 9) China                 26) Laos                  43) Taiwan
10) Cyprus                27) Lebanon               44) Tajikistan
11) East Timor            28) Macau                 45) Thailand
12) Georgia               29) Malaysia              46) Turkmenistan
13) Hong Kong             30) Mongolia              47) United Arab Emirates
14) India                 31) Myanmar (Burma)       48) Uzbekistan
15) Indonesia             32) Nepal                 49) Vietnam
16) Iran                  33) Oman                  50) Yemen
17) Iraq                  34) Pakistan
#? 43

The following information has been given:

        Taiwan

Therefore TZ=’Asia/Taipei’ will be used.
Local time is now:      Tue Feb 28 22:47:26 CST 2017.
Universal Time is now:  Tue Feb 28 14:47:26 UTC 2017.
Is the above information OK?
1) Yes
2) No
#? 1

You can make this change permanent for yourself by appending the line
        TZ=’Asia/Taipei’; export TZ
to the file ‘.profile’ in your home directory; then log out and log in again.

Here is that TZ value again, this time on standard output so that you
can use the /usr/bin/tzselect command in shell scripts:
Asia/Taipei

6. 安裝 snmpd
$ sudo apt-get install snmpd snmp
$ sudo mv /etc/snmp/snmpd.conf /etc/snmp/snmpd.conf.$(date +%F)

$ sudo echo ‘rocommunity public’ > /etc/snmp/snmpd.conf
$ sudo  chmod 600 /etc/snmp/snmpd.conf
$ sudo update-rc.d snmpd defaults
$ sudo /etc/init.d/snmpd restart

Ubuntu Linux 17.04 Family

Ubuntu 17.04


下載
http://releases.ubuntu.com/17.04/[@more@]Ubuntu MATE


下載:
https://ubuntu-mate.org/download/#zesty

Ubuntu GNOME


下載:
http://cdimage.ubuntu.com/ubuntu-gnome/releases/17.04/release/

Lubuntu


下載:
http://cdimage.ubuntu.com/lubuntu/releases/17.04/release/

Xubuntu


下載:
http://cdimage.ubuntu.com/xubuntu/releases/17.04/release/

Kubuntu


下載:
http://cdimage.ubuntu.com/kubuntu/releases/17.04/release/

Ubuntu Studio


下載:
http://cdimage.ubuntu.com/ubuntustudio/releases/zesty/release/

Ubuntu Kylin 优麒麟 & 銀河麒麟


下載:
http://www.ubuntukylin.com/downloads/

Ubuntu Server

下載:
http://releases.ubuntu.com/17.04/

更多的版本:
https://zh.wikipedia.org/wiki/Ubuntu#.E5.88.86.E6.94.AF.E7.89.88.E6.9C.AC

Ubuntu Linux 17.04

Ubuntu Linux 17.04 版本代號 Zesty Zapus(熱情的美洲林跳鼠),有興趣的人可以下載來使用看看,支援期預計到 2018-01。
光碟光碟畫面

進入桌面畫面

[@more@]Desktop x86
http://releases.ubuntu.com/17.04/ubuntu-17.04-desktop-i386.iso

Desktop x64
http://releases.ubuntu.com/17.04/ubuntu-17.04-desktop-amd64.iso

Server x86
http://releases.ubuntu.com/17.04/ubuntu-17.04-server-i386.iso

Server x64
http://releases.ubuntu.com/17.04/ubuntu-17.04-server-amd64.iso

在 CentOS 6.x x64 上安裝 OSSEC – HIDS 主機型入侵偵測系統

參考網站:
OSSEC 主機型入侵偵測系統 (HIDS) 安裝與設定 « Jamyy’s Weblog
建置OSSEC 主機型入侵偵測系統<br>網路威脅危害大,萬全準備不可少 – 技術專欄 – 網管人NetAdmin
浮雲雅築: [研究] OSSEC – HIDS 2.7.1 主機型入侵偵測系統 – server/agent 安裝 (CentOS 6.5 x64)
How to Install OSSEC on Red Hat or CentOS 6 – scottlinux.com | Linux Blog

OSSEC 官方網站:http://ossec.github.io

1. 增加 atomic 套件庫
http://ossec.github.io/downloads.html 下載所須要的版本
# wget http://updates.atomicorp.com/channels/ossec/centos/6/x86_64/RPMS/atomic-release-1.0-21.el6.art.noarch.rpm
# rpm -ivh atomic-release-1.0-21.el6.art.noarch.rpm

# wget -q -O – https://www.atomicorp.com/installers/atomic | sh

[@more@]2. 取消啟用 atomic 套件庫
# sed -i ‘s/enabled = 1/enabled = 0/’ /etc/yum.repos.d/atomic.repo

3. 更新 atomic 套件庫
# yum update –enablerepo=atomic

4. 搜尋 ossec 相關套件
# yum search ossec –enablerepo=atomic
ossec-hids-agent.x86_64 : The OSSEC HIDS Client
ossec-hids-client.x86_64 : The OSSEC HIDS Client
ossec-hids-debuginfo.x86_64 : Debug information for package ossec-hids
ossec-hids-hybrid.x86_64 : The OSSEC HIDS hybrid client
ossec-hids-mysql.x86_64 : The OSSEC HIDS Server
ossec-hids-postgres.x86_64 : The OSSEC HIDS Server postgres connector
ossec-hids-server.x86_64 : The OSSEC HIDS Server
ossec-wui.noarch : OSSEC Web Interface
ossec-hids.x86_64 : An Open Source Host-based Intrusion Detection System

ossec-hids-hybird 包含 Server / Agent

5. 安裝 ossec 相關套件
# yum install ossec-hids-mysql ossec-wui ossec-hids ossec-hids-server –enablerepo=atomic

6. 取消電子郵件通知
# sed -i ‘s/<email_notification>yes/<email_notification>no/’ /var/ossec/etc/ossec.conf

7. 建立 ossec-wui 管理帳號及密碼
# /usr/bin/htpasswd /usr/share/ossec-wui/.htpasswd ossec
New password:
Re-type new password:
Updating password for user ossec

8. 限制可以連線的範圍
# vim /etc/httpd/conf.d/ossec.conf
Alias /ossec    /usr/share/ossec-wui/
<Directory /usr/share/ossec-wui/>
 AllowOverride AuthConfig Limit
 Order deny,allow
 Deny from all
 Allow from 192.168.1.0/24

 <Files *.sh>
 deny from all
 </Files>
<Files ossec_conf.php>
 deny from all
 </Files>
 <Files .*>
 deny from all
 </Files>
</Directory>

9. 重新啟動 Apache Web Server
# /etc/init.d/httpd restart

10. 啟動 ossec-hids
# /etc/init.d/ossec-hids start

查詢網路卡的廠商

先用 ping 指令查詢
# ping -c 4 192.168.1.230
PING 192.168.1.230 (192.168.1.230) 56(84) bytes of data.
64 bytes from 192.168.1.230: icmp_seq=1 ttl=254 time=2.96 ms
64 bytes from 192.168.1.230: icmp_seq=2 ttl=254 time=1.19 ms
64 bytes from 192.168.1.230: icmp_seq=3 ttl=254 time=1.23 ms
64 bytes from 192.168.1.230: icmp_seq=4 ttl=254 time=1.18 ms

查詢卡號
# arp -a | grep 192.168.1.230
pc230.test.ilc.edu.tw (192.168.1.230) at 00:17:16:0c:e3:a5 [ether] on eth0

原本 IEEE 查詢的網頁已經無法查詢了!
http://standards.ieee.org/regauth/oui/index.shtml

在網路上搜尋了一下,找到大陸的一個網站,也可以查詢
网卡MAC码分析 – MAC地址查询 – 网卡MAC地址分析 – MAC厂商查询 – 网卡厂商查询 – 网卡MAC归属地查询

查詢到上面的網路卡是屬於 Qno 這一個公司所出產[@more@]如果您有特殊的因素,不想使用上面的網頁,可以下載整個網路卡廠商的 oui.txt 來進行查詢

1. 下載 IEEE oui.txt
# wget http://standards-oui.ieee.org/oui.txt -P /usr/local/bin

2. 建立查詢檔案
# cat /usr/local/bin/checkmacaddress.sh
#!/bin/bash
if [ $# -ne 1 ]; then
    echo “Usage: $0 first3mac”
    exit 1
fi
mac=$1
mac=${mac//:/-}

grep -i $mac /usr/local/bin/oui.txt

3. 更改權限
# chmod 700 /usr/local/bin/checkmacaddress.sh

4. 輸入網路卡卡號前三組進行測試,不分大小寫,可以使用 – 或 : 做分隔
# /usr/local/bin/checkmacaddress.sh 00:0c:29
# /usr/local/bin/checkmacaddress.sh 00:0C:29
# /usr/local/bin/checkmacaddress.sh 00-0c-29
# /usr/local/bin/checkmacaddress.sh 00-0C-29
00-0C-29   (hex)                VMware, Inc.

# /usr/local/bin/checkmacaddress.sh 00-17-16
00-17-16   (hex)                Qno Technology Inc.

在 CentOS 6.x 上安裝 BandwidthD

BandwidthD 是一套可以在區域網路上顯示各個 IP 網路使用情形的程式,由 David Hinkle 所開發。

BandwidthD 官方網站:http://bandwidthd.sourceforge.net/
底下是在 CentOS 6.x x64 下安裝[@more@]

1. 下載 rpm 檔
# wget ftp://ftp.pbone.net/mirror/li.nux.ro/download/nux/misc/el6/x86_64/bandwidthd-2.0.1-15.el6.nux.x86_64.rpm

2. 安裝所須套件
# yum install libpcap-devel libpng-devel gd-devel zlib-devel libpqxx

3. 安裝 BandwidthD
# rpm -ivh bandwidthd-2.0.1-15.el6.nux.x86_64.rpm

4. 修改設定檔 /etc/bandwidthd.conf
# vim /etc/bandwidthd.conf
加入要偵測的網段
subnet 192.168.1.0/24

5. 修改 /etc/httpd/conf.d/bandwidthd.conf
可以加上連線範圍的限定
# cat /etc/httpd/conf.d/bandwidthd.conf
Alias /bandwidthd /var/www/bandwidthd/htdocs

6. 設定開機時啟動
# chkconfig –level 3 bandwidthd on
# /etc/init.d/bandwidthd start

自己安裝 Windows / Office KMS Emulator

vlmcsd 是一套 OpenSource 的 KMS Emulator,可以在  Linux / Android / FreeBSD / Solaris / Minix / Mac OS / iOS / Windows 等平台上執行,也就是說,可以安裝在 Android / iPhone 的手機上,利用手機來啟動 Windows / Office。
vlmcsd 官方網站:https://github.com/Wind4/vlmcsd
[@more@]
KMS Emulator Server 架設
底下安裝在 CentOS 6.9 x64 之下
1. 下載 https://github.com/Wind4/vlmcsd/releases

2. 將下載下來的 binaries.tar.gz 上傳到 CentOS Server,並解壓縮
# tar xvzf binaries.tar.gz

3. 因為 vlmcsd 支援多個平台,這裡只需要 Linux 目錄下的 intel 平台
# mv binaries/Linux/intel /usr/local/vlmcsd

4. 建立連結方便執行
# ln -s /usr/local/vlmcsd/static/vlmcs-x64-musl-static /usr/local/bin/kms

5. 執行
# /usr/local/bin/kms &

6. 檢查是否有正常執行
# ps aux  | grep kms | grep -v grep
root       1675  0.0  0.0    196    52 ?        S    16:07   0:00 /usr/local/bin/kms
# netstat -antulp | grep kms
tcp        0      0 0.0.0.0:1688                0.0.0.0:*                   LISTEN      1675/kms
tcp        0      0 :::1688                     :::*                        LISTEN      1675/kms

7. 如果怕有問題,可以先考慮關閉 SELinux
# sed -i ‘s/SELINUX=enforcing/SELINUX=disabled/’ /etc/selinux/config

8. 開啟防火牆並限定來源
# iptables -A INPUT -p tcp -s  192.168.131.0/24 –syn -m state –state NEW –dport 1688 -j ACCEPT

9. 放在 /etc/rc.local 中開機時立即執行
# echo “/usr/local/bin/kms &” >> /etc/rc.local

Windows Client 10 認證,以 Windows 10 Enterprise 1703 15063 為例

10. 以系統管理員身份執行 命令提示字元

11. 執行指令

slmgr.vbs -upk(可以不用做)

KMS Client Key
https://technet.microsoft.com/en-us/library/jj612867.aspx
https://www.dwhd.org/20150723_011447.html

slmgr.vbs -ipk NPPR9-FWDCX-D2C8J-H872K-2YT43(可以不用做)

slmgr.vbs -skms KMS’IP

slmgr.vbs -ato

slmgr.vbs -dlv

Windows 與 KMS Server 連線

Windows 10 已啟動

啟動 Office 2010
cscript “C:Program FilesMicrosoft OfficeOffice15ospp.vbs” /sethst:192.168.131.135
cscript “C:Program FilesMicrosoft OfficeOffice15ospp.vbs” /act

安裝 Barnyard2 / Base / Adodb – For Snort

參考網頁:
浮雲雅築: [研究] Snort 2.9.6.2 + Barnyard 2.13 安裝 (CentOS 6.5 x64) 快速安裝程式
Startup script timeout (Centos 7) · Issue #141 · firnsy/barnyard2 · GitHub

底下參考自:讓Snort開始運作,Information Security 資安人科技網

Barnyard是一套用來讀取 Snort 統一輸出報表(Unified output)並將之轉存到資料庫的特製工具,並且會直接監視資料庫連線來預防資料的流失。統一輸出報表是 Snort3 種輸出報表的其中一個選項,它透過減輕 Snort  引擎中的有效負荷的傳輸(payload translation)來增快處理速度。

1. 安裝所需套件
# yum install git libtool libnet libnet-devel mariadb-devel daq-devel libyaml-devel file-devel libcap-ng-devel libpcap-devel libdnet-devel

2. 切換目錄
# cd /usr/local/src

3. 使用 git 下載 barnyard2
# git clone https://github.com/firnsy/barnyard2.git barnyard2
Cloning into ‘barnyard2’…
remote: Counting objects: 1292, done.
remote: Total 1292 (delta 0), reused 0 (delta 0), pack-reused 1292
Receiving objects: 100% (1292/1292), 1.04 MiB | 601.00 KiB/s, done.
Resolving deltas: 100% (896/896), done.[@more@]
4. 切換目錄
# cd barnyard2

5. 進行設定
# ./autogen.sh
Found libtoolize
libtoolize: putting auxiliary files in `.’.
libtoolize: copying file `./ltmain.sh’
libtoolize: putting macros in AC_CONFIG_MACRO_DIR, `m4′.
libtoolize: copying file `m4/libtool.m4′
libtoolize: copying file `m4/ltoptions.m4′
libtoolize: copying file `m4/ltsugar.m4′
libtoolize: copying file `m4/ltversion.m4′
libtoolize: copying file `m4/lt~obsolete.m4′
autoreconf: Entering directory `.’
autoreconf: configure.ac: not using Gettext
autoreconf: running: aclocal –force -I m4
autoreconf: configure.ac: tracing
autoreconf: running: libtoolize –copy –force
libtoolize: putting auxiliary files in `.’.
libtoolize: copying file `./ltmain.sh’
libtoolize: putting macros in AC_CONFIG_MACRO_DIR, `m4′.
libtoolize: copying file `m4/libtool.m4′
libtoolize: copying file `m4/ltoptions.m4′
libtoolize: copying file `m4/ltsugar.m4′
libtoolize: copying file `m4/ltversion.m4′
libtoolize: copying file `m4/lt~obsolete.m4′
autoreconf: running: /usr/bin/autoconf –force
autoreconf: running: /usr/bin/autoheader –force
autoreconf: running: automake –add-missing –copy –force-missing
configure.ac:11: installing ‘./config.guess’
configure.ac:11: installing ‘./config.sub’
configure.ac:8: installing ‘./install-sh’
configure.ac:8: installing ‘./missing’
autoreconf: Leaving directory `.’
You can now run “./configure” and then “make”.

6. 進行編譯及安裝
# ./configure –with-mysql –with-mysql-libraries=/usr/lib64/mysql
# make && make install

7. 複製檔案到相對應目錄
# cp /usr/local/src/barnyard2/rpm/barnyard2.config /etc/sysconfig/barnyard2
# cp /usr/local/src/barnyard2/rpm/barnyard2 /etc/init.d/

8. 更改檔案給予執行權限
# chmod +x /etc/init.d/barnyard2

9. 設定開機時啟動 barnyard2
# chkconfig –add barnyard2

10. 建立連結
# ln -s /usr/local/etc/barnyard2.conf /etc/snort/barnyard2.conf
# ln -s /usr/local/bin/barnyard2 /usr/bin/

11. 建立目錄
# mkdir -p /var/log/snort/eth0/archive/

12. 修改 /etc/init.d/barnyard2
# sed -i -e “s@BARNYARD_OPTS=@#BARNYARD_OPTS=@”   /etc/init.d/barnyard2
# sed -i -e “/BARNYARD_OPTS=”-D -c $CONF/aBARNYARD_OPTS=”-D -c /etc/snort/barnyard2.conf -d /var/log/snort -w /var/log/snort/barnyard2.waldo -l /var/log/snort -a /var/log/snort -f snort.log -X /var/lock/subsys/barnyard2-eth0.pid””   /etc/init.d/barnyard2

13. 修改 /etc/sysconfig/barnyard2
# sed -i -e “s@LOG_FILE=@#LOG_FILE=@”   /etc/sysconfig/barnyard2
# sed -i -e “/LOG_FILE=”snort_unified.log”/aLOG_FILE=”snort.log””   /etc/sysconfig/barnyard2

14. 修改 /etc/sysconfig/snort
# sed -i -e “s@ALERTMODE=fast@#ALERTMODE=fast@”    /etc/sysconfig/snort
# sed -i -e “s@BINARY_LOG=1@#BINARY_LOG=1@”    /etc/sysconfig/snort

15. 修改 /etc/snort/barnyard2.conf
# sed -i -e “s@config sid_file@# config sid_file@” /etc/snort/barnyard2.conf
# sed -i -e “/config sid_file/aconfig sid_file: /etc/snort/etc/sid-msg.map” /etc/snort/barnyard2.conf
# sed -i -e “/database: log to a variety of databases/aoutput database: log, mysql, user=barnyard2 password=123456 dbname=snort host=localhost” /etc/snort/barnyard2.conf

16. 修改 /etc/snort/snort.conf
# sed -i -e “s@output unified2@#output unified2@”    /etc/snort/snort.conf
# sed -i -e “/output unified2: filename merged.log, limit 128, nostamp, mpls_event_types, vlan_event_types/aoutput unified2: filename snort.log, limit 128”   /etc/snort/snort.conf

17. 建立資料庫及設定設用者帳號密碼
# /usr/bin/mysql -u root -p
MariaDB [(none)]> create database snortdb;
MariaDB [(none)]> grant all privileges on snortdb.* to barnyard2@localhost identified by ‘123456’;
MariaDB [(none)]> flush privileges;

19. 匯入資料
# /usr/bin/mysql snortdb -ubarnyard2 -p123456 < /usr/local/src/barnyard2/schemas/create_mysql

20. 進行測試
# /usr/local/bin/barnyard2 -T -c /etc/snort/barnyard2.conf -d /var/log/snort -w /var/log/snort/barnyard2.waldo -l /var/log/snort -a /var/log/snort -f snort.log -X /var/lock/subsys/barnyard2-eth0.pid

如果有無法啟動的狀況
# vim /etc/systemd/system/barnyard2.service
[Unit]
Description=Barnyard2 Dedicated Unified2 Spooler
After=network.target

[Service]
Type=simple
ExecStart=/usr/local/bin/barnyard2 -c /etc/snort/barnyard2.conf -d /var/log/snort/ -f snort.log

[Install]
WantedBy=multi-user.target

# systemctl enable barnyard2.service
Created symlink from /etc/systemd/system/multi-user.target.wants/barnyard2.service to /etc/systemd/system/barnyard2.service.
# systemctl start barnyard2

21. 安裝 Base + adodb (Web UI)
# cd /usr/local/src
# wget http://nchc.dl.sourceforge.net/project/adodb/adodb-php5-only/adodb-518-for-php5/adodb518a.tgz
# wget http://nchc.dl.sourceforge.net/project/secureideas/BASE/base-1.4.5/base-1.4.5.tar.gz
# tar zxvf base-1.4.5.tar.gz -C /var/www/html
# mv /var/www/html/base-1.4.5 /var/www/html/base
# chmod a+w /var/www/html/base
# tar zxvf adodb518a.tgz -C /var/www/html
# chmod a+w /var/www/html/adodb5
# 修改 /etc/php.ini
# vim /etc/php.ini
date.timezone = “Asia/Taipei”
error_reporting = E_ALL & ~E_NOTICE
找到
; UNIX: “/path1:/path2”
;include_path = “.:/php/includes”
底下增加一行
include_path => .:/usr/share/pear:/usr/share/php

22. 重新啟動 Web Server
# systemctl restart httpd

23. 安裝過程畫面


24. 更改目錄權限
# chmod a-w /var/www/html/base
# chmod a-w /var/www/html/adodb5