Apache Web Server 2.4 使用密碼來限制瀏覽來源

1. 建立使用者及密碼
# /usr/bin/htpasswd -c /var/www/test/.htpasswd admin
New password:
Re-type new password:
Adding password for user admin

第二個使用者就不用加上 -c
# /usr/bin/htpasswd /var/www/test/.htpasswd abc[@more@]
2. 建立設定檔 /etc/httpd/conf.d/test.conf
# vim /etc/httpd/conf.d/test.conf
Alias /base /var/www/test
<Directory /var/www/test/>
Order Deny,Allow
#Deny from all
#Allow from 192.168.1.0/24
Require all denied
Require ip 192.168.1.0/24

AuthType Basic
AuthName “Restricted Files”
AllowOverride AuthConfig
# (Following line optional)
AuthBasicProvider file
AuthUserFile “/var/www/test/.htpasswd”
Require valid-user
</Directory>

3. 重新啟動 Apache Web Server
# systemctl restart httpd
# systemctl status httpd

4. 測試一下 http://Server’IP/test

修改 Scratch 2.0 454 Offline Editor 版中文翻譯

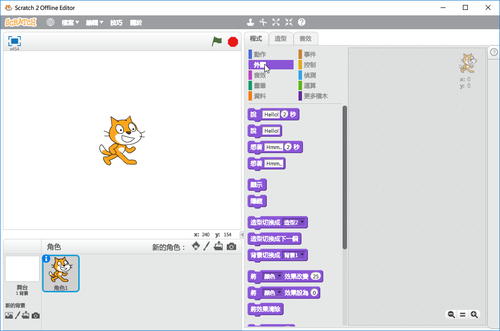
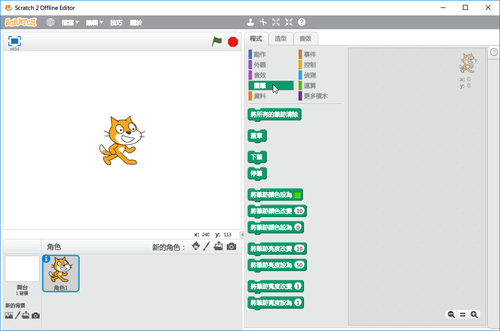
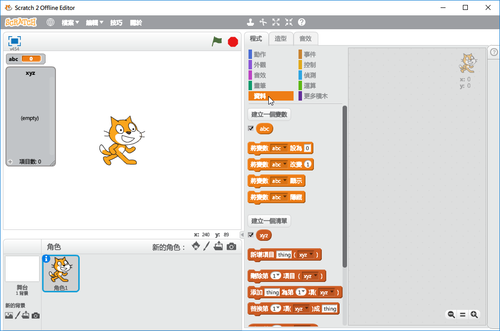
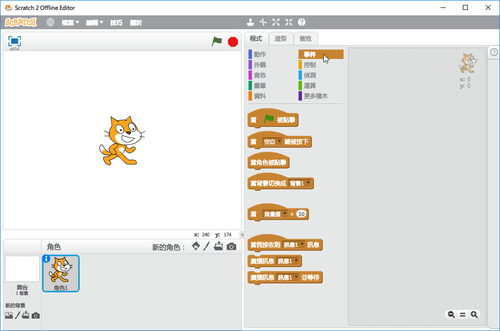
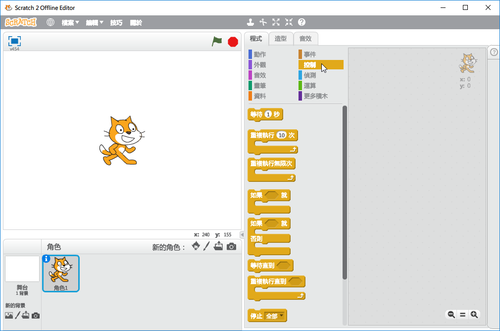
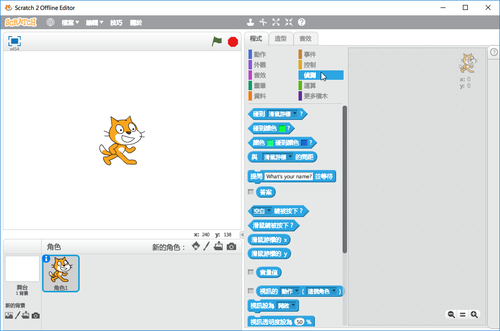
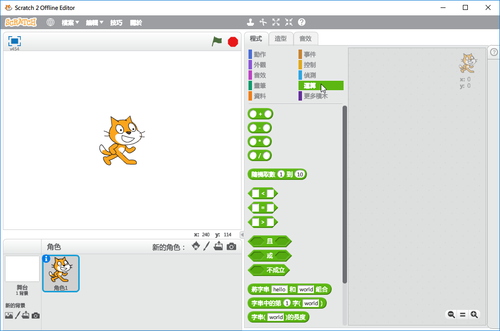
稍微修改了一下 Scratch 2.0 454  Offline Editor 版中文翻譯,主要是一些用語的調整
動作

外觀

[@more@]音效

畫筆

資料

事件

控制

偵測

運算

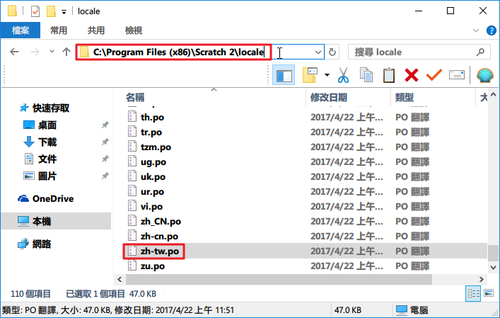
如果要替換掉原來的中文翻譯檔 zh-tw.po,請先備份原檔,如果覺得翻譯不好可以改回來!
Windows 64 位元
C:Program Files (x86)Scratch 2locale
Windows 32 位元
C:Program FilesScratch 2locale

下載下面的翻譯檔,解壓縮後,覆蓋原檔即可!
下載

Apache Web Server 2.4 限制瀏覽來源 IP

建立設定檔
# vim /etc/httpd/conf.d/base.conf
Alias /base /var/www/base
<Directory /var/www/base/>
Order Deny,Allow
# 2.2
#Deny from all
#Allow from 192.168.1.0/24
# 2.4
Require all denied
Require ip 192.168.1.0/24
</Directory>

重新啟動 Web Server
# systemctl restart httpd

檢查是否有正常啟動
# system status httpd

在 CentOS 7.x 上安裝 ntopng

ntopng 官方網站:http://www.ntop.org/
ntop 是一套好用的圖形化介面網路軟體,可以監控並記錄整個網路的流量。ntopng 則是 ntop 的下一個版本。

參考網頁:
【 Linux 】NTopNG安裝 (CentOS 7) – 亞索數位筆記
CentOs 7 ntopng 安裝 @ 工作雜記 :: 隨意窩 Xuite日誌

1. 安裝 epel 套件庫
# yum install epel-release

2. 新增 ntop 套件庫設定檔
# vim /etc/yum.repos.d/ntop-nmon.repo
[ntop]
name=ntop packages
baseurl=http://www.nmon.net/centos-stable/$releasever/$basearch/
enabled=1
gpgcheck=1
gpgkey=http://www.nmon.net/centos-stable/RPM-GPG-KEY-deri

[ntop-noarch]
name=ntop packages
baseurl=http://www.nmon.net/centos-stable/$releasever/noarch/
enabled=1
gpgcheck=1
gpgkey=http://www.nmon.net/centos-stable/RPM-GPG-KEY-deri

清除舊的暫存並更新套件庫套件資訊
# yum clean all
# yum update[@more@]
3. 安裝 ntopng 相關套件
# yum install pfring n2disk nprobe ntopng ntopng-data cento nbox

安裝 PF_RING 驅動程式
# yum install pfring-drivers-zc-dkms

4. 設定開機時啟動 ntopng 相關服務
# systemctl start redis.service
# systemctl enable redis.service

# systemctl start ntopng.service
# systemctl enable ntopng.service

5. 加入防火牆設定
# firewall-cmd –permanent –add-port=3000/tcp
# firewall-cmd –reload

# iptables -A INPUT -p tcp –syn -m state –state NEW –dport 3000 -j ACCEPT

6. 檢查是否有正常啟動
# systemctl status ntopng.service
● ntopng.service – Start/stop ntopng program
   Loaded: loaded (/etc/systemd/system/ntopng.service; enabled; vendor preset: disabled)
   Active: active (running) since Wed 2017-03-01 21:34:25 CST; 3s ago
  Process: 12500 ExecStop=/etc/systemd/scripts/ntopng stop (code=exited, status=0/SUCCESS)
  Process: 12560 ExecStart=/etc/systemd/scripts/ntopng start (code=exited, status=0/SUCCESS)
 Main PID: 12567 (ntopng)
   CGroup: /system.slice/ntopng.service
           mq12567 /usr/bin/ntopng /etc/ntopng/ntopng.conf

Mar 01 21:34:24 flow logger[12561]: ntopng start
Mar 01 21:34:24 flow ntopng[12560]: Starting ntopng: No network card detected
Mar 01 21:34:24 flow ntopng[12567]: [NtopPro.cpp:182] ERROR: [LICENSE] Invalid or missing ntopng License [Empty license file]
Mar 01 21:34:24 flow ntopng[12567]: [NtopPro.cpp:195] WARNING: [LICENSE] ntopng will now run in pro mode for 10 minutes
Mar 01 21:34:24 flow ntopng[12567]: [NtopPro.cpp:197] WARNING: [LICENSE] before returning to community mode
Mar 01 21:34:24 flow ntopng[12567]: [NtopPro.cpp:198] WARNING: [LICENSE] You can buy a permanent license at http://shop.ntop.org
Mar 01 21:34:24 flow ntopng[12567]: [NtopPro.cpp:199] WARNING: [LICENSE] or run ntopng in community mode starting
Mar 01 21:34:24 flow ntopng[12567]: [NtopPro.cpp:200] WARNING: [LICENSE] ntopng –community
Mar 01 21:34:25 flow ntopng[12560]: [  OK  ]
Mar 01 21:34:25 flow systemd[1]: Started Start/stop ntopng program.

有正常啟動,但有 ERROR 和一些 WARNING

解決方式:
# echo “–community” >> /etc/ntopng/ntopng.conf

7. 重新啟動 ntopng 服務
# systemctl restart ntopng.service

8. 已正常無 WARNING 警告訊息
# systemctl status ntopng.service
● ntopng.service – Start/stop ntopng program
   Loaded: loaded (/etc/systemd/system/ntopng.service; enabled; vendor preset: disabled)
   Active: active (running) since Wed 2017-03-01 21:37:19 CST; 2s ago
  Process: 12604 ExecStop=/etc/systemd/scripts/ntopng stop (code=exited, status=0/SUCCESS)
  Process: 12659 ExecStart=/etc/systemd/scripts/ntopng start (code=exited, status=0/SUCCESS)
 Main PID: 12666 (ntopng)
   CGroup: /system.slice/ntopng.service
           mq12666 /usr/bin/ntopng /etc/ntopng/ntopng.conf

Mar 01 21:37:18 flow systemd[1]: Starting Start/stop ntopng program…
Mar 01 21:37:18 flow logger[12660]: ntopng start
Mar 01 21:37:18 flow ntopng[12659]: Starting ntopng: No network card detected
Mar 01 21:37:19 flow ntopng[12659]: [  OK  ]
Mar 01 21:37:19 flow systemd[1]: Started Start/stop ntopng program.

9. 開啟瀏覽器,在網址列輸入 http://Server’IP:3000

預設登入的帳號 / 密碼:admin / admin

其它設定 /etc/ntopng/ntopng.conf
–http-port xxxx
–local-networks “XXX.XXX.XXX.XXX” 網段:例如:192.168.0.0/24
–interface 網路介面,例如:eth0 eth1 enp6s0

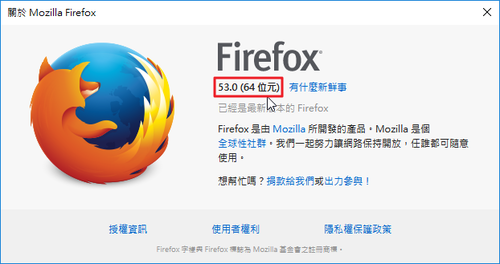
Firefox 53.0 & ESR 52.1.0 版

直接下載最新版本安裝
Windows
x86
http://ftp.mozilla.org/pub/firefox/releases/53.0/win32/zh-TW/Firefox%20Setup%2053.0.exe
ESR 52.1.0 版本
http://ftp.mozilla.org/pub/firefox/releases/52.1.0esr/win32/zh-TW/Firefox%20Setup%2052.1.0esr.exe

x64
http://ftp.mozilla.org/pub/firefox/releases/53.0/win64/zh-TW/Firefox%20Setup%2053.0.exe
ESR 52.1.0 版本
http://ftp.mozilla.org/pub/firefox/releases/52.1.0esr/win64/zh-TW/Firefox%20Setup%2052.1.0esr.exe

Mac
http://ftp.mozilla.org/pub/firefox/releases/53.0/mac/zh-TW/Firefox%2053.0.dmg
ESR 52.1.0 版本
http://ftp.mozilla.org/pub/firefox/releases/52.1.0esr/mac/zh-TW/Firefox%2052.1.0esr.dmg

安裝 Barnyard2 / Base / Adodb – For Suricata

參考網頁:
Suricata + Barnyard + BASE 安裝 – Neverland

底下參考自:讓Snort開始運作,Information Security 資安人科技網

Barnyard是一套用來讀取 Snort 統一輸出報表(Unified output)並將之轉存到資料庫的特製工具,並且會直接監視資料庫連線來預防資料的流失。統一輸出報表是 Snort3 種輸出報表的其中一個選項,它透過減輕 Snort  引擎中的有效負荷的傳輸(payload translation)來增快處理速度。

1. 安裝所需套件
# yum install git libtool libnet libnet-devel mariadb-devel daq-devel libyaml-devel file-devel libcap-ng-devel libpcap-devel libdnet-devel

2. 切換目錄
# cd /usr/local/src

3. 使用 git 下載 barnyard2
# git clone https://github.com/firnsy/barnyard2.git barnyard2
Cloning into ‘barnyard2’…
remote: Counting objects: 1292, done.
remote: Total 1292 (delta 0), reused 0 (delta 0), pack-reused 1292
Receiving objects: 100% (1292/1292), 1.04 MiB | 601.00 KiB/s, done.
Resolving deltas: 100% (896/896), done.[@more@]
4. 切換目錄
# cd barnyard2

5. 進行設定
# ./autogen.sh
Found libtoolize
libtoolize: putting auxiliary files in `.’.
libtoolize: copying file `./ltmain.sh’
libtoolize: putting macros in AC_CONFIG_MACRO_DIR, `m4′.
libtoolize: copying file `m4/libtool.m4′
libtoolize: copying file `m4/ltoptions.m4′
libtoolize: copying file `m4/ltsugar.m4′
libtoolize: copying file `m4/ltversion.m4′
libtoolize: copying file `m4/lt~obsolete.m4′
autoreconf: Entering directory `.’
autoreconf: configure.ac: not using Gettext
autoreconf: running: aclocal –force -I m4
autoreconf: configure.ac: tracing
autoreconf: running: libtoolize –copy –force
libtoolize: putting auxiliary files in `.’.
libtoolize: copying file `./ltmain.sh’
libtoolize: putting macros in AC_CONFIG_MACRO_DIR, `m4′.
libtoolize: copying file `m4/libtool.m4′
libtoolize: copying file `m4/ltoptions.m4′
libtoolize: copying file `m4/ltsugar.m4′
libtoolize: copying file `m4/ltversion.m4′
libtoolize: copying file `m4/lt~obsolete.m4′
autoreconf: running: /usr/bin/autoconf –force
autoreconf: running: /usr/bin/autoheader –force
autoreconf: running: automake –add-missing –copy –force-missing
configure.ac:11: installing ‘./config.guess’
configure.ac:11: installing ‘./config.sub’
configure.ac:8: installing ‘./install-sh’
configure.ac:8: installing ‘./missing’
autoreconf: Leaving directory `.’
You can now run “./configure” and then “make”.

6. 進行編譯及安裝
# ./configure –with-mysql –with-mysql-libraries=/usr/lib64/mysql
# make && make install

7. 複製檔案到相對應目錄
# cp /usr/local/src/barnyard2/rpm/barnyard2.config /etc/sysconfig/barnyard2
# cp /usr/local/src/barnyard2/rpm/barnyard2 /etc/init.d/

8. 更改檔案給予執行權限
# chmod +x /etc/init.d/barnyard2

9. 設定開機時啟動 barnyard2
# chkconfig –add barnyard2

10. 建立連結
# ln -s /usr/local/etc/barnyard2.conf /etc/suricata/barnyard2.conf
# ln -s /usr/local/bin/barnyard2 /usr/bin/

11. 建立目錄
# mkdir -p /var/log/snort/eth0/archive/

12. 修改 /etc/init.d/barnyard2
# sed -i -e “s@Snort Output Processor@Suricata Output Processor@”   /etc/init.d/barnyard2
# sed -i -e “s@BARNYARD_OPTS=@#BARNYARD_OPTS=@”   /etc/init.d/barnyard2
# sed -i -e “/daemon/iBARNYARD_OPTS=”-D -c /etc/suricata/barnyard2.conf -d /var/log/suricata -w /var/log/suricata/barnyard2.waldo -l /var/log/suricata -a /var/log/suricata -f unified2.alert -X /var/lock/subsys/barnyard2.pid”” /etc/init.d/barnyard2d2

13. 修改 /etc/sysconfig/barnyard2
# sed -i -e “s@LOG_FILE=@#LOG_FILE=@”   /etc/sysconfig/barnyard2
# sed -i -e “/LOG_FILE=”snort_unified.log”/aLOG_FILE=”unified2.log“”   /etc/sysconfig/barnyard2
# sed -i -e “s@CONF@#CONF@” /etc/sysconfig/barnyard2
#
sed -i -e “s@SNORTDIR@#SNORTDIR@” /etc/sysconfig/barnyard2
# sed -i -e “/Probably not this either/aCONF=/etc/suricata/barnyard2.conf” /etc/sysconfig/barnyard2
# sed -i -e “/#SNORTDIR/aSNORTDIR=”/var/log/suricata”” /etc/sysconfig/barnyard2

14. 修改 /etc/suricata/barnyard2.conf
# cp /etc/suricata/barnyard2.conf /etc/suricata/barnyard2.conf.$(date +%F)
# sed -i ‘s@/etc/snort/reference.config@/etc/suricata/rules/reference.config@’ /etc/suricata/barnyard2.conf
# sed -i ‘s@/etc/snort/classification.config@/etc/suricata/rules/classification.config@’ /etc/suricata/barnyard2.conf
# sed -i ‘s@/etc/snort/gen-msg.map@/etc/suricata/rules/gen-msg.map@’ /etc/suricata/barnyard2.conf
# sed -i ‘s@/etc/snort/sid-msg.map@/etc/suricata/rules/sid-msg.map@’ /etc/suricata/barnyard2.conf
# sed -i -e “/database: log to a variety of databases/aoutput database: log, mysql, user=barnyard2 password=123456 dbname=suricatadb host=localhost” /etc/suricata/barnyard2.conf

15. 修改 /etc/suricata/suricata.yaml
# vim /etc/suricata/suricata.yaml
  – unified2-alert:
      enabled: yes
      filename: unified2.alert

16. 建立資料庫及設定設用者帳號密碼
# /usr/bin/mysql -u root -p
MariaDB [(none)]> create database snortdb;
MariaDB [(none)]> grant all privileges on snortdb.* to barnyard2@localhost identified by ‘123456’;
MariaDB [(none)]> flush privileges;

17. 匯入資料
# /usr/bin/mysql suricatadb -ubarnyard2 -p123456 < /usr/local/src/barnyard2/schemas/create_mysql

18. 進行測試
# /usr/local/bin/barnyard2 -T -c /etc/suricata/barnyard2.conf -d /var/log/suricata -w /var/log/suricata/barnyard2.waldo -l /var/log/suricata -a /var/log/suricata -f unified2.alert -X /var/lock/subsys/barnyard2.pid

19. 如果有無法啟動的狀況
# vim /etc/systemd/system/barnyard2.service
[Unit]
Description=Barnyard2 Dedicated Unified2 Spooler
After=network.target

[Service]
Type=simple
ExecStart=/usr/local/bin/barnyard2 -c /etc/suricata/barnyard2.conf -d /var/log/suricata/ -w /var/log/suricata/barnyard2.waldo -l /var/log/suricata -a /var/log/suricata -f unified2.alert -X /var/lock/subsys/barnyard2.pid

[Install]
WantedBy=multi-user.target

20. 建立目錄及改變目錄擁有者群組
# mkdir /var/log/barnyard2
# chown -R suricata:suricata /var/log/barnyard2

21. 設定開機時啟動
# systemctl enable barnyard2.service
Created symlink from /etc/systemd/system/multi-user.target.wants/barnyard2.service to /etc/systemd/system/barnyard2.service.

22. 啟動並檢查
# systemctl start barnyard2
# systemctl status barnyard2.service
● barnyard2.service – Barnyard2 Dedicated Unified2 Spooler
   Loaded: loaded (/etc/systemd/system/barnyard2.service; enabled; vendor preset: disabled)
   Active: active (running) since Wed 2017-03-01 19:06:47 CST; 1min 18s ago
 Main PID: 630 (barnyard2)
   CGroup: /system.slice/barnyard2.service
           mq630 /usr/local/bin/barnyard2 -c /etc/suricata/barnyard2.conf -d /var/log/suricata/ -f unified2.alert

Mar 01 19:07:24 ids barnyard2[630]: database:  data encoding = hex
Mar 01 19:07:24 ids barnyard2[630]: database:   detail level = full
Mar 01 19:07:24 ids barnyard2[630]: database:     ignore_bpf = no
Mar 01 19:07:24 ids barnyard2[630]: database: using the “log” facility
Mar 01 19:07:24 ids barnyard2[630]: –== Initialization Complete ==–
Mar 01 19:07:24 ids barnyard2[630]: ______   -*> Barnyard2 <*-
Mar 01 19:07:24 ids barnyard2[630]: / ,,_    Version 2.1.14 (Build 337)
Mar 01 19:07:24 ids barnyard2[630]: |o”  )~|  By Ian Firns (SecurixLive): http://www.securixlive.com/
Mar 01 19:07:24 ids barnyard2[630]: + ”” +  (C) Copyright 2008-2013 Ian Firns <firnsy@securixlive.com>
Mar 01 19:07:24 ids barnyard2[630]: Waiting for new spool file

23 安裝 Base + adodb (Web UI)
# cd /usr/local/src
# wget http://nchc.dl.sourceforge.net/project/adodb/adodb-php5-only/adodb-518-for-php5/adodb518a.tgz
# wget http://nchc.dl.sourceforge.net/project/secureideas/BASE/base-1.4.5/base-1.4.5.tar.gz
# tar zxvf base-1.4.5.tar.gz -C /var/www/html
# mv /var/www/html/base-1.4.5 /var/www/html/base
# chmod a+w /var/www/html/base
# tar zxvf adodb518a.tgz -C /var/www/html
# chmod a+w /var/www/html/adodb5
# 修改 /etc/php.ini
# vim /etc/php.ini
date.timezone = “Asia/Taipei”
error_reporting = E_ALL & ~E_NOTICE
找到
; UNIX: “/path1:/path2”
;include_path = “.:/php/includes”
底下增加一行
include_path => .:/usr/share/pear:/usr/share/php

24. 重新啟動 Web Server
# systemctl restart httpd

25. 更改目錄權限
# chmod a-w /var/www/html/base
# chmod a-w /var/www/html/adodb5

在 CentOS 7.x 上安裝 Suricata 入侵偵測系統

Suricata 和 Snort 一樣,都是入侵偵測系統,二者之間的差異可以參考:
Snort vs Suricata – Aanval Wiki

Suricata 官方網站:https://oisf.net/suricata/
參考網站:
浮雲雅築: [研究] Suricata 3.0 入侵偵測系統安裝 (CentOS 7.2 x64)
如何在 Linux 系統上安裝 Suricata 入侵檢測系統 – 每日頭條
Building an IDS on CentOS using Suricata
CentOS Installation – Suricata – Open Information Security Foundation
IT Security through Open Source : Suricata – wildcard rule loading

1. 利用 epel 套件庫安裝 Suricata
# yum install suricata –enablerepo=epel[@more@]2. 下載 rules 並解壓縮
# wget http://rules.emergingthreats.net/open/suricata/emerging.rules.tar.gz
# tar xvzf suricata/emerging.rules.tar.gz -C /etc/suricata

3. 測試設定檔 /etc/suricata/suricata.yaml
# /sbin/suricata -T -c /etc/suricata/suricata.yaml -i eth0
1/3/2017 — 14:50:53 – <Info> – Running suricata under test mode
1/3/2017 — 14:50:53 – <Notice> – This is Suricata version 3.2.1 RELEASE
1/3/2017 — 14:50:56 – <Notice> – Configuration provided was successfully loaded. Exiting.

如果沒有做第二步驟,會有一些 Warning
# /sbin/suricata -T -c /etc/suricata/suricata.yaml -i eth0
1/3/2017 — 14:16:50 – <Info> – Running suricata under test mode
1/3/2017 — 14:16:50 – <Notice> – This is Suricata version 3.2.1 RELEASE
1/3/2017 — 14:16:50 – <Warning> – [ERRCODE: SC_ERR_NO_RULES(42)] – No rule files match the pattern /etc/suricata/rules/botcc.rules
1/3/2017 — 14:19:04 – <Warning> – [ERRCODE: SC_ERR_NO_RULES(42)] – No rule files match the pattern /etc/suricata/rules/ciarmy.rules
1/3/2017 — 14:19:32 – <Warning> – [ERRCODE: SC_ERR_NO_RULES(42)] – No rule files match the pattern /etc/suricata/rules/compromised.rules
1/3/2017 — 14:20:18 – <Warning> – [ERRCODE: SC_ERR_NO_RULES(42)] – No rule files match the pattern /etc/suricata/rules/drop.rules


4. 因為使用 systemctl 一直無法正常啟動
# mv /usr/lib/systemd/system/suricata.service /root

5. 所以自行建立啟動檔 /etc/init.d/suricatd
# vim /etc/init.d/suricatad
#!/bin/sh
# $Id$
#
# suricatad         Start/Stop the suricata IDS daemon.
#
# chkconfig: 2345 40 60
# description:  Suricata is a lightweight network intrusion detection tool that
#                currently detects more than 1100 host and network
#                vulnerabilities, portscans, backdoors, and more.
#

# Source function library.
. /etc/rc.d/init.d/functions

# See how we were called.
case “$1” in
  start)
        echo -n “Starting Suricata: “
                daemon PCAP_FRAMES=max /sbin/suricata -D -c /etc/suricata/suricata.yaml -i eth0
        ;;
  stop)
        echo -n “Stopping Suricata: “
        killproc suricata
        echo
        ;;
  restart)
        $0 stop
        $0 start
        ;;
  status)
        status suricata
        ;;
  *)
        echo “Usage: $0 {start|stop|restart|status|}”
        exit 1
esac

exit 0

6. 設定檔案權限
# chmod +x /etc/init.d/suricatad

7. 設定開機時啟動
# chkconfig –add suricatad
# /etc/init.d/suricatad start
# /etc/init.d/suricatad status
● suricatad.service – SYSV: Suricata is a lightweight network intrusion detection tool that currently detects more than 1100 host and network vulnerabilities, portscans, backdoors, and more.
   Loaded: loaded (/etc/rc.d/init.d/suricatad; bad; vendor preset: disabled)
   Active: active (running) since Wed 2017-03-01 15:10:45 CST; 3min 58s ago
     Docs: man:systemd-sysv-generator(8)
   CGroup: /system.slice/suricatad.service
           mq311 /sbin/suricata -D -c /etc/suricata/suricata.yaml -i eth0

Mar 01 15:10:45 ids systemd[1]: Starting SYSV: Suricata is a lightweight network intrusion detection tool that currently detects more than 1100 host and network vulnerabilities, portscans, back…s, and more….
Mar 01 15:10:45 ids suricatad[308]: Starting Suricata: 1/3/2017 — 07:10:45 – <Notice> – This is Suricata version 3.2.1 RELEASE
Mar 01 15:10:45 ids suricatad[308]: [  OK  ]
Mar 01 15:10:45 ids systemd[1]: Started SYSV: Suricata is a lightweight network intrusion detection tool that currently detects more than 1100 host and network vulnerabilities, portscans, backdoors, and more..
Hint: Some lines were ellipsized, use -l to show in full.

列出 CentOS / Debian / Ubuntu 開機時服務啟動的設定狀態

在 RedHat / CentOS Linux 中可以使用 chkconfig / systemctl 來查看開機時服務啟動的設定狀態
CentOS 6.x
# /sbin/chkconfig –list
crond           0:off   1:off   2:on    3:on    4:on    5:on    6:off
fail2ban        0:off   1:off   2:off   3:off   4:on    5:on    6:off
htcacheclean    0:off   1:off   2:off   3:off   4:off   5:off   6:off
httpd           0:off   1:off   2:off   3:on    4:off   5:off   6:off
ipset           0:off   1:off   2:on    3:on    4:on    5:on    6:off
iptables        0:off   1:off   2:on    3:on    4:on    5:on    6:off
mysqld          0:off   1:off   2:off   3:on    4:off   5:off   6:off
netconsole      0:off   1:off   2:off   3:off   4:off   5:off   6:off
netfs           0:off   1:off   2:off   3:on    4:on    5:on    6:off
network         0:off   1:off   2:on    3:on    4:on    5:on    6:off
ntpdate         0:off   1:off   2:off   3:off   4:off   5:off   6:off
rdisc           0:off   1:off   2:off   3:off   4:off   5:off   6:off
restorecond     0:off   1:off   2:off   3:off   4:off   5:off   6:off
rsyslog         0:off   1:off   2:on    3:on    4:on    5:on    6:off
snmpd           0:off   1:off   2:off   3:on    4:off   5:off   6:off
snmptrapd       0:off   1:off   2:off   3:off   4:off   5:off   6:off
sshd            0:off   1:off   2:on    3:on    4:on    5:on    6:off
udev-post       0:off   1:on    2:off   3:off   4:off   5:off   6:off[@more@]
# /sbin/chkconfig –list snmpd
snmpd           0:off   1:off   2:off   3:on    4:off   5:off   6:off

# /sbin/chkconfig –list | grep 3:on
crond           0:off   1:off   2:on    3:on    4:on    5:on    6:off
httpd           0:off   1:off   2:off   3:on    4:off   5:off   6:off
ipset           0:off   1:off   2:on    3:on    4:on    5:on    6:off
iptables        0:off   1:off   2:on    3:on    4:on    5:on    6:off
mysqld          0:off   1:off   2:off   3:on    4:off   5:off   6:off
netfs           0:off   1:off   2:off   3:on    4:on    5:on    6:off
network         0:off   1:off   2:on    3:on    4:on    5:on    6:off
rsyslog         0:off   1:off   2:on    3:on    4:on    5:on    6:off
snmpd           0:off   1:off   2:off   3:on    4:off   5:off   6:off
sshd            0:off   1:off   2:on    3:on    4:on    5:on    6:off

CentOS 7.x
# /usr/bin/systemctl list-unit-files | grep enabled
autovt@.service                        enabled
barnyard2.service                      enabled
crond.service                          enabled
getty@.service                         enabled
httpd.service                          enabled
iptables.service                       enabled
mariadb.service                        enabled
rsyslog.service                        enabled
snmpd.service                          enabled
sshd.service                           enabled
systemd-readahead-collect.service      enabled
systemd-readahead-drop.service         enabled
systemd-readahead-replay.service       enabled
default.target                         enabled
graphical.target                       enabled
remote-fs.target                       enabled
runlevel5.target                       enabled

在 Debian / Ubuntu
# apt-get install sysv-rc-conf

# /usr/sbin/sysv-rc-conf –list
atd          0:off      1:off   2:on    3:on    4:on    5:on    6:off
bootlogs     1:on       2:on    3:on    4:on    5:on
cron         2:on       3:on    4:on    5:on
dbus         2:on       3:on    4:on    5:on
halt         0:off
killprocs    1:on
kmod         S:on
motd         1:on       2:on    3:on    4:on    5:on
networking   0:off      6:off   S:on
postfix      0:off      1:off   2:on    3:on    4:on    5:on    6:off
procps       S:on
rc.local     2:on       3:on    4:on    5:on
reboot       6:off
rmnologin    2:on       3:on    4:on    5:on
rpcbind      0:off      1:off   6:off   S:on
rsync        2:on       3:on    4:on    5:on
rsyslog      0:off      1:off   2:on    3:on    4:on    5:on    6:off
sendsigs     0:off      6:off
single       1:on
snmpd        0:off      1:off   2:on    3:on    4:on    5:on    6:off
ssh          2:on       3:on    4:on    5:on
umountfs     0:off      6:off
umountroot   0:off      6:off
urandom      0:off      6:off   S:on
x11-common   S:on

# /usr/sbin/sysv-rc-conf –list snmpd
snmpd        0:off      1:off   2:on    3:on    4:on    5:on    6:off

# /usr/sbin/update-rc.d snmpd remove
# /usr/sbin/sysv-rc-conf –list snmpd
snmpd

# /usr/sbin/update-rc.d snmpd defaults
# /usr/sbin/sysv-rc-conf –list snmpd
snmpd        0:off      1:off   2:on    3:on    4:on    5:on    6:off