刪除邏輯卷冊 / 卷冊群組 / 實體卷冊

刪除邏輯卷冊
# umount /dev/systemVG/www_LV
# lvremove /dev/systemVG/www_LV
Do you really want to remove active logical volume www_LV? [y/n]: y
  Logical volume “www_LV” successfully removed

# pvscan
  PV /dev/sda5   VG systemVG        lvm2 [1020.00 MiB / 1020.00 MiB free]
  PV /dev/sda6   VG systemVG        lvm2 [1020.00 MiB / 1020.00 MiB free]
  PV /dev/sda7                      lvm2 [1.00 GiB]
  Total: 3 [2.99 GiB] / in use: 2 [1.99 GiB] / in no VG: 1 [1.00 GiB]

[@more@]將卷冊群組停止使用
# vgchange -a n systemVG
刪除卷冊群組
# vgremove systemVG
  Volume group “systemVG” successfully removed

刪除實體卷冊
# pvremove /dev/sda5 /dev/sda6 /dev/sda7
  Labels on physical volume “/dev/sda5” successfully wiped
  Labels on physical volume “/dev/sda6” successfully wiped
  Labels on physical volume “/dev/sda7” successfully wiped

縮放卷冊群組和邏輯卷冊的大小

增加實體卷冊到卷冊群組
# vgdisplay systemVG
— Volume group —
VG Name systemVG
System ID
Format lvm2
Metadata Areas 2
Metadata Sequence No 2
VG Access read/write
VG Status resizable
MAX LV 0
Cur LV 1
Open LV 1
Max PV 0
Cur PV 2
Act PV 2
VG Size 1.99 GiB
PE Size 4.00 MiB
Total PE 510
Alloc PE / Size 125 / 500.00 MiB
Free PE / Size 385 / 1.50 GiB
VG UUID oWUkZt-IOhU-1qw2-THBl-qRfY-w3xK-JDCPXe

VG Size 為 2G,Cur PV 2 由 2 個 PV 組成

[@more@]# vgextend systemVG /dev/sda7
Volume group “systemVG” successfully extended

# vgdisplay systemVG
— Volume group —
VG Name systemVG
System ID
Format lvm2
Metadata Areas 3
Metadata Sequence No 3
VG Access read/write
VG Status resizable
MAX LV 0
Cur LV 1
Open LV 1
Max PV 0
Cur PV 3
Act PV 3
VG Size 2.99 GiB
PE Size 4.00 MiB
Total PE 765
Alloc PE / Size 125 / 500.00 MiB
Free PE / Size 640 / 2.50 GiB
VG UUID oWUkZt-IOhU-1qw2-THBl-qRfY-w3xK-JDCPXe

VG 變成 3G,Cur PV 由 3 個 PV 所組成

將實體卷冊從卷冊群組中移除
# vgreduce systemVG /dev/sda7
Removed “/dev/sda7” from volume group “systemVG”
vgreduce 指令工具可以將尚未使用到的實體卷冊從卷冊群組中移除,但如果實體卷冊已經被有存取容量空間占用時,就會無法刪除

透過指令來縮放邏輯卷冊
# df -h | grep www_LV
/dev/mapper/systemVG-www_LV 500M 33M 468M 7% /var/www

# lvdisplay | grep “LV Size”
LV Size 500.00 MiB

加大 www_LV 邏輯卷冊 加到 750M(原有 500M + 250M)
# umount /var/www
# lvextend -L +250M /dev/systemVG/www_LV
Rounding up size to full physical extent 252.00 MiB
Extending logical volume www_LV to 752.00 MiB
Logical volume www_LV successfully resized

# ls -l /var/www
總計 0
-rw-r–r– 1 root root 0 5月 17 21:16 test.html

格式化後續新增的部分
ext2/ext3 resizefs
# resize2fs -s +250M /dev/systemVG/www_LV
# resize_reiserfs -s +250M /dev/systemVG/www_LV
resize_reiserfs 3.6.21 (2009 www.namesys.com)

ReiserFS report:
blocksize 4096
block count 192000 (128000)
free blocks 183783 (119785)
bitmap block count 6 (4)

Syncing..done

resize_reiserfs: Resizing finished successfully.

重新掛載
# mount -t reiserfs /dev/systemVG/www_LV /var/www
檢查容量
# lvdisplay | grep “LV Size”
LV Size 752.00 MiB
# df -h | grep www_LV
/dev/mapper/systemVG-www_LV 750M 33M 718M 5% /var/www

縮小邏輯卷冊的大小
# umount /var/www
# resize_reiserfs -s -100M /dev/systemVG/www_LV
resize_reiserfs 3.6.21 (2009 www.namesys.com)

You are running BETA version of reiserfs shrinker.
This version is only for testing or VERY CAREFUL use.
Backup of you data is recommended.

Do you want to continue? [y/N]: y
Processing the tree: 0%….20%….40%….60%….80%….100% left 0, 0 /sec

nodes processed (moved):
int 0 (0),
leaves 1 (0),
unfm 0 (0),
total 1 (0).

check for used blocks in truncated region

ReiserFS report:
blocksize 4096
block count 166400 (192000)
free blocks 158183 (183783)
bitmap block count 6 (6)

Syncing..done

resize_reiserfs: Resizing finished successfully.

使用 lvreduce 減少 www_LV 的 100 空間
# lvreduce -L -100M /dev/systemVG/www_LV
WARNING: Reducing active logical volume to 652.00 MiB
THIS MAY DESTROY YOUR DATA (filesystem etc.)
Do you really want to reduce www_LV? [y/n]: y
Reducing logical volume www_LV to 652.00 MiB
Logical volume www_LV successfully resized

重新掛載
# mount -t reiserfs /dev/systemVG/www_LV /var/www
# df -h | grep www_LV
/dev/mapper/systemVG-www_LV 650M 33M 618M 5% /var/www
# lvdisplay | grep “LV Size”
LV Size 652.00 MiB

Proxmox – LVM

掃描目前實體卷冊的狀態
# pvscan
  PV /dev/sda3   VG pve   lvm2 [118.99 GiB / 14.61 GiB free]
  Total: 1 [118.99 GiB] / in use: 1 [118.99 GiB] / in no VG: 0 [0   ]

掃描目前卷冊群組的狀態
# vgscan
  Reading all physical volumes.  This may take a while…
  Found volume group “pve” using metadata type lvm2

顯示目前系統上面的 VG 狀態
# vgdisplay pve
  — Volume group —
  VG Name               pve
  System ID
  Format                lvm2
  Metadata Areas        1
  Metadata Sequence No  80
  VG Access             read/write
  VG Status             resizable
  MAX LV                0
  Cur LV                5
  Open LV               2
  Max PV                0
  Cur PV                1
  Act PV                1
  VG Size               118.99 GiB
  PE Size               4.00 MiB
  Total PE              30461
  Alloc PE / Size       26720 / 104.38 GiB
  Free  PE / Size       3741 / 14.61 GiB
  VG UUID               M7GUTE-om2m-DMcv-1D0G-o3FQ-Ta3I-HCsZa3
[@more@]

# lvs
  LV                    VG   Attr       LSize  Pool Origin        Data%  Meta%  Move Log Cpy%Sync Convert
  data                  pve  twi-aotz– 66.74g                    1.69   1.36
  root                  pve  -wi-ao—- 29.50g
  snap_vm-103-disk-1_OK pve  Vri—tz-k  8.00g data vm-103-disk-1
  swap                  pve  -wi-ao—-  8.00g
  vm-103-disk-1         pve  Vwi-a-tz–  8.00g data               13.88

顯示硬碟分割
# fdisk -l
Device      Start       End   Sectors  Size Type
/dev/sda1    2048      4095      2048    1M BIOS boot
/dev/sda2    4096    528383    524288  256M EFI System
/dev/sda3  528384 250069646 249541263  119G Linux LVM

Disk /dev/mapper/pve-root: 29.5 GiB, 31675383808 bytes, 61865984 sectors
Units: sectors of 1 * 512 = 512 bytes
Sector size (logical/physical): 512 bytes / 512 bytes
I/O size (minimum/optimal): 512 bytes / 512 bytes
Disk /dev/mapper/pve-swap: 8 GiB, 8589934592 bytes, 16777216 sectors
Units: sectors of 1 * 512 = 512 bytes
Sector size (logical/physical): 512 bytes / 512 bytes
I/O size (minimum/optimal): 512 bytes / 512 bytes
Disk /dev/mapper/pve-vm–103–disk–1: 8 GiB, 8589934592 bytes, 16777216 sectors
Units: sectors of 1 * 512 = 512 bytes
Sector size (logical/physical): 512 bytes / 512 bytes
I/O size (minimum/optimal): 65536 bytes / 65536 bytes

掃描目前邏輯卷冊的狀態
# lvscan
  ACTIVE            ‘/dev/pve/swap‘ [8.00 GiB] inherit
  ACTIVE            ‘/dev/pve/root‘ [29.50 GiB] inherit
  ACTIVE            ‘/dev/pve/data‘ [66.74 GiB] inherit
  ACTIVE            ‘/dev/pve/vm-103-disk-1‘ [8.00 GiB] inherit
  inactive          ‘/dev/pve/snap_vm-103-disk-1_OK‘ [8.00 GiB] inherit

# vgs
  VG   #PV #LV #SN Attr   VSize   VFree
  pve    1   5   0 wz–n- 118.99g 14.61g

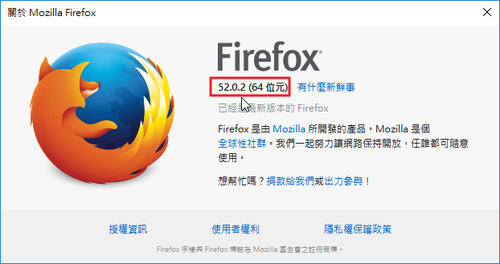
Firefox 52.0.2 版


直接下載最新版本安裝
Windows
x86
http://ftp.mozilla.org/pub/firefox/releases/52.0.2/win32/zh-TW/Firefox%20Setup%2052.0.2.exe
ESR 版本
http://ftp.mozilla.org/pub/firefox/releases/52.0.2esr/win32/zh-TW/Firefox%20Setup%2052.0.2esr.exe

x64
http://ftp.mozilla.org/pub/firefox/releases/52.0.2/win64/zh-TW/Firefox%20Setup%2052.0.2.exe
ESR 版本
http://ftp.mozilla.org/pub/firefox/releases/52.0.2esr/win64/zh-TW/Firefox%20Setup%2052.0.2esr.exe

Mac
http://ftp.mozilla.org/pub/firefox/releases/52.0.2/mac/zh-TW/Firefox%2052.0.2.dmg
ESR 版本
http://ftp.mozilla.org/pub/firefox/releases/52.0.2esr/mac/zh-TW/Firefox%2052.0.2esr.dmg

LVM

# fdisk /dev/sda
Disk /dev/sda: 60.0 GB, 60011642880 bytes
255 磁頭,63 磁區/磁軌,7296 磁柱,總計 117210240 磁區
單位 = 磁區 之於 1 * 512 = 512 位元組
磁區大小 (邏輯/實體):512 位元組 / 512 位元組
I/O 大小 (最小/最佳化):512 位元組 / 512 位元組
磁碟識別碼:0x0004176a

所用裝置 開機      開始         結束      區塊   識別號  系統
/dev/sda1   *        2048      208895      103424   83  Linux
/dev/sda2          208896     2314239     1052672   82  Linux 交換區/ Solaris
/dev/sda3         2314240    87859199    42772480   83  Linux
/dev/sda4        87859200   117209087    14674944    f  W95 Ext’d (LBA)

命令 (m 以獲得說明):n
起初 磁區 (87861248-117209087, 預設 87861248):
使用預設值 87861248
最後 磁區, +磁區 或 +大小{K,M,G} (87861248-117209087, 預設 117209087):+1G

命令 (m 以獲得說明):p

Disk /dev/sda: 60.0 GB, 60011642880 bytes
255 磁頭,63 磁區/磁軌,7296 磁柱,總計 117210240 磁區
單位 = 磁區 之於 1 * 512 = 512 位元組
磁區大小 (邏輯/實體):512 位元組 / 512 位元組
I/O 大小 (最小/最佳化):512 位元組 / 512 位元組
磁碟識別碼:0x0004176a

所用裝置 開機      開始         結束      區塊   識別號  系統
/dev/sda1   *        2048      208895      103424   83  Linux
/dev/sda2          208896     2314239     1052672   82  Linux 交換區/ Solaris
/dev/sda3         2314240    87859199    42772480   83  Linux
/dev/sda4        87859200   117209087    14674944    f  W95 Ext’d (LBA)
/dev/sda5        87861248    89958399     1048576   83  Linux
命令 (m 以獲得說明):t
分割區編號 (1-5): 5
十六進位編碼 (輸入 L 以列出編碼):8e
分割區 5 的系統類型已變更為 8e (Linux LVM)

命令 (m 以獲得說明):wq
分割表已變更!

呼叫 ioctl() 以重新讀取分割表。

警告:重新讀取分割表失敗並產生錯誤 16: 裝置或系統資源忙碌中。
內核仍然使用舊的表格。新的表格將於下一次
重新開機時使用,或是您執行 partprobe(8) 或 kpartx(8) 之後。
同步磁碟。[@more@]
# fdisk -l
Disk /dev/sda: 60.0 GB, 60011642880 bytes
255 磁頭,63 磁區/磁軌,7296 磁柱,總計 117210240 磁區
單位 = 磁區 之於 1 * 512 = 512 位元組
磁區大小 (邏輯/實體):512 位元組 / 512 位元組
I/O 大小 (最小/最佳化):512 位元組 / 512 位元組
磁碟識別碼:0x0004176a

所用裝置 開機      開始         結束      區塊   識別號  系統
/dev/sda1   *        2048      208895      103424   83  Linux
/dev/sda2          208896     2314239     1052672   82  Linux 交換區/ Solaris
/dev/sda3         2314240    87859199    42772480   83  Linux
/dev/sda4        87859200   117209087    14674944    f  W95 Ext’d (LBA)
/dev/sda5        87861248    89958399     1048576   8e  Linux LVM
/dev/sda6        89960448    92057599     1048576   8e  Linux LVM
/dev/sda7        92059648    94156799     1048576   8e  Linux LVM

將磁碟分割區轉換成實體卷冊裝置(Physical Volume)
# pvcreate /dev/sda5 /dev/sda6 /dev/sda7
  Physical volume “/dev/sda5” successfully created
  Physical volume “/dev/sda6” successfully created
  Physical volume “/dev/sda7” successfully created

掃描目前實體卷冊的狀態
# pvscan
  PV /dev/sda5                      lvm2 [1.00 GiB]
  PV /dev/sda6                      lvm2 [1.00 GiB]
  PV /dev/sda7                      lvm2 [1.00 GiB]
  Total: 3 [3.01 GiB] / in use: 0 [0   ] / in no VG: 3 [3.01 GiB]

將實體卷冊裝置組合成卷冊群組(Volume Group)
# vgcreate systemVG /dev/sda5 /dev/sda6
  Volume group “systemVG” successfully created

# vgscan
  Reading all physical volumes.  This may take a while…
  Found volume group “systemVG” using metadata type lvm2

顯示更完整的邏輯卷冊組成資訊
# vgdisplay systemVG
  — Volume group —
  VG Name               systemVG
  System ID            
  Format                lvm2
  Metadata Areas        2
  Metadata Sequence No  1
  VG Access             read/write
  VG Status             resizable
  MAX LV                0
  Cur LV                0
  Open LV               0
  Max PV                0
  Cur PV                2
  Act PV                2
  VG Size               2.00 GiB
  PE Size               4.00 MiB
  Total PE              512
  Alloc PE / Size       0 / 0  
  Free  PE / Size       512 / 2.00 GiB
  VG UUID               Ck34kQ-uRCu-7Sy5-Xuz3-707j-9do0-wfx6rq

建立邏輯卷冊裝置(Logical Volume)
-L 指定邏輯卷冊裝置的容量大小
-n 指定名稱
# lvcreate -L 500M -n www_LV systemVG
  Logical volume “www_LV” created

顯示邏輯卷冊裝置相關資訊
# lvdisplay /dev/systemVG/www_LV
  — Logical volume —
  LV Name                /dev/systemVG/www_LV
  VG Name                systemVG
  LV UUID                YMPbbQ-W3Hs-nFX1-GmUh-QsTE-0AT9-MsUgS4
  LV Write Access        read/write
  LV Status              available
  # open                 0
  LV Size                500.00 MiB
  Current LE             125
  Segments               1
  Allocation             inherit
  Read ahead sectors     auto
  – currently set to     1024
  Block device           253:0

格式化
# mkfs.reiserfs /dev/systemVG/www_LV
# mkdir /var/www
# mount -t reiserfs /dev/systemVG/www_LV /var/www
# mount | grep www_LV
/dev/mapper/systemVG-www_LV on /var/www type reiserfs (rw)
修改 /etc/fstab 組態檔
# vim /etc/fstab
/dev/systemVG/www_LV /var/www                 reiserfs       acl,user_xattr              0 0

Proxmox – LXC 掛載 NFS 分享的目錄

本來學校的 Server 都是先備份到 NAS 然後再同步到 Google Drive,不過 PVE Server 不允許 LXC 直接掛載其它主機所分享的 NFS,如果要使用的話,必須要先在 PVE Server 上已經掛載連接的目錄才可以使用,可能是為了系統安全的因素。

1. 在 PVE Server 上安裝 autofs
# apt-get install autofs

2. 修改 /etc/auto.master
# vim /etc/auto.master
加入下面一行
/mnt/nasnfs     /etc/auto.nfs

3. 建立 /etc/auto.nfs 設定檔
# vim /etc/auto.nfs
# pve 本機上要掛載的目錄,配合前面就是 /mnt/nasnfs/pve
# 192.168.1.13:/volume1/homes/t850008/Server/pve nas server 上的目錄
pve 192.168.1.13:/volume1/homes/t850008/Server/pve[@more@]4. 啟動 autofs 服務
# systemctl start autofs
# systemctl enable autofs

5. 測試
# cd /mnt/nasnfs/pve
# df -h | grep t850008
192.168.1.13:/volume1/homes/t850008/Server/pve  5.4T  2.5T  2.9T  47% /mnt/nasnfs/pve

6. 在 LXC 設定檔中加入
mp0 是在 pve server 上的目錄
mp 是 lxc 虛擬機上要掛載的目錄
# cat /etc/pve/lxc/102.conf | grep mp
mp0: /mnt/nasnfs/pve,mp=/mnt/ArchLinux

7. 在 LXC 上設定
# mount | grep ArchLinux
192.168.1.13:/volume1/homes/t850008/Server/pve on /mnt/ArchLinux type nfs4 (rw,relatime,vers=4.0,rsize=131072,wsize=131072,namlen=255,hard,proto=tcp,port=0,timeo=600,retrans=2,sec=sys,clientaddr=192.168.1.11,local_lock=none,addr=192.168.1.13)
# cd /mnt/ArchLinux
# df -h | grep ArchLinux
192.168.1.13:/volume1/homes/t850008/Server/pve  5.4T  2.5T  2.9T  47% /mnt/ArchLinux

在 PVE Server 上的設定

Proxmox – ArchLinux LXC 初始環境設定

1. 將套件庫來源設定成 Taiwan
# sed -i ‘s/^Server/#Server/’ /etc/pacman.d/mirrorlist
# sed -i ‘373s/#Server/Server/’ /etc/pacman.d/mirrorlist

2. 更新套件庫
# pacman -Syy
[@more@]3. 更新金鑰
執行時間會有些久
# pacman-key –init
# rm -rf /etc/pacman.d/gnupg/
# rm -rf /root/.gnupg/
# gpg –refresh-keys
# pacman-key –init && pacman-key –populate
gpg: /etc/pacman.d/gnupg/trustdb.gpg: trustdb created
gpg: no ultimately trusted keys found
gpg: starting migration from earlier GnuPG versions
gpg: porting secret keys from ‘/etc/pacman.d/gnupg/secring.gpg’ to gpg-agent
gpg: migration succeeded
gpg: Generating pacman keyring master key…
gpg: key 6C2605DB2059BF97 marked as ultimately trusted
gpg: directory ‘/etc/pacman.d/gnupg/openpgp-revocs.d’ created
gpg: revocation certificate stored as ‘/etc/pacman.d/gnupg/openpgp-revocs.d/EE25                                                                                               24C9262539E30E67A6B66C2605DB2059BF97.rev’
gpg: Done
==> Updating trust database…
gpg: marginals needed: 3  completes needed: 1  trust model: pgp
gpg: depth: 0  valid:   1  signed:   0  trust: 0-, 0q, 0n, 0m, 0f, 1u
==> Appending keys from archlinux.gpg…
==> Locally signing trusted keys in keyring…
  -> Locally signing key 684148BB25B49E986A4944C55184252D824B18E8…
  -> Locally signing key 91FFE0700E80619CEB73235CA88E23E377514E00…
  -> Locally signing key AB19265E5D7D20687D303246BA1DFB64FFF979E7…
  -> Locally signing key 0E8B644079F599DFC1DDC3973348882F6AC6A4C2…
  -> Locally signing key 44D4A033AC140143927397D47EFD567D4C7EA887…
  -> Locally signing key 27FFC4769E19F096D41D9265A04F9397CDFD6BB0…
==> Importing owner trust values…
gpg: setting ownertrust to 4
gpg: inserting ownertrust of 4
gpg: setting ownertrust to 4
==> Disabling revoked keys in keyring…
  -> Disabling key 7FA647CD89891DEDC060287BB9113D1ED21E1A55…
  -> Disabling key D4DE5ABDE2A7287644EAC7E36D1A9E70E19DAA50…
  -> Disabling key BC1FBE4D2826A0B51E47ED62E2539214C6C11350…
  -> Disabling key 63F395DE2D6398BBE458F281F2DBB4931985A992…
  -> Disabling key 8F76BEEA0289F9E1D3E229C05F946DED983D4366…
  -> Disabling key 81D7F8241DB38BC759C80FCE3A726C6170E80477…
  -> Disabling key E7210A59715F6940CF9A4E36A001876699AD6E84…
  -> Disabling key F5A361A3A13554B85E57DDDAAF7EF7873CFD4BB6…
  -> Disabling key 9515D8A8EAB88E49BB65EDBCE6B456CAF15447D5…
  -> Disabling key 4A8B17E20B88ACA61860009B5CED81B7C2E5C0D2…
  -> Disabling key 0B20CA1931F5DA3A70D0F8D2EA6836E1AB441196…
  -> Disabling key 66BD74A036D522F51DD70A3C7F2A16726521E06D…
==> Updating trust database…
gpg: marginals needed: 3  completes needed: 1  trust model: pgp
gpg: depth: 0  valid:   1  signed:   6  trust: 0-, 0q, 0n, 0m, 0f, 1u
gpg: depth: 1  valid:   6  signed:  68  trust: 0-, 0q, 0n, 6m, 0f, 0u
gpg: depth: 2  valid:  68  signed:   7  trust: 68-, 0q, 0n, 0m, 0f, 0u
gpg: next trustdb check due at 2017-09-07
# pacman-key –refresh-keys

4. 更新已安裝套件
# pacman -Syu

5. 安裝 OpenSSH Server
# pacman -S openssh
# systemctl enable sshd.service
# systemctl start sshd.service

6.設定時區
# rm -rf /etc/localtime
# ln -s /usr/share/zoneinfo/Asia/Taipei /etc/localtime
# date

7. 安裝 vim 及 mlocate / dnsutils / net-tools 套件
# pacman -S vim mlocate dnsutils net-tools zip unzip p7zip ntp ssmtp logwatch screen colordiff net-snmp wget 

8. 安裝 cronie 工作排程
# pacman -S cronie
啟動 cronie
# systemctl start cronie
設定開機時啟動
# systemctl enable cronie

9. 安裝 syslog-ng
# pacman -S syslog-ng
設定開機時啟動
# systemctl enable syslog-ng
啟動 syslog-ng
# systemctl start syslog-ng

Proxmox – 解決 ArchLinux LXC 無法安裝套件的問題

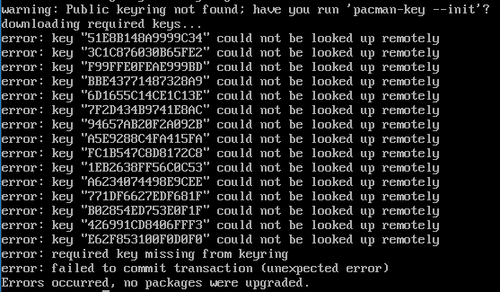
在安裝套件或更新已安裝的套件時,都會出現如下圖的錯誤訊息

看起來似乎是沒有把 key 的值下載下來![@more@]解決方式:
參考網站:
[SOLVED] Resolving pacman-key update issues.

刪除 /etc/pacman.d/gnupg/ 目錄,如果目錄存在
# rm -R /etc/pacman.d/gnupg/
刪除 /root/.gnupg/ 目錄,如果目錄存在
# rm -R /root/.gnupg/
# gpg –refresh-keys
這個步驟會很久
# pacman-key –init && pacman-key –populate
# pacman-key –refresh-keys