因為想要嘗試使用 Banan Pi R1 來做一些 Server 上的應用,所以買了二片,下面是使用 Bananian Linux 的一些筆記。
預設登入的帳號及密碼:root / pi
登入成功畫面。
Linux bananapi 3.4.111-bananian #5 SMP PREEMPT Fri Mar 25 17:24:42 UTC 2016 armv7l
————————————————————————
Welcome to Bananian Linux!
For news and updates check: https://www.bananian.org
Any questions? Read the FAQ first: https://www.bananian.org/faq
Run ‘bananian-config’ to set up Bananian Linux
Run ‘bananian-update’ to check for distribution updates
————————————————————————
Last login: Mon Dec 19 03:02:16 2016[@more@]
執行 bananian-config 進行設定
# bananian-config
———————————————————————————
Welcome to bananian-config!
This script assists you to set up some basic parameters…
For news and updates check: http://www.bananian.org
———————————————————————————
鍵盤設定,直接按 Enter 鍵跳過
Your current keyboard layout is ‘us’. Do you want to change it? (y/N)
設定 root 管理者密碼
Your current root password is still ‘pi’. You have to change it now!
Configuring root password…
Enter new UNIX password:
Retype new UNIX password:
passwd: password updated successfully
設定時區
———————————————————————————
Your current timezone is ‘Etc/UTC’. Do you want to change it? (y/N)y
Configuring timezone…
選擇 Asia / Taipei
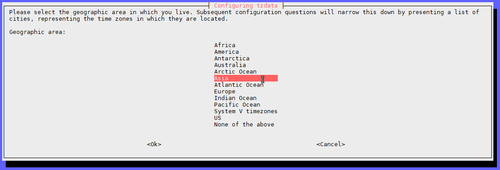
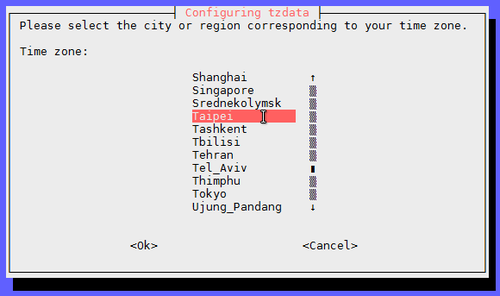
Current default time zone: ‘Asia/Taipei’
Local time is now: Mon Dec 19 11:20:17 CST 2016.
Universal Time is now: Mon Dec 19 03:20:17 UTC 2016.
設定語系,可以按 Enter 鍵跳過
———————————————————————————
Your current locale is ‘en_US.UTF-8’. Do you want to change it? (y/N)
設定主機名稱,依需求來做設定
———————————————————————————
Your current hostname is ‘bananapi’. Do you want to change it? (y/N)y
Configuring hostname… (restart required)
Enter new hostname: bpl
設定硬體設定檔,可以按 Enter 鍵跳過
———————————————————————————
Your current hardware configuration is: BananaPi
Do you want to change it? (y/N)
是否要擴展 root 分割區
———————————————————————————
Do you want to expand the root file system (recommended)? (y/N)y
Expanding root file system… (ignore the warnings and reboot immediately)
Welcome to fdisk (util-linux 2.25.2).
Changes will remain in memory only, until you decide to write them.
Be careful before using the write command.
Command (m for help): Disk /dev/mmcblk0: 1.9 GiB, 1990197248 bytes, 3887104 sectors
Units: sectors of 1 * 512 = 512 bytes
Sector size (logical/physical): 512 bytes / 512 bytes
I/O size (minimum/optimal): 512 bytes / 512 bytes
Disklabel type: dos
Disk identifier: 0x0ccea0b3
Device Boot Start End Sectors Size Id Type
/dev/mmcblk0p1 2048 43007 40960 20M 83 Linux
/dev/mmcblk0p2 43008 3710936 3667929 1.8G 83 Linux
Command (m for help): Partition number (1,2, default 2):
Partition 2 has been deleted.
Command (m for help): Partition type
p primary (1 primary, 0 extended, 3 free)
e extended (container for logical partitions)
Select (default p): Partition number (2-4, default 2): First sector (43008-3887103, default 43008): Last sector, +sectors or +size{K,M,G,T,P} (43008-3887103, default 3887103):
Created a new partition 2 of type ‘Linux’ and of size 1.9 GiB.
Command (m for help): Disk /dev/mmcblk0: 1.9 GiB, 1990197248 bytes, 3887104 sectors
Units: sectors of 1 * 512 = 512 bytes
Sector size (logical/physical): 512 bytes / 512 bytes
I/O size (minimum/optimal): 512 bytes / 512 bytes
Disklabel type: dos
Disk identifier: 0x0ccea0b3
Device Boot Start End Sectors Size Id Type
/dev/mmcblk0p1 2048 43007 40960 20M 83 Linux
/dev/mmcblk0p2 43008 3887103 3844096 1.9G 83 Linux
Command (m for help): The partition table has been altered.
Calling ioctl() to re-read partition table.
Re-reading the partition table failed.: Device or resource busy
The kernel still uses the old table. The new table will be used at the next reboot or after you run partprobe(8) or kpartx(8).
Please reboot
———————————————————————————
done! please reboot your system now! (shutdown -r now)
完成基本設定,執行 shutdown -r now 重新啟動系統,設定生效。
# shutdown -r now


